Show sent messages as tasks in Salesforce
UpdatedYou can send message information to Salesforce—the emails you send, whether or not people click them, and so on. In Salesforce, you’ll typically record these events as Tasks. When you send message events to Salesforce, you’ll need to map a few fields to make sure that Salesforce processes your message activity tasks properly.
How it works
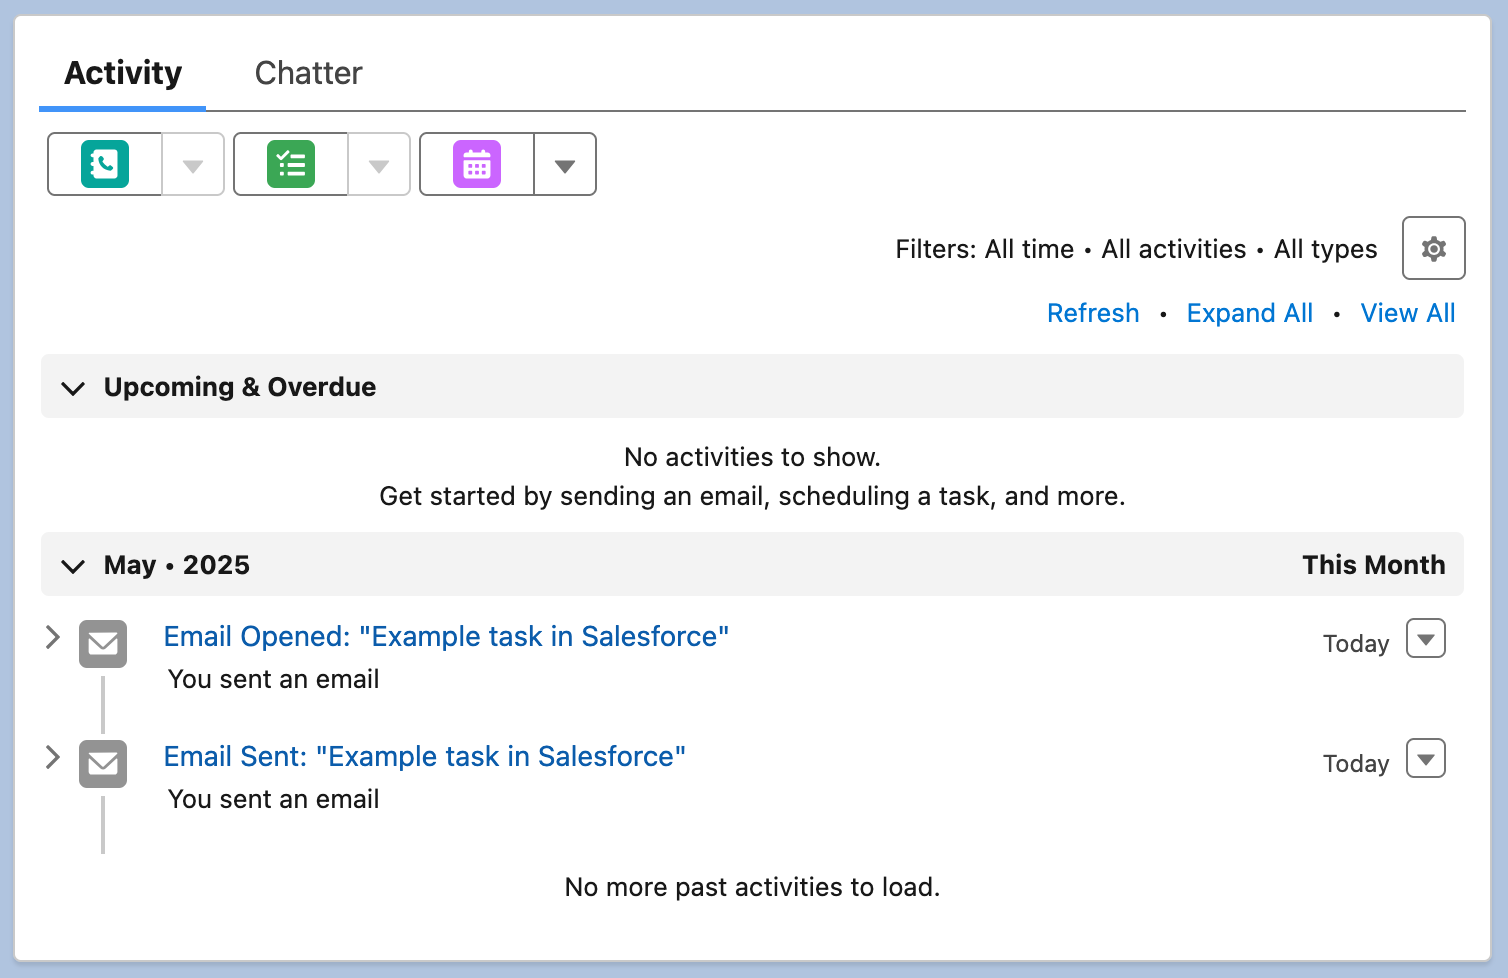
The Task for Message Delivery action records message events from Customer.io as completed tasks in Salesforce. This makes it easy for you to see the messages you’ve sent, whether people have interacted with them, and so on—all in Salesforce. This helps you make your Salesforce environment a reliable source of truth.
To take advantage of this action, you need to make sure that you sync people from Salesforce to Customer.io with their Contact ID or Lead ID. That’s how we associate tasks with people in Salesforce.

Set up the Task for Message Delivery action
By default, we only record tasks for emails, but you could set up different actions to record tasks for other message types. See Message event triggers for more information.
Go to Data & Integrations > Integrations and select your Salesforce Data out integration.
Go to the Actions tab and click Add Action.
Scroll down to The Contact or Lead ID to associate the task with (string) and select the attribute that contains your audience’s Contact or Lead ID. You may need to search for a variable in the drop-down.
By default, when you sync people from Salesforce to Customer.io, we map Contact ID or Lead ID to their
$.customer.id—but you could store it as another attributeA key-value pair that you associate with a person or an object—like a person’s name, the date they were created in your workspace, or a company’s billing date etc. Use attributes to target people and personalize messages.. If you’re not sure what attribute you use, you can find it in your Salesforce data-in integration.Do you store both contact and lead IDs?
If you store both contact and lead IDs, you can use the
coalescefunction to use the contact ID if it exists, and fall back to the lead ID if it doesn’t in the formatcoalesce($.customer.contact_id, $.customer.lead_id).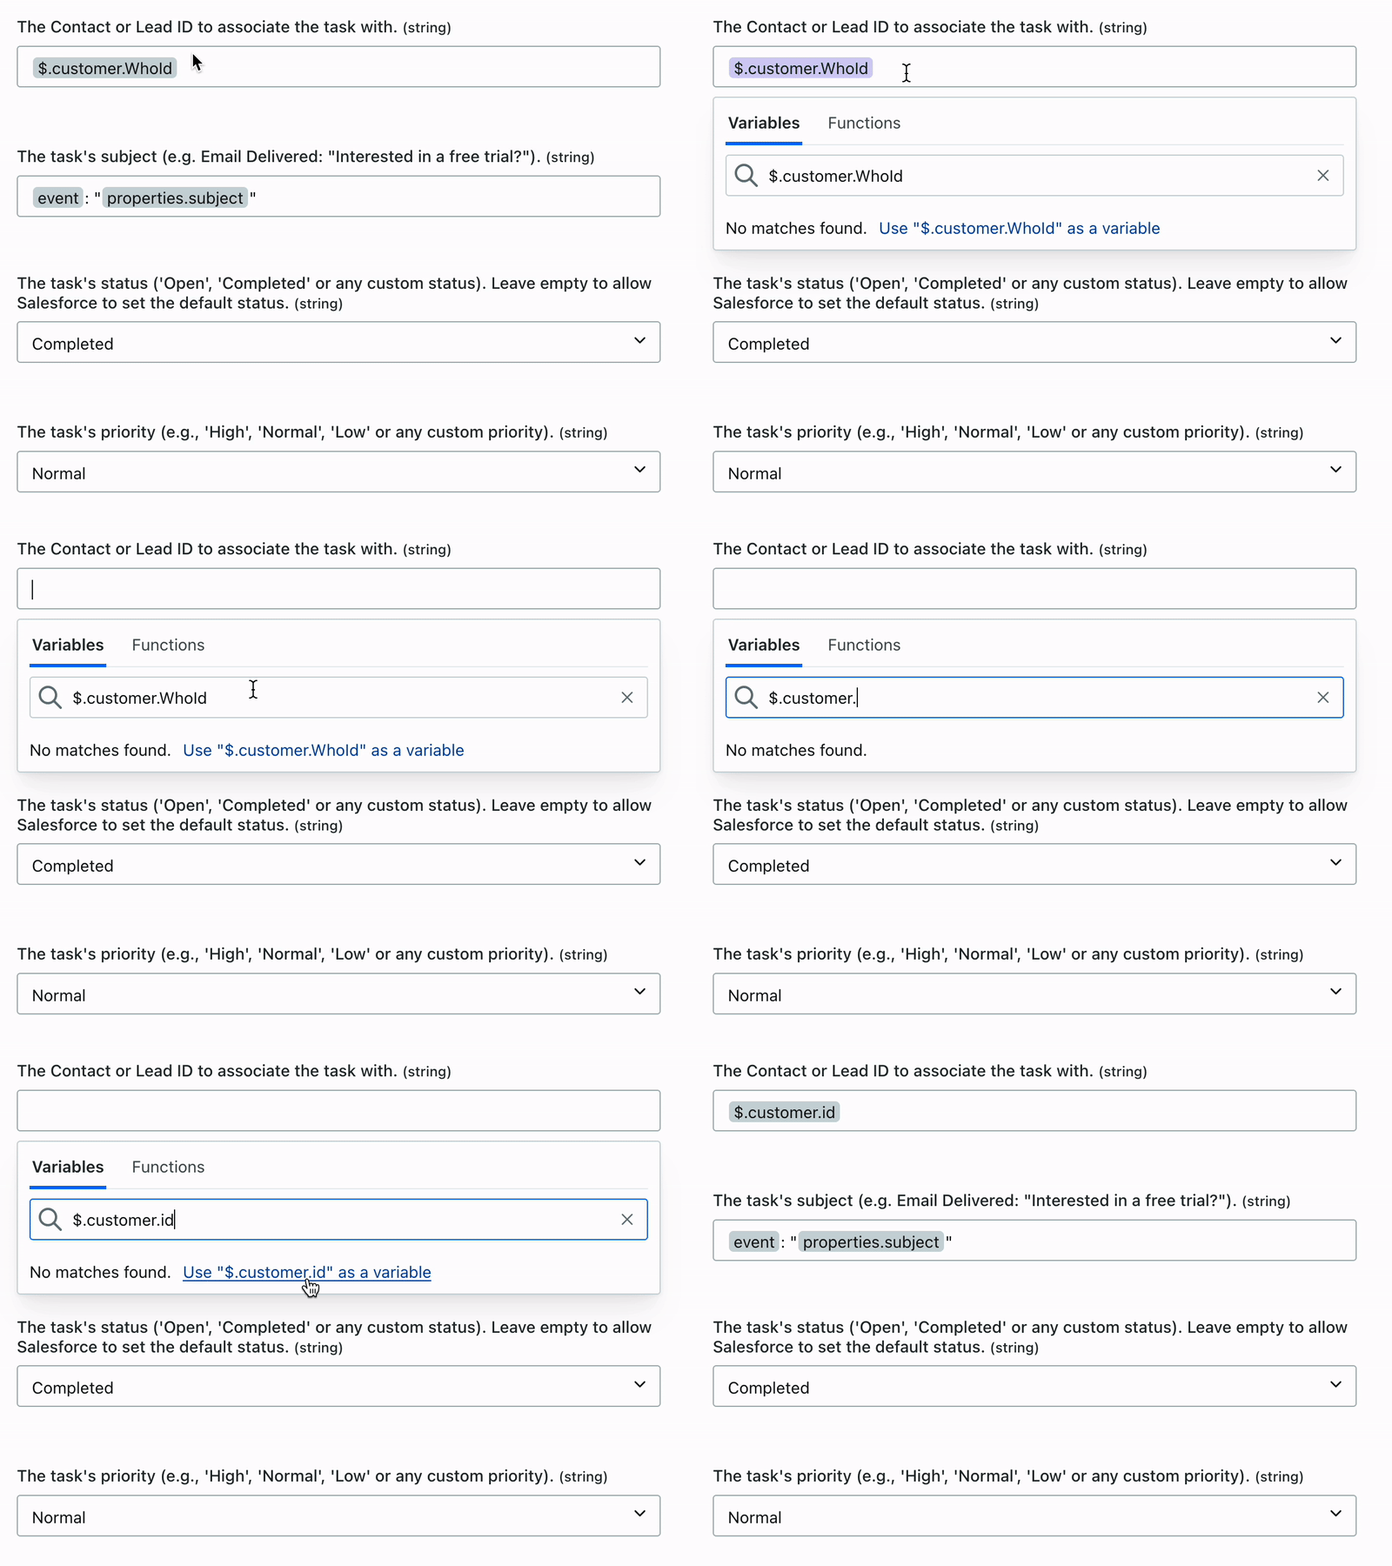
Click Save action.
Now Salesforce will record completed tasks for email events.
What value is the Contact or Lead ID in Customer.io?
We need the identifier for a person in Salesforce so that we can associate tasks with them—typically their Contact or Lead ID; you’ll set it in the The Contact or Lead ID to associate the task with (string) when you set up the Task for Message Delivery action.
You typically map this value to an attributeA key-value pair that you associate with a person or an object—like a person’s name, the date they were created in your workspace, or a company’s billing date etc. Use attributes to target people and personalize messages. in Customer.io when you set up your Salesforce data-in integration, but if you don’t know what attribute stores your contact or lead IDs, you can find or update this value in your Salesforce data-in integration. Learn more about mapping lead and contact IDs in Customer.io.
- Go to Data & Integrations > Integrations and select your Salesforce Data in integration.
- Go to Syncs.
- Find your contact or lead sync and click Settings > Edit.
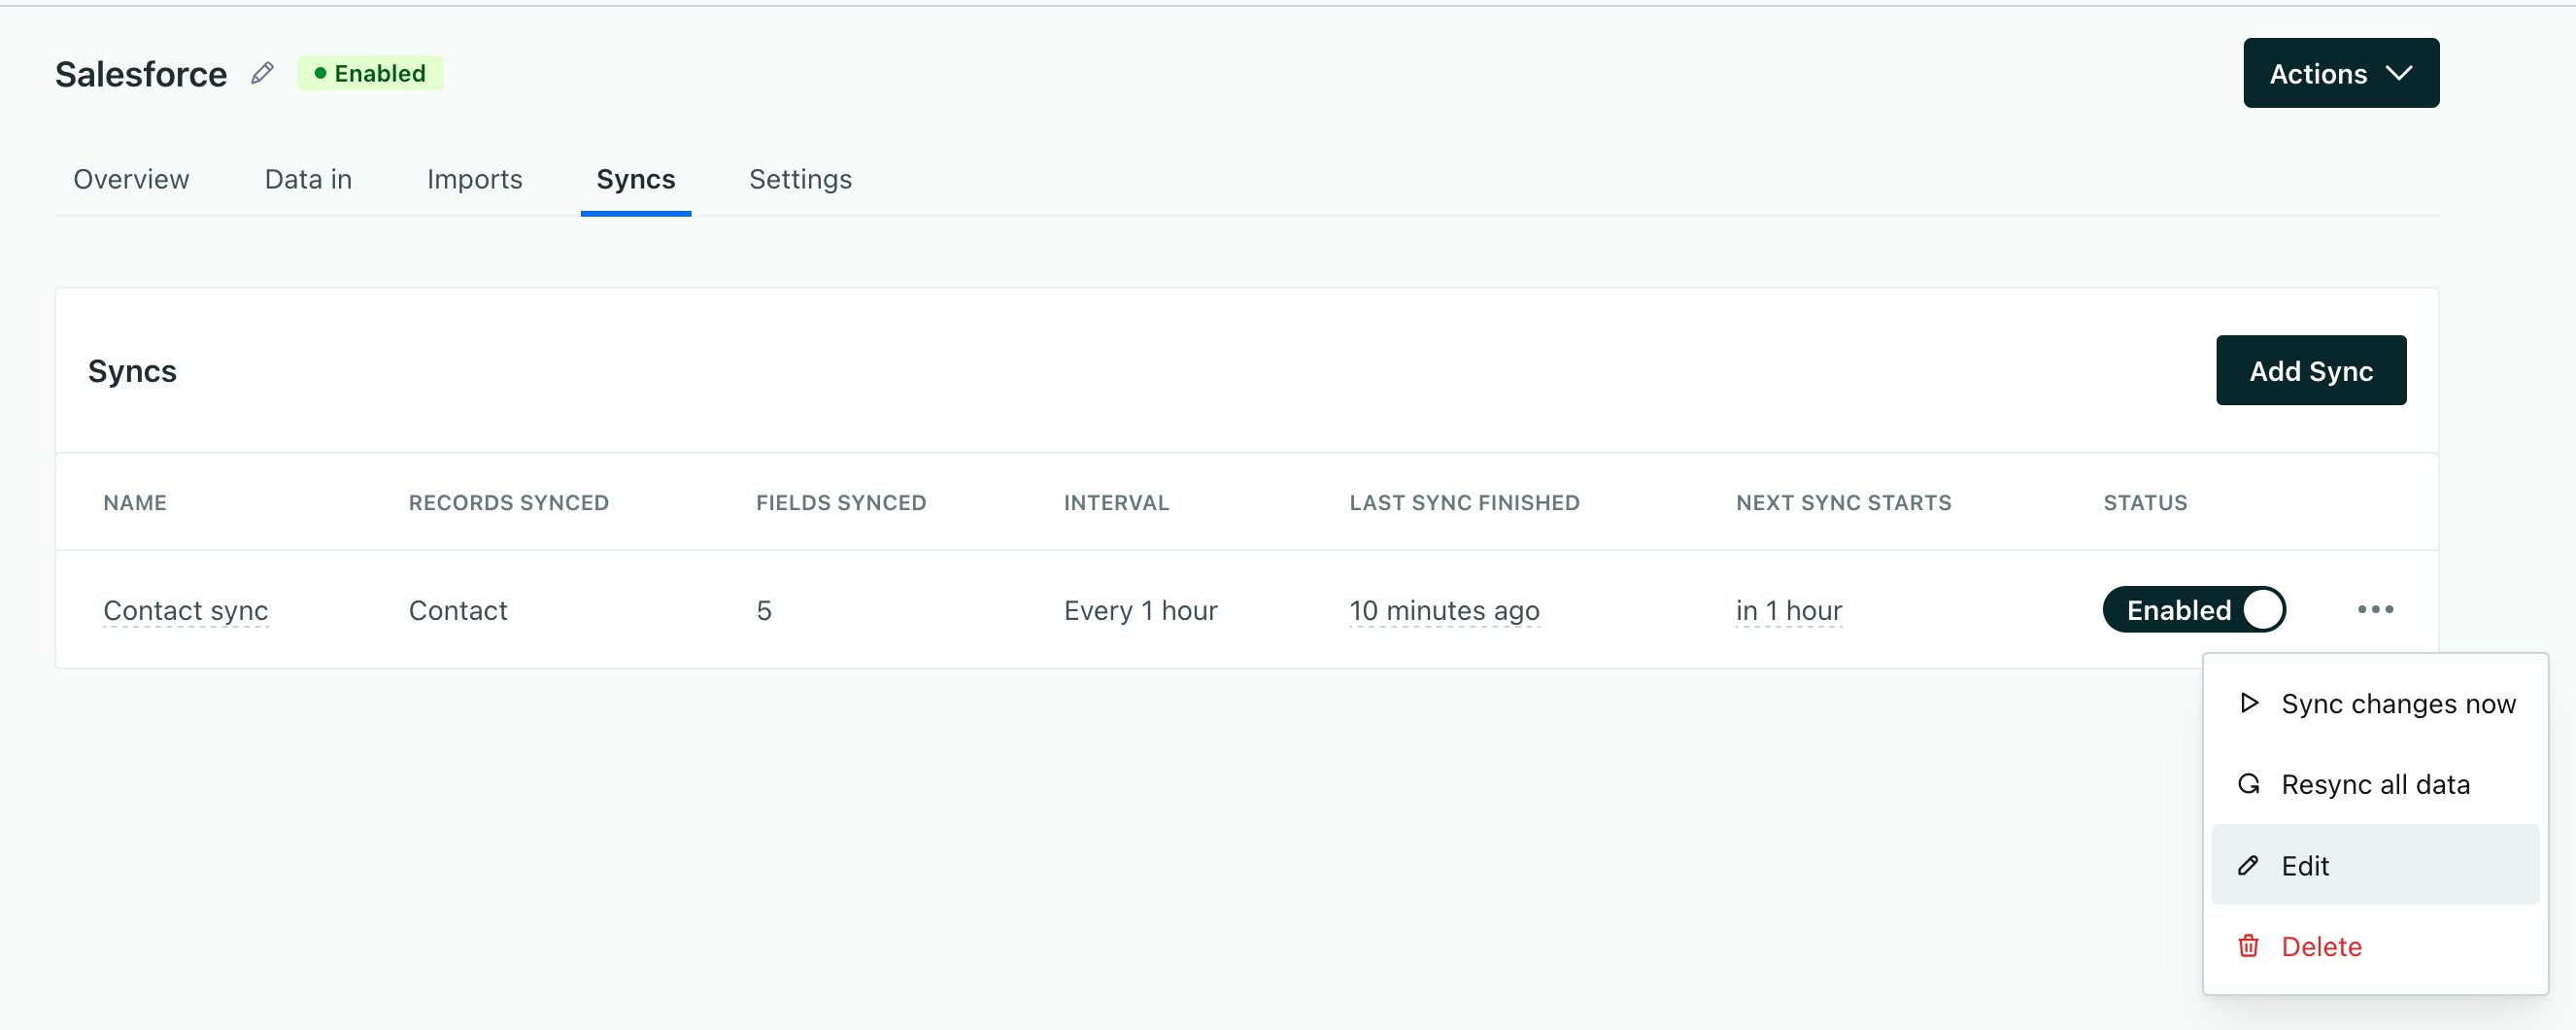

- Click Edit next to Fields to Sync and find the attribute that contains the Contact or Lead ID. If you’ve renamed the attribute, you’ll see the name of the attribute you’ve set.
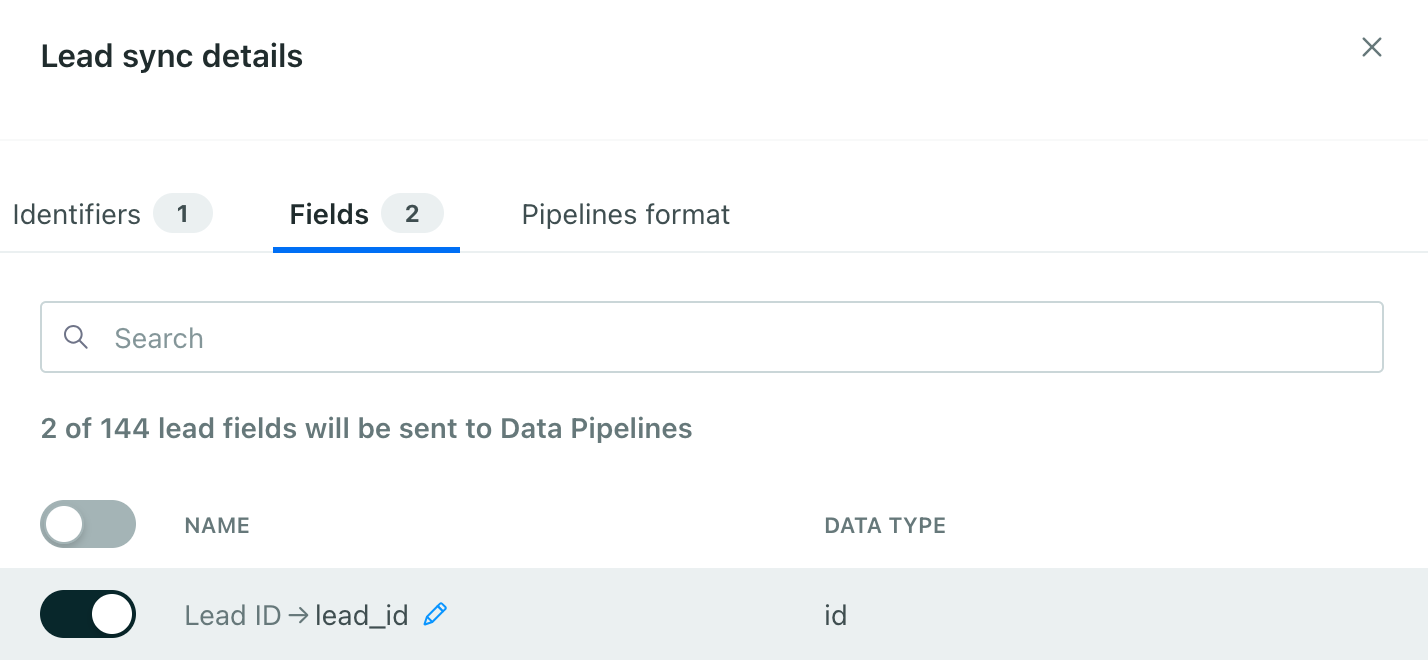

- If you haven’t already enabled the contact or lead ID, toggle it on and click Rename to set the name of the attribute you want to use to store the Contact or Lead ID, like
contact_idorlead_id.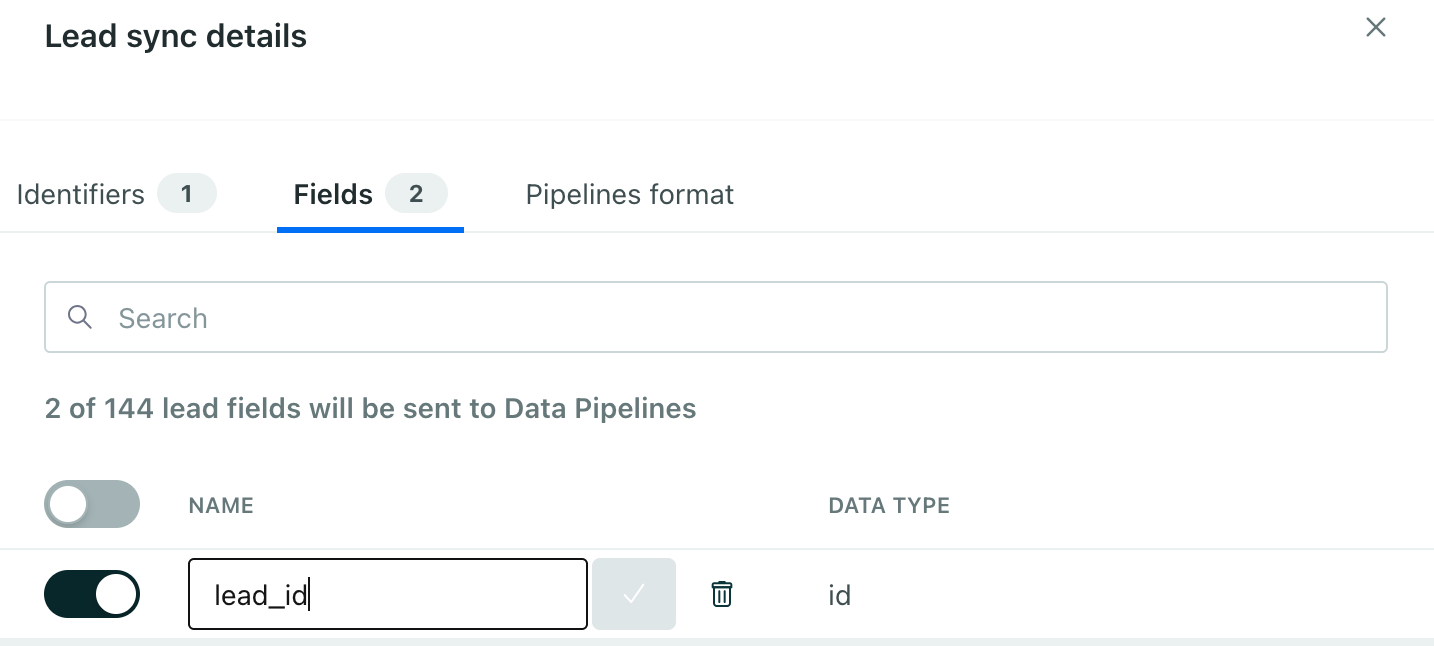

This value is the ID you’ll use to associate the task with a person in Salesforce in the format $.customer.<attributeName>, e.g. $.customer.id.
What if I send a message to someone who isn’t in Salesforce?
Because we look for a value representing a person’s Contact or Lead ID in Customer.io—and that’s a condition for the action itself—Customer.io will ignore any message events for people who don’t have a Contact or Lead ID.
If you send a message to a person who isn’t in Salesforce, you won’t see anything in the Data out tab for your Salesforce integration.
Capturing a subset of events
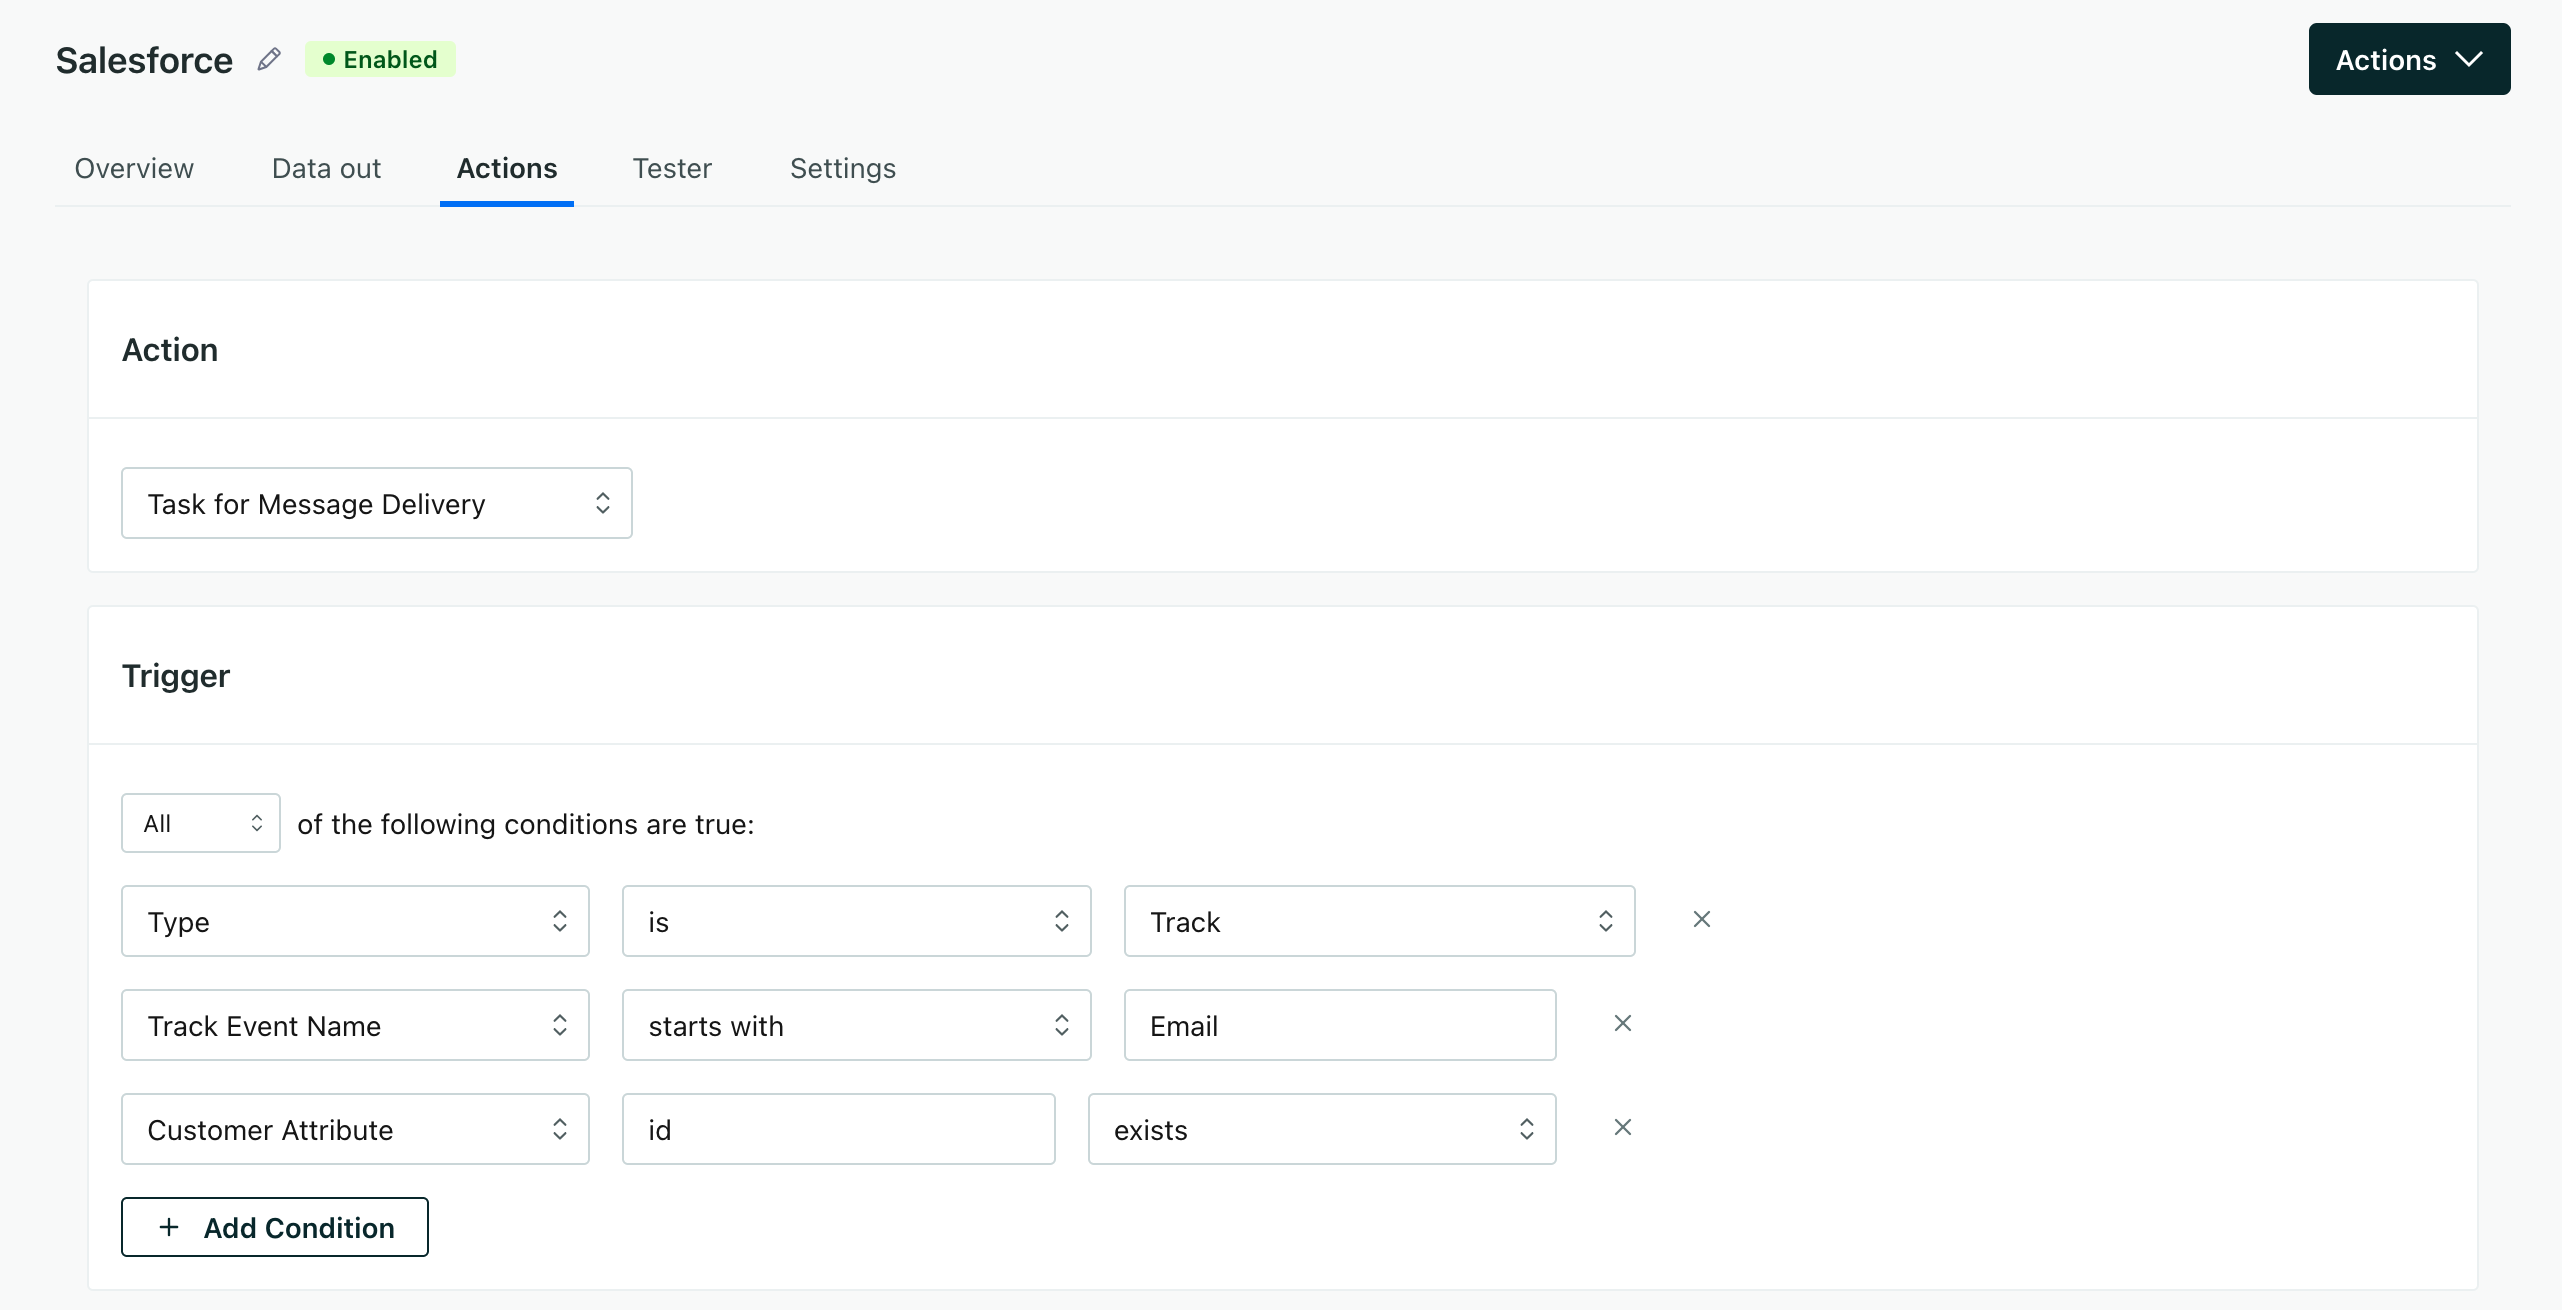
By default, the Task for Message Delivery action captures all email events. That may include events that you don’t want to record as tasks. For example, you may only care about sends, clicks, and opens; you may only want to record tasks for specific campaigns or emails by their subject.
If you only want to capture specific email events, you can edit the trigger to capture only the events you want. But, because triggers don’t support nested and/or conditions, you may need to create different actionsA block in a campaign workflow—like a message, delay, or attribute change. for each set of criteria you use.
- Go to Data & Integrations > Integrations and select your Salesforce Data out integration.
- Go to the Actions tab and click Edit next to the Task for Message Delivery action.
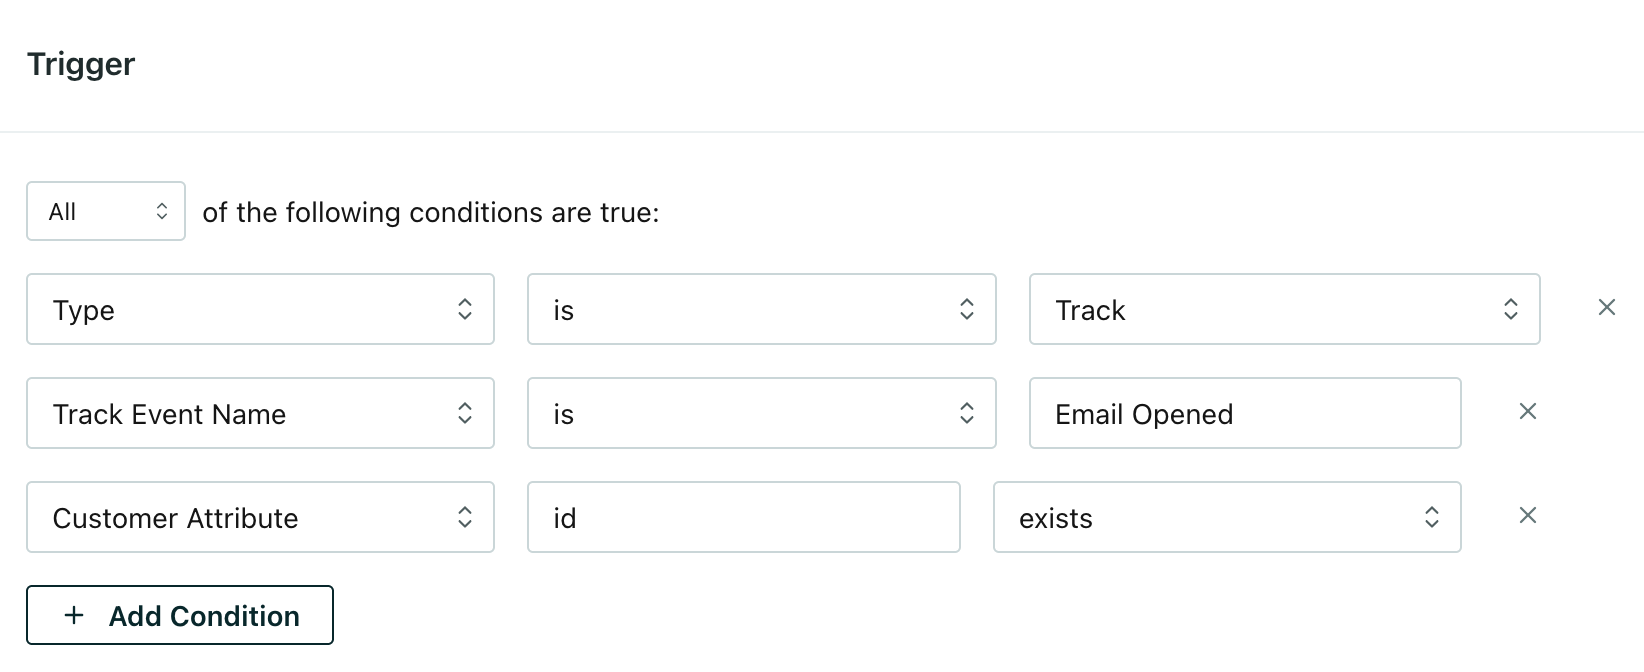
- Update the Trigger to capture the events you want. You may want to use the
subjectfield to capture a specific email. Or you could set the Track Event Name toEmail Openedto capture all email opens but not other event types. We’ve provided examples below.You might need to create multiple actions
Because triggers don’t support nested and/or conditions, you may need to create different actions for each set of criteria you use. For example, you may want to create an action for each email event you want to capture—e.g. one trigger for
Email Sentand another forEmail Openedif you only want to capture those two events.Email subject trigger Specific email event trigger 


- Click Save action.
Capture non-email message events
By default, the Task for Message Delivery action captures email-based message events. You can edit the trigger to capture different message events, but different message events contain different data—this may change the values you want to map to Salesforce tasks. We recommend that you create different actions for different message types.
We default to the email task type, but you can edit the task type to match the message type.
Go to Data & Integrations > Integrations and select your Salesforce Data out integration.
Go to the Actions tab and click Add Action.
In the Trigger step change the Track Event Name to the kind of message events you want to capture:
Push,SMS, orIn-App.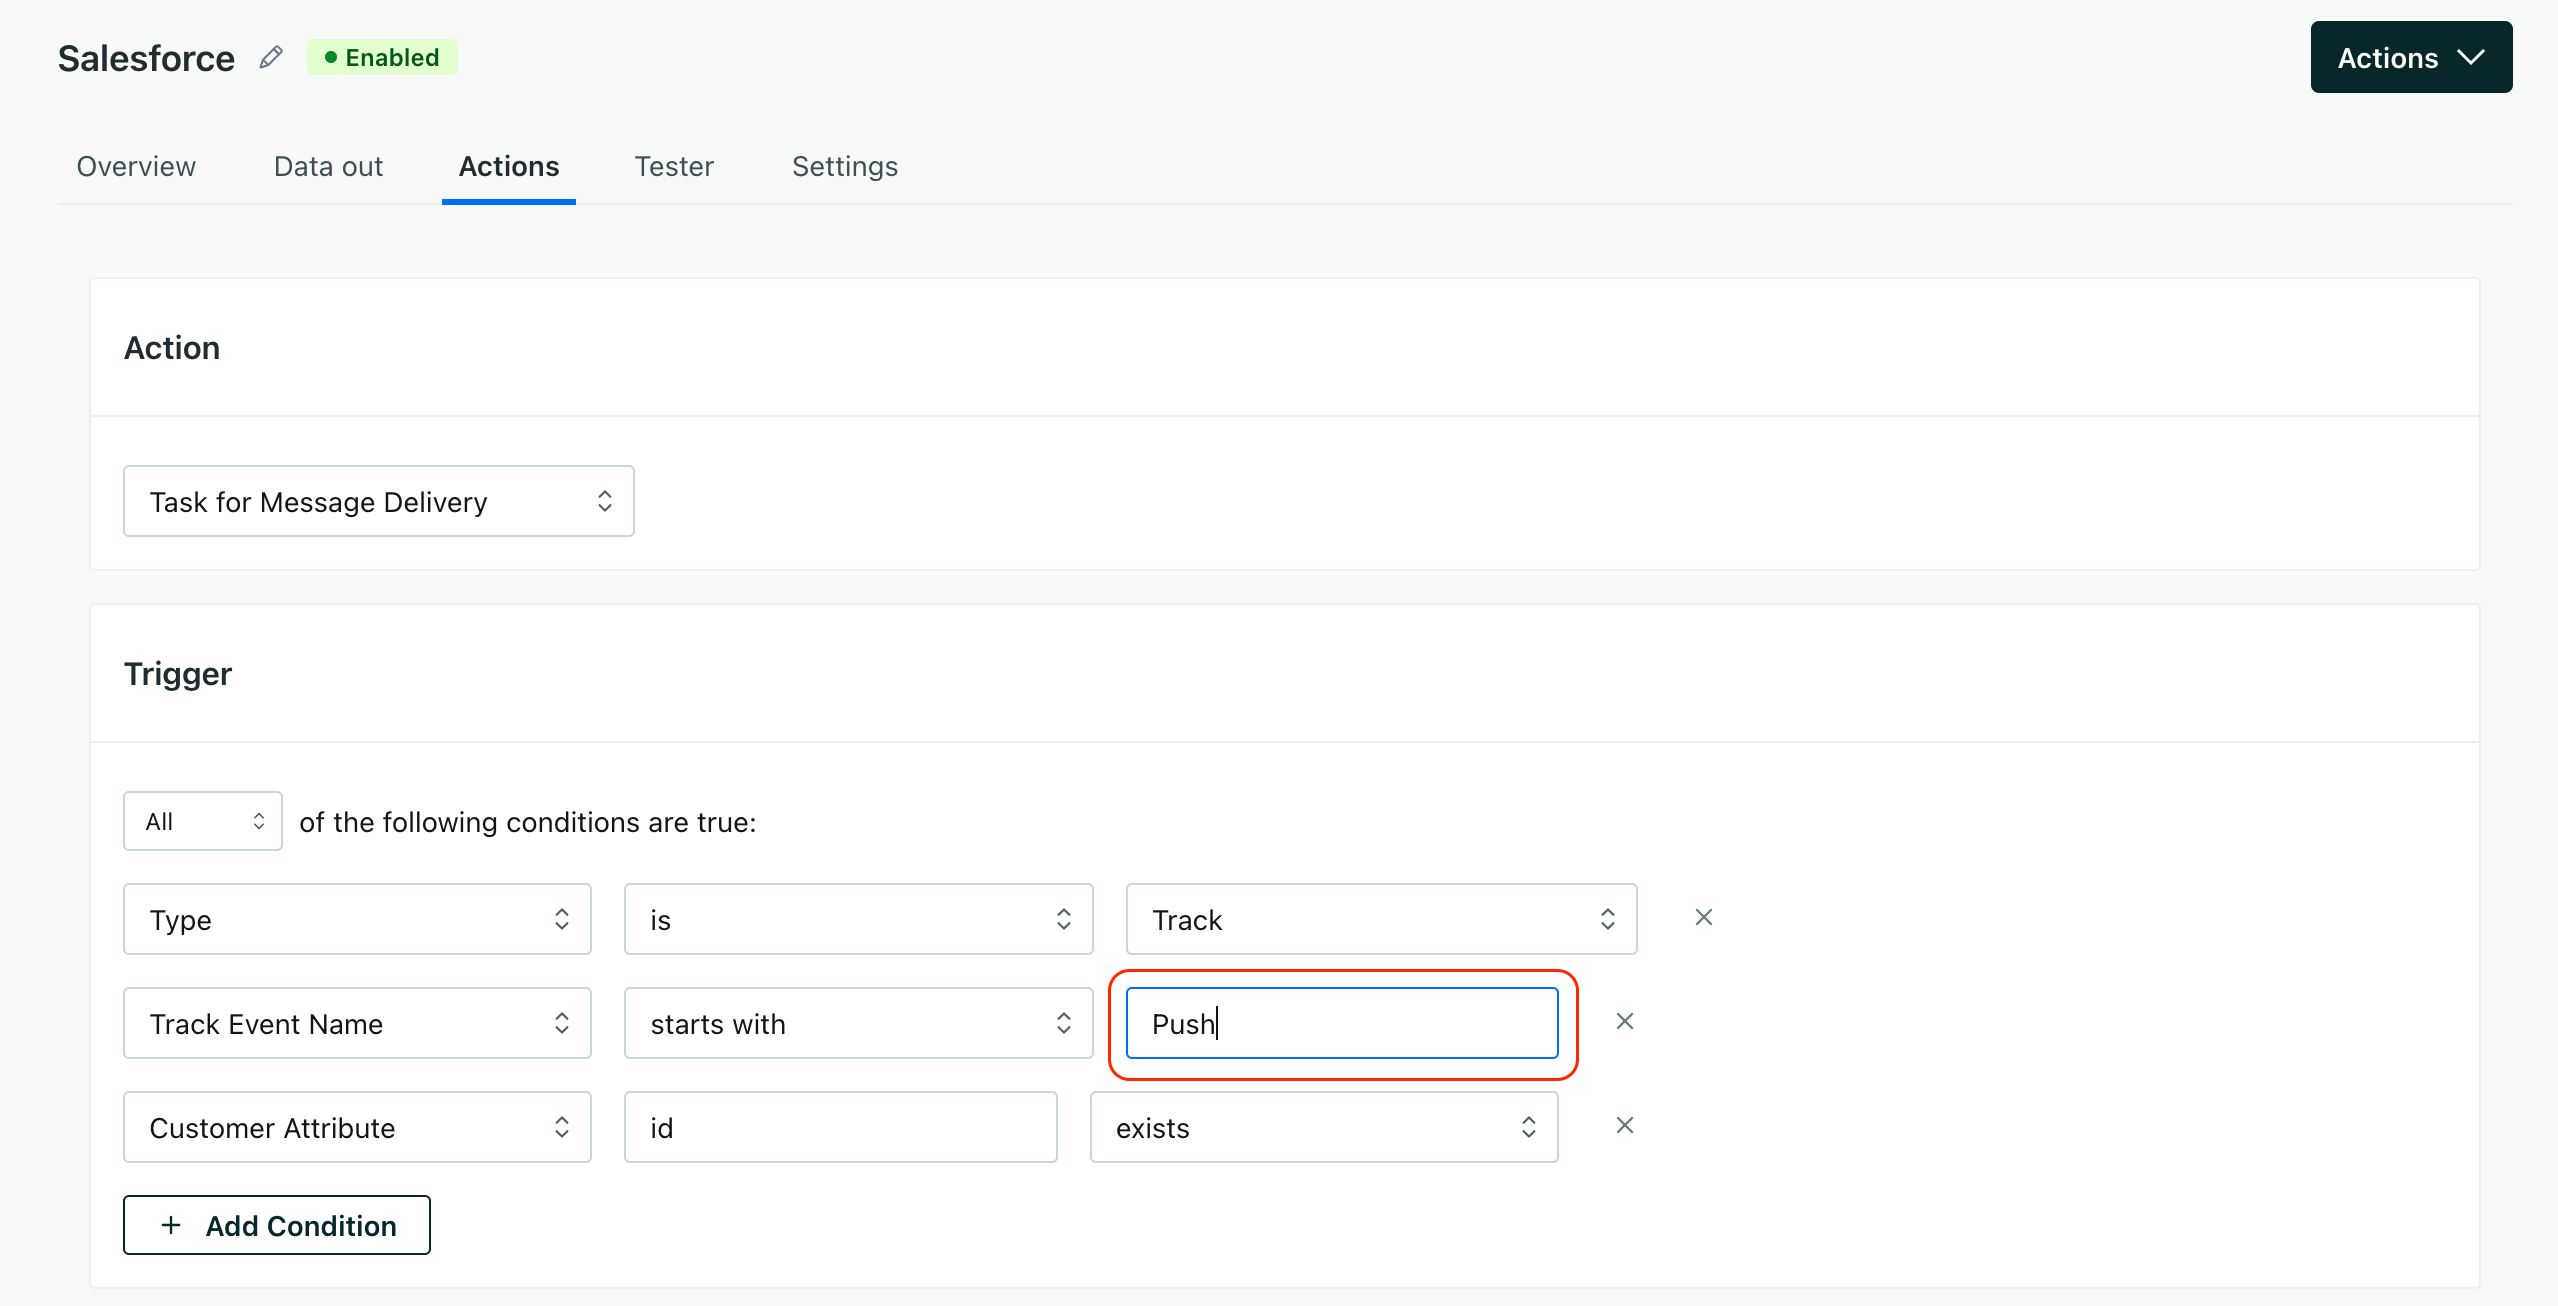

Click Save action.
Now Salesforce will record completed tasks for each non-email message event.
Set up an action to create tasks in Salesforce
Attribute enrichment requests
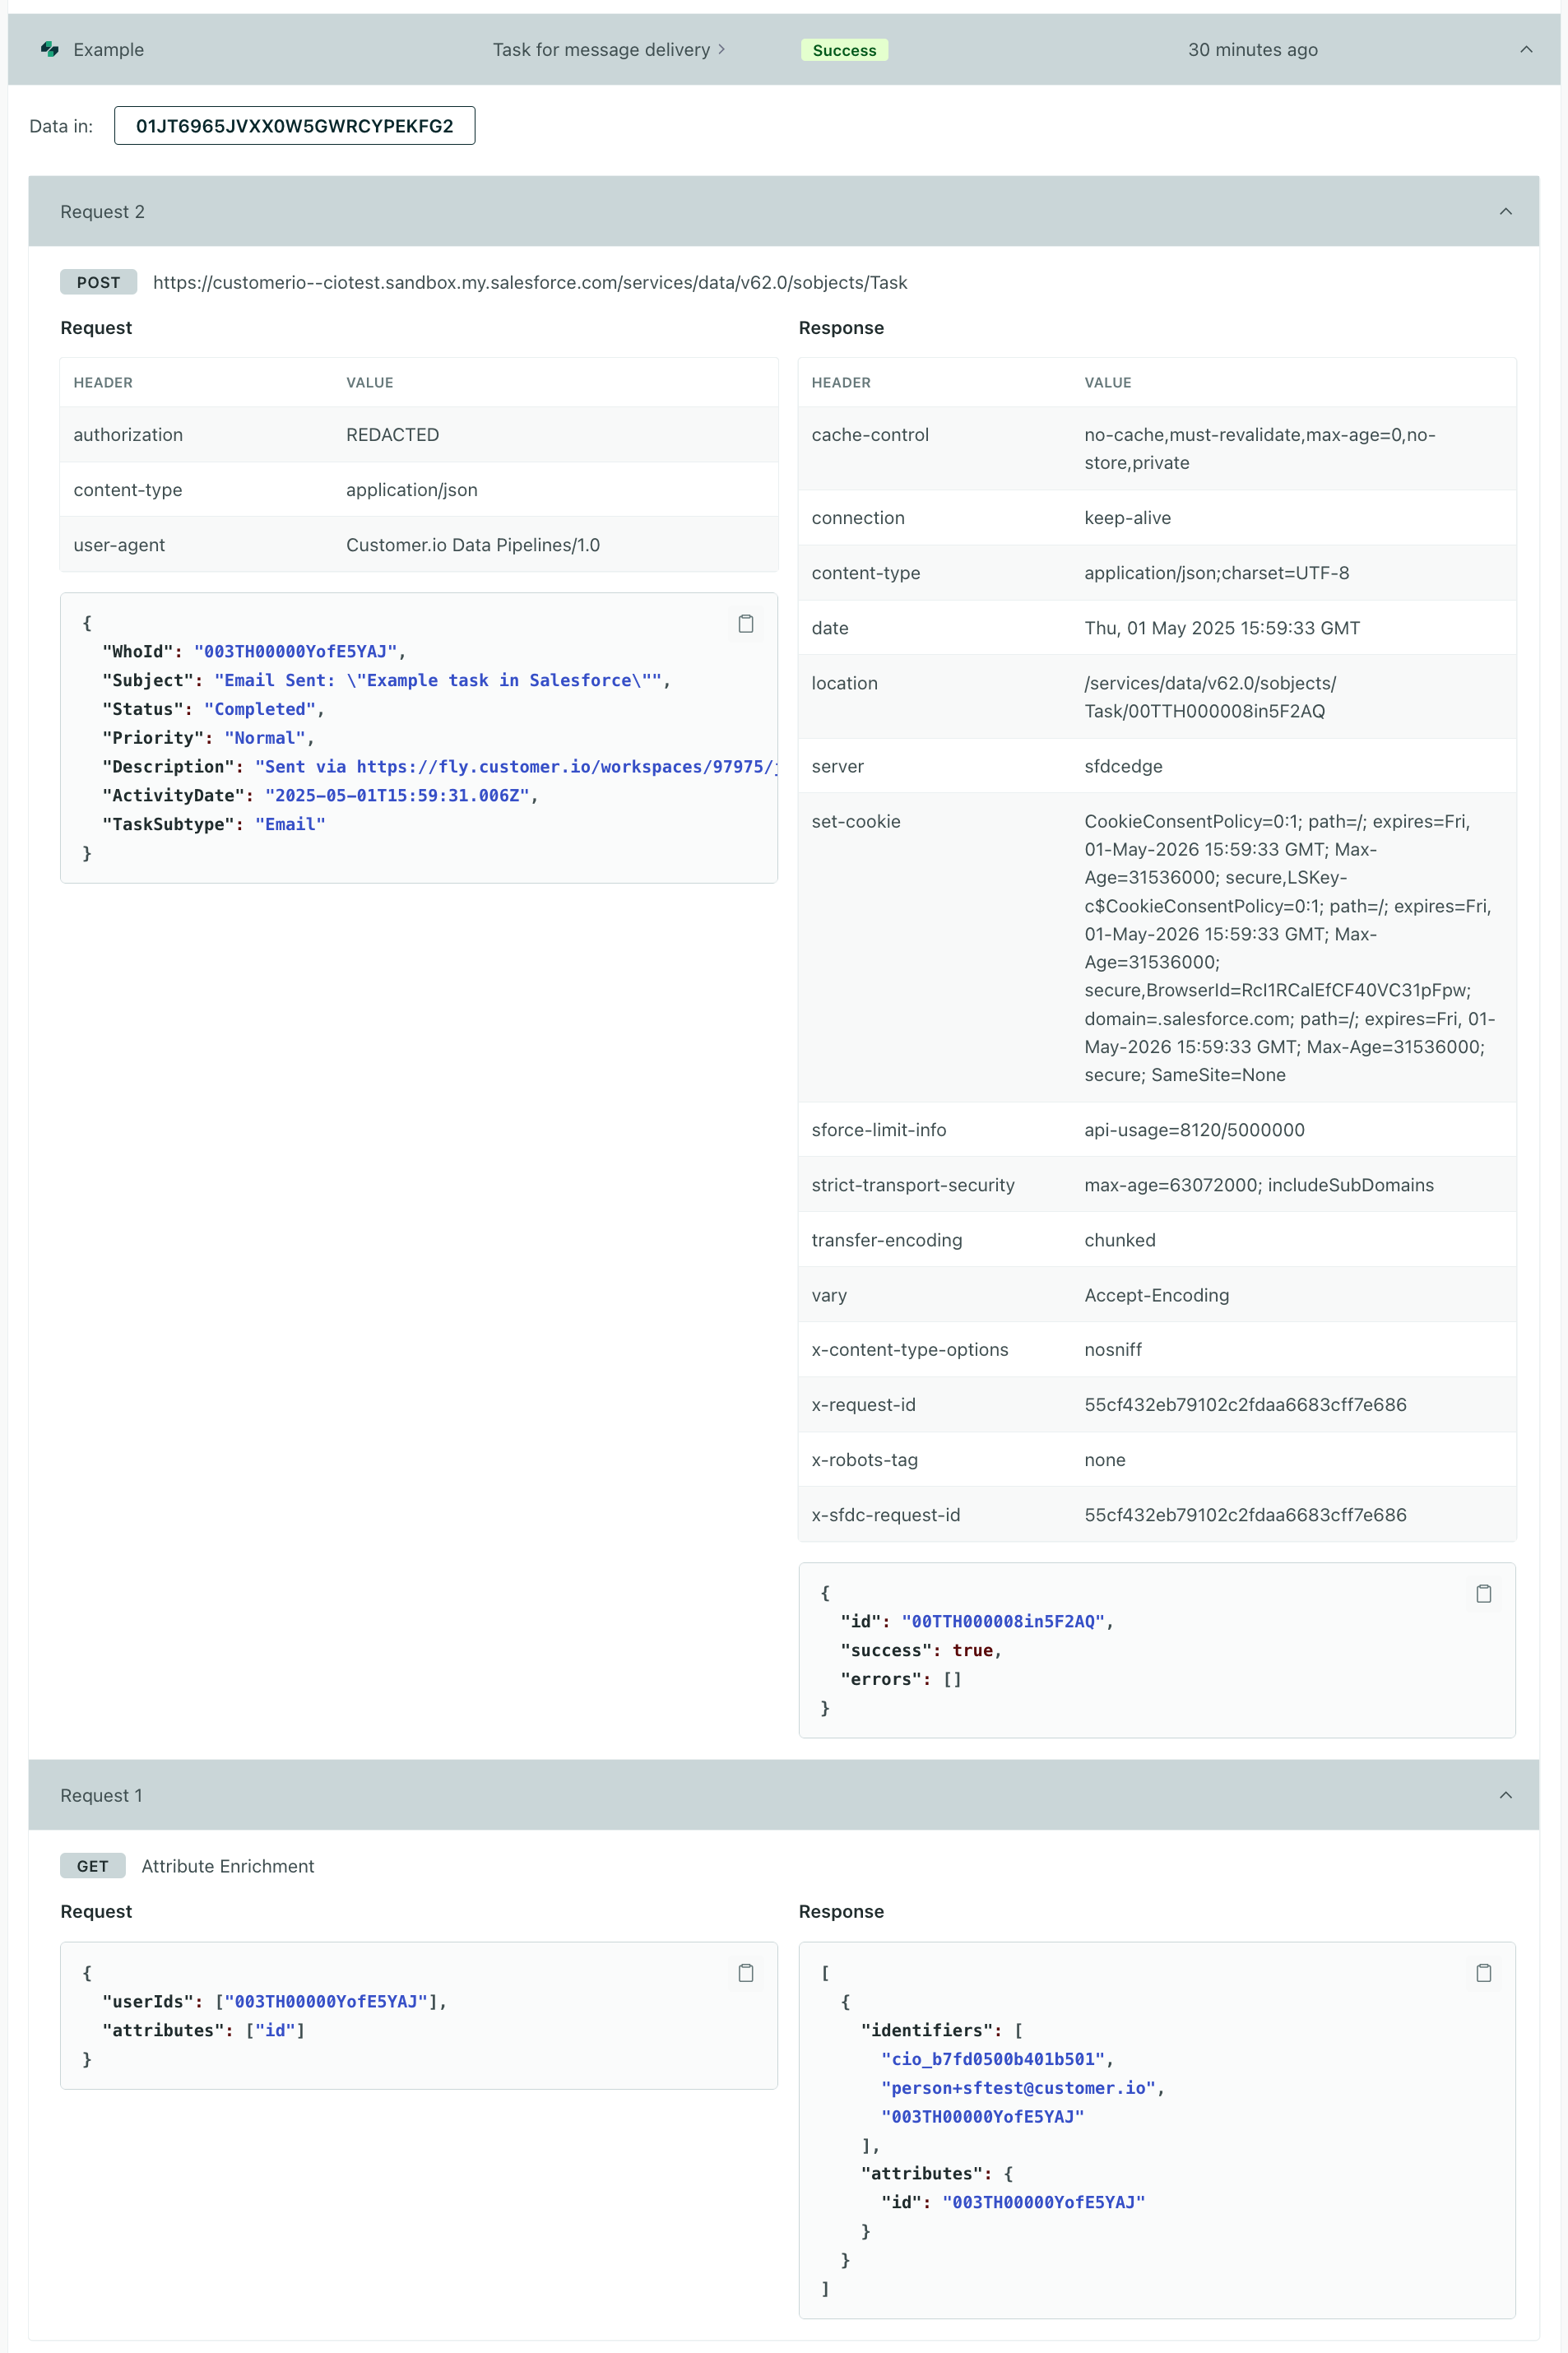
Message events from Customer.io don’t necessarily contain a person’s Contact or Lead ID, so we need to look up the person’s Contact or Lead ID in Customer.io. Then we send that enriched event to Salesforce, where it creates a task.
This means that for each message event, you’ll see two requests in the Data out tab for your Salesforce integration: one internal request to look up the Contact ID in Customer.io and the actual request to create the task in Salesforce. Since this second request is the only one that goes to Salesforce, this model doesn’t increase the number of Salesforce API calls you make as a part of your Customer.io integration.
In general, you don’t need to worry about the internal attribute enrichment requests, but it can help you see what data we’re fetching from Customer.io to map to users in Salesforce.

Message event triggers
By default, the Task for Message Delivery action captures all email events listed below. You can edit the trigger to capture different events for different message channels (push, sms, in-app), but different message events contain different data—this may change the values you want to map to Salesforce tasks—like the subject line. We recommend that you create different actions for different message types.
| Name | Description |
|---|---|
| Email Drafted | Customer.io successfully rendered a message and populated liquidA syntax that supports variables, letting you personalize messages for your audience. For example, if you want to reference a person’s first name, you might use the variable {{customer.first_name}}. for an individual recipient. The message is ready to send. |
| Email Attempted | An email that couldn’t be sent to the delivery provider will be retried. |
| Email Deferred | An email that the delivery provider couldn’t send will be retried by the delivery provider. |
| Email Sent | An email was sent from Customer.io to the delivery provider. |
| Email Delivered | The delivery provider reported the email was delivered to an inbox. |
| Email Opened | An email was opened. |
| Email Link Clicked | A tracked link in an email was clicked. |
| Email Converted | A person matched conversion criteria attributed to an email. |
| Email Unsubscribed | A person unsubscribed via a particular email. |
| Email Bounced | The delivery provider was unable to deliver the email. |
| Email Dropped | An email wasn’t sent because it was addressed to a person who was suppressed. |
| Email Marked as Spam | An email was marked as spam by the recipient. |
| Email Failed | An email couldn’t be sent to the delivery provider. |
| Push Drafted | Customer.io successfully rendered a push notification and populated liquidA syntax that supports variables, letting you personalize messages for your audience. For example, if you want to reference a person’s first name, you might use the variable {{customer.first_name}}. for an individual recipient. The message is ready to send. |
| Push Attempted | A push notification that couldn’t be sent to the delivery provider will be retried. |
| Push Sent | A push notification was sent from Customer.io to the delivery provider. |
| Push Delivered | A push notification was delivered to a recipient. You must use our SDKs or report delivered metrics to us using the API. |
| Push Opened | The app on a person’s device reported the push notification was opened. You must use our SDKs or report opened metrics to us using the API. |
| Push Link Clicked | A tracked link in a push notification has been clicked. Note that we do not track Clicked metrics or enable link tracking for push notifications by default. When a person taps a push notification, the message is marked as Opened. If you want to track links specifically, you’d need to send this metric back to us through the metric reporting API. |
| Push Converted | A person matched conversion criteria attributed to a push notification. |
| Push Bounced | The delivery provider reported at least one invalid device token. |
| Push Dropped | A push notification wasn’t sent because at least one device token previously bounced. |
| Push Failed | A push notification couldn’t be sent to the delivery provider. |
| Push Undeliverable | A push notification was undeliverable, likely because it hit a message limit. |
| SMS Drafted | Customer.io successfully rendered an SMS message and populated liquidA syntax that supports variables, letting you personalize messages for your audience. For example, if you want to reference a person’s first name, you might use the variable {{customer.first_name}}. for an individual recipient. The message is ready to send. |
| SMS Attempted | An SMS that couldn’t be sent to the delivery provider will be retried. |
| SMS Sent | An SMS was sent from Customer.io to the delivery provider. |
| SMS Delivered | The delivery provider reported the SMS was delivered. |
| SMS Link Clicked | A tracked link in an SMS has been clicked. |
| SMS Converted | A person matched conversion criteria attributed to an SMS. |
| SMS Bounced | The delivery provider was unable to deliver the SMS. |
| SMS Failed | An SMS couldn’t be sent to the delivery provider. |
| SMS Undeliverable | An SMS message was undeliverable, likely because it hit a message limit. |
| Slack Drafted | Customer.io successfully rendered a slack message and populated liquidA syntax that supports variables, letting you personalize messages for your audience. For example, if you want to reference a person’s first name, you might use the variable {{customer.first_name}}. for an individual recipient. The message is ready to send. |
| Slack Attempted | A slack message that couldn’t be sent will be retried. |
| Slack Sent | A slack message was sent from Customer.io to slack. |
| Slack Link Clicked | A tracked link in a slack message has been clicked. |
| Slack Failed | A slack message couldn’t be sent to slack. |
| Slack Undeliverable | A Slack message was undeliverable, likely because it hit a message limit. |
| Webhook Drafted | Customer.io successfully populated a webhook with liquidA syntax that supports variables, letting you personalize messages for your audience. For example, if you want to reference a person’s first name, you might use the variable {{customer.first_name}}. and is ready to send it. |
| Webhook Attempted | A webhook that couldn’t be sent will be retried. |
| Webhook Sent | A webhook was sent from Customer.io to the specified Webhook URL. |
| Webhook Link Clicked | A tracked link in a webhook payload has been opened. |
| Webhook Failed | A webhook couldn’t be sent to the specified Webhook URL. |
| In-App Drafted | Customer.io successfully rendered an in-app message and is ready to send it. |
| In-App Attempted | An in-app that couldn’t be sent will be retried. |
| In-App Sent | An in-app was sent. |
| In-App Opened | An in-app was opened. |
| In-App Clicked | A tracked response in an in-app was clicked. |
| In-App Converted | A person matched conversion criteria attributed to an in-app. |
| In-App Failed | An in-app couldn’t be sent. |
