Filter data coming into Customer.io
PremiumThis feature is available for Premium plans. EnterpriseThis feature is available for Enterprise plans. BetaThis feature is new and we're actively working on it. UpdatedBy default, all data you send into Customer.io shows up in your workspace. But for some integrations, you might want to filter out certain records, attributes, or event data. You can do this by updating your workspace’s actions.
How it works
When you sync data from an integration like HubSpot to Customer.io, we re-shape it to match Customer.io’s data model through Actions. By default, your Journeys Workspace Actions are set up to process and use all of the data you sync to Customer.io. This works for most integrations.
But what do you do if you want to filter out certain requests from HubSpot?
You’d create a new Customer.io Journeys (Workspace) instance to handle data from these integrations independently from default settings! In your new Customer.io Journeys (Workspace) integration, you’ll modify Actions to handle requests from these integrations without affecting other integrations.
have its own filter?} b-..->|no|c(Data goes
into Customer.io) b-->|yes|d{Does data match
an action filter?} d-->|yes|c d-.->|no|f(Data doesn't go
into Customer.io)
Basic process to filter data
You likely want to follow this process and set up filters before you add your new integration to your workspace—or at least before you finish setting it up and sending data to Customer.io.
If you set up your source integration first, you might send unwanted data to Customer.io that you’ll have to remove later!
- Add a new Customer.io (Workspace) integration.
- Modify the Actions for the new integration to filter data from HubSpot.
- Connect your HubSpot integration to your new Customer.io (Workspace) instance.
1. Add a new Customer.io (Workspace) instance
You’ll add a new Customer.io (Workspace) integration to store your filters. Setting up a separate integration here ensures that your filters don’t affect other integrations in your workspace; they’ll only affect your incoming HubSpot data.
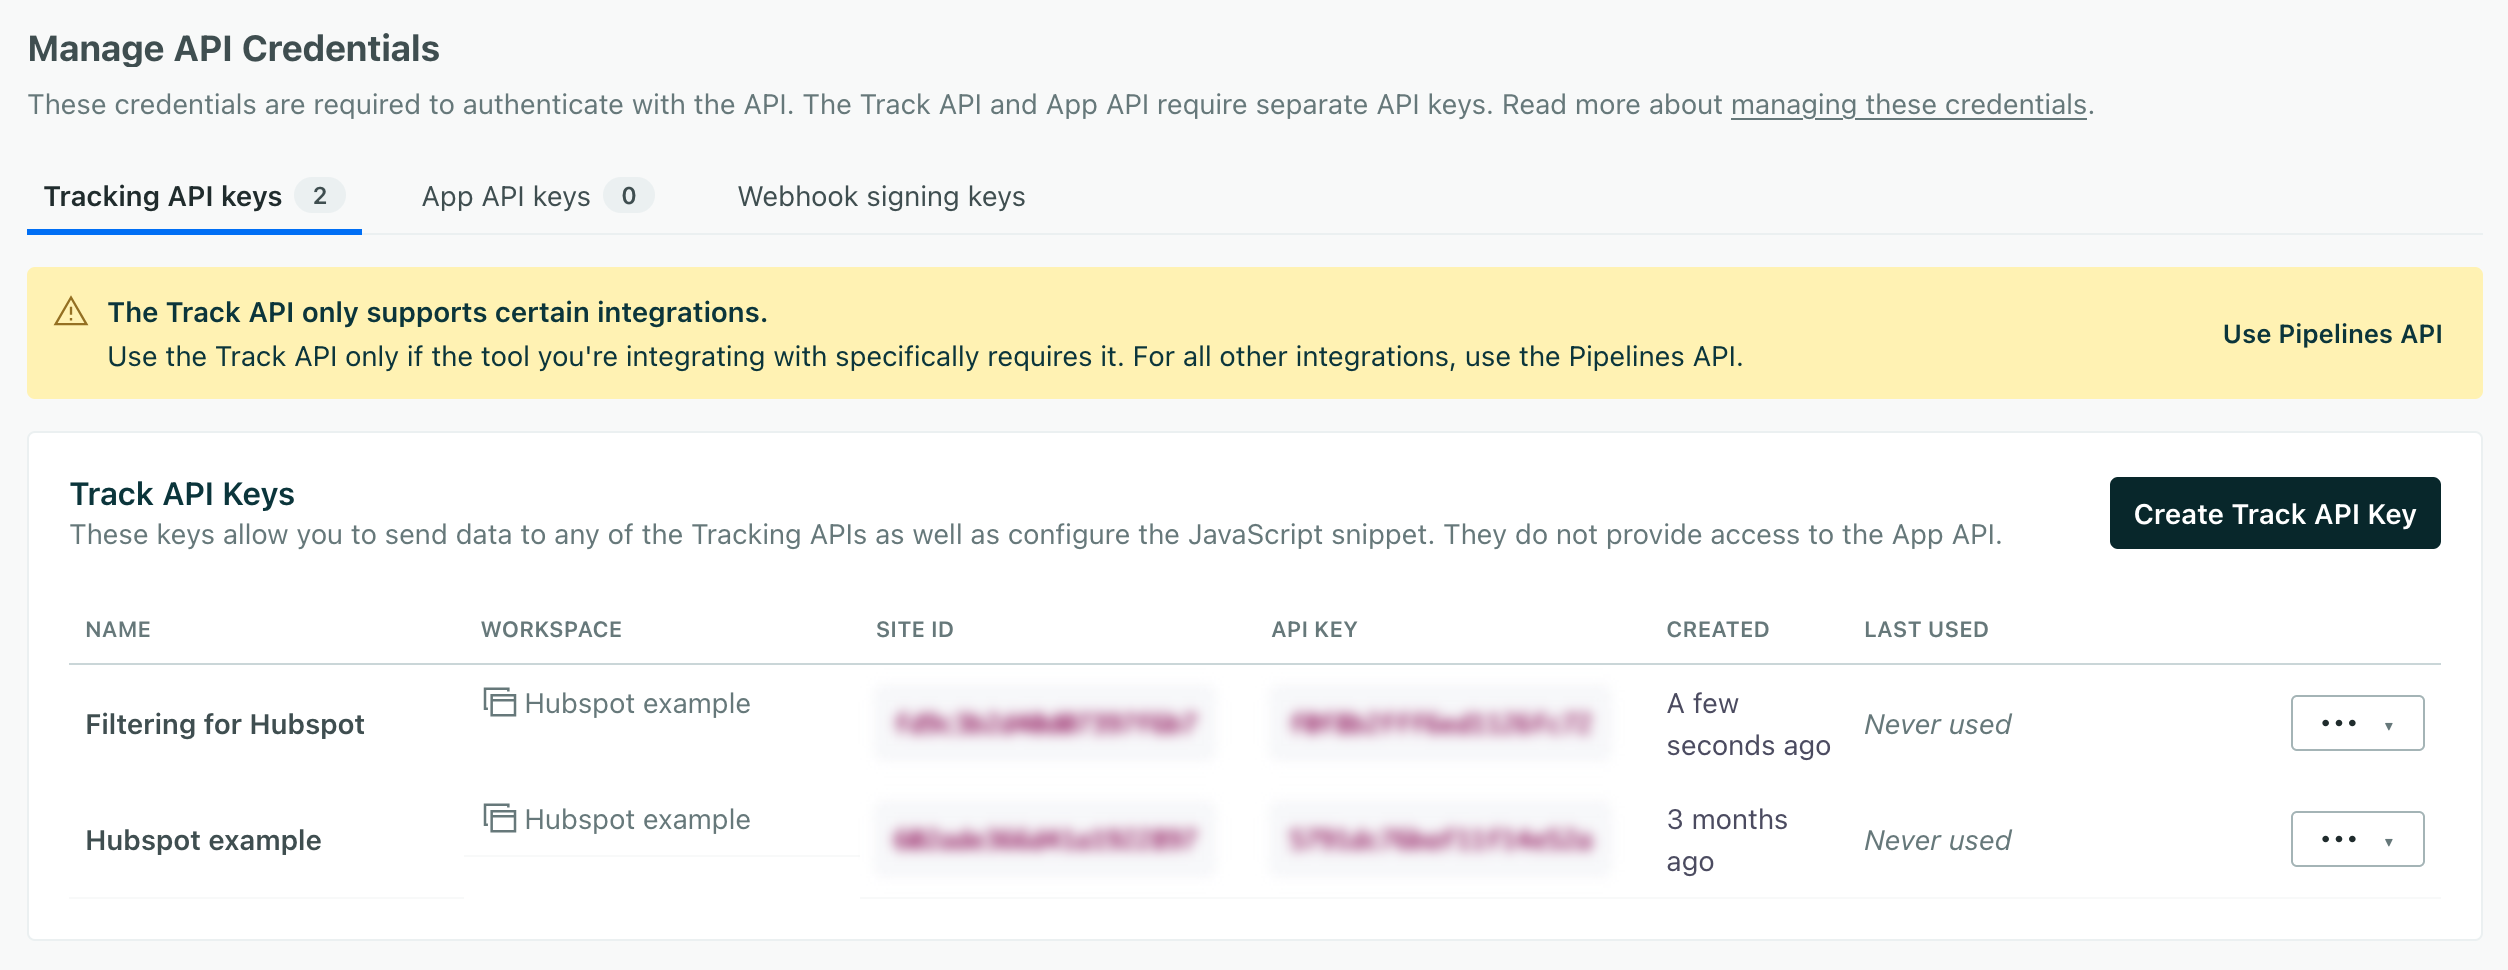
- Go to > Workspace Settings > API and webhook credentials.
- Click Create Track API Key and give your credentials a name—you might want to name it something like “Filtering for
”. 
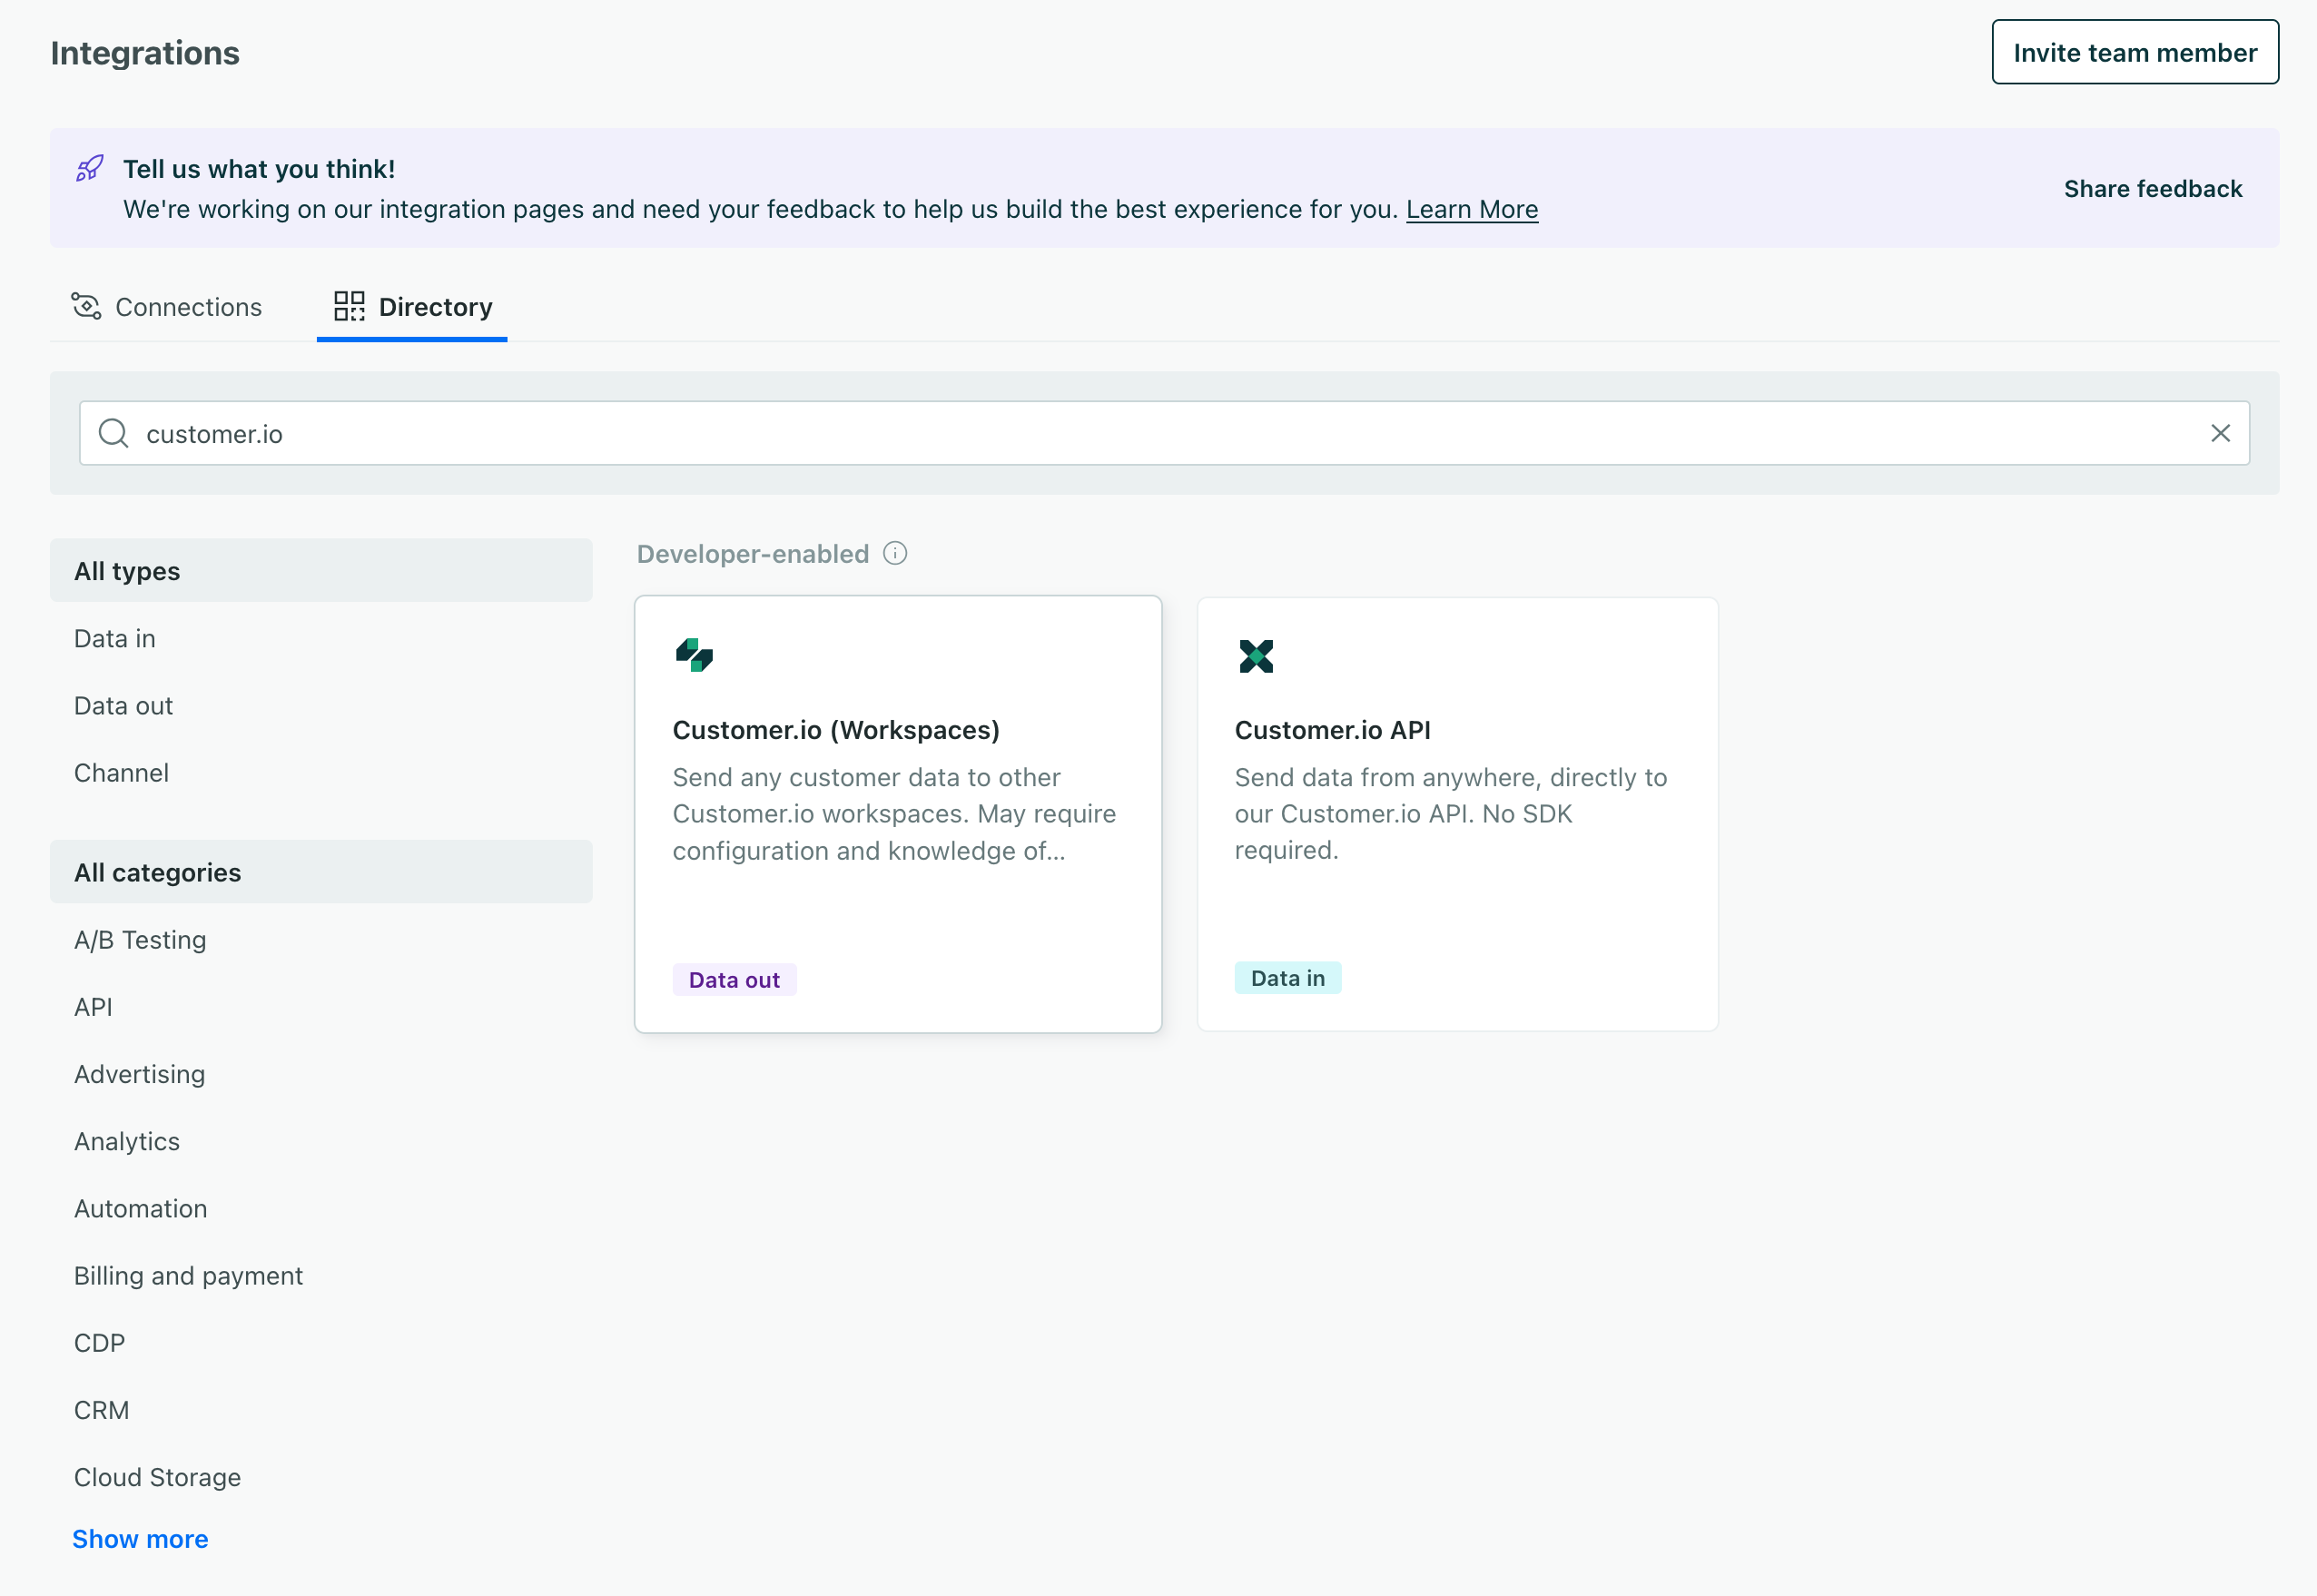
- Now go to Data & Integrations > Integrations and click Create Integration.
- Select Customer.io (Workspace) and click Create.
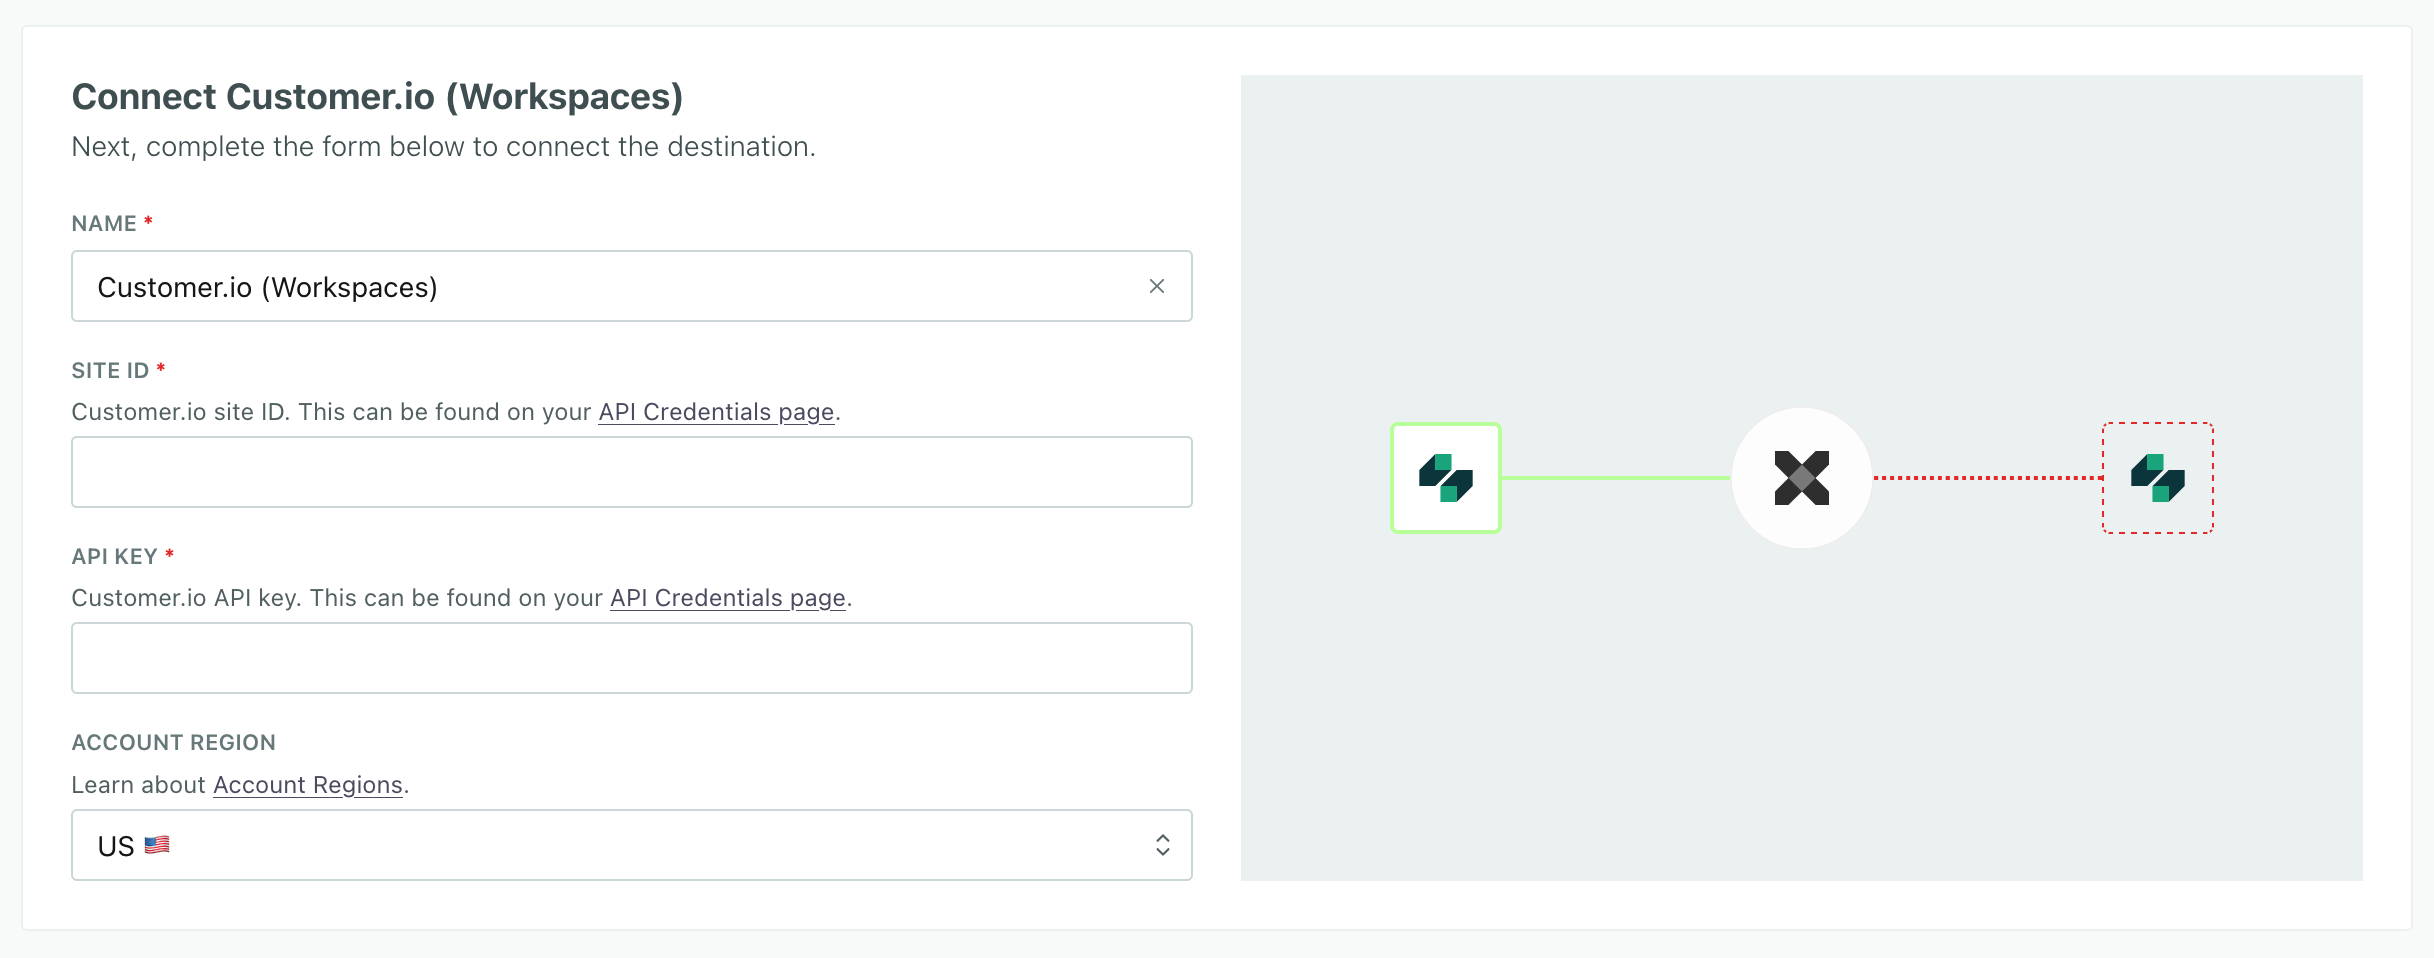
- Give the new integration a name, like “Filtering for <integration name>.” Keeping the name aligned with the API credentials you created in the previous step can help you keep track of your filters.
- Enter the Site ID and API Key you copied in the previous step and click Next: Configure Data.
- Deselect the Messaging data integration and select the API credentials you created in the previous steps. This ensures that we don’t send any data through these filters yet.
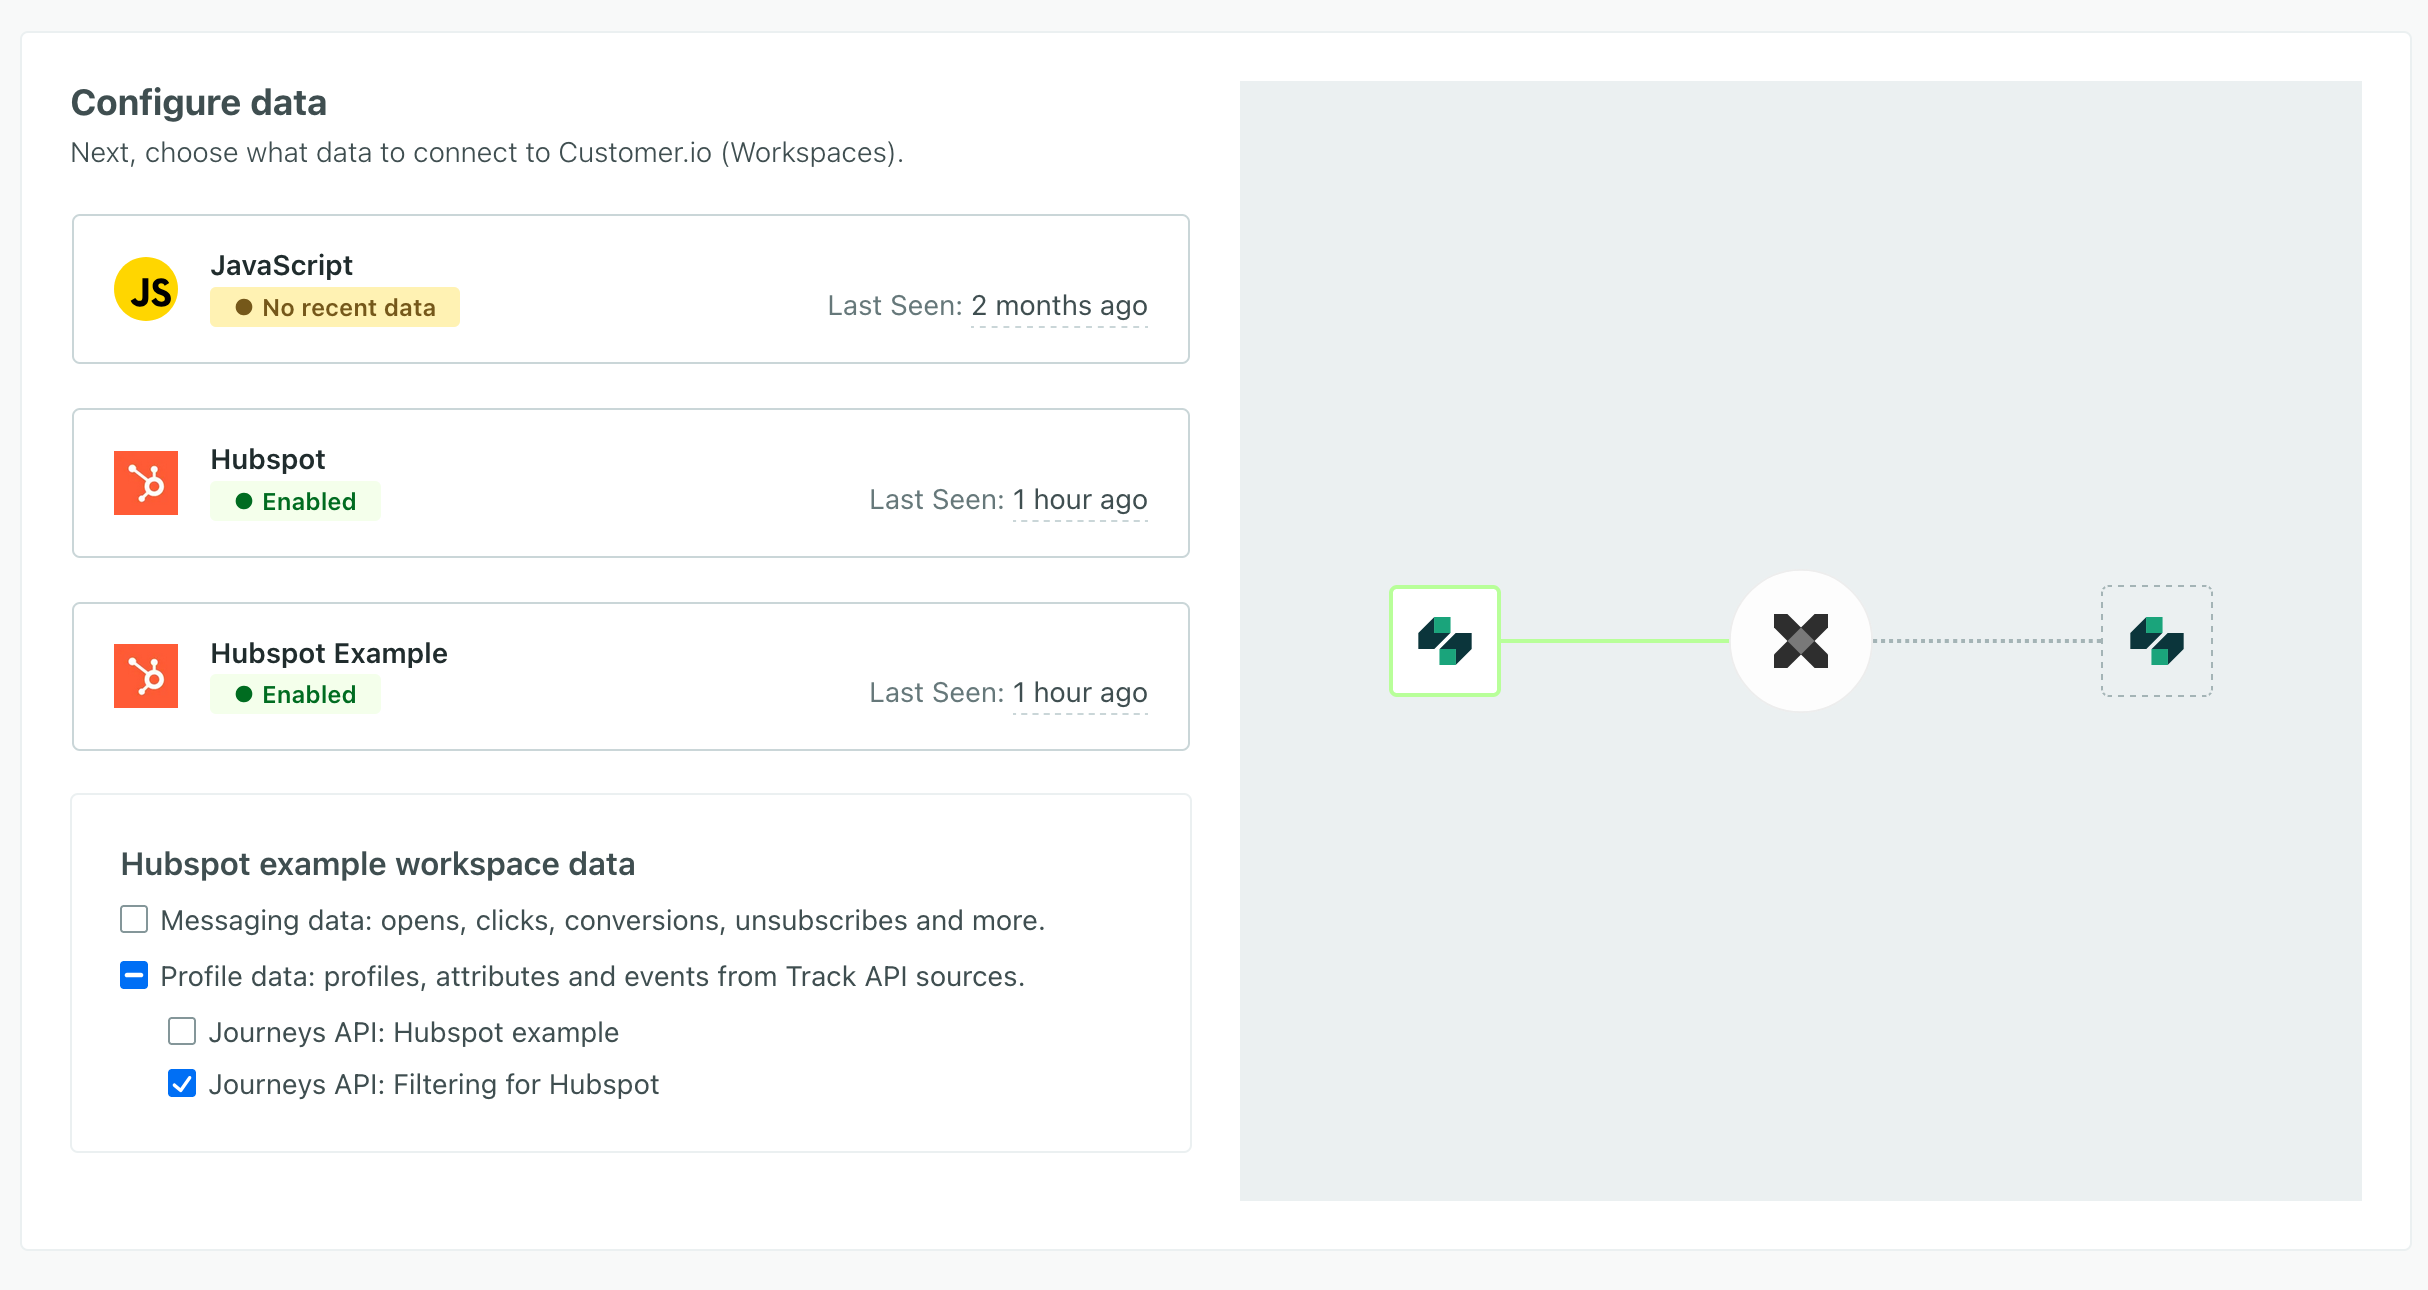
- Click Save.
Now you can modify your actions to filter data from your new integration.
2. Modify actions to filter requests
When you look at your new Customer.io (Workspace) instance, you’ll see a list of actions. You’ll modify these actions to filter requests coming from HubSpot.
For example, you might:
- Filter out requests that don’t contain specific traits or properties. You’ll do this by editing the Trigger for one or more actions.
- Filter for marketing contacts to only sync marketing contacts to Customer.io. You’ll do this by editing the Trigger for one or more actions.
- Set up filters for objects to handle specific objects (like companies, deals, and so on). You’ll do this by editing the Trigger for one or more actions.
- Add new actions to handle specific requests differently from others. You’ll do this by creating a New Action and editing the trigger for an existing action.
Filter requests
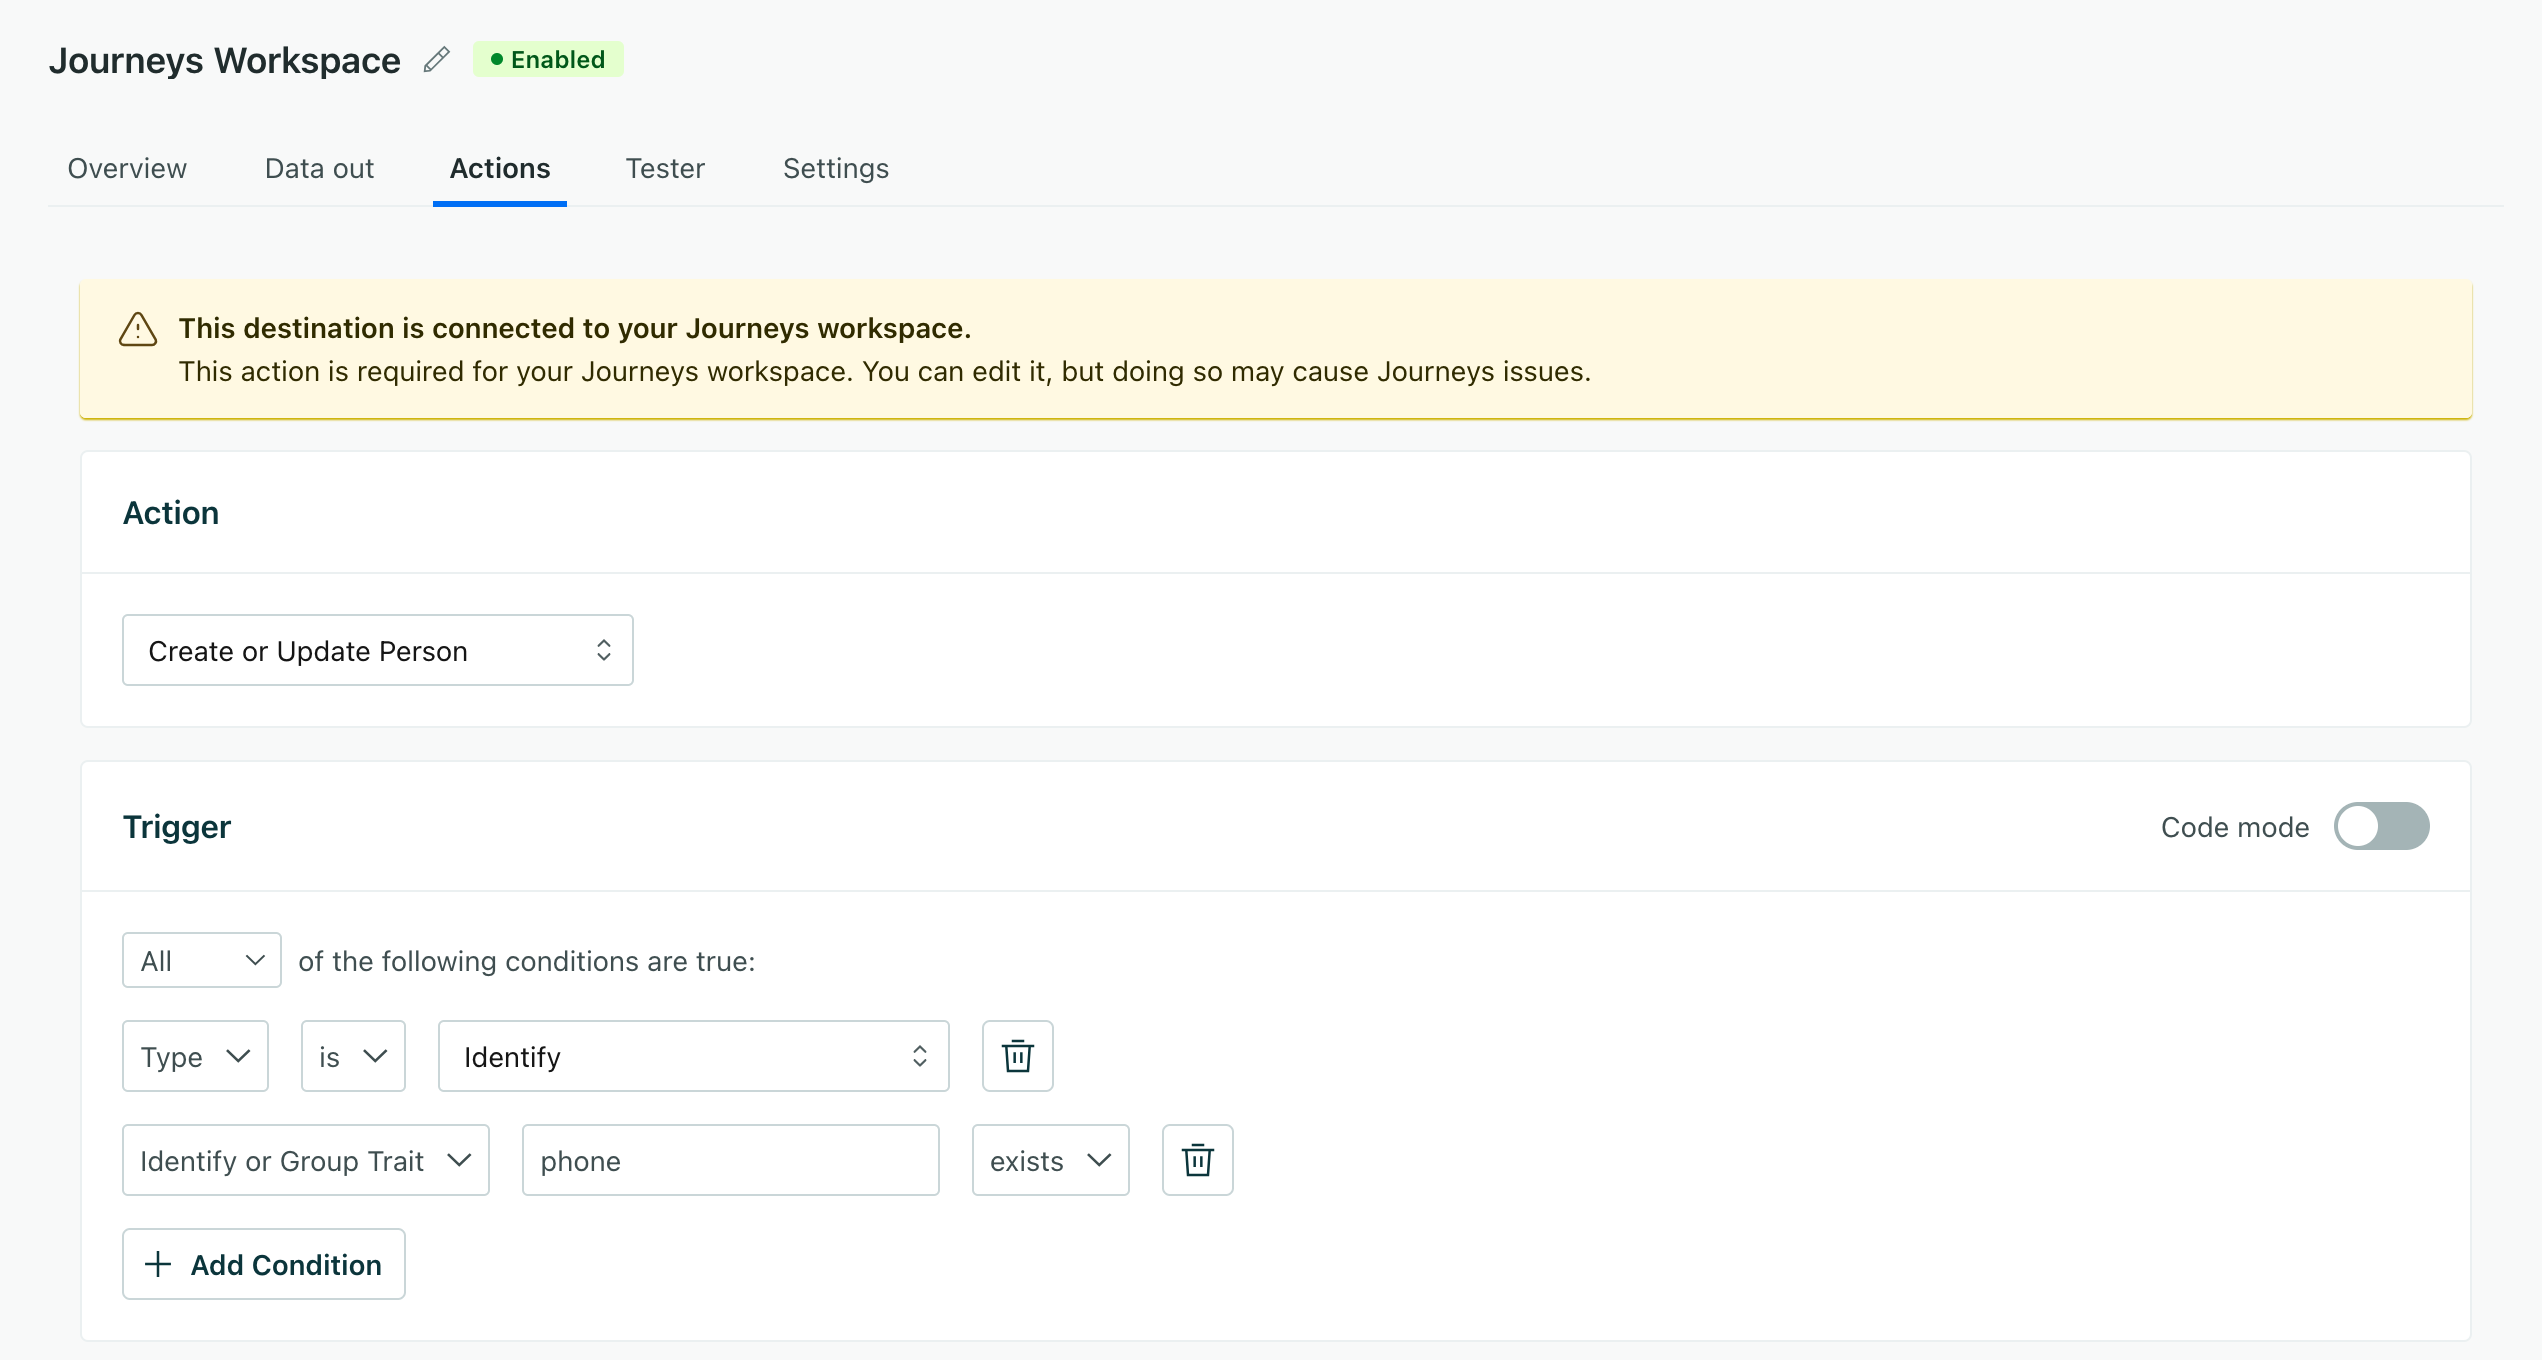
Most of the default triggers are based on the incoming request type—track, identify, page, screen, group, and alias. We also have a few additional triggers for specific events—like Object Deleted and User Suppressed.
By default, these actions process any data matching the Type and Event name criteria. Here’s where you’ll add conditions to filter out requests that don’t contain specific traits or event properties.
For example, when you sync Contacts from your HubSpot data source, you might not want to process user profiles that don’t contain a phone number. In this case, you would add a condition to the Identify action and add a condition where the Traits phone exists. That means that we’ll only process identify requests where the phone trait exists.
Filter for marketing contacts
If you use HubSpot’s Marketing Cloud, you have a concept of marketing contacts. You might want to filter these contacts into, or out of, Customer.io to make sure you contact the right people.
You can do this by updating the identify action to filter on the hs_marketable_status trait. If hs_marketable_status is “true”, the contact is marketable. If it’s “false”, the contact is not marketable.
Note that you can’t use the is true operator because hs_marketable_status is a string, not a boolean.

Filters for objects
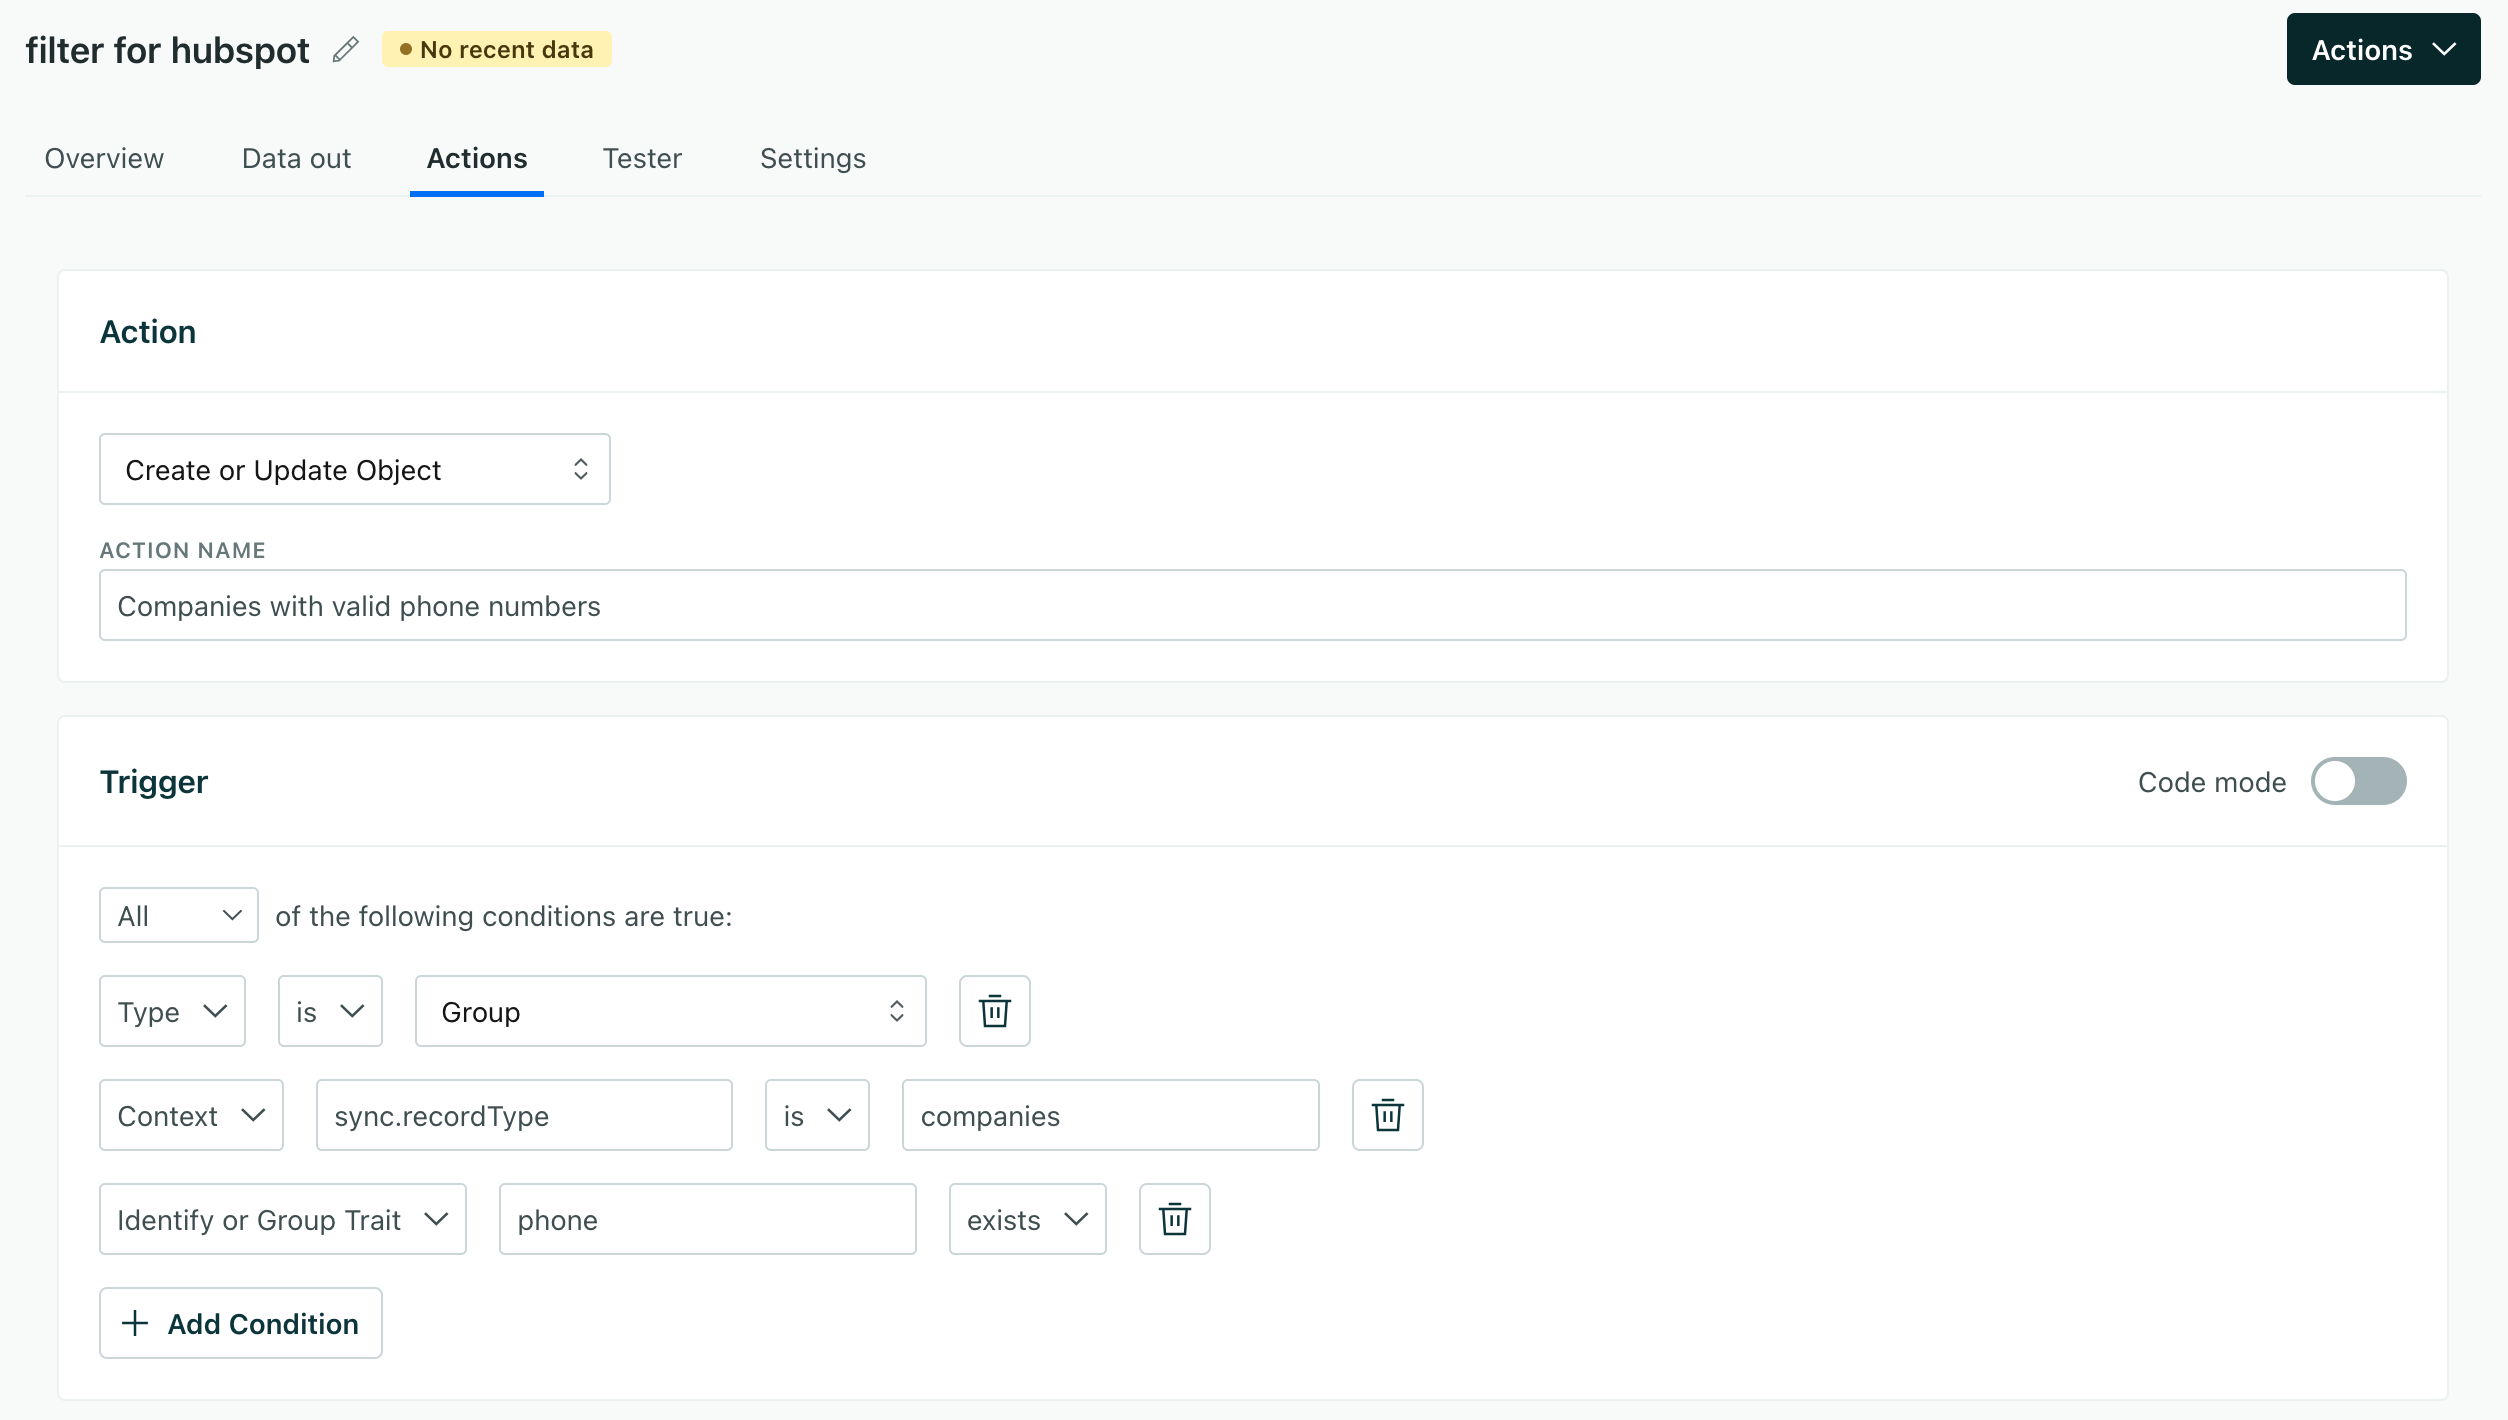
You might want to create filters for different objects—companies, deals, and so on. To do this, you’ll set up your filter based on the recordType from HubSpot. The recordType represents the kind of data you bring in from HubSpot.
To manage object filters, you’ll need to make two changes to your actions:
- Create a filter for the
recordTypetype you want to filter. - Exclude the
recordTypefrom othergroupactions. If you don’t do this, then therecordTypeyou want to create a specific case for will get handled along with other objects! This would effectively override the filter you created for the specific object.
For example, if you sync Companies from HubSpot, recordType will be companies. And if you wanted to filter requests for companies that have a phone trait, you’d filter on context.sync.recordType is companies and the phone trait exists. So you’d great a new Group action with this criteria.
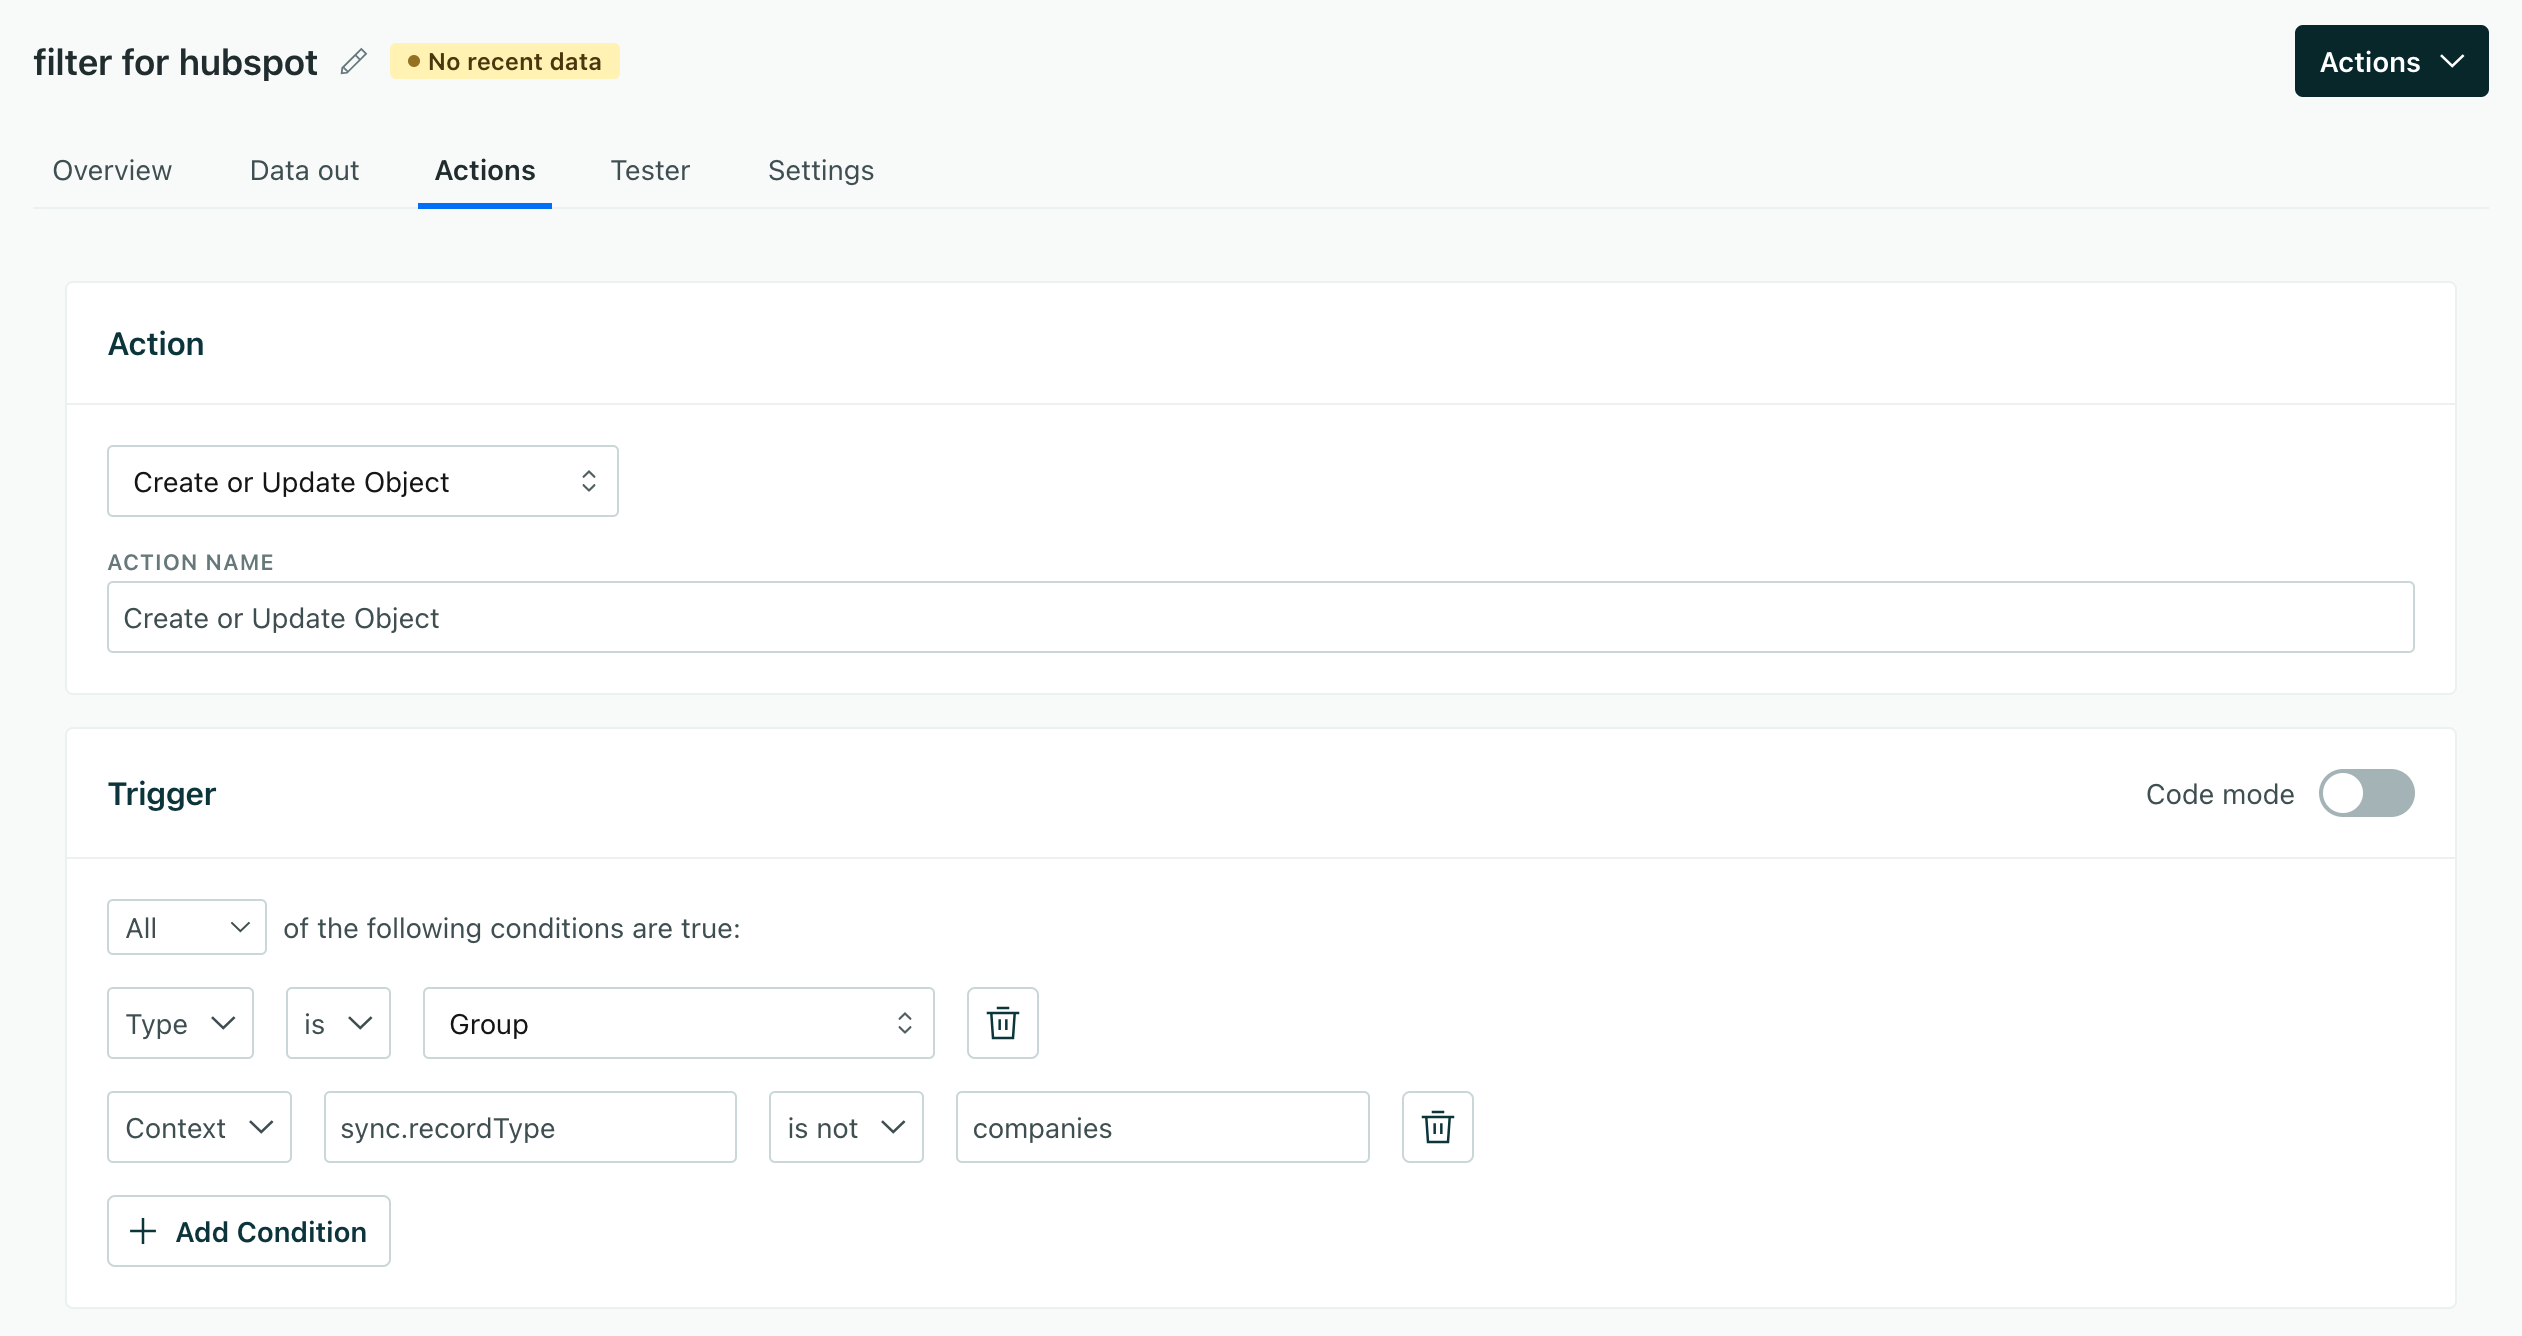
Then, on your existing group actions (sometimes called Create or Update Object), you’ll add a condition to the trigger where recordType is not companies. This ensures that you respect the filter you created for the companies record type!
| Step 1: create an action to handle the specific object | Step 2: exclude the object from other group actions |
|---|---|
 |  |
Add new actions to handle specific requests
Imagine that we capture event_sign_up events from one integration, but we capture them as event_signup events from all our other integrations and we want to make the event name consistent.
In this case, we would:
- Create a new action for the
event_sign_upevent and set the trigger to Track Event Name isevent_sign_up. - In the Data Structure, change The name of the event from
$.eventtoevent_signupand Save the action.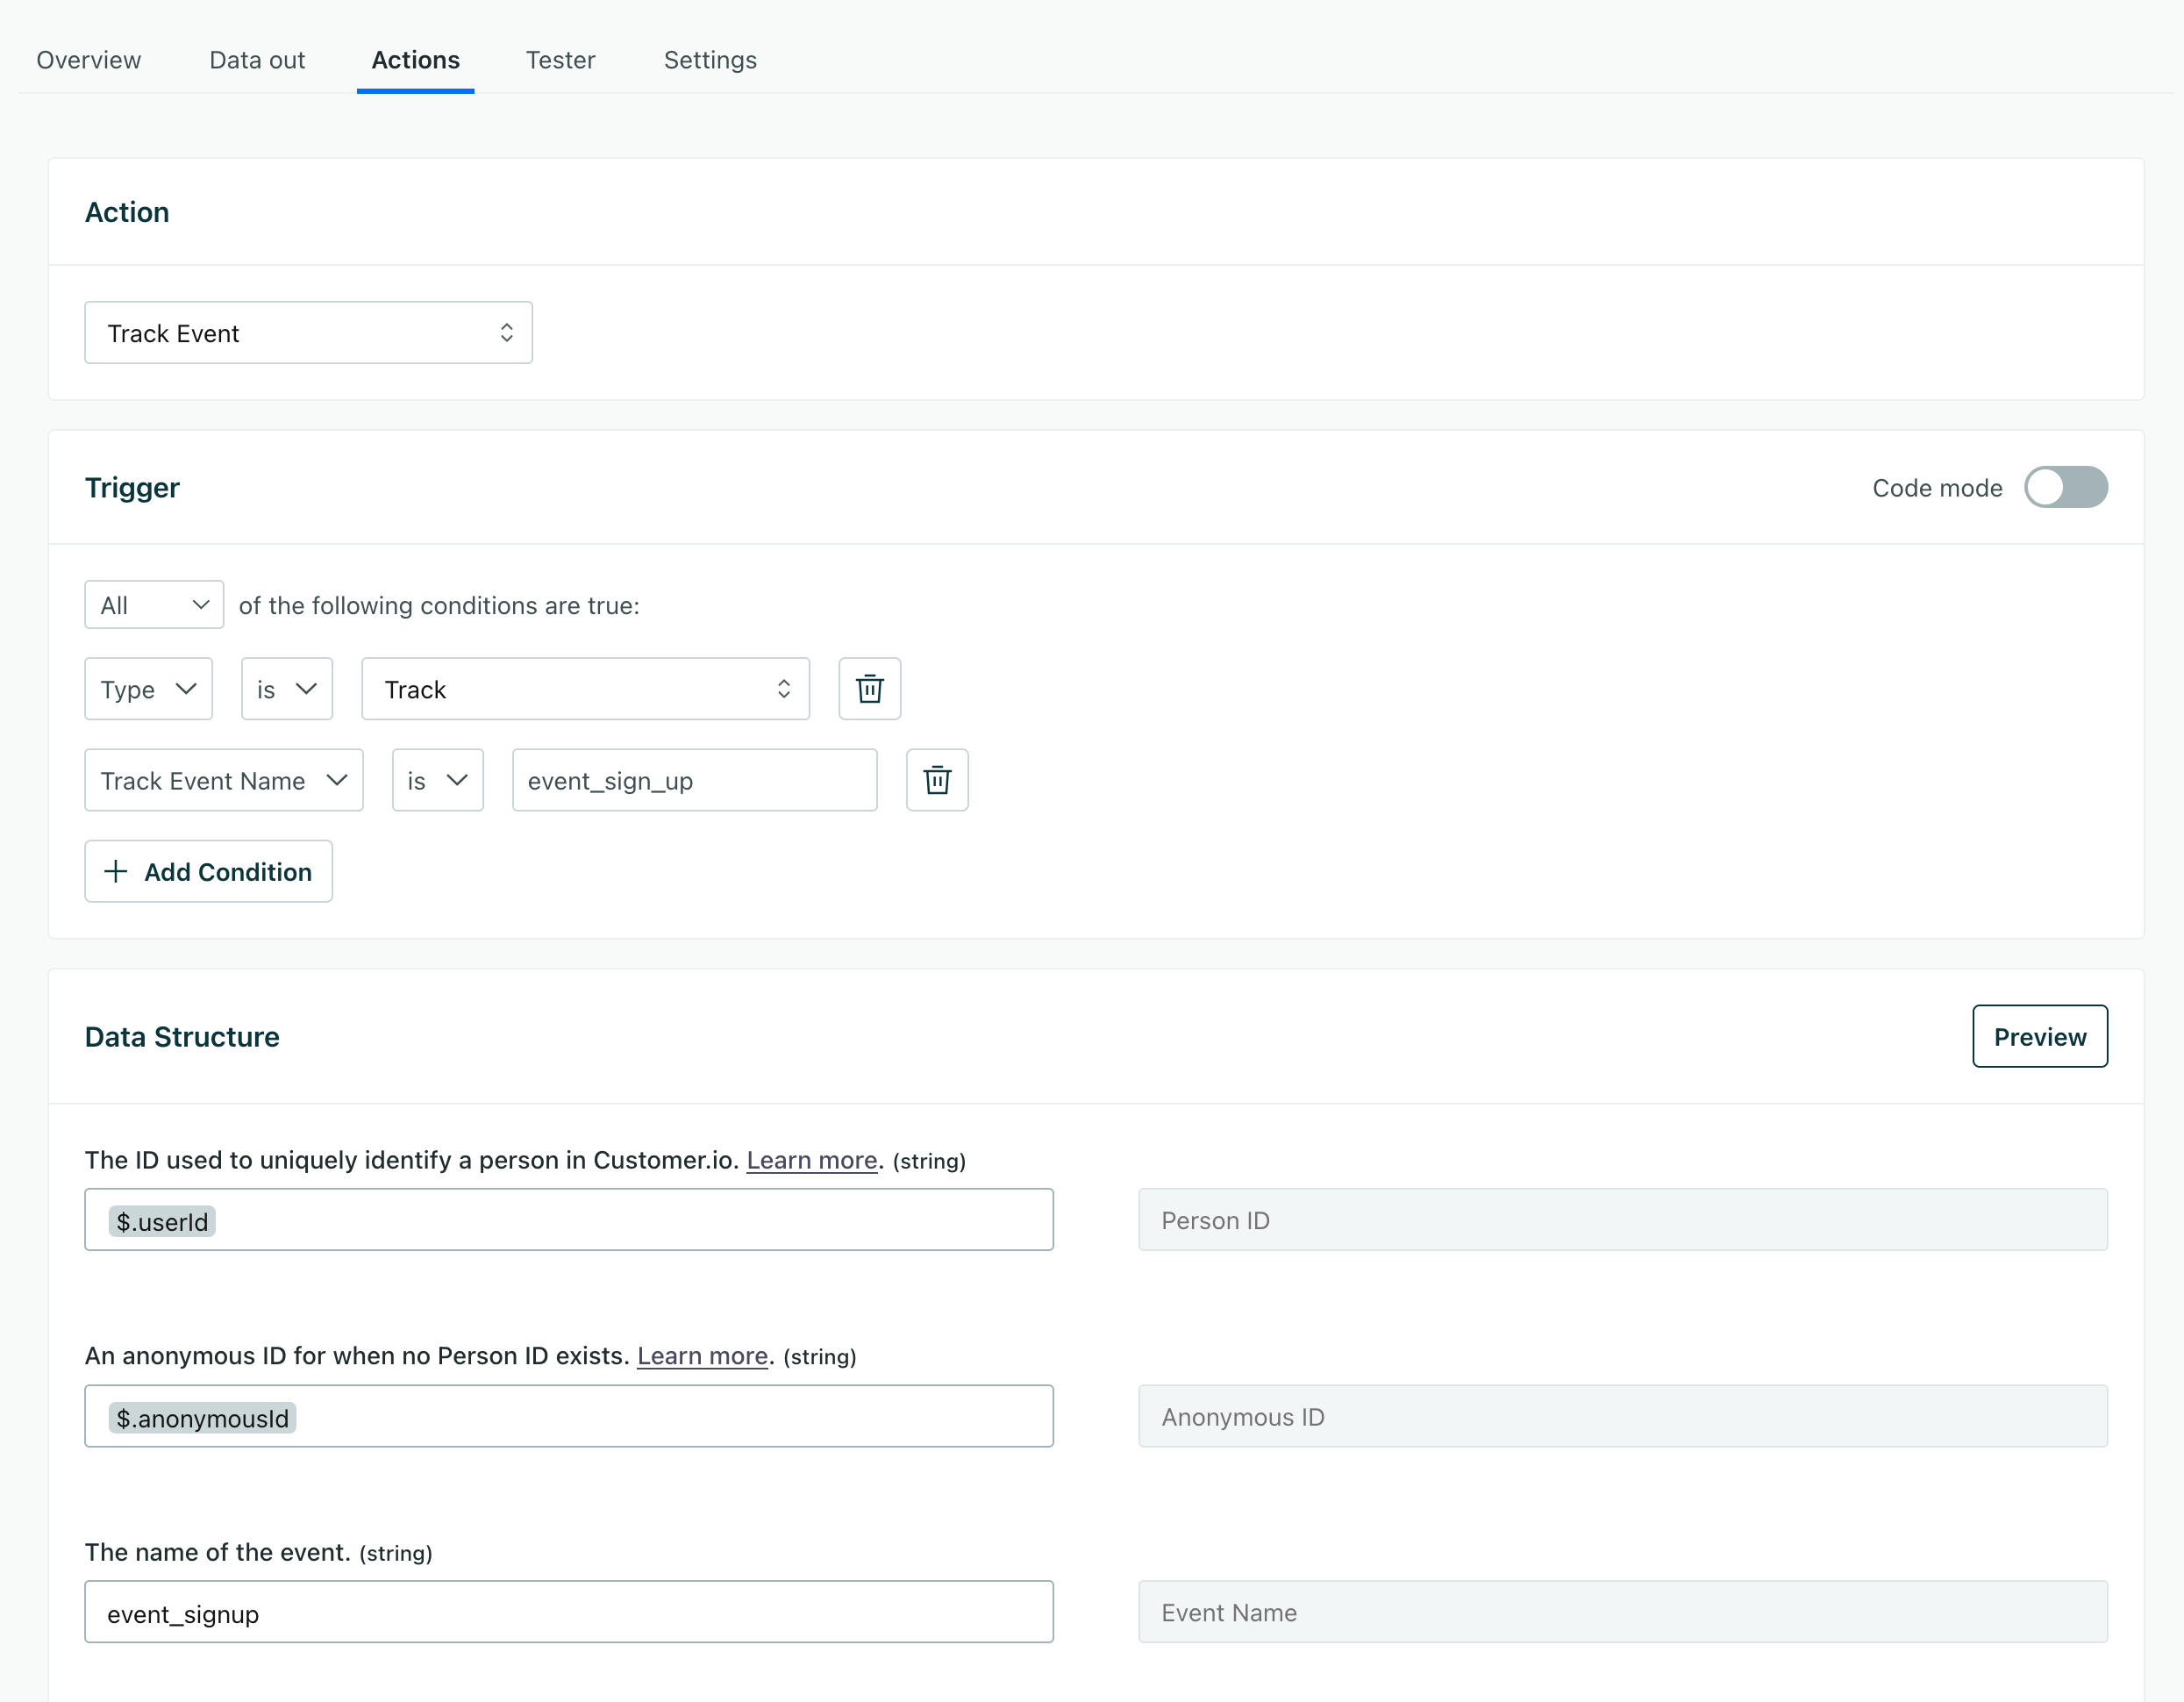
- Edit the existing Track Event action and add a condition to the trigger where Track Event Name is not
event_sign_up.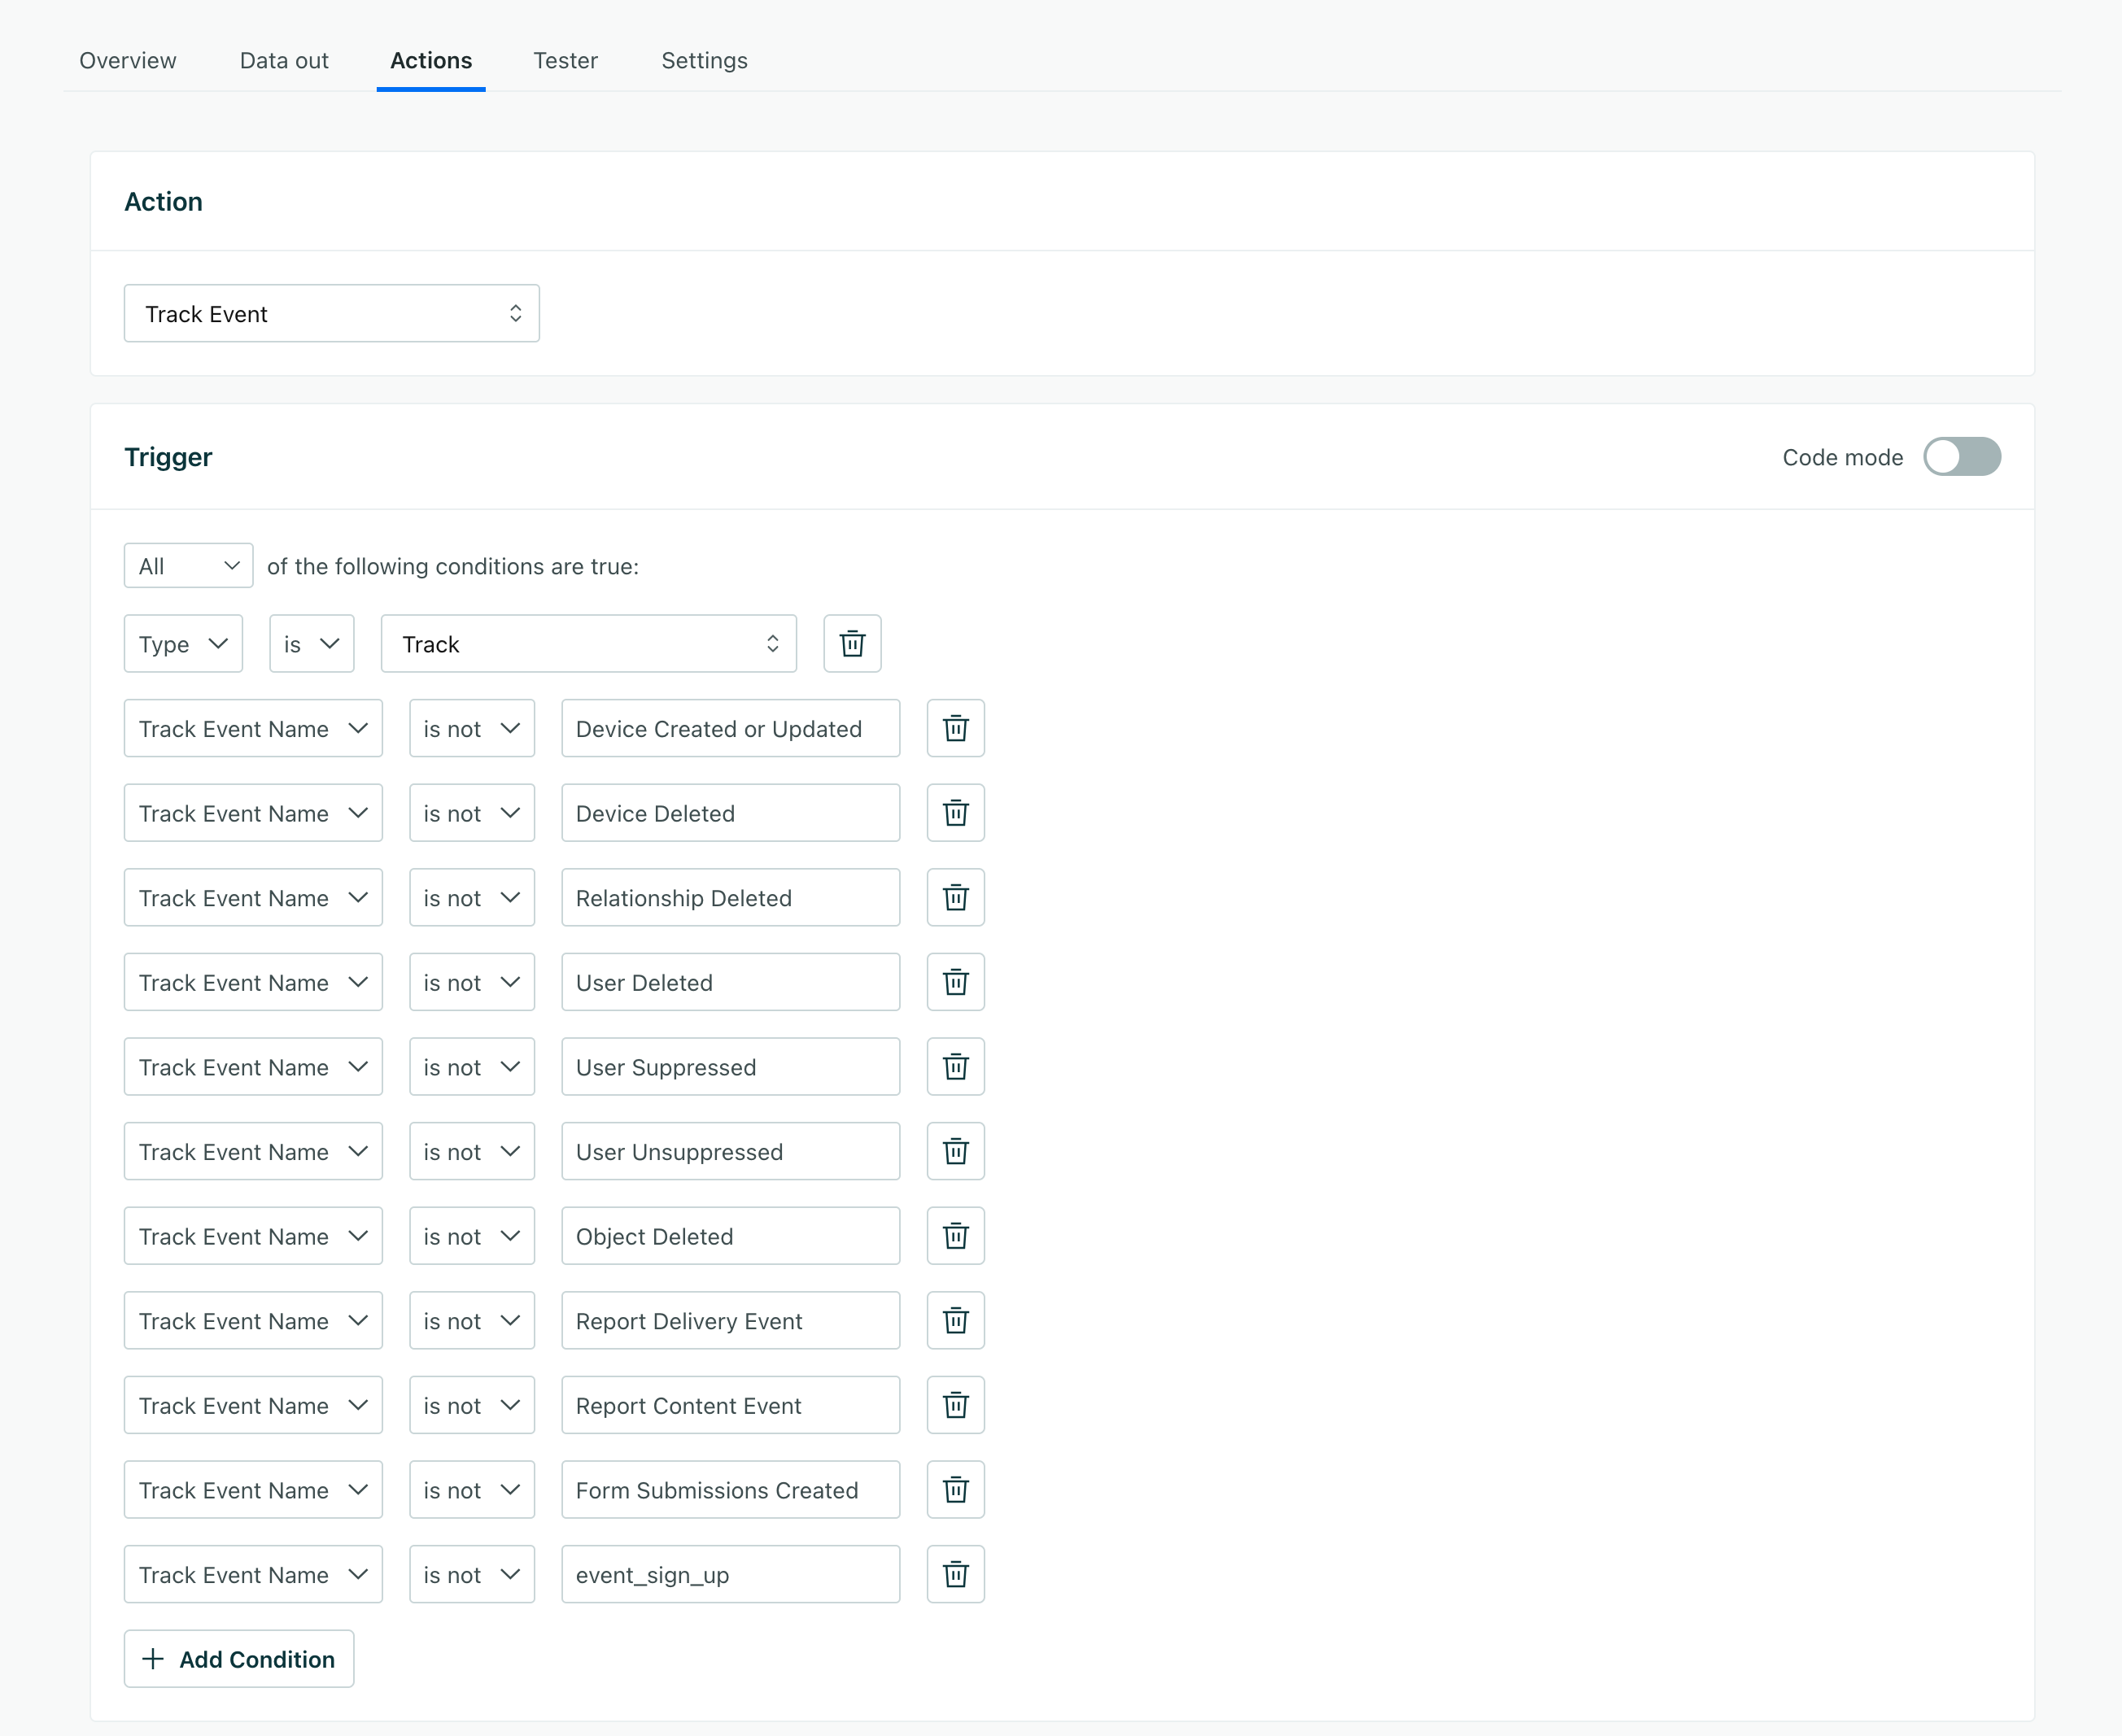
3. Connect your HubSpot integration to your filters
Now that you’ve set up your filters, you can connect your HubSpot integration and start syncing data to Customer.io.
- If you haven’t already, set up your new HubSpot integration.
- When you set up Syncs make sure that you include the fields or other data that you use to filter requests in the sync. For example, if you filter requests based on the
phonetrait, you’ll need to include thephonefield in the sync.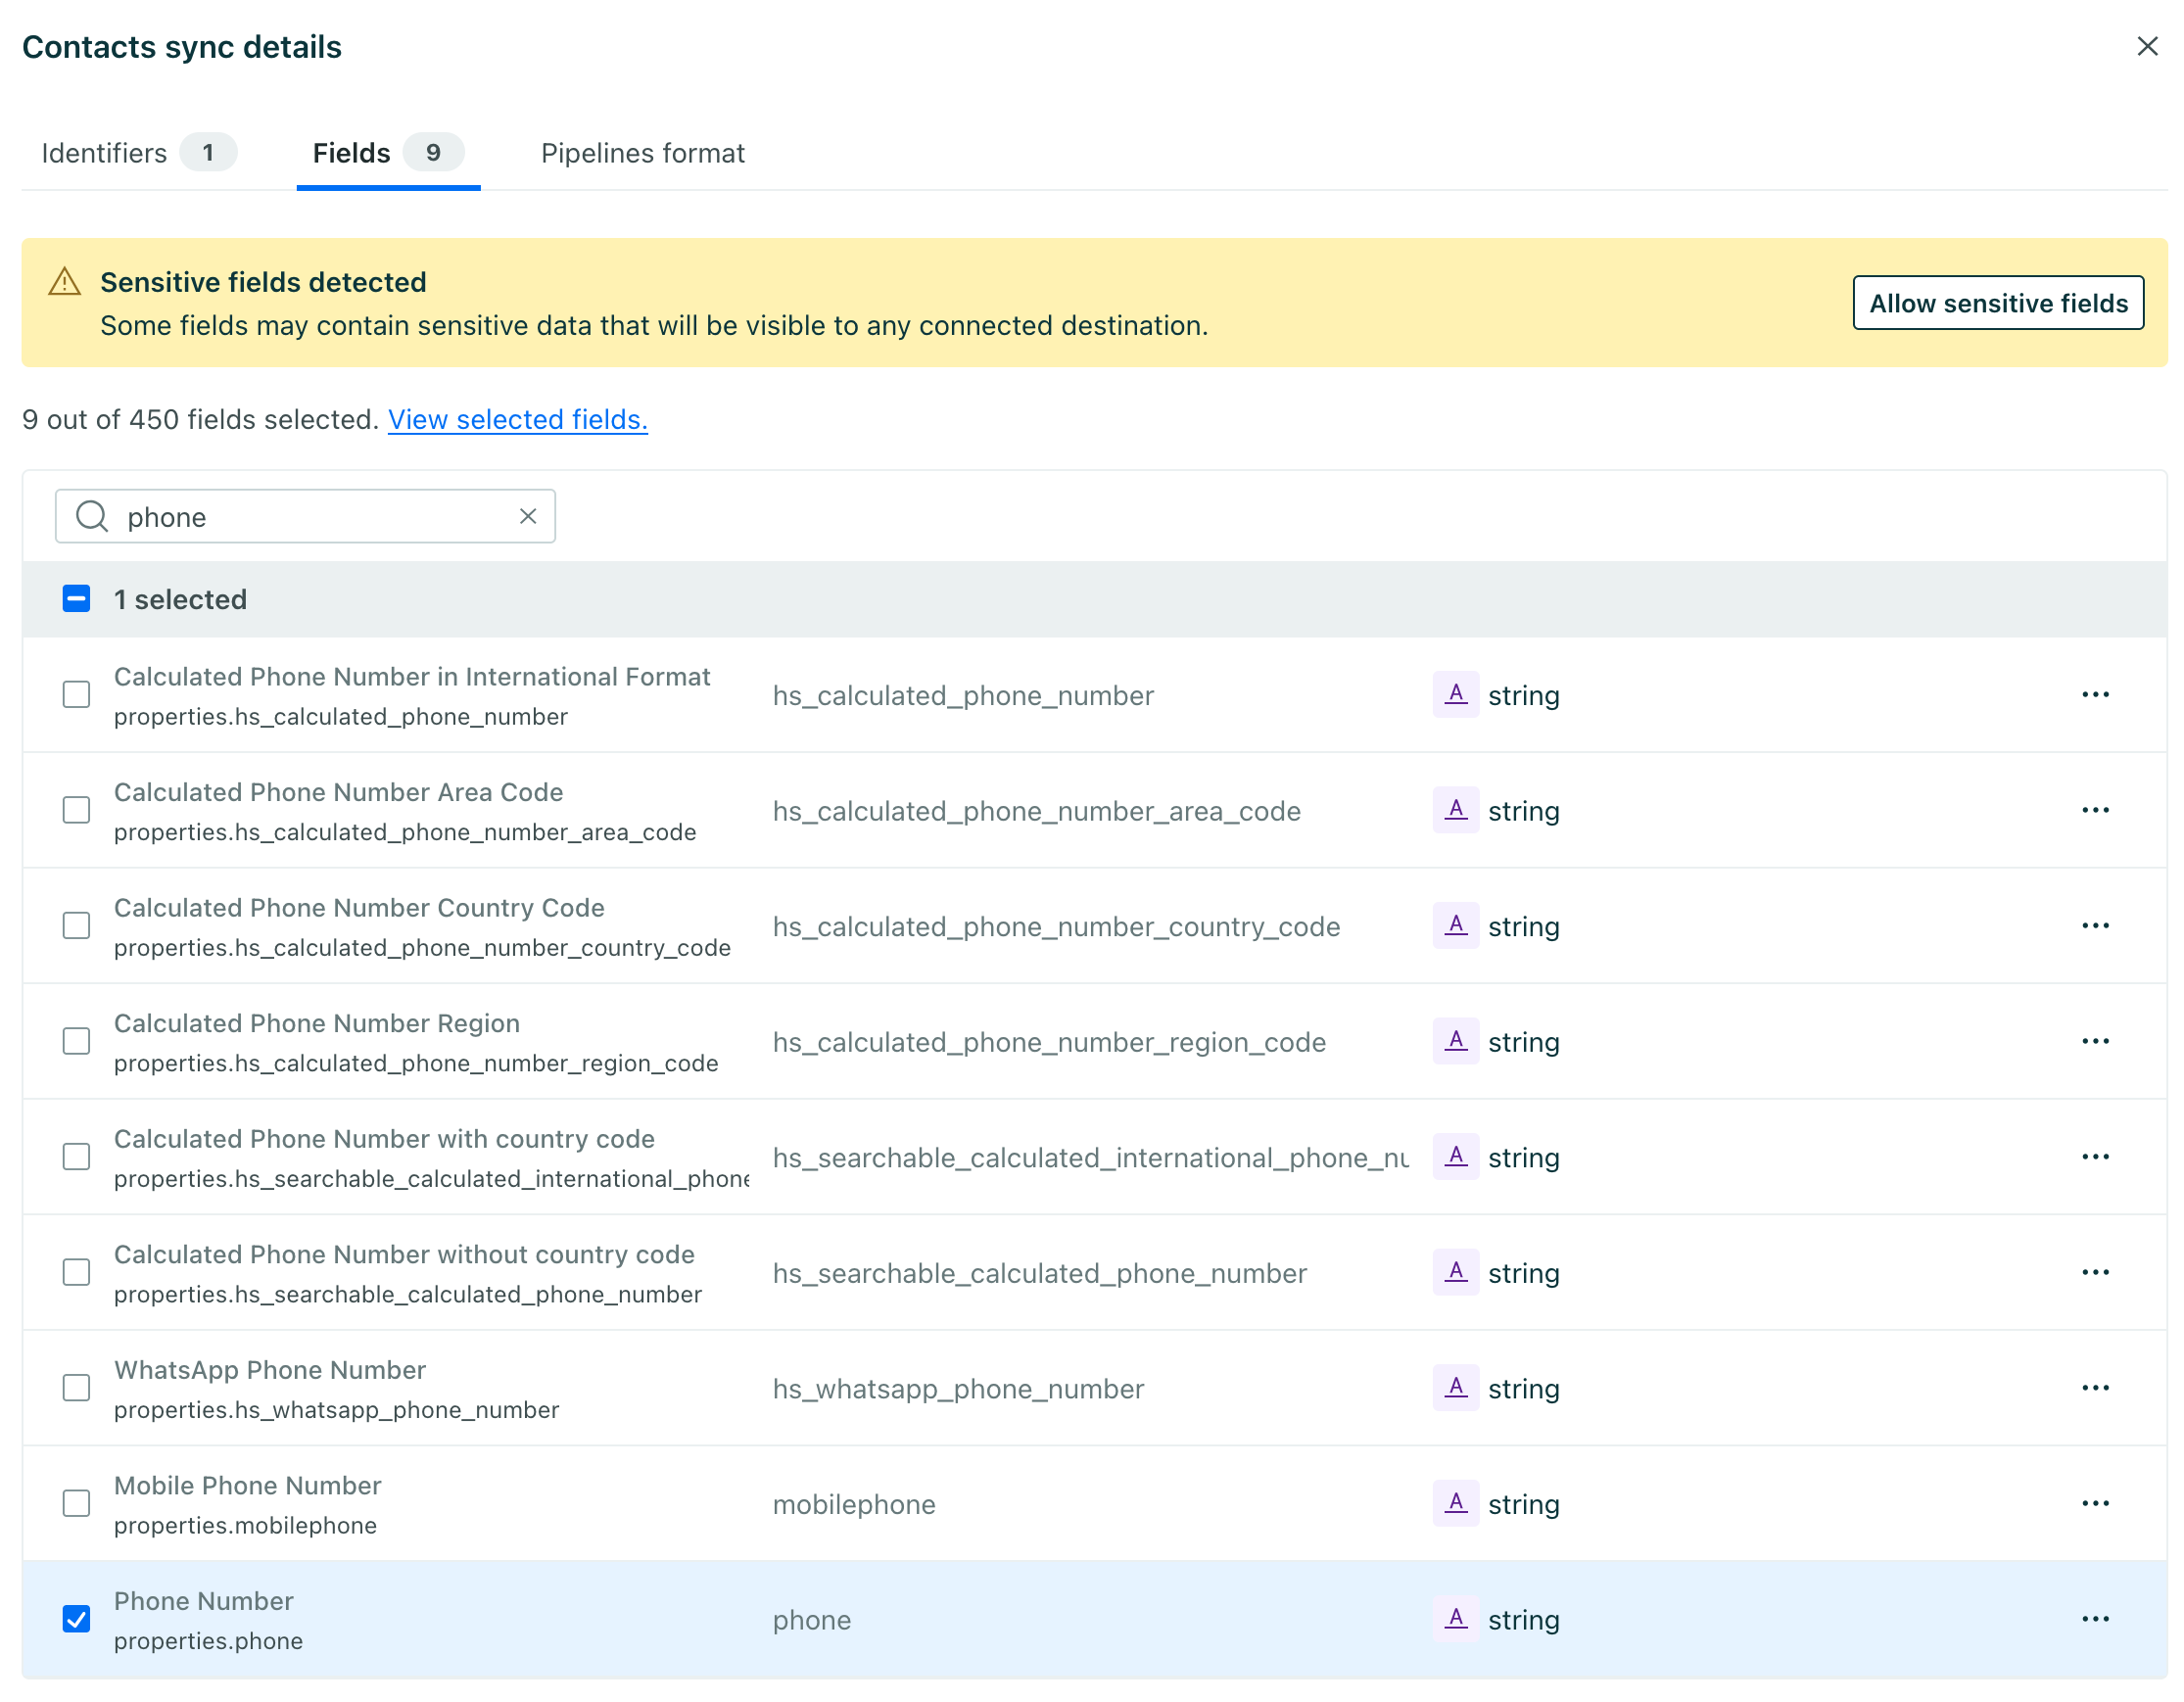
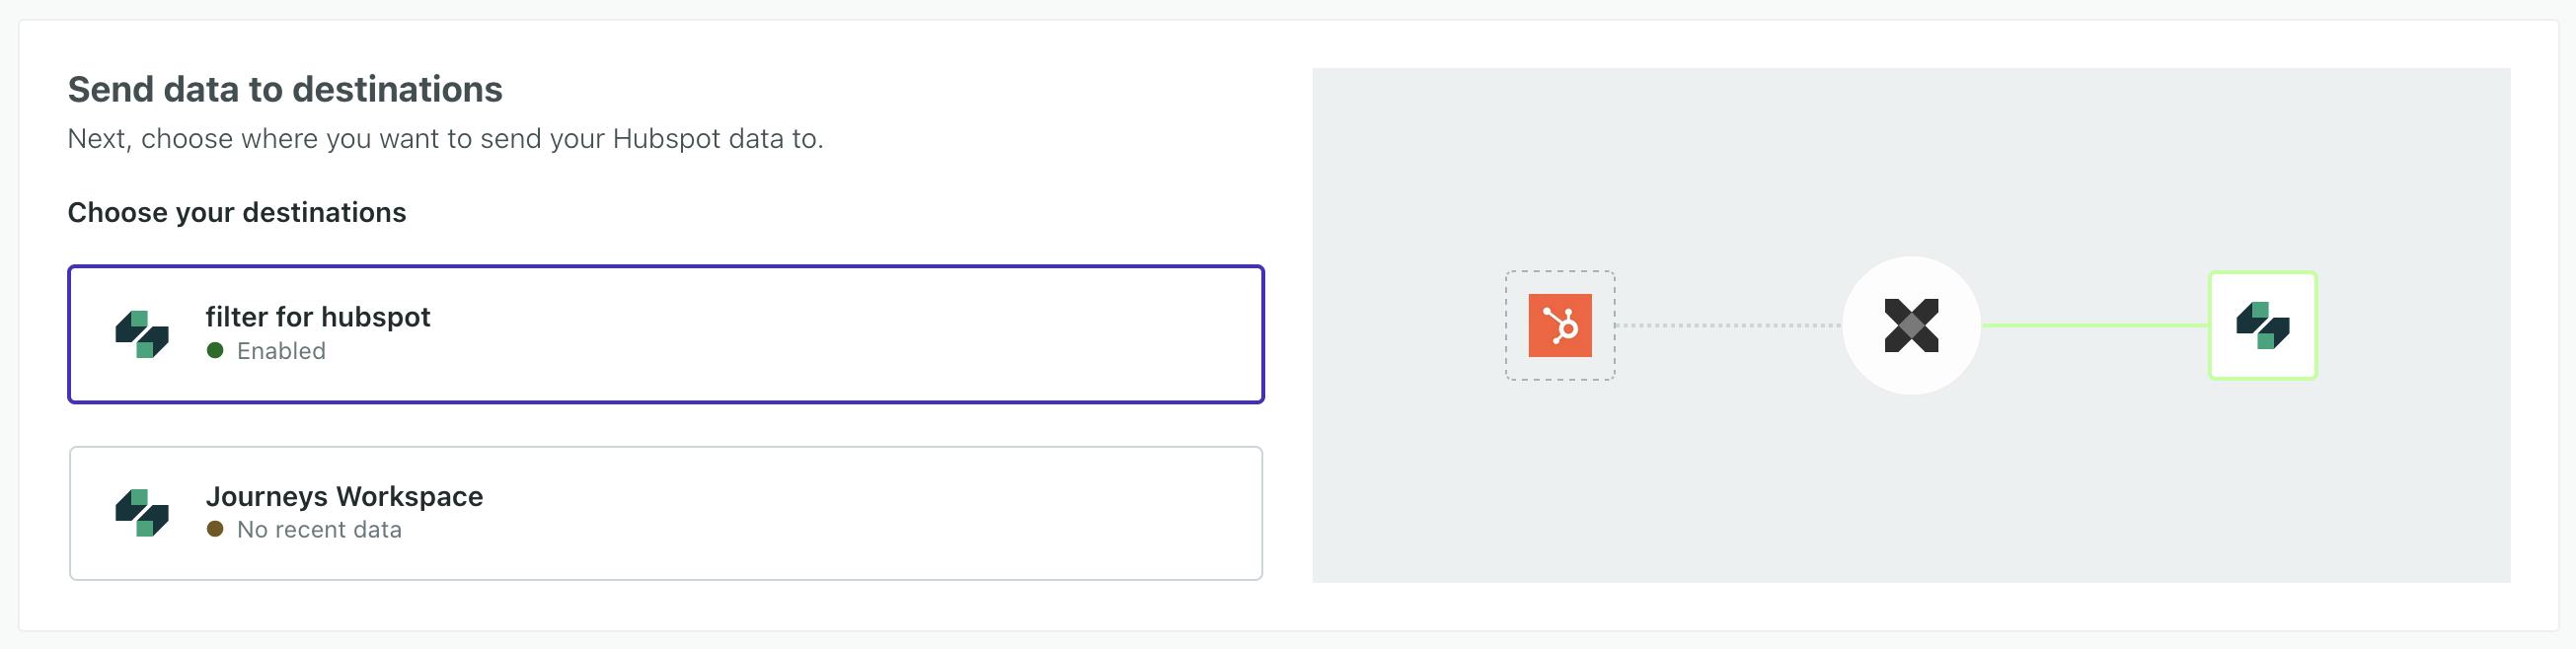
- In the final step where you select the places you want to send your data, select your new Customer.io (Workspace) destination. Deselect the default Journeys Workspace destination.
- Click Enable Integration.
Now your new integration is set up and will start accepting data from your sources. If you want to tailor the data that your sources send to destinations, go to your destination’s actionsThe source event and data that triggers an API call to your destination. For example, an incoming identify event from your sources adds or updates a person in our Customer.io Journeys destination. tab. See Actions for more information.

