HubSpot data-in integration
PremiumThis feature is available for Premium plans. EnterpriseThis feature is available for Enterprise plans. BetaThis feature is new and we're actively working on it. UpdatedThe HubSpot source lets you activate your CRM data in Customer.io. With this integration, you can identify and automatically message people as you add them to Hubspot—follow up with leads, message contacts when it’s time to renew their contracts, and so on. This makes HubSpot a part of your larger marketing stack without needing developers to write a complicated integration.
How it works
This integration sends data from HubSpot to Customer.io on regular intervals called syncs. You’ll set up syncs for each kind of data you want to use in Customer.io.
As you set up syncs, you’ll map your HubSpot data to Customer.io. These will be the attributesA key-value pair that you associate with a person or an object—like a person’s name, the date they were created in your workspace, or a company’s billing date etc. Use attributes to target people and personalize messages. that you use to personalize messages and segment members of your HubSpot audience.
Set up your HubSpot integration
When you set up your integration, you’ll configure your first Sync—the type of data that you want to send to Customer.io. We suggest that you start with Contacts—the people you’ve identified in HubSpot.
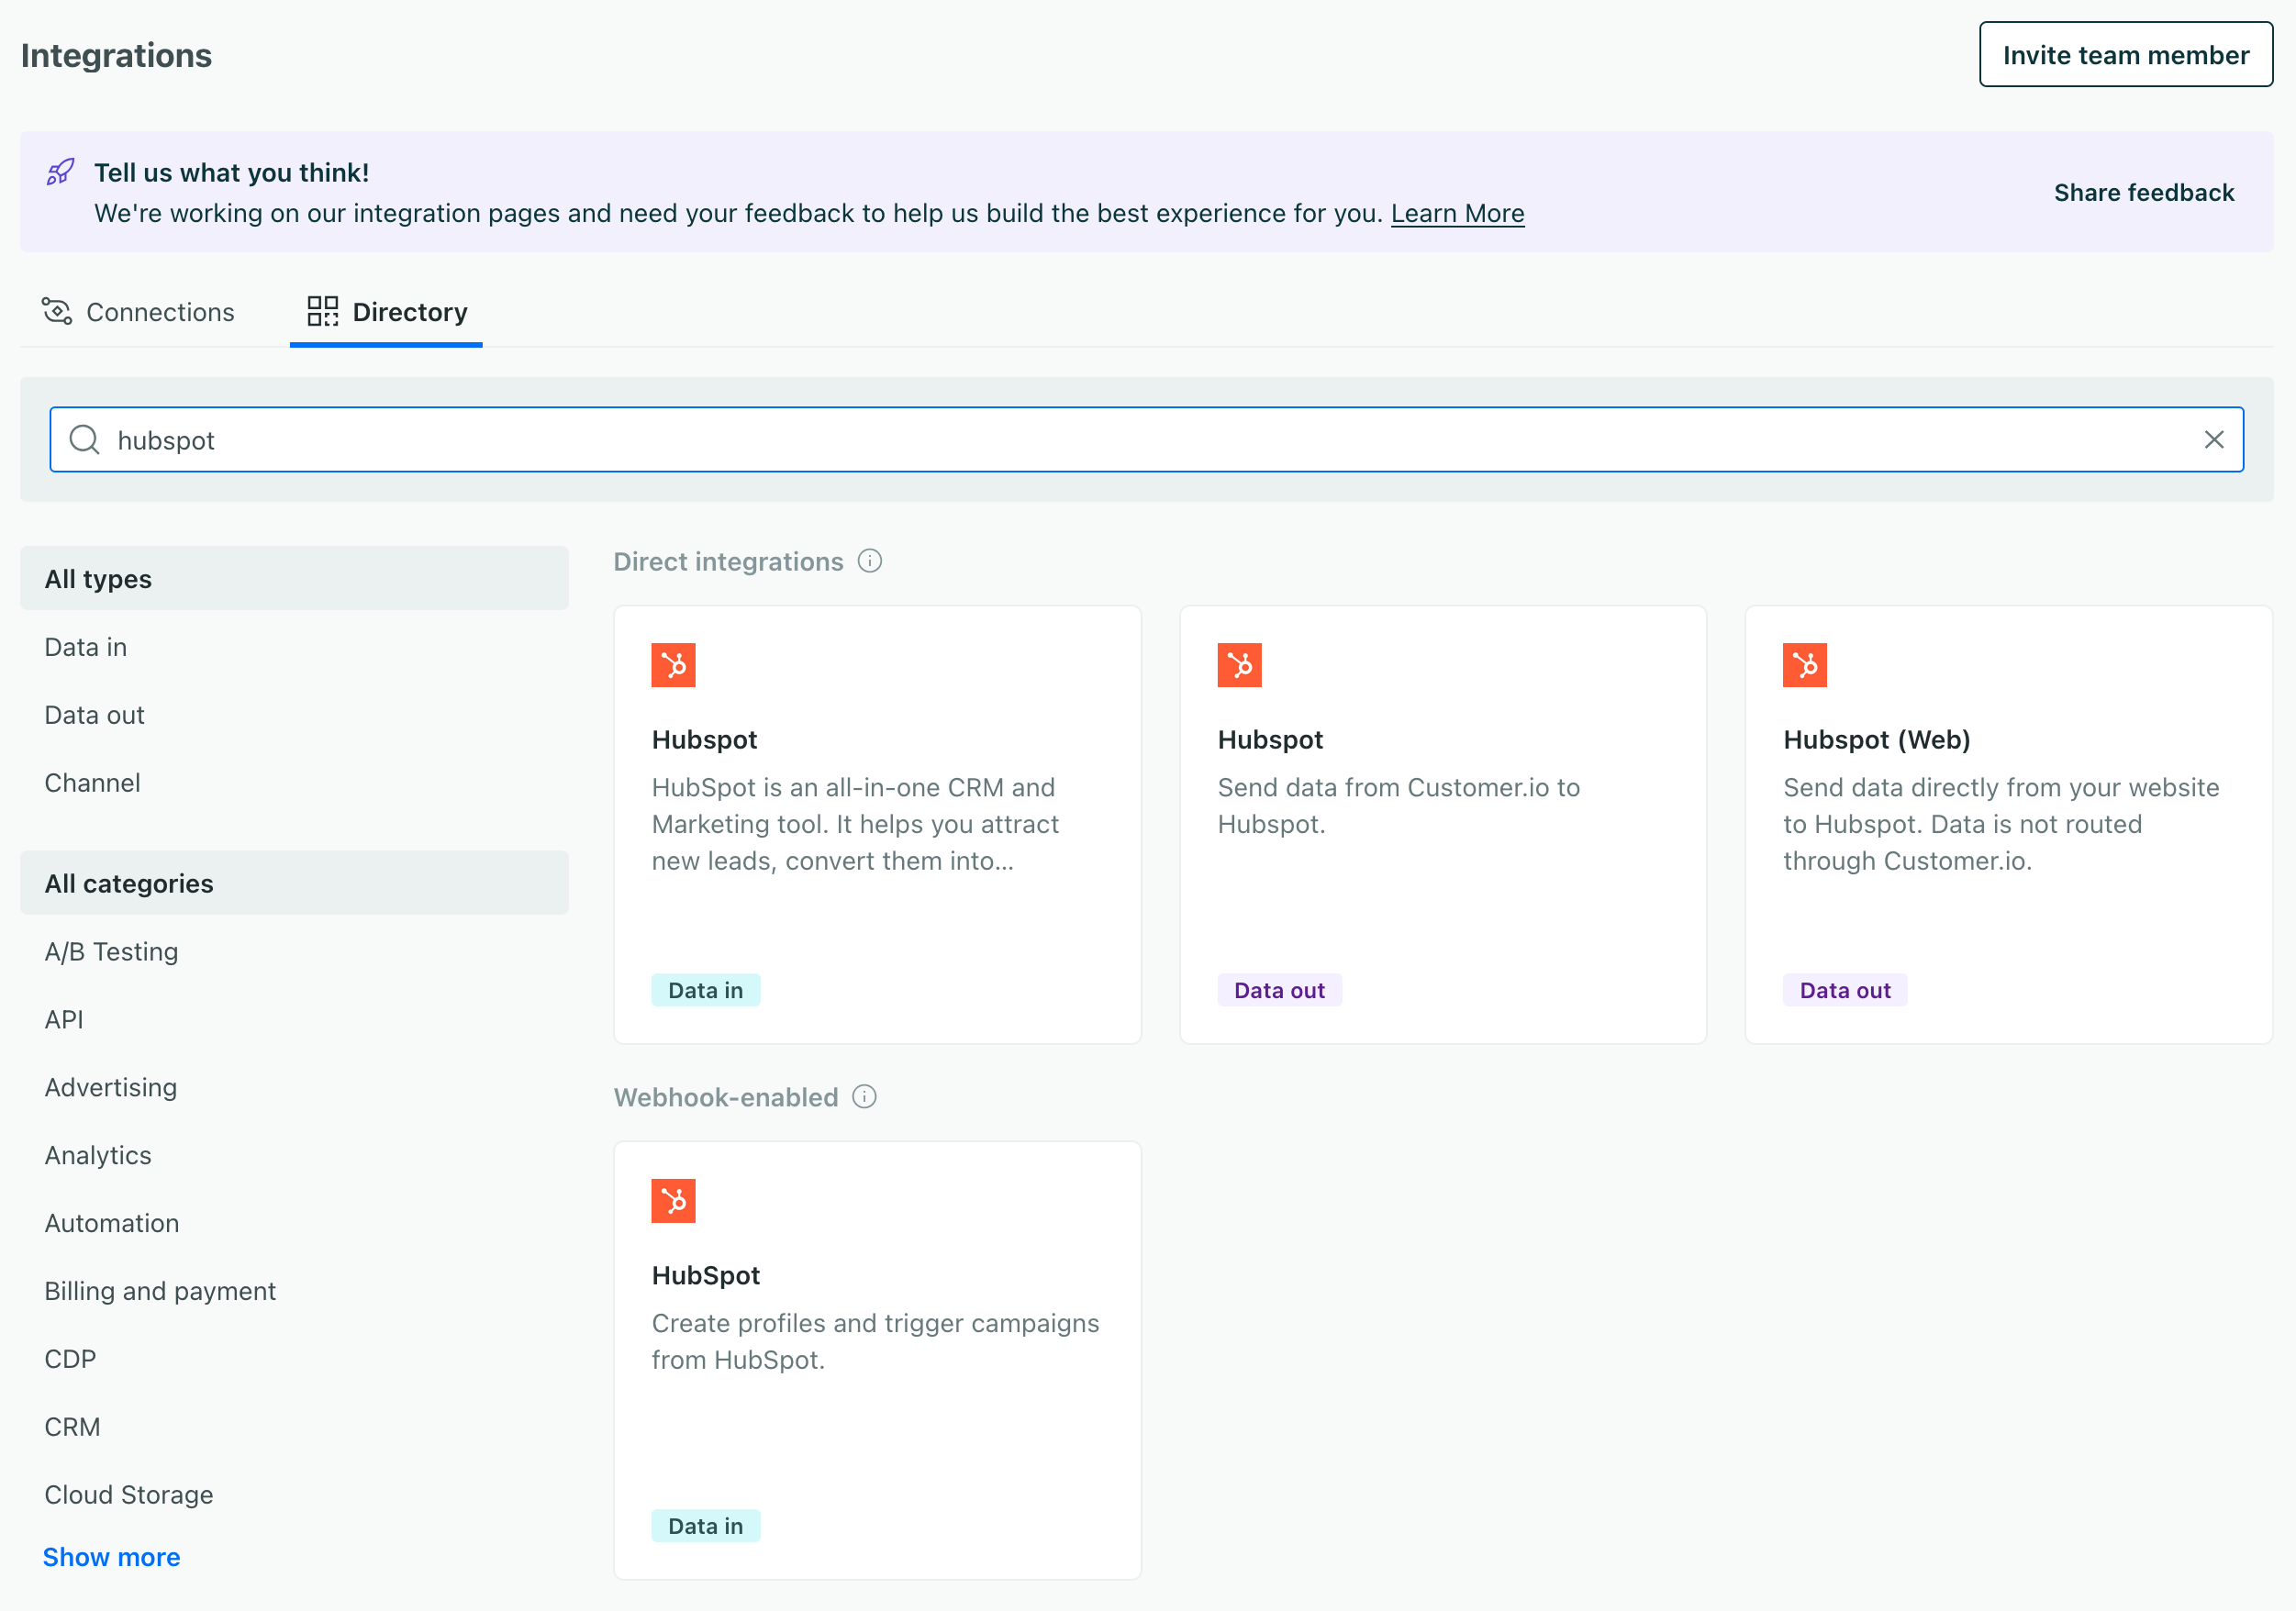
Go to Data & Integrations > Integrations. In the Directory tab, pick the Data In HubSpot integration
Give the integration a friendly Name and click Connect HubSpot.
Here’ you’ll pick the account you want to connect to Customer.io and then click Choose Account.

HubSpot will list the permissions you’ll grant to Customer.io. If you accept, click Connect app. While we have access to your data, it’s important to note that the scope of your data is limited to your workspace and account. We don’t share it with anyone else.
Click Next: Create Sync.
Pick the kind of data you want to sync to Customer.io. We suggest that you start with Contacts because it’s the easiest and most natural data type to send into Customer.io and other services.
By default, we’ll bring in all contacts, but you can set up filters to limit your sync to Marketing Contacts or other people you want to bring into Customer.io. See Filter incoming data for more information.
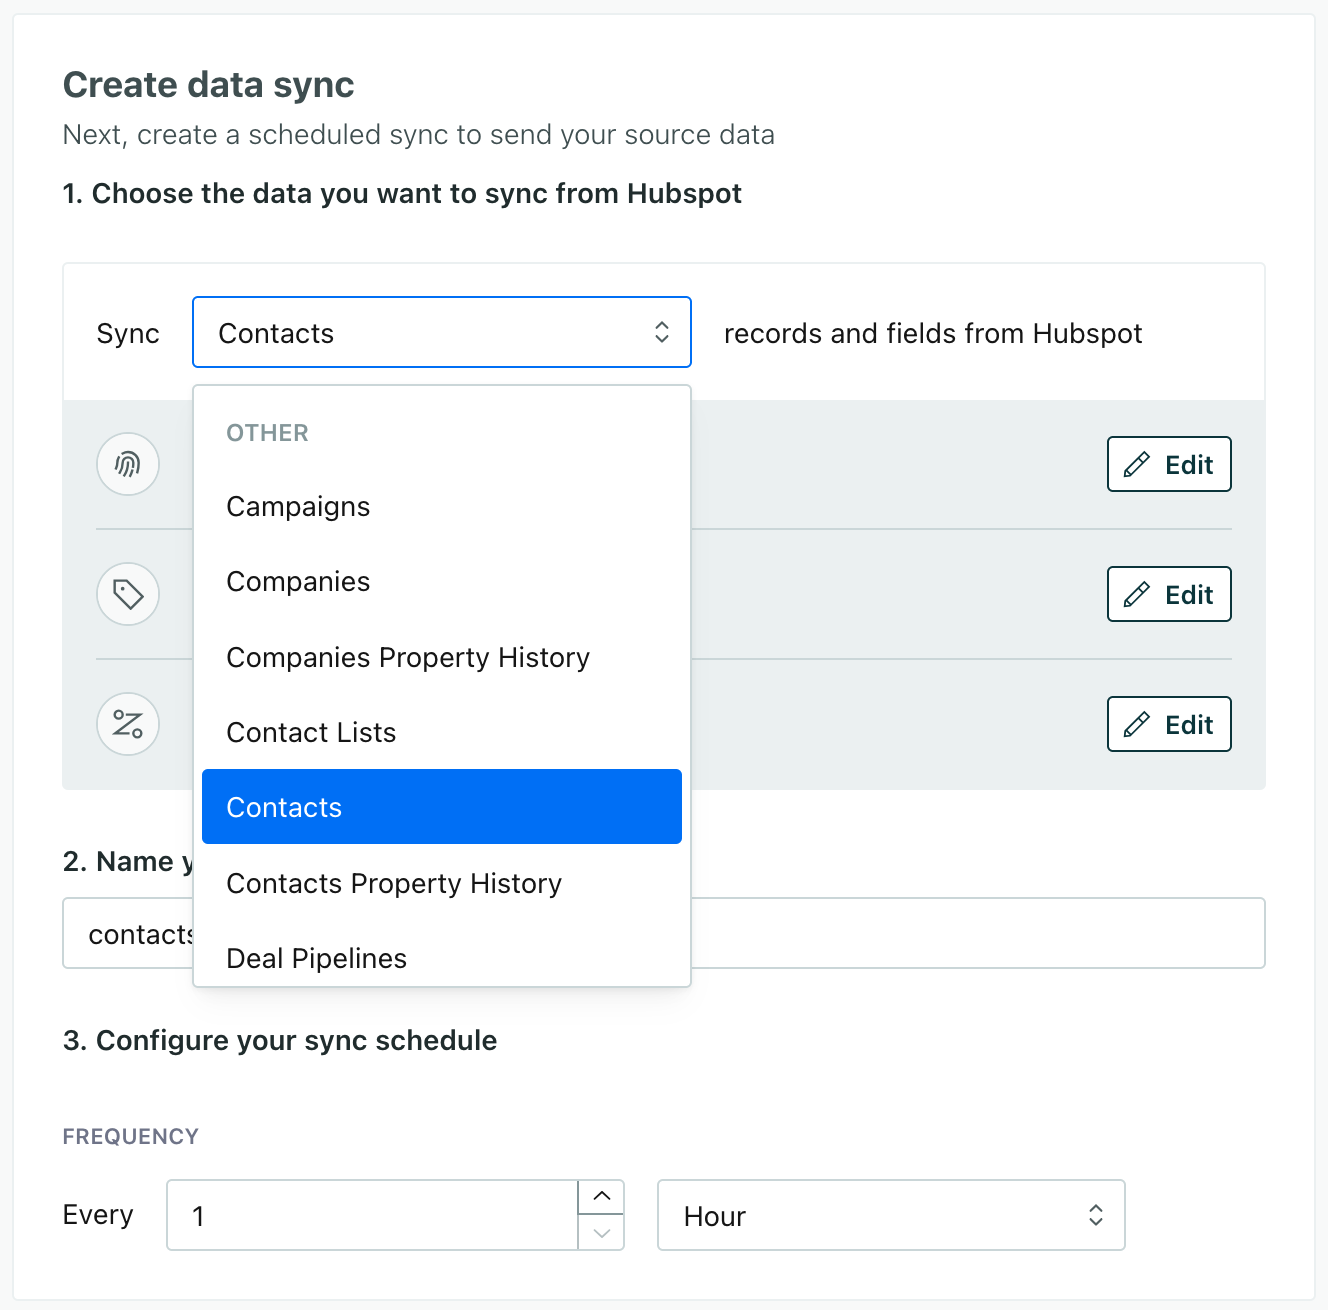
In the three fields below Sync, set up the data you want to bring into Customer.io. If this is your first sync, and you’re syncing Contacts, you probably only need to update Fields to sync.
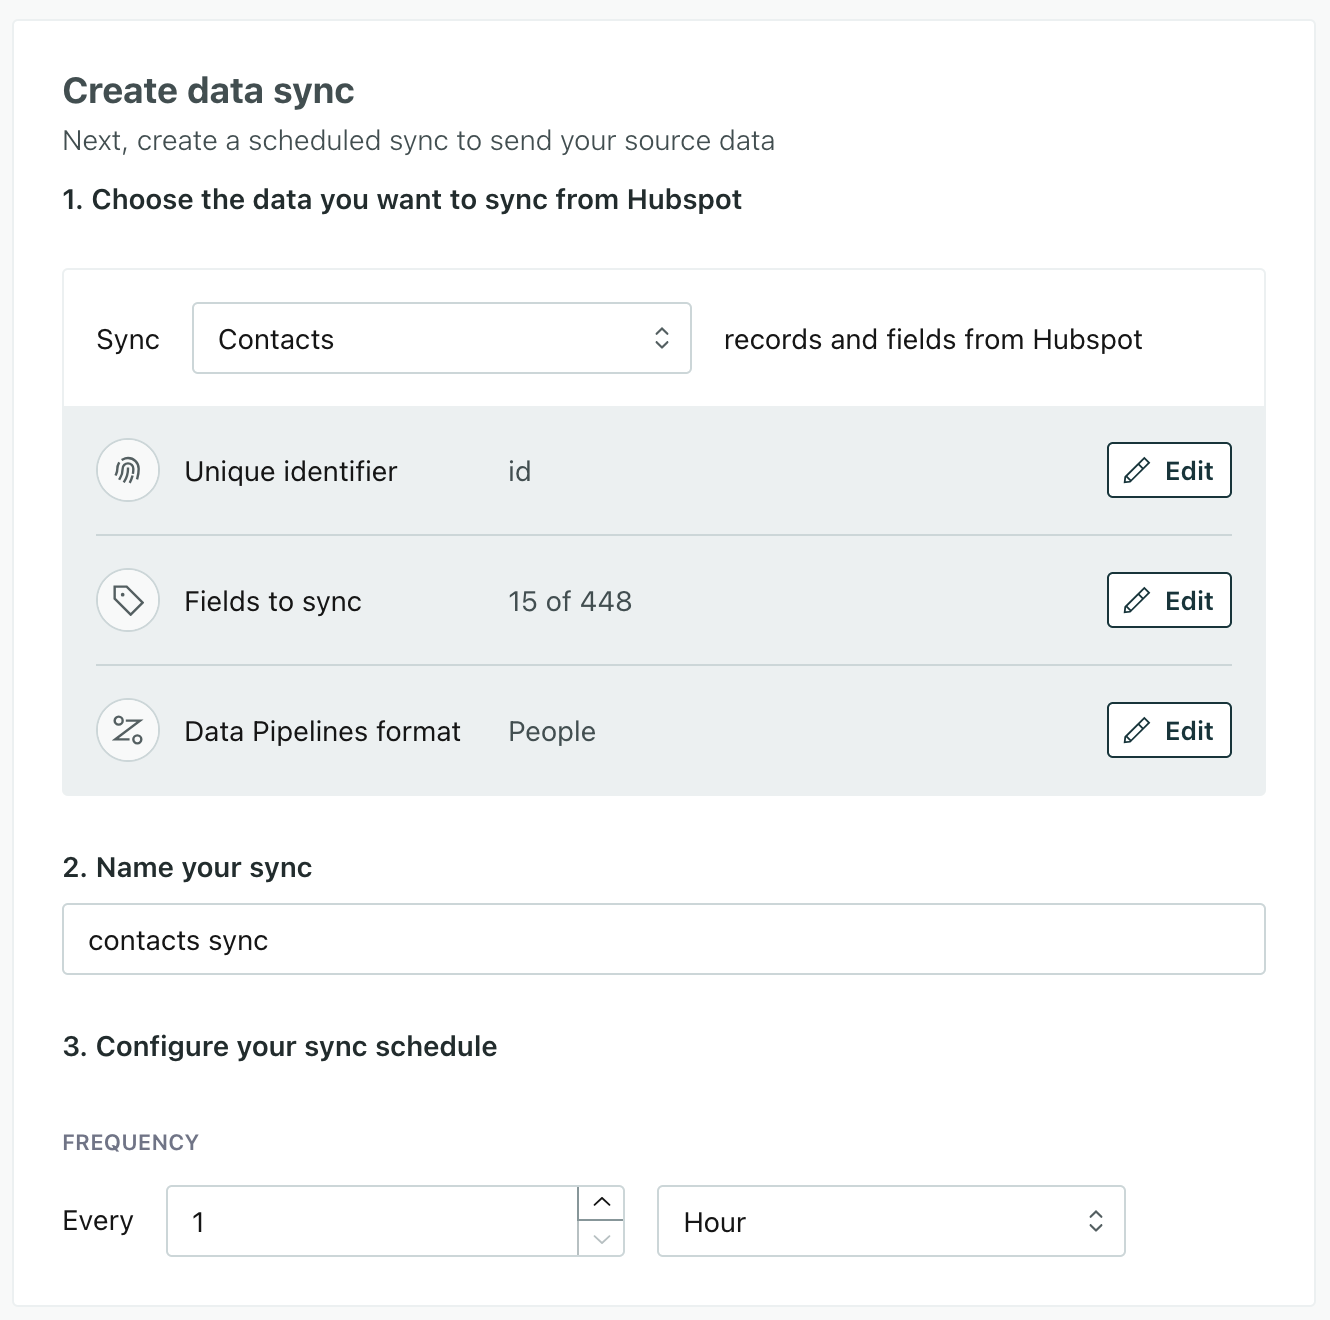
- Unique identifier: This is the value we’ll use to identify individual people or objects. If HubSpot is your source of truth, you should leave this as
id. If that value doesn’t make sense for your setup, see setting identifiers for more information. - Fields to sync: This is the data you want to bring into Customer.io. You can toggle the fields you want to bring into Customer.io on or off and click Settings > Edit to change the names of the fields in Customer.io. See mapping fields for more information.
We automatically remove the
properties.prefix from HubSpot field namesBy default, HubSpot field names contain aproperties.prefix likeproperties.fieldName. When we bring data into Customer.io, we remove this prefix to make the field names easier to use in Customer.io, soproperties.fieldNamebecomesfieldName. - Pipelines format: Unless you know the data type you want to use in Customer.io, don’t change this value. See Pipelines format for more information.
- Unique identifier: This is the value we’ll use to identify individual people or objects. If HubSpot is your source of truth, you should leave this as
Give your sync a Name and configure the Frequency—how often you want to sync data from HubSpot to Customer.io.
Click Next: choose destinations.
Select the places you want to connect your HubSpot data to. By default, we’ll sync data to your workspace (shown as Journeys Workspace), but you can also send your data to other destinations—like your data warehouse or analytics platforms.
Click Enable HubSpot.
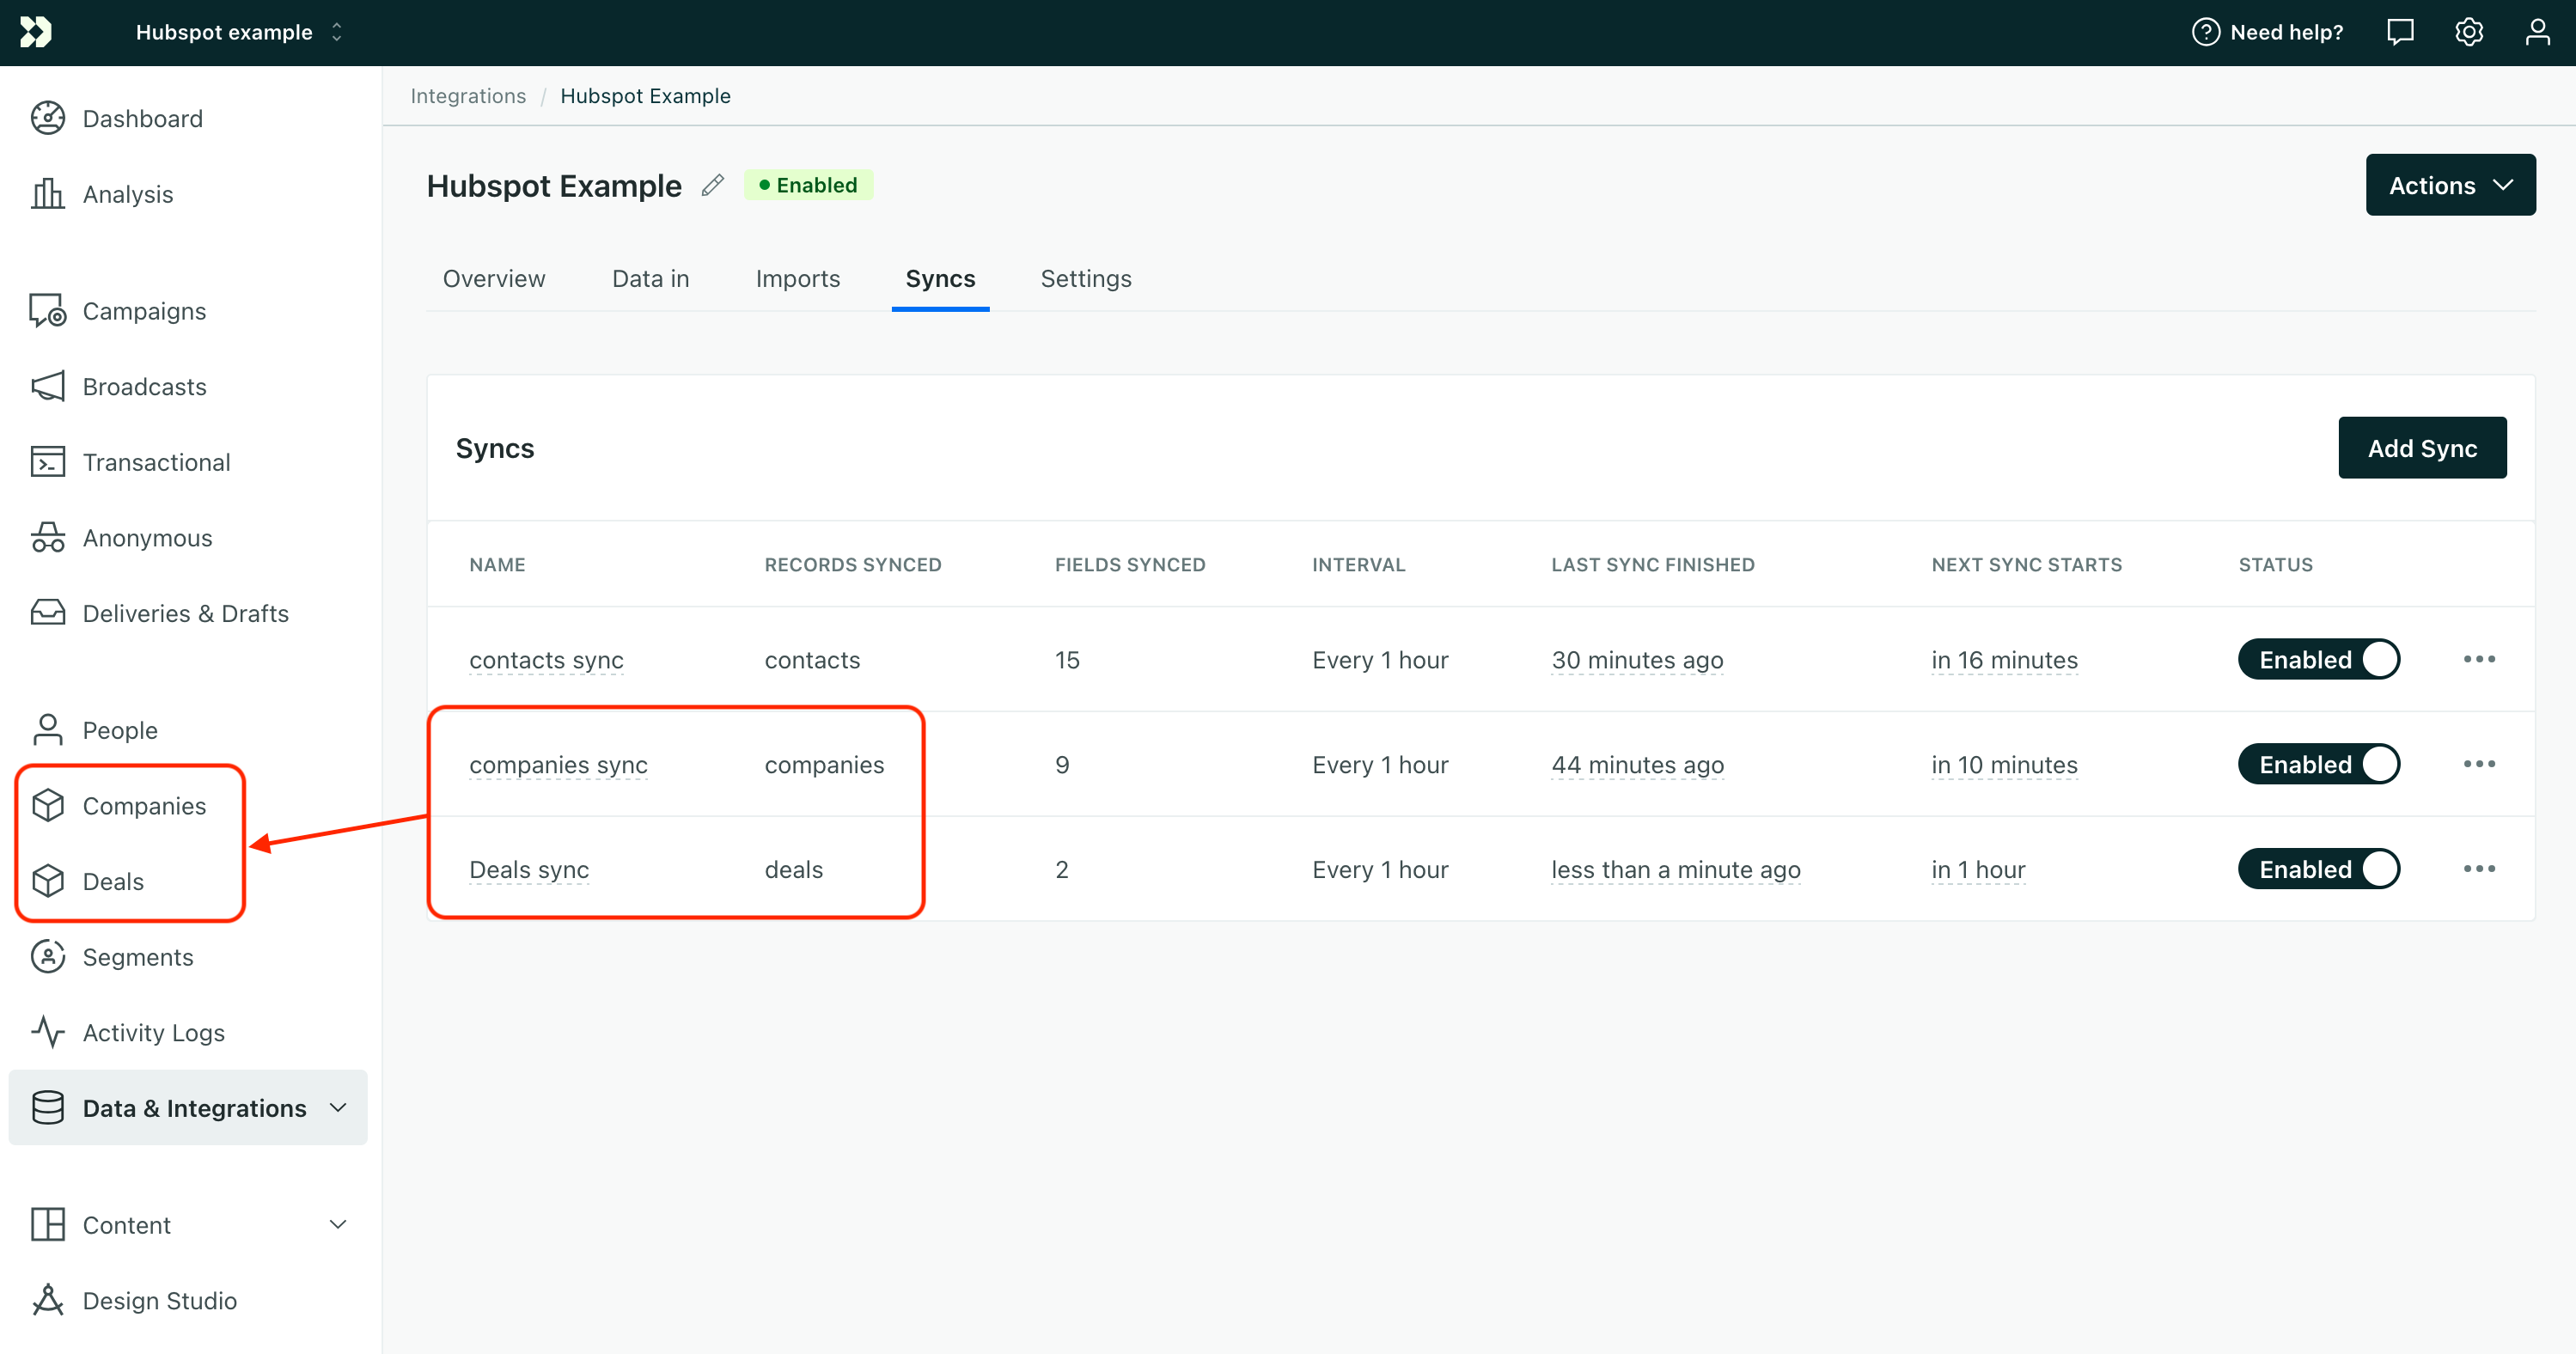
Your integration is now set up and your first sync is running! You can go to your integration’s Syncs tab to see the status of your sync and create more syncs to send other kinds of data from HubSpot into Customer.io.
Set up additional syncs
During the initial setup you created your first sync. Now, you can set up additional syncs to import other kinds of data from HubSpot.
Just go to your HubSpot integration’s Syncs tab and click Add Sync.
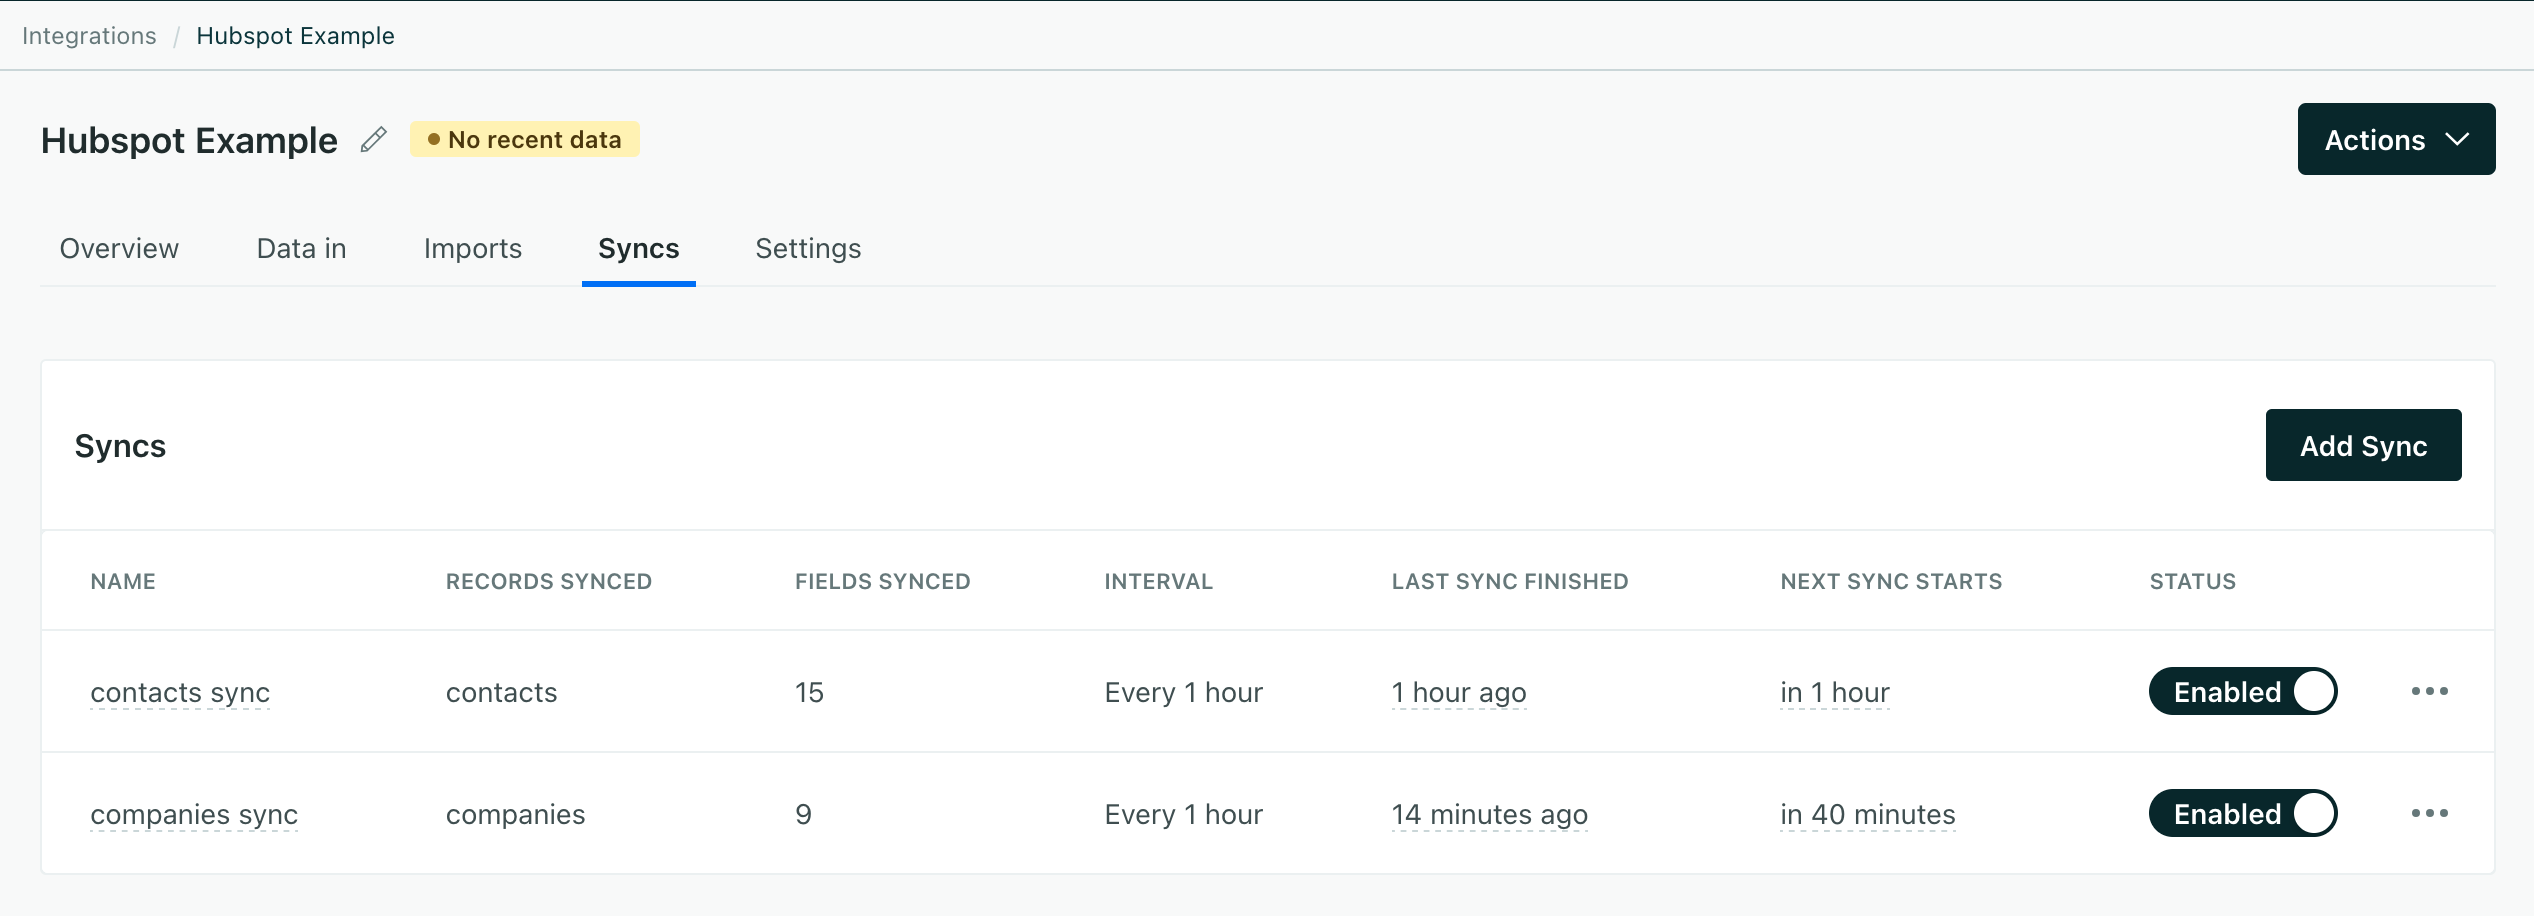
You likely synced your Contacts in your first sync. For other syncs, you’ll probably sync Companies or Deals. You’ll need to perform a few extra steps for these data types. See Syncing Custom Objects for more information.
Don’t try to sync forms or form submissions yet
Syncing custom objects
When you sync non-people data, like Companies or Deals, you’ll use the custom objectsAn object is a non-person entity that you can associate with one or more people—like a company, account, or online course. Data Pipelines format. You need to define your new data type in Customer.io and tell us how to relate it to contacts (or other people) in Customer.io.
You can filter for specific objects you want to sync to Customer.io
If you don’t want to bring all companies, deals, or other kinds of HubSpot data into Customer.io, you can set up filters. For objects, you’ll likely set up an actionA block in a campaign workflow—like a message, delay, or attribute change. where type is group, context.sync.recordType is companies (or whatever data you want to sync) and then the other criteria you want to filter on. See Filter incoming data for more information.
- In the Sync step, select Identifier.
- Determine the Relationship ID: in most cases, this is just the Contacts data type—because contacts represent people in HubSpot. If you’ve changed this value, you’ll need to select the field that represents your People in Customer.io—this could be an
emailaddress or another value.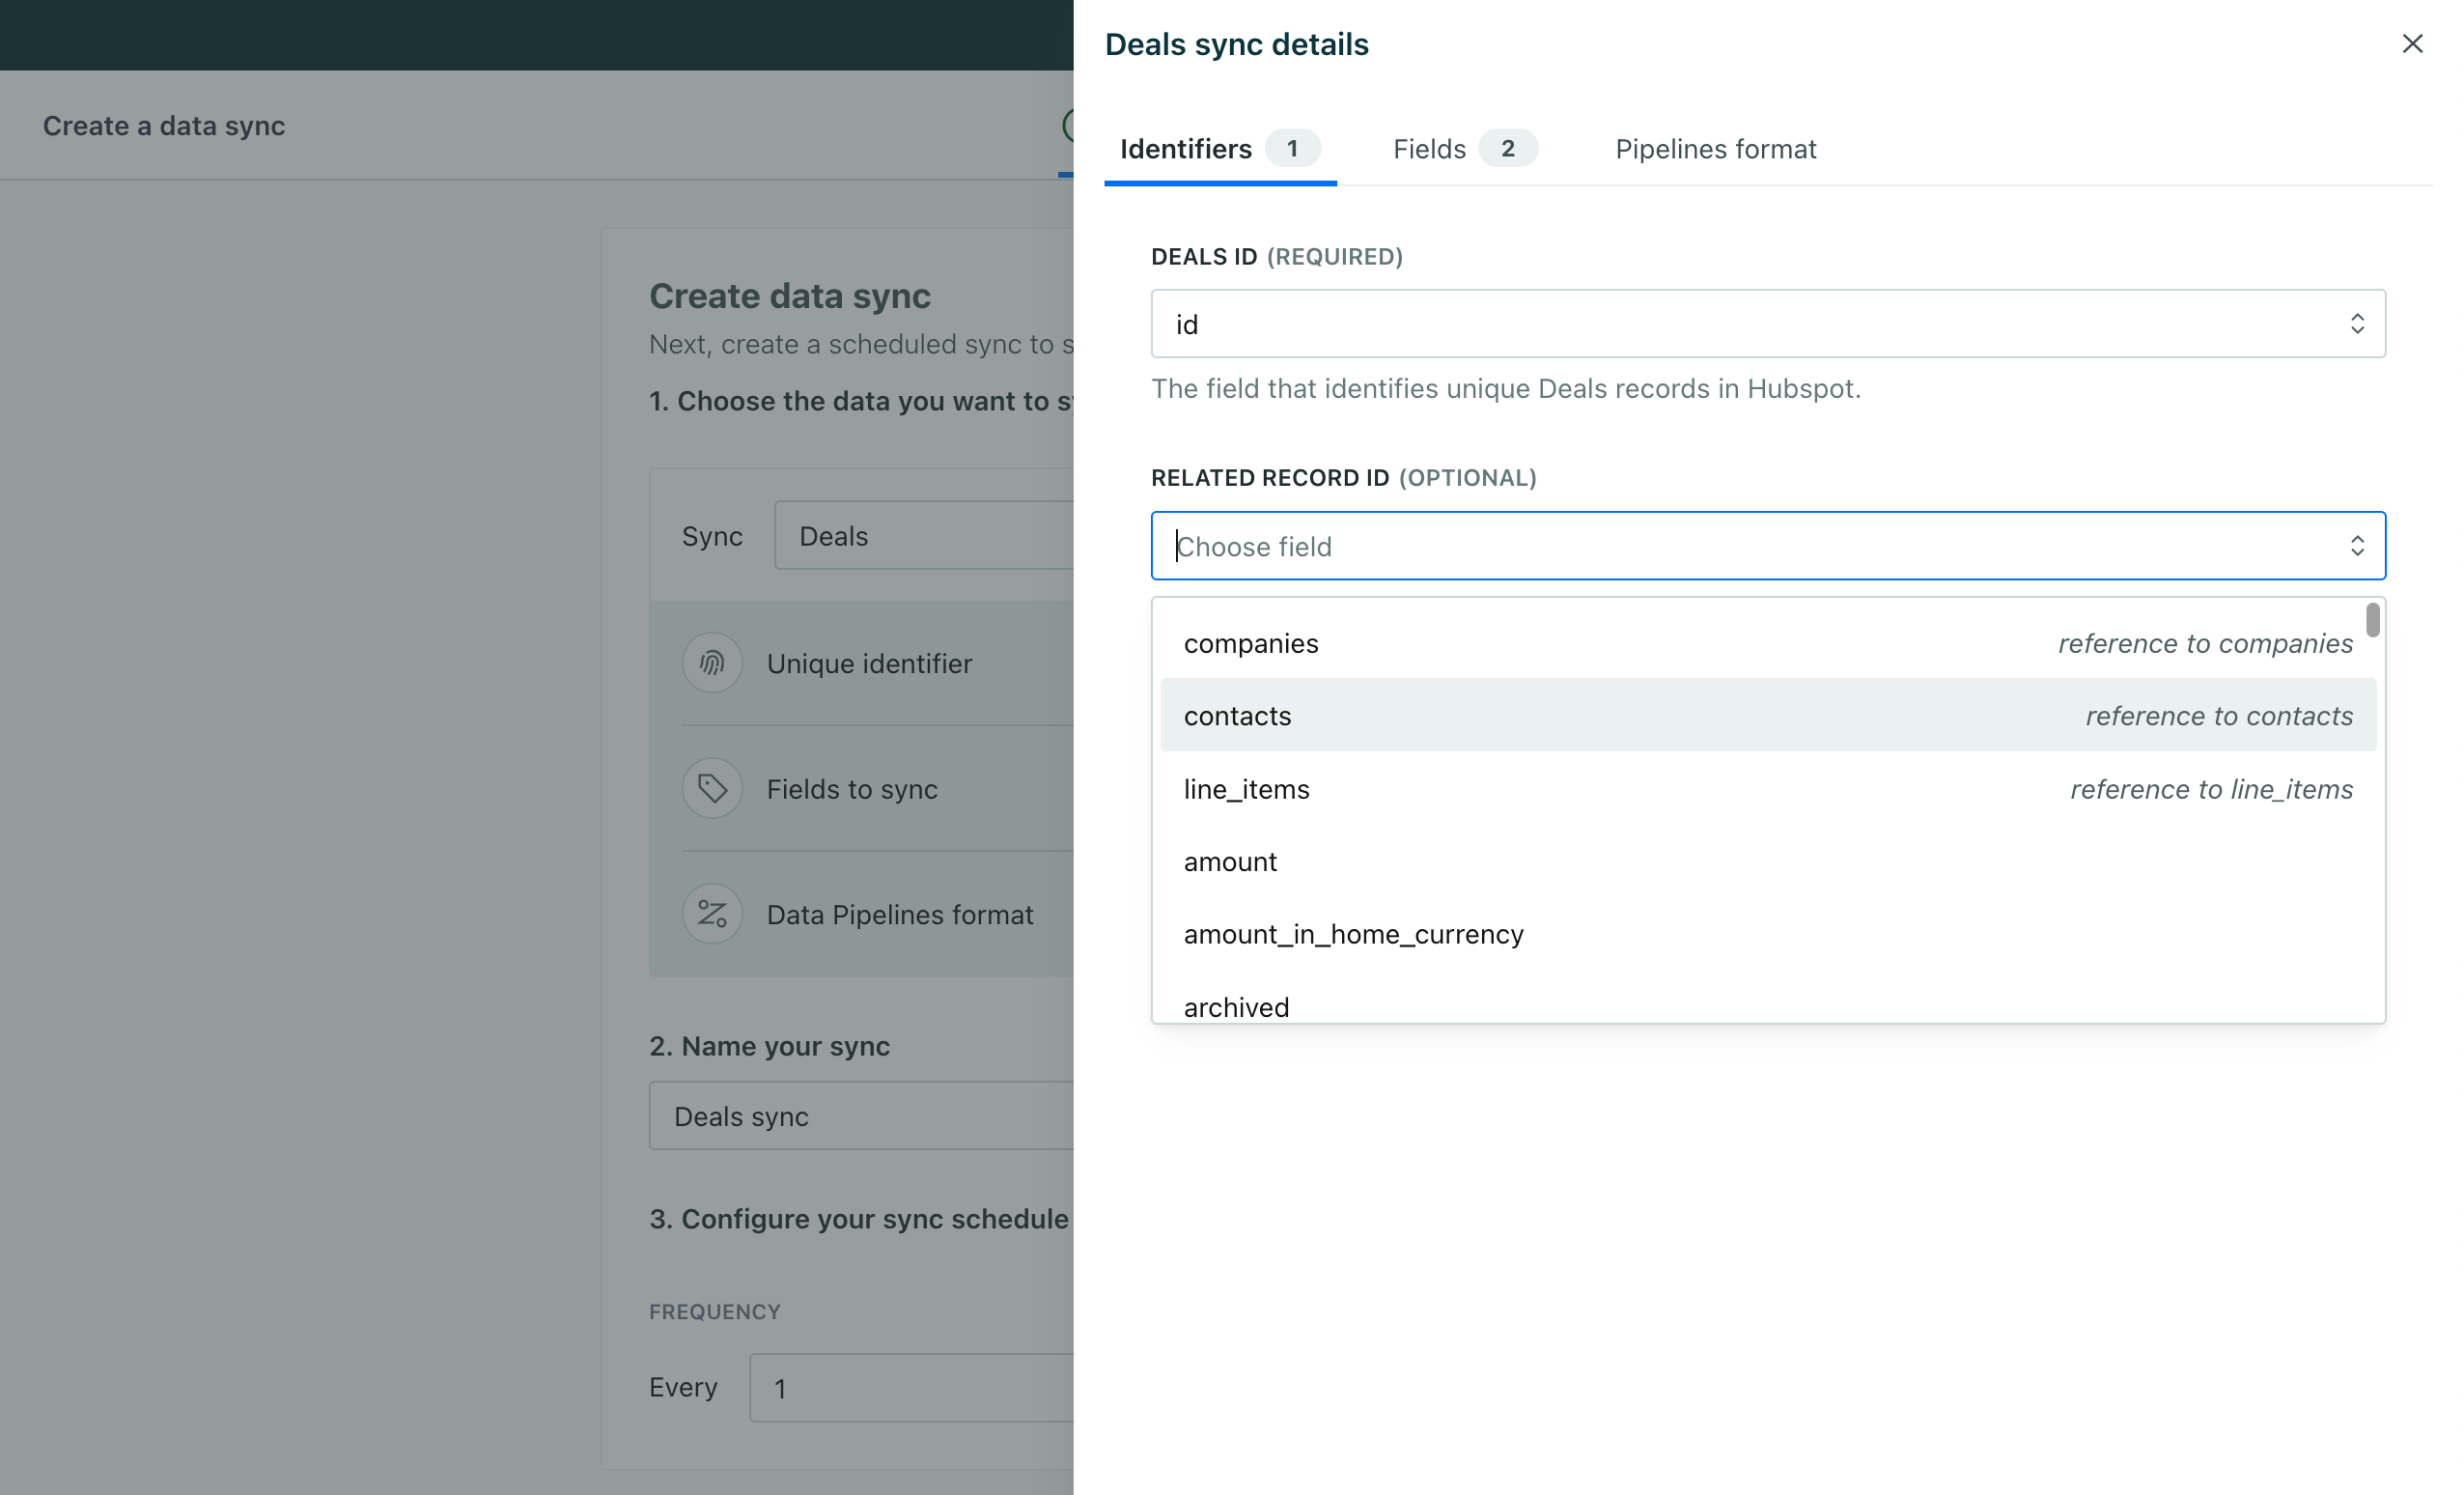
- Select the Fields you want to sync for this data type. These fields are the attributesA key-value pair that you associate with a person or an object—like a person’s name, the date they were created in your workspace, or a company’s billing date etc. Use attributes to target people and personalize messages. associated with your objects in Customer.io. For example, if you sync Companies you might pick fields like the company name, address, and industry.
- Make sure that the Data Pipelines format is set to Custom Object.
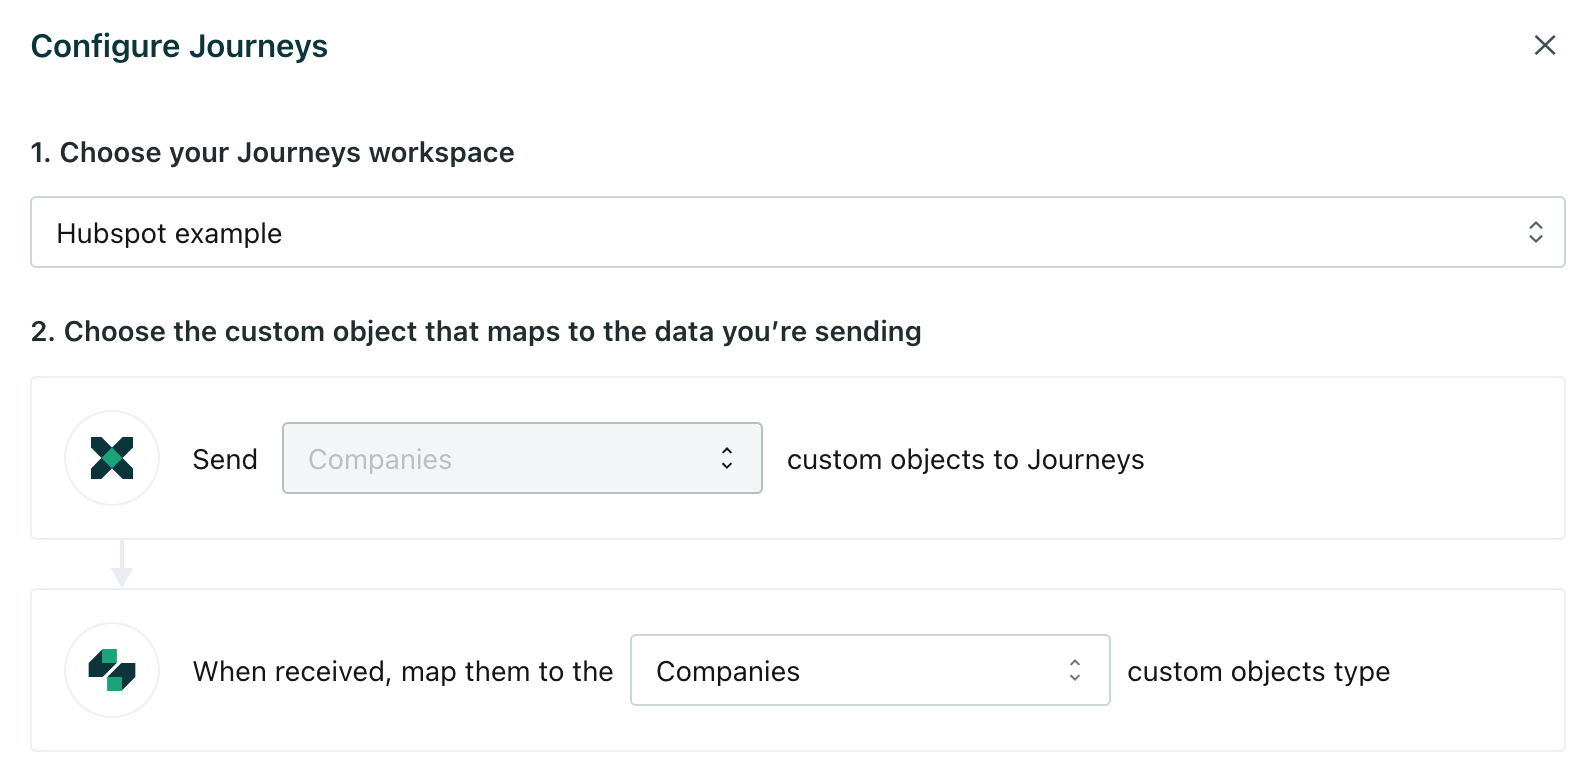
- When you move on to the Destinations step, select Customer.io Journeys.
- Here you’ll select the HubSpot data you want to sync to Customer.io as a custom objectAn object is a non-person entity that you can associate with one or more people—like a company, account, or online course.. If the custom object doesn’t already exist, click New Object Type and set the singular and plural forms—like Company and Companies.
Custom Objects appear in the left-side navigation in Customer.io. If you created a new object as a part of this process, it’ll appear in the navigation when your first sync finishes.
The first sync and subsequent syncs
When you set up a new sync, the first sync interval captures all of the data of the specified type. Subsequent syncs capture records that changed since the previous sync. This means that your first sync may take significantly longer than subsequent syncs, as we pull all your HubSpot data into Customer.io.
For example, when you sync contacts, your first sync will send all of the current contacts in your HubSpot environment. The next sync will gather all changes to contacts—all your new contacts, updates to existing contacts, and deleted contacts—since the previous sync.
Updating syncs
When you update a sync to add or remove fields, your updates take affect at the next sync interval. This means that your changes don’t affect data that you’ve already sent from HubSpot (or any syncs in progress).
For example, if you sync contacts to Customer.io and add the birthday from the sync, the next sync will add birthdays for new contacts but it won’t update your existing contacts—because nothing changed in HubSpot.
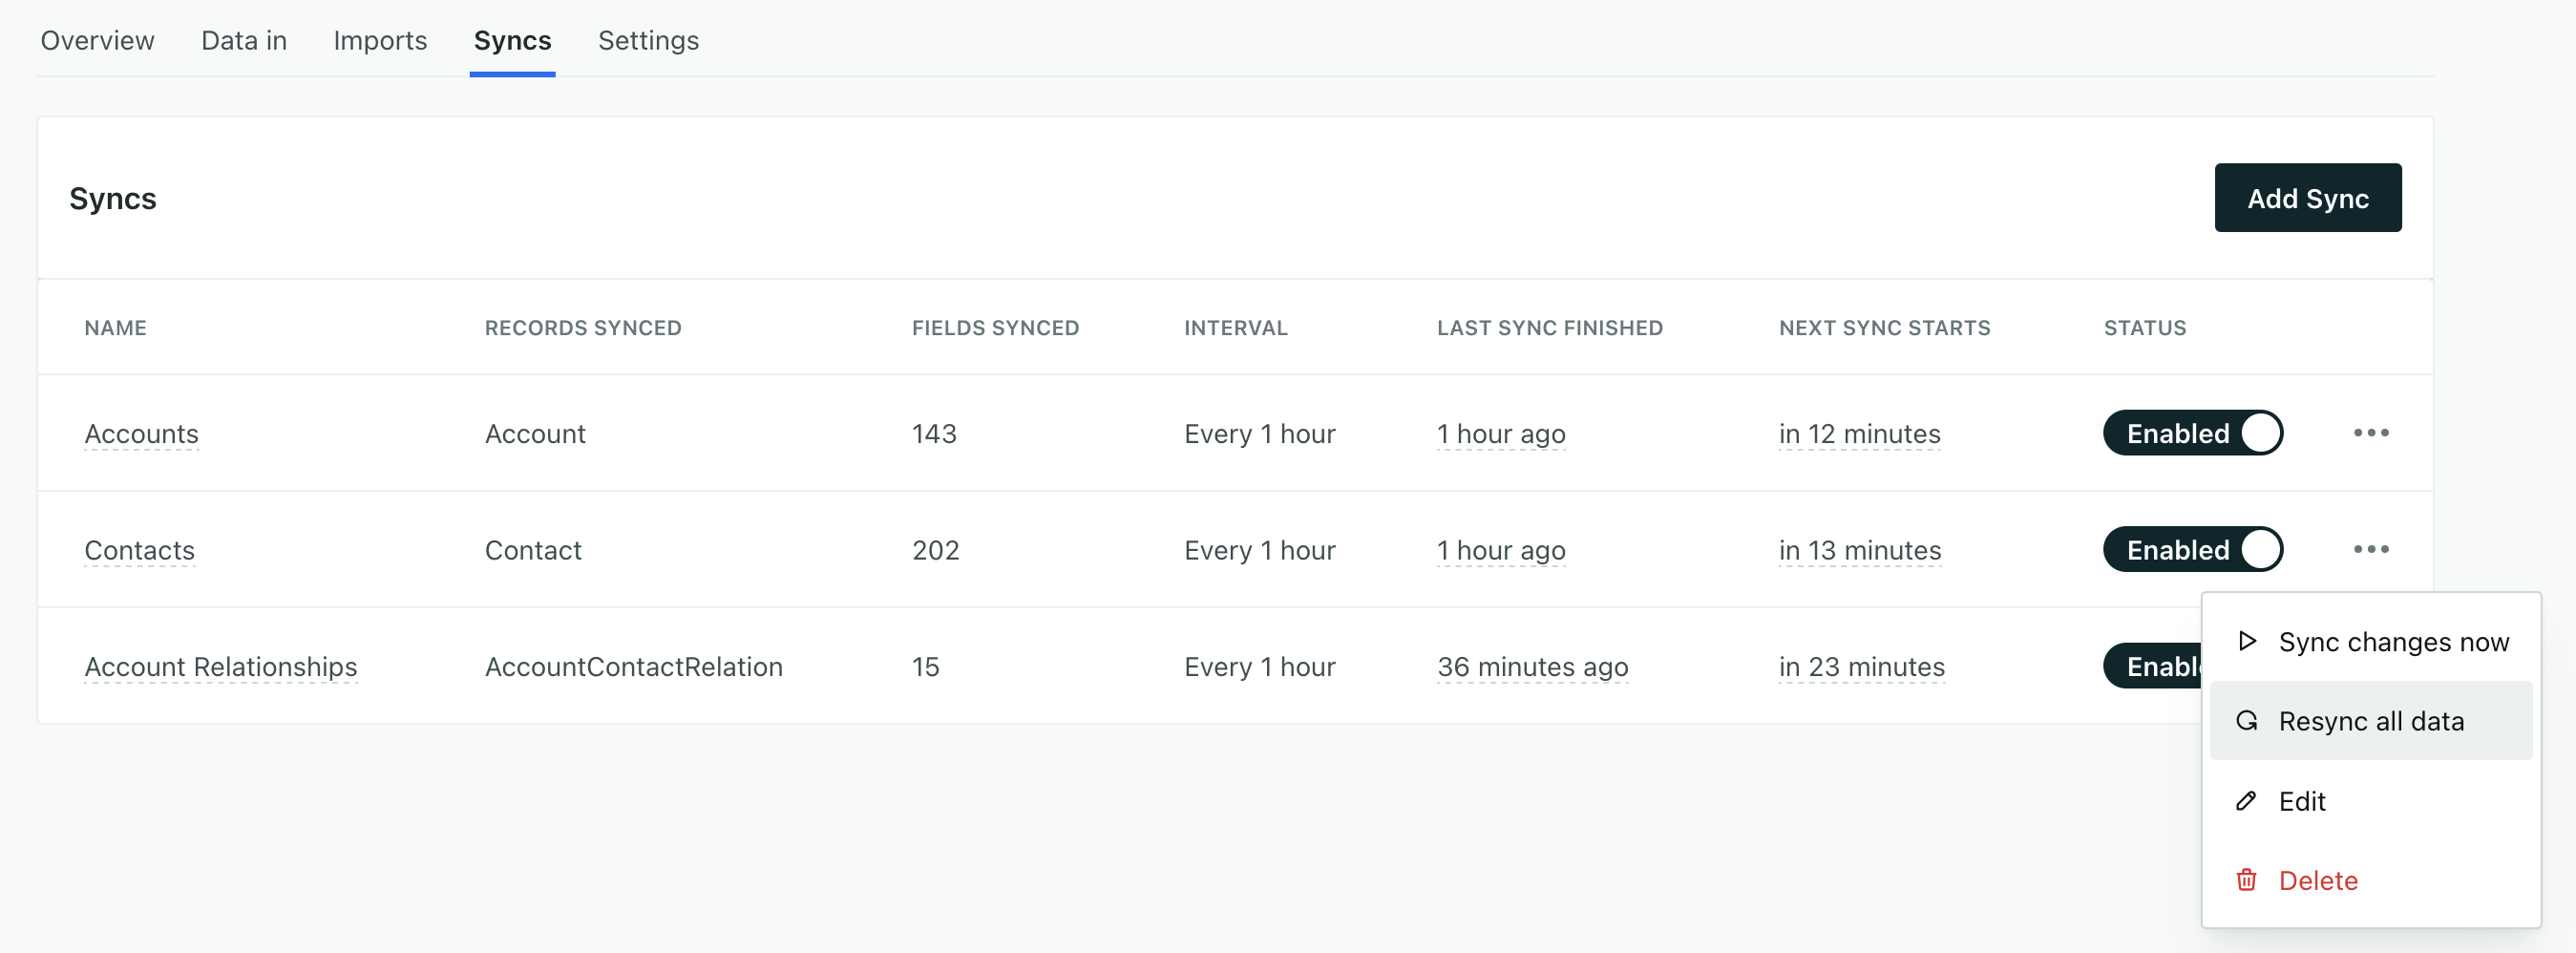
To update all data you’ve passed from HubSpot to Customer.io (and other places you send your HubSpot data to), you can Resync all data. This sends all of your corresponding HubSpot data through Customer.io again, updating all of your records with the changes you made to your sync. You typically only need to do this when you add fields to a sync.
Following our birthday example above, if you use the Resync all data option, we’ll set the birthday attribute for all HubSpot contacts synced to Customer.io—both new contacts and contacts that have already been synced from HubSpot.
We’ll present this option whenever you update a sync. You can also manually resync your data by going to the Syncs tab, clicking next to the sync you updated, and then clicking Resync all data.
Resyncing doesn’t remove existing data from Customer.io
birthday field from a sync, resyncing won’t remove the birthday attribute from contacts that have already been synced from HubSpot.
