Understanding Reverse ETL integrations
UpdatedHow it works
Our data warehouse and database “reverse ETL” (Extract, Transform, Load) integrations extract data from a data warehouse so you can take advantage of your data in Customer.io and other services downstream. These integrations help you leverage your big data storage in Customer.io. For example, you might write a query representing track events so you can sync records from Snowflake to Mixpanel.
When you set up a reverse ETL integration, you’ll set up one or more syncs. This is the kind of API call you want to transform your data into (like track, identify, etc) and the query that returns the data you want to use in Customer.io. Each row returned from the query represents an API method.
You’ll have to create a sync for each kind of method or data you want to use in Customer.io or other integrations. We run your query on an interval, and expose a last_sync_time value that you can use to make sure that you only sync data that changed since the previous sync interval.
Add a reverse ETL or database integration
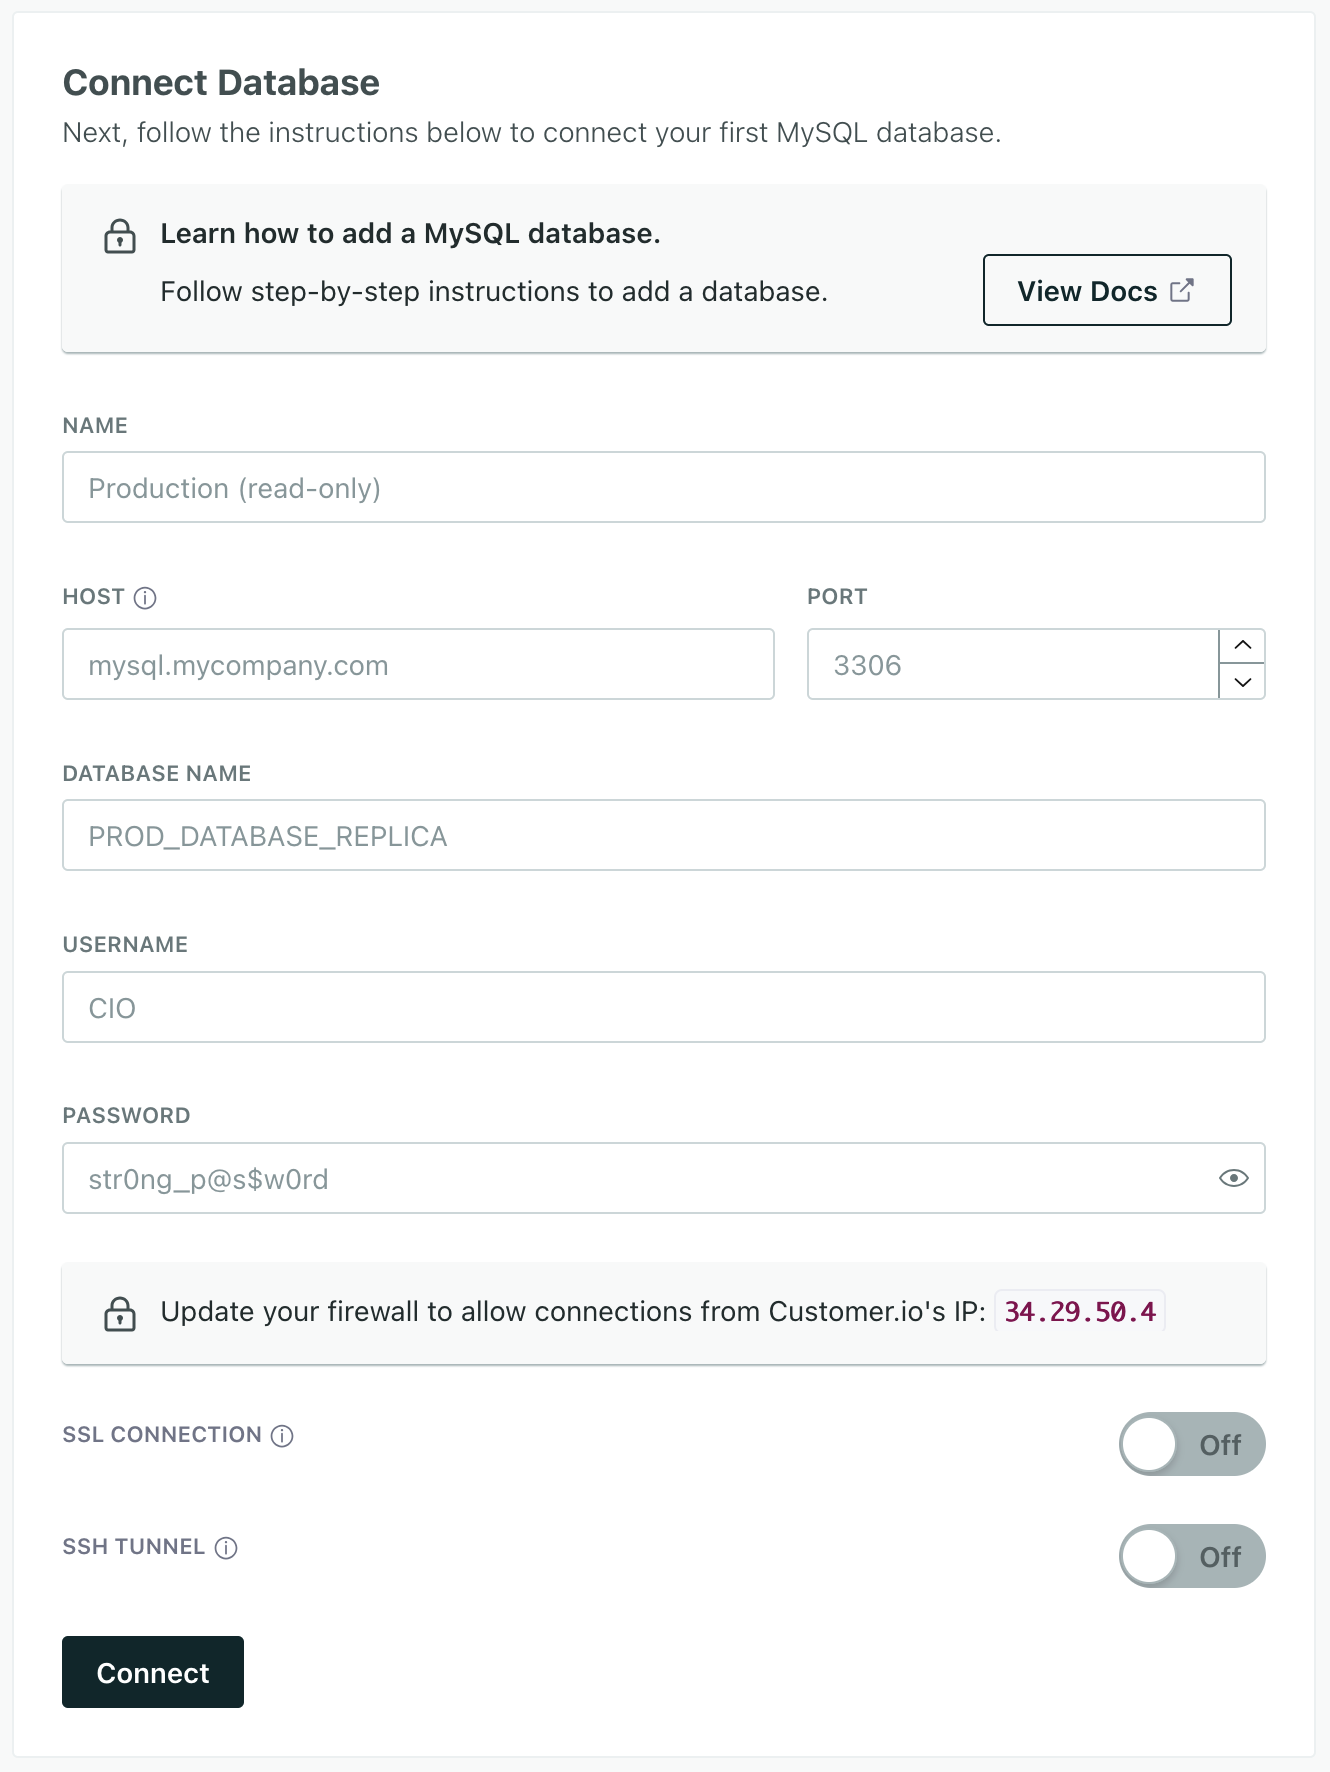
Before you add an integration, we suggest that you set up a service account or create a user account specifically for Customer.io with read-only access to the tables you want to sync. This helps you ensure the security of your data, and gives you a way to revoke access if you need to.
Your database or storage bucket must allow connections from the following IP addresses. If our IP addresses are blocked, we won’t be able to connect to your database.
| Account region | IP Addresses |
|---|---|
| US | 34.29.50.4, 35.222.130.209 |
| EU | 34.22.168.136, 34.78.194.61 |
- Go to Data & Integrations > Integrations and make sure you’re in the Directory tab.
- Find and select your Data Warehouse or Database. Make sure it says Data In; we offer some data-out integrations for these same data warehouses and databases!
- Give your database a name and connect your database to Customer.io
- Set up a Sync. A sync is the type of data (
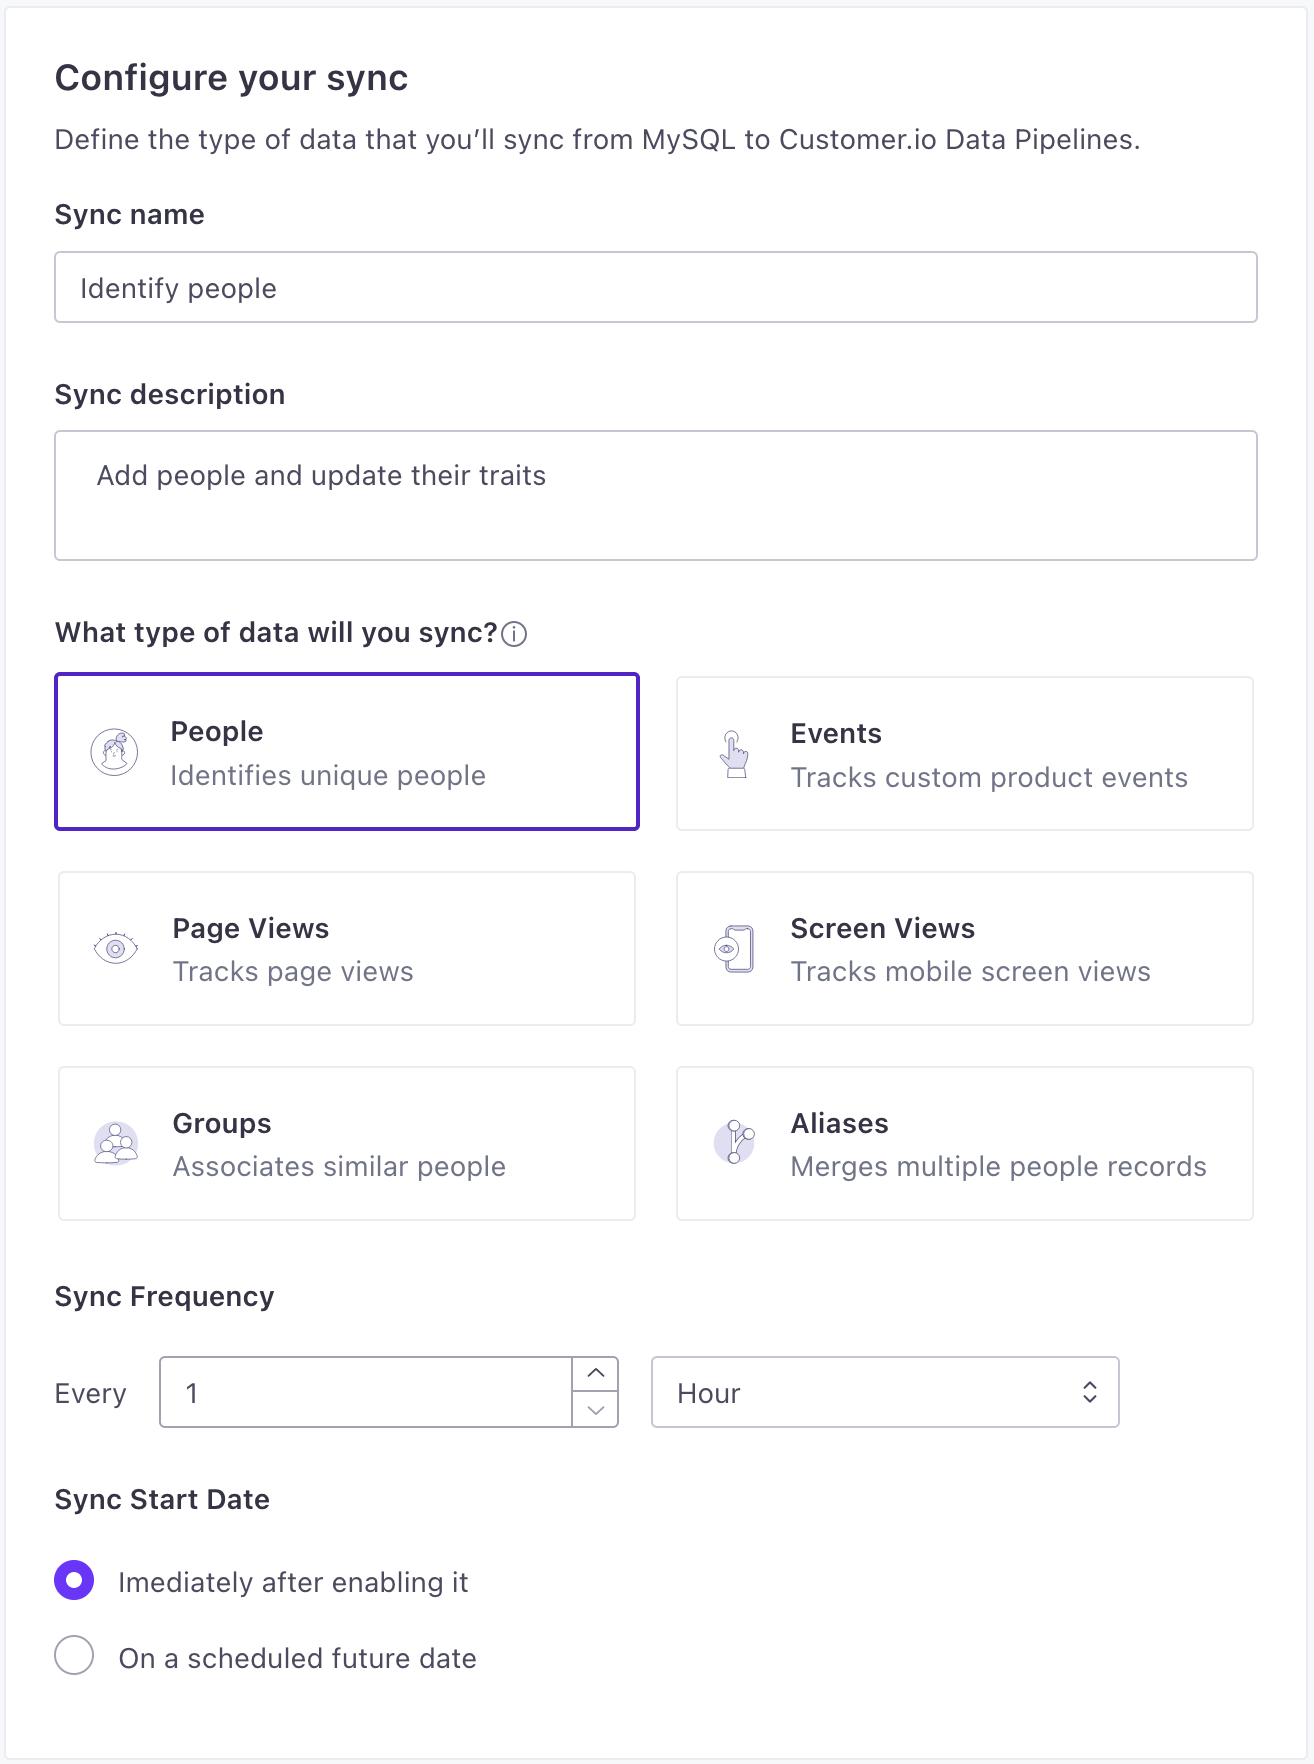
identify,track, etc) you want to import from your database and click Next: Define Query. You can set up syncs for each type of data you want to import.- Provide a Name and Description for the sync. This helps you understand the sync at a glance when you look at your integration’s Overview later.
- Select the type of data you want to import.
- Set the Sync Frequency, indicating how often you want to query your database for new data. You should set the frequency such that sync operations don’t overlap. Learn more about sync frequency.
- Select when you want to start the sync: whether you want to begin importing data immediately, or schedule the sync to start at a later date.
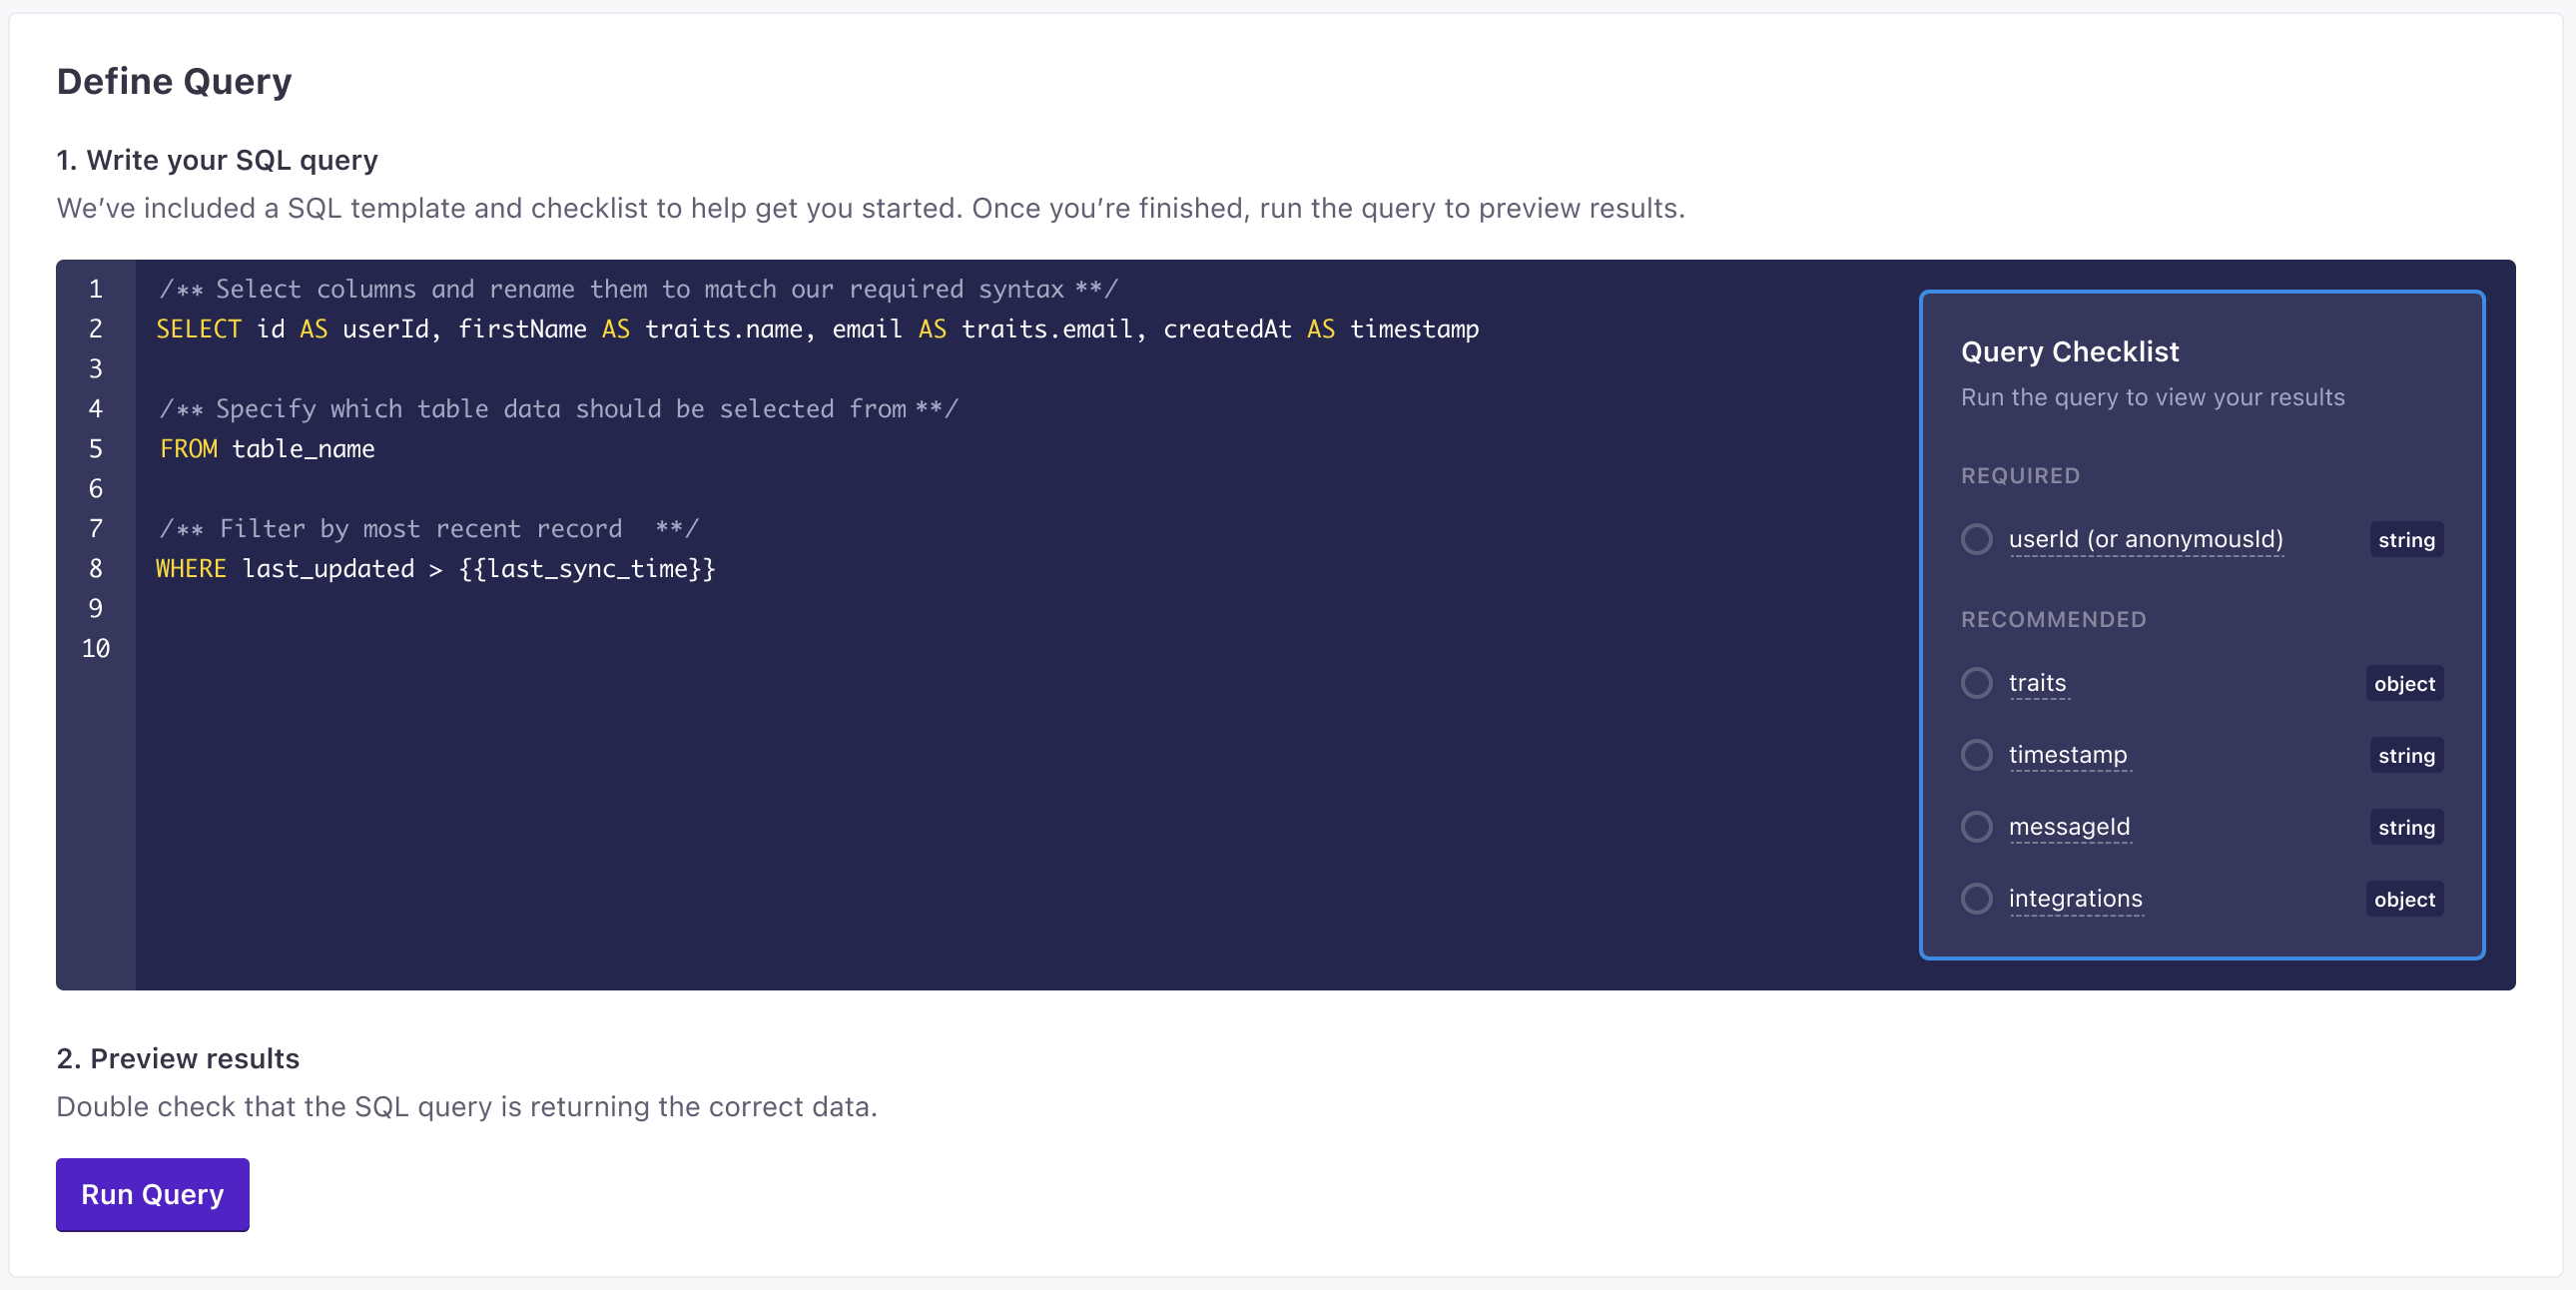
- Enter the query that selects the data you want to import. Click Run Query to preview results and make sure that your query selects the right information.
- Click Enable to enable your sync.
Now you can connect your database to places outside of Customer.io.
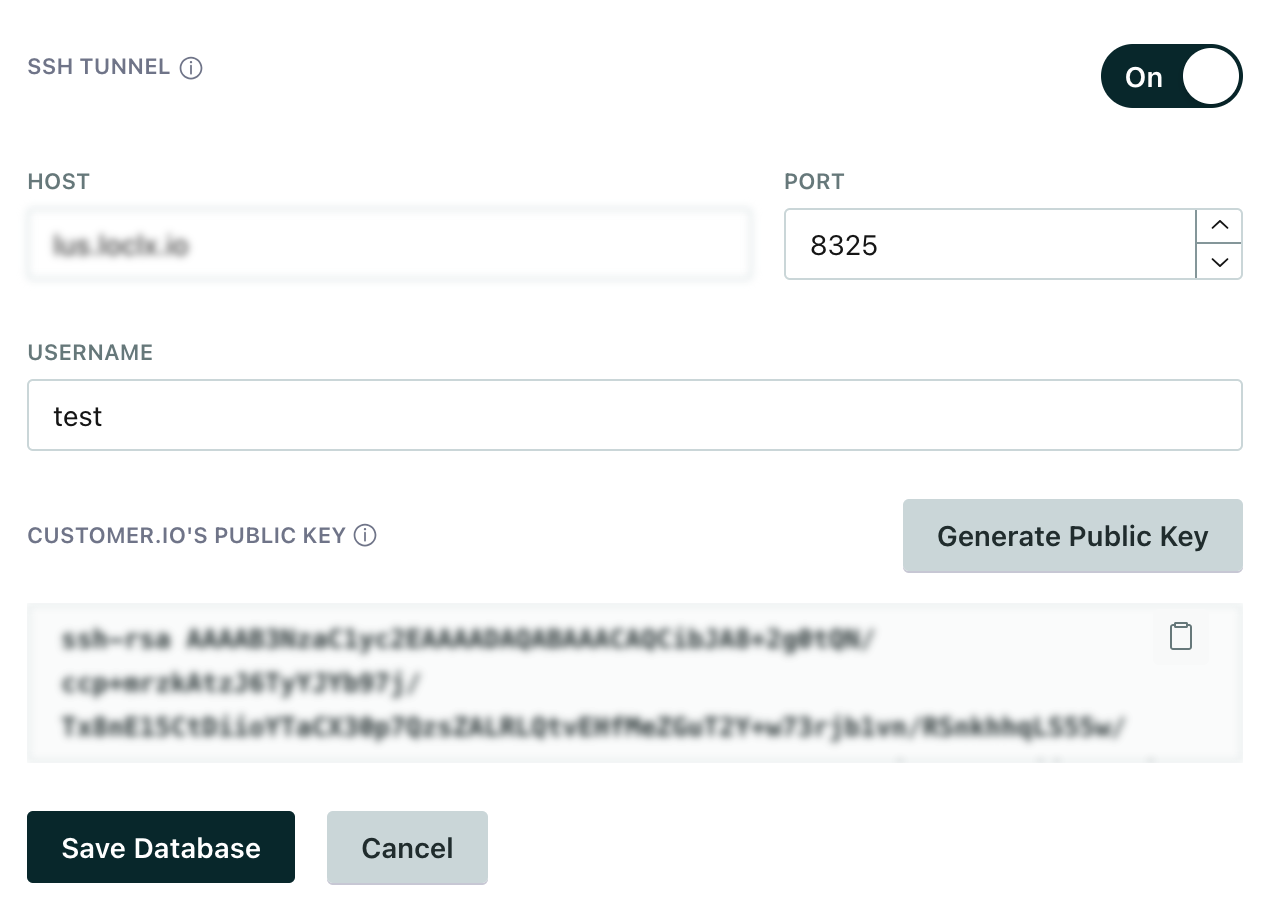
SSH Tunneling
For added security, we support SSH tunnelling for our MySQL, PostgreSQL, and Microsoft SQL Server integrations.
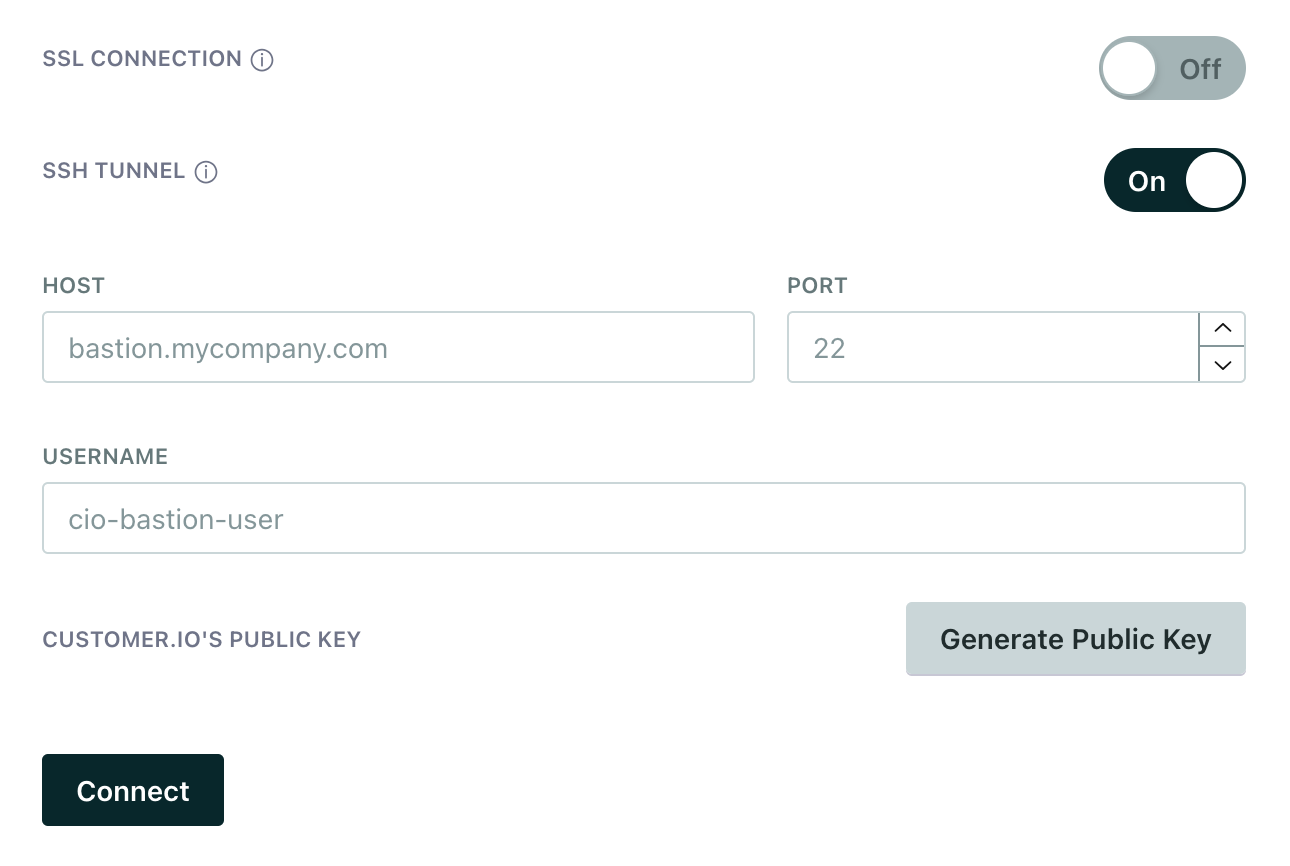
To set up your tunnel, you’ll generate a public key when you add your database:
- Enable SSH tunneling.
- Provide the hostname and port of your SSH server.
- Click Generate Public Key to generate a public key for your SSH server.
- Copy the public key to your SSH server and click Connect.
Rotating SSH Keys
You can return to your integration and generate a new public key for your SSH server at any time.
- Go to Data & Integrations > Integrations and select your database in the Connections tab.
- Go to the Databases tab and click the settings icon and go to Edit.
- Click Generate Public Key to generate a new public key and copy the key to your SSH server to continue connecting to your database.
We won’t save or use the key until you click Save Database, and we won’t let you save your changes until your database connection is active with the new key.
Add additional sync models
A sync defines the type of call you want to make to Customer.io. Your query that returns the data you want to capture on every interval. Each row returned from the query represents an individual API call.
After you set up your integration, you can add subsequent syncs to extract and transform data into additional calls by going to the Sync tab for your integration and clicking Add sync.
Last sync time: sync only the records you want
We expose a last_sync_time variable that you should use in your query to sync only the records that have changed since the last sync. This helps you avoid syncing the same records over and over again—which can cause each query to take longer, risk sending duplicate information into Customer.io or other places.
We strongly recommend that you index a column in your database representing the date-time each row was last-updated. When you write your query, you should add a WHERE clause comparing your “last updated” column to the {{last_sync_time}}.
The last sync time is a Unix timestamp representing the date-time when the previous sync started. The first time you sync, {{last_sync_time}} will be 0, so you’ll sync all records. After that, you’ll only sync records that have changed since the last sync.
SELECT id AS userId, email, first_name, created AS created_at
FROM my_people
WHERE UNIX_TIMESTAMP(last_updated) > {{last_sync_time}}
Update existing profiles without creating new ones
By default, identify requests create new people in Customer.io for any userId that doesn’t already exist. If you want to update existing profiles without adding new ones, you can use the _update parameter in your query.
SELECT
  userId,
  email,
  someAttribute,
  true AS '_update'
FROM
  peopleTable
WHERE
  updatedAt > {{last_sync_time}}
Reserved properties and traits
We automatically treat values that aren’t reserved by our API calls as traits or event properties depending on the type of call you send, so you don’t have to force your query to return data exactly in the shape our API expects. For example, if you want to set the email trait, you can return user.email AS email.
For identify or group data, any property other than the following goes in the traits object: userId, anonymousId, groupId, integrations, messageId, timestamp, context.
For track, page, and screen data, any property other than the following goes in the properties object: userId, anonymousId, event, integrations, messageId, timestamp, context.
These fields correspond to the common fields that we reserve in each API call, and extend to children of these reserved fields. For example, context.ip is also reserved. Learn more about common fields in our APIs.
Nested traits, properties, and relationship attributes
When you set up a sync, you’re essentially propagating the result of a SELECT query to the Pipelines API. Some properties or attributes require you to nest data. Or you might simply want to nest properties based on how you expect them in Customer.io.
Some reverse ETL integrations support dot notation, like SELECT product AS 'cart.product_name'. But some, like BigQuery, don’t. You can support nested items in a platform-agnostic syntax using JSON_OBJECT. This lets you build an object from items in your query by alternating keys and values in order, e.g. key, value, key, value.
For example, if you relate someone to a company (a custom objectAn object is a non-person entity that you can associate with one or more people—like a company, account, or online course.), and you want to set attributes for the relationship, you’d nest them inside a traits.relationshipAttributes object. But BigQuery doesn’t support dot notation, so here’s how you’d do that:
SELECT
   id as groupId,
   name,
   json_object(
      'job_title', job_title,
      'primary_contact', primary_contact
   ) as relationshipAttributes
You may need to do the same for other objects, like device context, relationship attributes, and so on. See our API documentation for more information about the structure of our payloads and properties you might need to pass as objects.
Sync Frequency
You can sync data as often as every minute. However, we recommend that you set your sync frequency such that sync operations don’t overlap. If you schedule syncs such that a sync operation is scheduled to start while the previous operation is still we’ll skip the next sync operation.
Enable and disable syncs
In your integration, you can go into the Syncs tab to enable and disable syncs. You can also delete syncs from this tab.
When you disable a sync, we stop running the associated query and sending the type of data to the places you’ve connected your integration to—including Customer.io. We don’t delete the sync, so you can re-enable it later.
When you enable a sync, we’ll resume the sync. The next sync interval will send all data that has changed since the last sync.

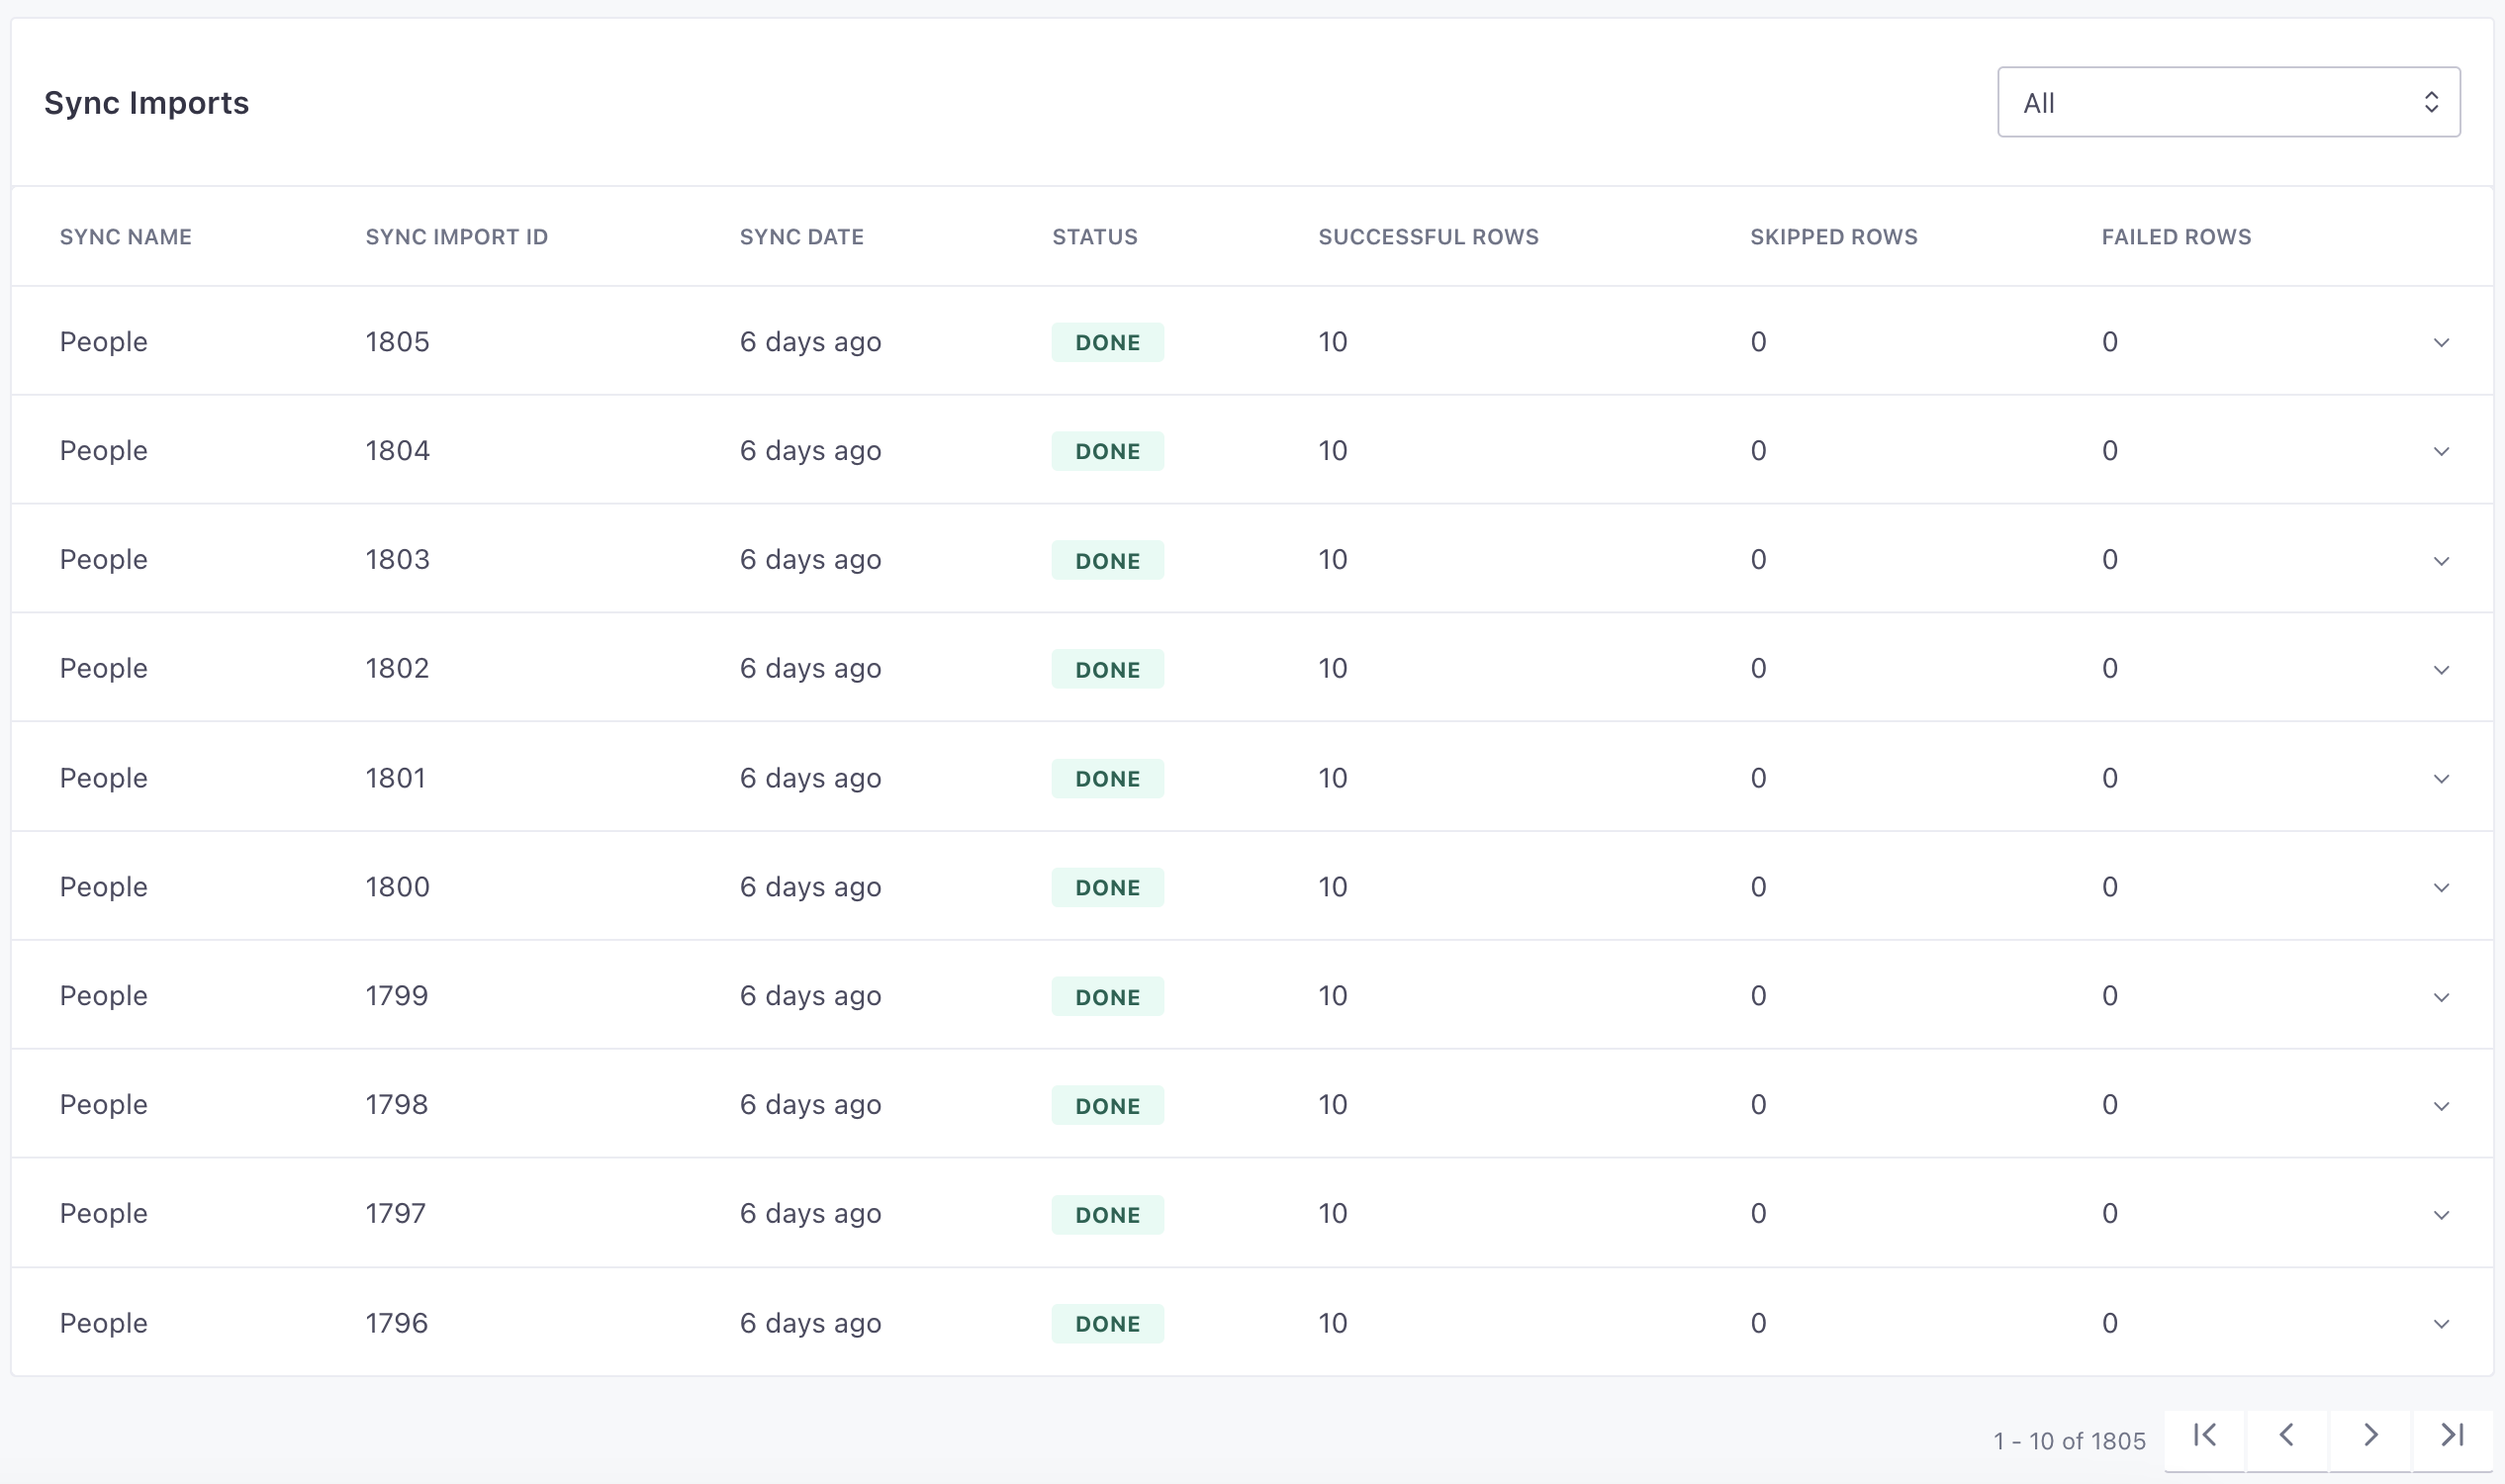
Errors and sync history
In the Imports tab for your integration, we display a row for each sync interval showing the number of successful and unsuccessful rows—where each row represents an individual operation (like an identify call or a track call). You can click a sync to see errors. Typically errors occur when a row is either missing data or contains data that doesn’t map to the appropriate source call type.
If a sync has errors, the row also includes a Download button, so you can download a list of errors.
You can also go to the Syncs tab to see the status of your syncs, how often they run, and their last run time. You might use this tab to see if your syncs complete on time or if you need to decrease the frequency of syncs.
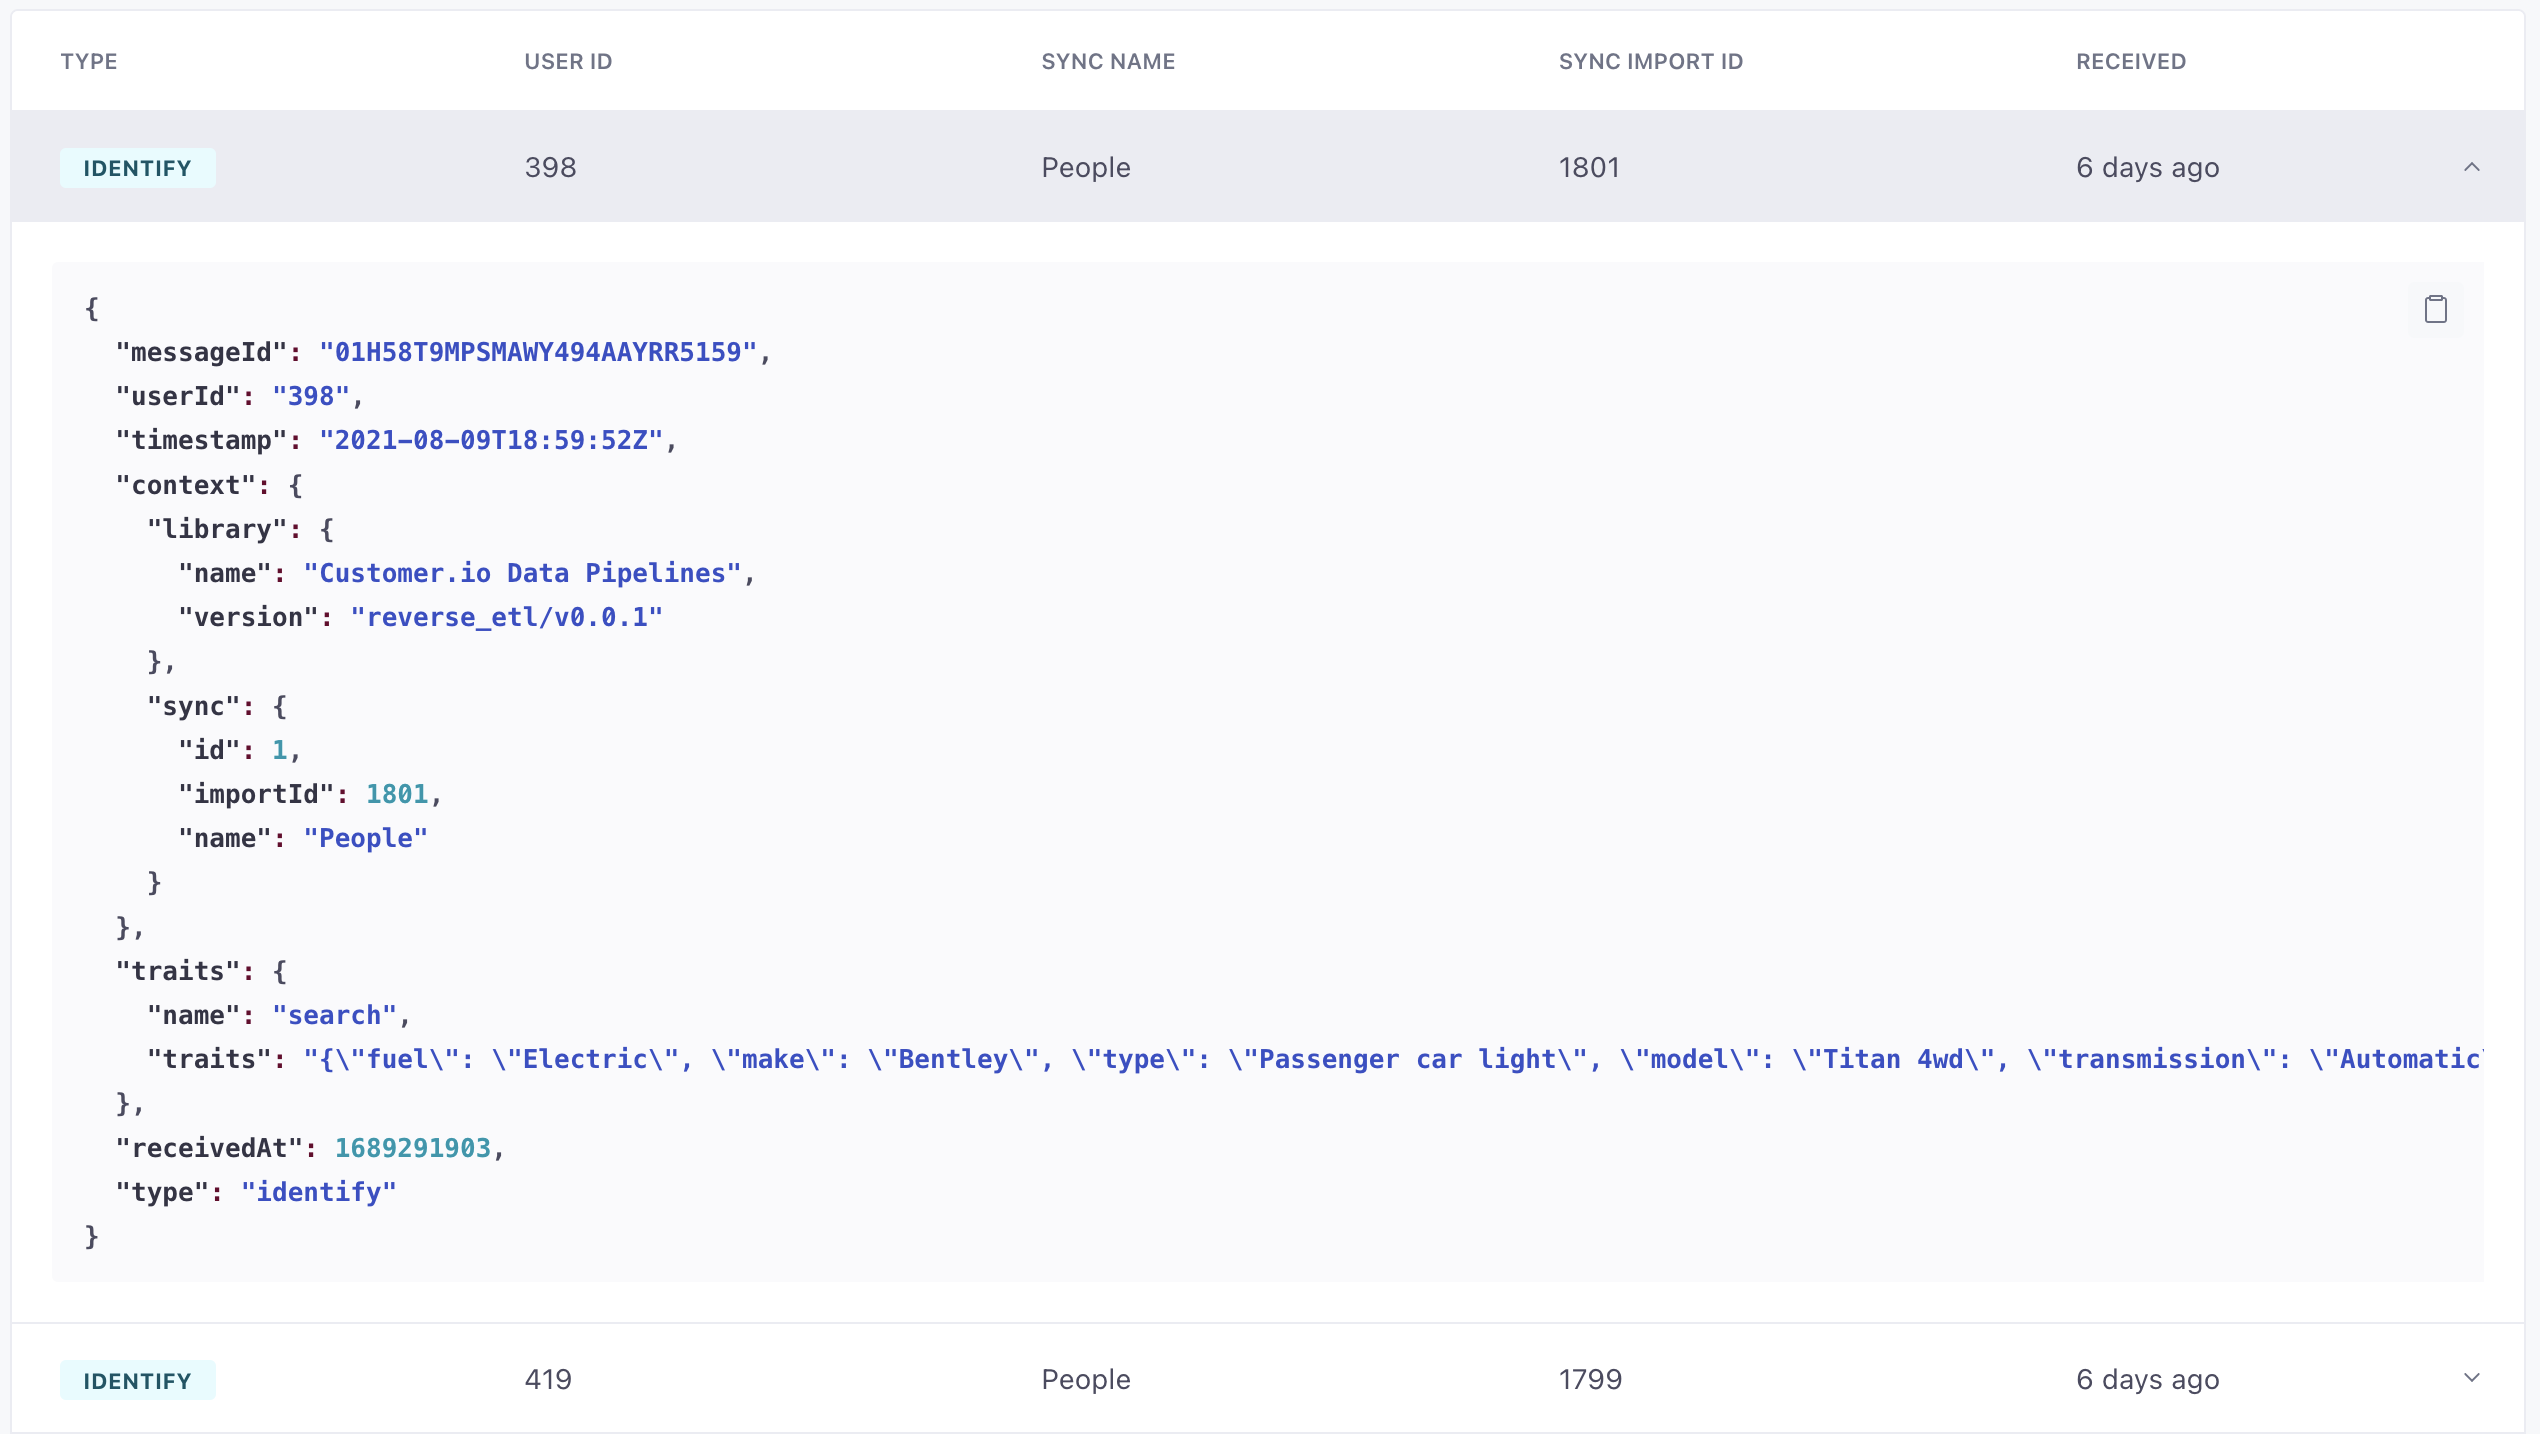
The Data In tab also shows successful source calls. You can use this to see exactly how your rows map to source calls.
Missing rows
Missing rows are often due to the value you compare to last_sync_time.
SELECT id AS userId, email, first_name, created AS created_at, message_id AS messageId
FROM my_people
WHERE UNIX_TIMESTAMP(last_updated) > {{last_sync_time}}
If you can, update last_updated based on when your syncs start. If you can’t do this, you’ll need to change your query. For example, you could query for results beginning 5 minutes before the previous sync to give yourself a buffer and make sure that your query doesn’t miss results you want to sync:
WHERE UNIX_SECONDS(last_updated) >= {{last_sync_time}} - 300
If you query for results beginning some amount of time before the previous sync, you should also update your query to capture (or generate a) messageId. This is a string field that we use to prevent duplicate entries. We accept the first instance of any given event with a given messageId and ignore any duplicate events with the same messageId. If your “time-buffered query” includes events with the same messageId as an event in a previous sync, we’ll ignore the duplicates.
If you backdate events, you’ll need to deduplicate them before you send them to Customer.io. We deduplicate the messageId for 12 hours after we receive the operation—not the timestamp on the event itself.
Sync query limits
| Name | Details | Limit |
|---|---|---|
| Maximum query length | The maximum length allowed for any query. | 131,072 characters |
userId column name length | The maximum length allowed for the userId column name. | 191 characters |
| timestamp column name length | The maximum length for the timestamp column name. | 191 characters |
| Sync frequency | The shortest possible duration between syncs. | 1 minutes |
Result limits
A sync cannot return more than 40 million records and 300 total columns.
| Name | Details | Limit |
|---|---|---|
| Record count | The maximum number of records a single sync will process. Note: This is the number of records extracted from the warehouse not the limit for the number of records loaded to the integration (for example, new/update/deleted). | 30 million records |
| Column count | The maximum number of columns a single sync will process. | 512 columns |
| Column name length | The maximum length of a record column. | 128 characters |
| Record JSON size | The maximum size for a record when converted to JSON (some of this limit is used by Customer.io). | 512 KiB |
| Column JSON size | The maximum size of any single column value. | 128 KiB |

