Inline in-app messages
UpdatedInline in-app messages help you send dynamic content into your app. The messages can look and feel like a part of your app, but provide fresh and timely content without requiring app updates.
How it works
An inline message targets a specific view in your app. Basically, you’ll create an empty placeholder view in your app’s UI, and we’ll fill it with the content of your message.
This makes it easy to show dynamic content in your app without development effort. You don’t need to force an update every time you want to talk to your audience. And, unlike push notifications, banners, toasts, and so on, in-line messages can look like natural parts of your app.
1. Add View to your app UI to support inline messages
Add an inline view to your app’s UI
You’ll add a UI element to your app’s UI code to support inline messages using SwiftUI, Storyboard, Interface Builder, or UIKit via code.
We’ve set up examples in our UIKit and SwiftUI sample apps that might help if you want to see a real-world implementation of this feature.
Storyboard
Open your storyboard file and drag a
UIViewonto your view controller.Set the class of the
UIViewtoInlineMessageUIViewin the Identity Inspector.Setup layout constraints: you’re responsible for setting the width and the leading, top, trailing, and bottom constraints for the view. See view layout for more information.
In your
ViewController, set theelementIdfor theInlineMessageUIView. This is the ID you’ll use in the Customer.io UI when you want to send an in-app message.import CioMessagingInApp @IBOutlet weak var inlineInAppView: InlineMessageUIView! override func viewDidLoad() { super.viewDidLoad() // Replace <element-id-here> with an ID that makes sense to you. // You'll use this ID when you build an in-app message in Customer.io. inlineInAppView.elementId = "<element-id-here>" }
UIKit Swift
Create an instance of
InlineMessageUIViewand add it to your view hierarchy.import CioMessagingInApp override func viewDidLoad() { super.viewDidLoad() // Replace <element-id-here> with an ID that makes sense to you. // You'll use this ID when you build an in-app message in Customer.io. let inlineMessage = InlineMessageUIView(elementId: "<element-id-here>") }Setup layout constraints: you’re responsible for setting the width and the leading, top, trailing, and bottom constraints for the view. See view layout for more information.
SwiftUI
Create an instance of InlineMessage and add it to your view hierarchy. You shouldn’t set a height on your View to avoid breaking functionality. InlineMessage automatically updates the height for you when messages load and are interacted with.
import SwiftUI
import CioMessagingInApp

struct MyScreen: View {
    var body: some View {
        // Replace <element-id-here> with an ID that makes sense to you.
        // You'll use this ID when you build an in-app message in Customer.io.
        InlineMessage(elementId: "<element-id-here>")
        // Note: Avoid setting a hard-coded height on the View to avoid breaking functionality.
        // The InlineMessage dynamically changes it's height when messages are loaded and interacted with.
        // .frame()
    }
}
UIKit: Setup layout constraints for your message
InlineMessageUIView uses AutoLayout and modifies its own height. But otherwise, you’ll need to set up layout constraints for the view including the width and the leading, top, trailing, and bottom constraints for the view.
You can create a height constraint, but it won’t matter because we modify it at runtime. You may still want to set a height if you use Storyboard because XCode will throw warnings and errors if you don’t set a height.
2. Build and send your message!
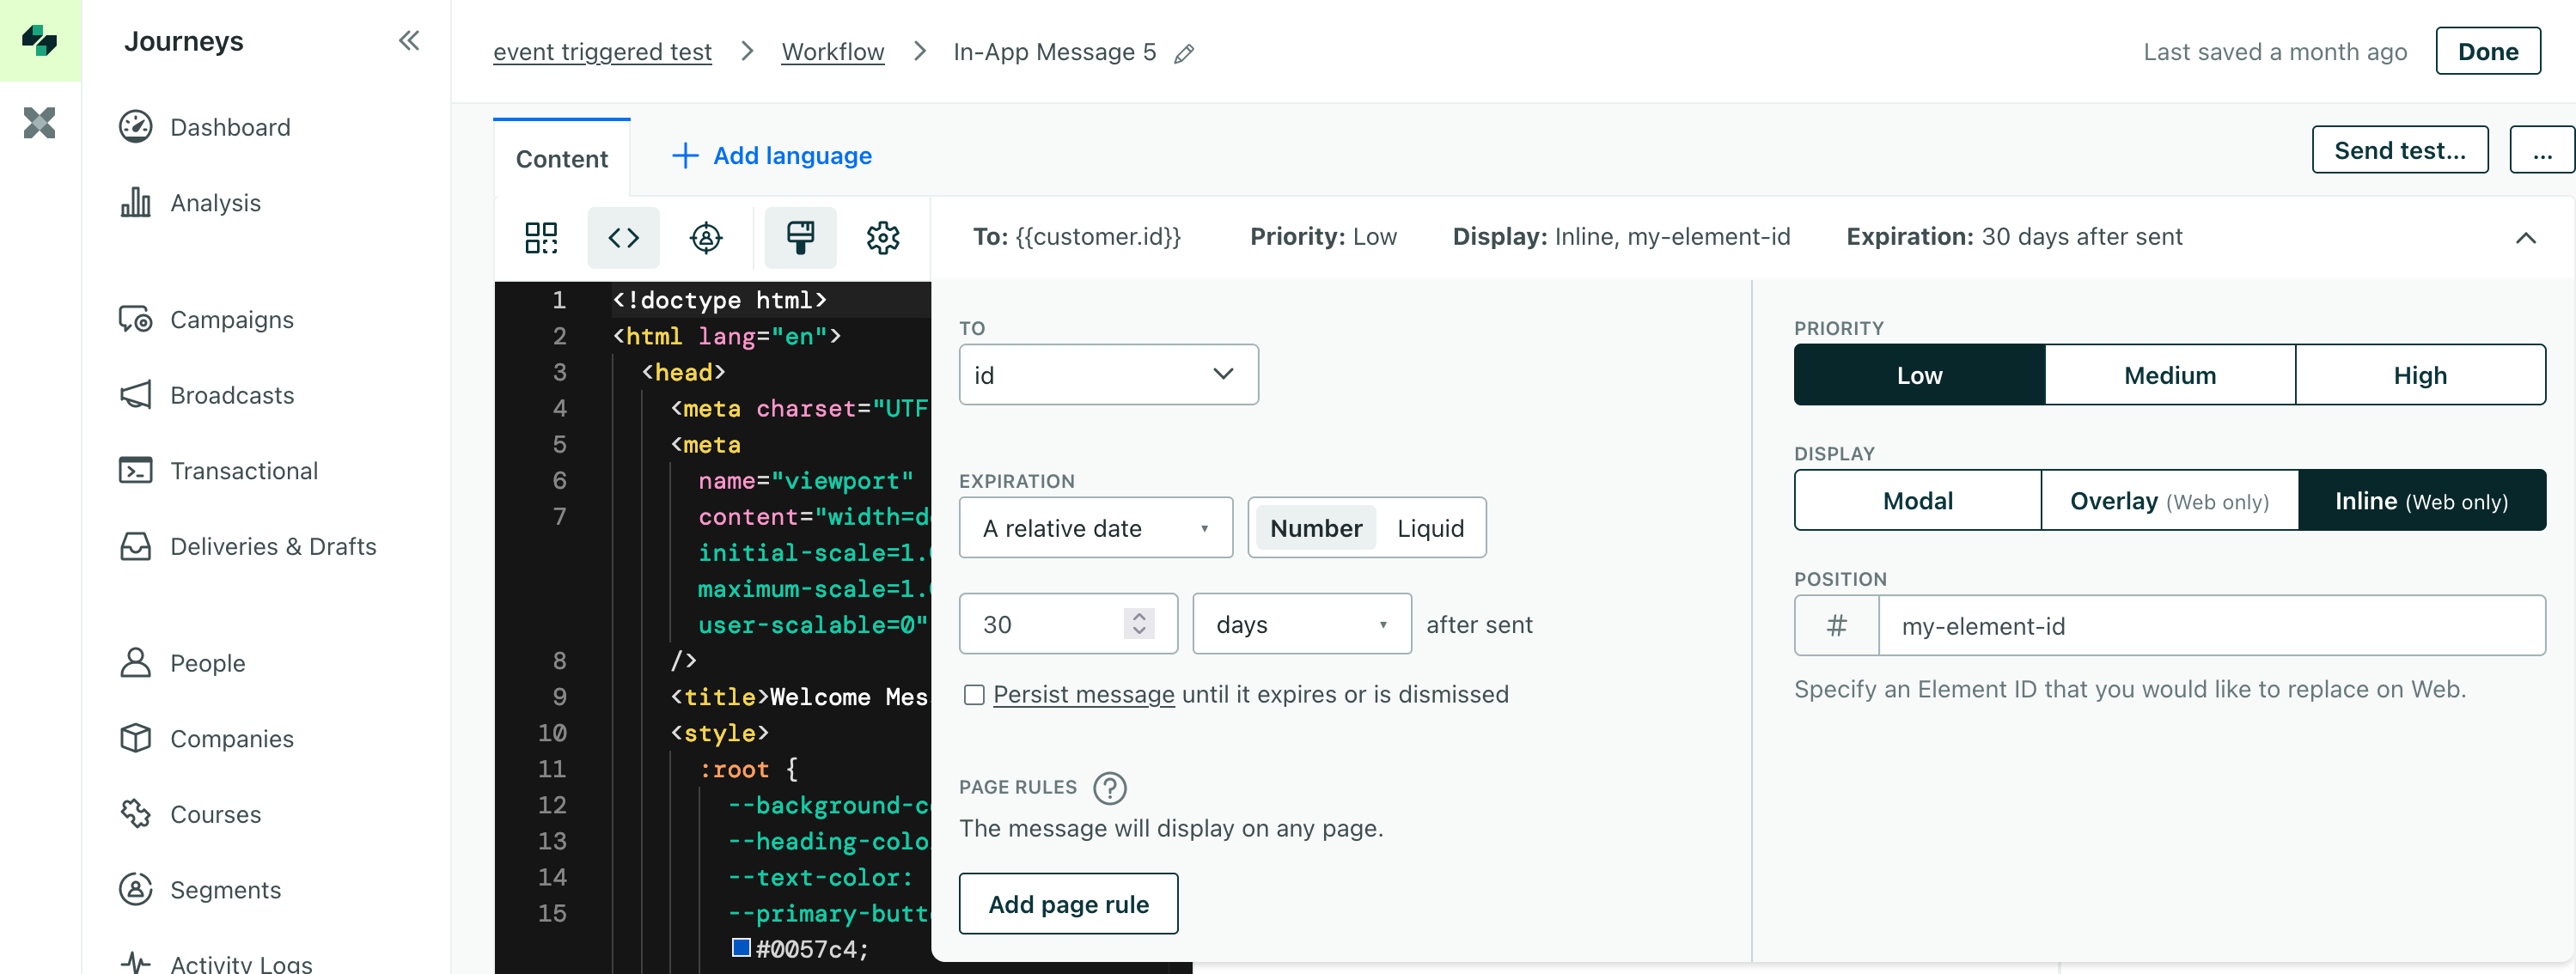
When you add an in-app message to a broadcast or campaign in Customer.io:
- Set the Display to Inline and set the Element ID to the ID you set in your app.
- (Optional) If you send multiple messages to the same Element ID, you’ll also want to set the Priority. This determines which message we’ll show to your audience first, if there are multiple messages in the queue.
Then craft and send your message!
Handling custom actions
When you set up an in-app message, you can determine the “action” to take when someone taps a button, taps your message, etc. In most cases, you’ll want to deep link to a screen, etc. But, in some cases, you might want to execute some custom action or code—like requesting that a user opts into push notifications or enables a particular setting.
While you’ll have to write custom code to handle custom actions, the SDK helps you listen for in-app message events including your custom action, so you know when to execute your custom code.
Follow these steps to implement custom action buttons for inline messages:
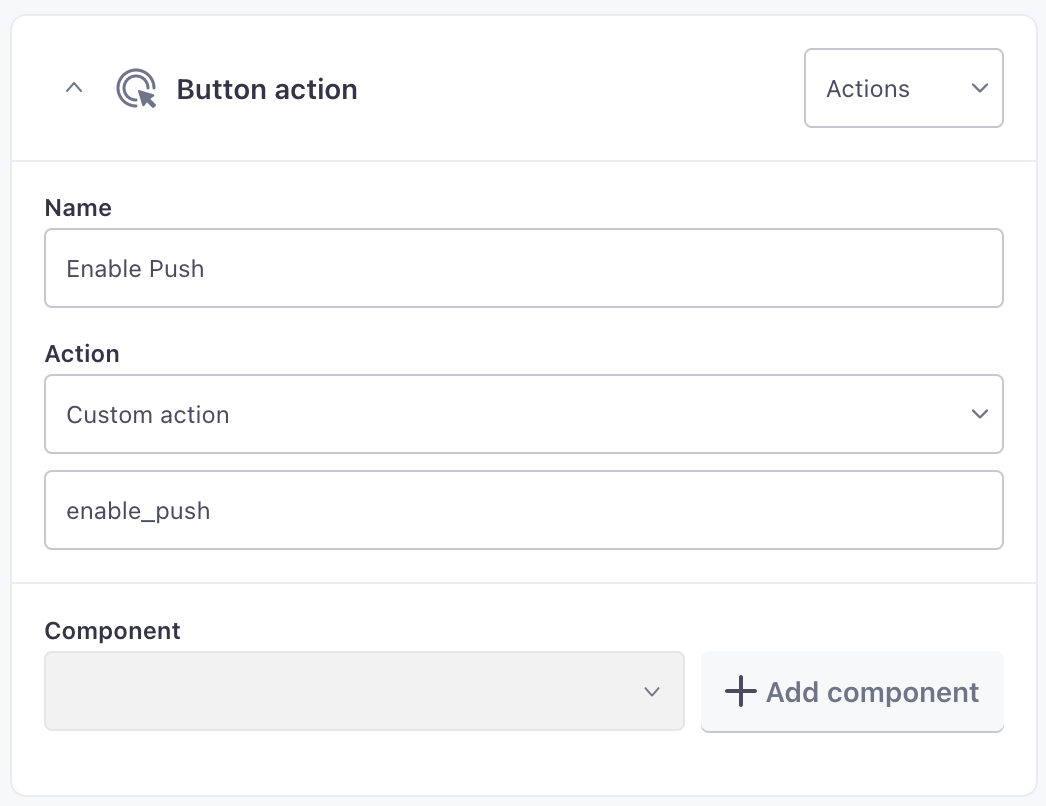
1. Compose an in-app message with a custom action
When you add an action to an in-app message in Customer.io, select Custom Action and set your Action’s Name and value. The Name corresponds to the actionName, and the value represents the actionValue in your event listener.
2. Listen for events
For inline in-app messages, you have 2 options for listening to these action click events.
Register a delegate with inline View:
UIKit
import CioMessagingInApp

class MyViewController: UIViewController {
    override func viewDidLoad() {
        super.viewDidLoad()

        // Given you have an inline View in your ViewController, set a delegate to listen for action events.
        // Note: The inline View holds a `weak` reference to the `onActionDelegate`.
        inlineInAppView.onActionDelegate = self
    }
}

extension MyViewController: InlineMessageUIViewDelegate {
    func onActionClick(message: InAppMessage, actionValue: String, actionName: String) {
        // Perform some logic when people tap an action button.

        // Example code handling button tap:
        switch(actionValue) { // use actionValue or actionName, depending on how you composed the in-app message.
            case "enable-auto-renew":
                // Perform the action to enable auto-renew
                enableAutoRenew(actionValue)

            // You can add more cases here for other actions
            default:
                // Handle unknown actions or do nothing
                print("Unknown action: \(actionName)")
        }
    }
}
SwiftUI
import CioMessagingInApp
import SwiftUI

struct MyScreen: View {
    var body: some View {
        InlineMessage(elementId: "<element-id-here>", onActionClick: { message, actionValue, actionName in
            // Perform some logic when custom action button pressed.

            // Example code handling button press:
            switch(actionValue) { // use actionValue or actionName, depending on how you composed the in-app message.
                case "enable-auto-renew":
                    // Perform the action for enabling auto-renew
                    enableAutoRenew(actionValue)

                // You can add more cases here for other actions
                default:
                    // Handle unknown actions or do nothing
                    print("Unknown action: \(actionName)")
            }
        })
    }
}
Register a global SDK event listener.
When you register an event listener with the in-app SDK, we’ll call the
messageActionTakenevent listener. We call this event listener for both modal and inline in-app message types, so you can reuse logic if you want.
Handle responses to messages (event listeners)
Similar to modal in-app messages, you can set up event listeners to handle your audience’s response to your messages.
For inline messages, you can listen for three different events:
messageShown: a message is “sent” and appears to a user.errorWithMessage: the message itself produces an error—this probably prevents the message from appearing to the user.messageActionTaken: the user performs an action in the message. As shown above, this is only called if the View instance doesn’t have anonActionDelegateset.
Unlike modal in-app messages, you’ll notice that there’s no messageDismissed event. This is because inline messages don’t really have a concept of dismissal like modal messages do. They’re meant to be a part of your app!
Known limitations
We’re actively developing this feature. But, in the meantime, you should be aware of the following limitations:
InlineMessageUIViewdoes not work as expected inside aUITableView: If you have a scrolling list,InlineMessageUIViewworks great inUIStackViewandUIScrollView.

