Convert emails to Design Studio
BetaThis feature is new and we're actively working on it. UpdatedLearn how to migrate emails to Design Studio. You can automatically migrate emails made with the drag-and-drop editor. For other editors, follow our best practices below.
Design Studio has most in common with our drag-and-drop editor; both editors have a visual, block-based builder. However, Design Studio also has global styles, templates, robust reusable components, and more. To use Design Studio’s full suite of features, you can create emails in Design Studio from emails originally made in the drag-and-drop editor with our converter tool.
Want to learn how to migrate emails made in our rich text or code editors? Or want to add an email made outside Customer.io to Design Studio? Check out our steps on converting emails made with other editors below.
Before you convert drag-and-drop emails to Design Studio
Before you convert or copy drag-and-drop emails to Design Studio, make sure you understand how conversion impacts your workflow and which drag-and-drop emails you can migrate.
How to publish changes
When you connect Design Studio messages to a campaign, broadcast, etc., you have to publish changes to the message so the workflow sends the latest updates. This concept did not exist with the drag-and-drop editor. Learn more about publishing with Design Studio.
How default styles convert
The converter keeps your original styling intact. If you migrate an email that uses the default styles for the drag-and-drop editor, the conversion also uses those styles, even if your default styles in Design Studio are different.
For example, if your drag-and-drop email uses the default Arial font, and your global text styles use Times New Roman, your converted email will use Arial.
Learn more about changing your styles through Design Studio’s Properties menu.
If you don’t see the option to migrate, check your liquid version
You can only migrate emails that use our latest liquid renderer.
You’re using the latest renderer and don’t need to take any additional action if you see the options to migrate:
- From the Actions menu of the drag-and-drop editor, you see the option to convert.
- From the editor selection page, you hover over a message and see the option Create in Design Studio
If you don’t see the option to convert or create, your message uses the legacy renderer. Learn more how to upgrade your liquid renderer.
Recreate a drag-and-drop email in Design Studio
Before converting your messages, make sure you understand the workflow involved in moving your messages to Design Studio.
If you convert a drag-and-drop email to Design Studio, your original template is replaced with the Design Studio email. If you would rather keep the original email template in tact, choose to copy and create in Design Studio instead.
During conversion, you can preview the message in Design Studio and make changes before you officially migrate your email. So rest assured that whichever way you migrate a drag-and-drop email to Design Studio, you have time to review before your message goes live!
Convert the drag-and-drop email to Design Studio
This process replaces the original drag-and-drop email with the converted file in Design Studio. If you would rather keep the original email template in tact, choose to copy and create in Design Studio instead.
To convert a message from the drag-and-drop editor, follow these steps:
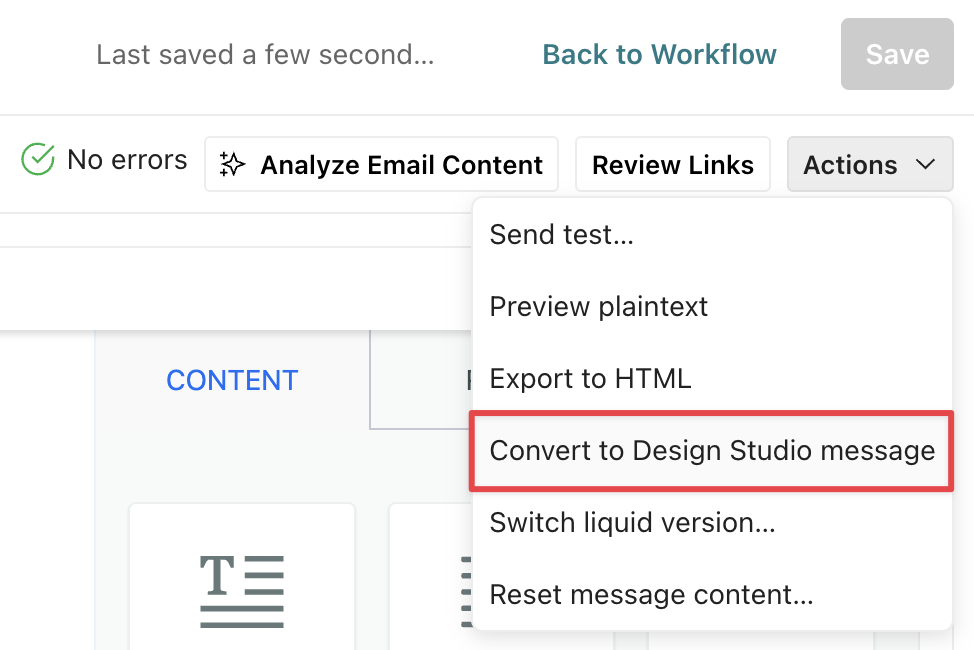
- Open your drag-and-drop email.
- Click the Actions menu, and select Convert to Design Studio message.
- Follow the prompts to convert, preview, and save your changes.
Copy and create the drag-and-drop email in Design Studio
This process creates a new version of your original template. The drag-and-drop email remains in tact, and a new file is created in Design Studio.
To create a drag-and-drop email in Design Studio, follow these steps:
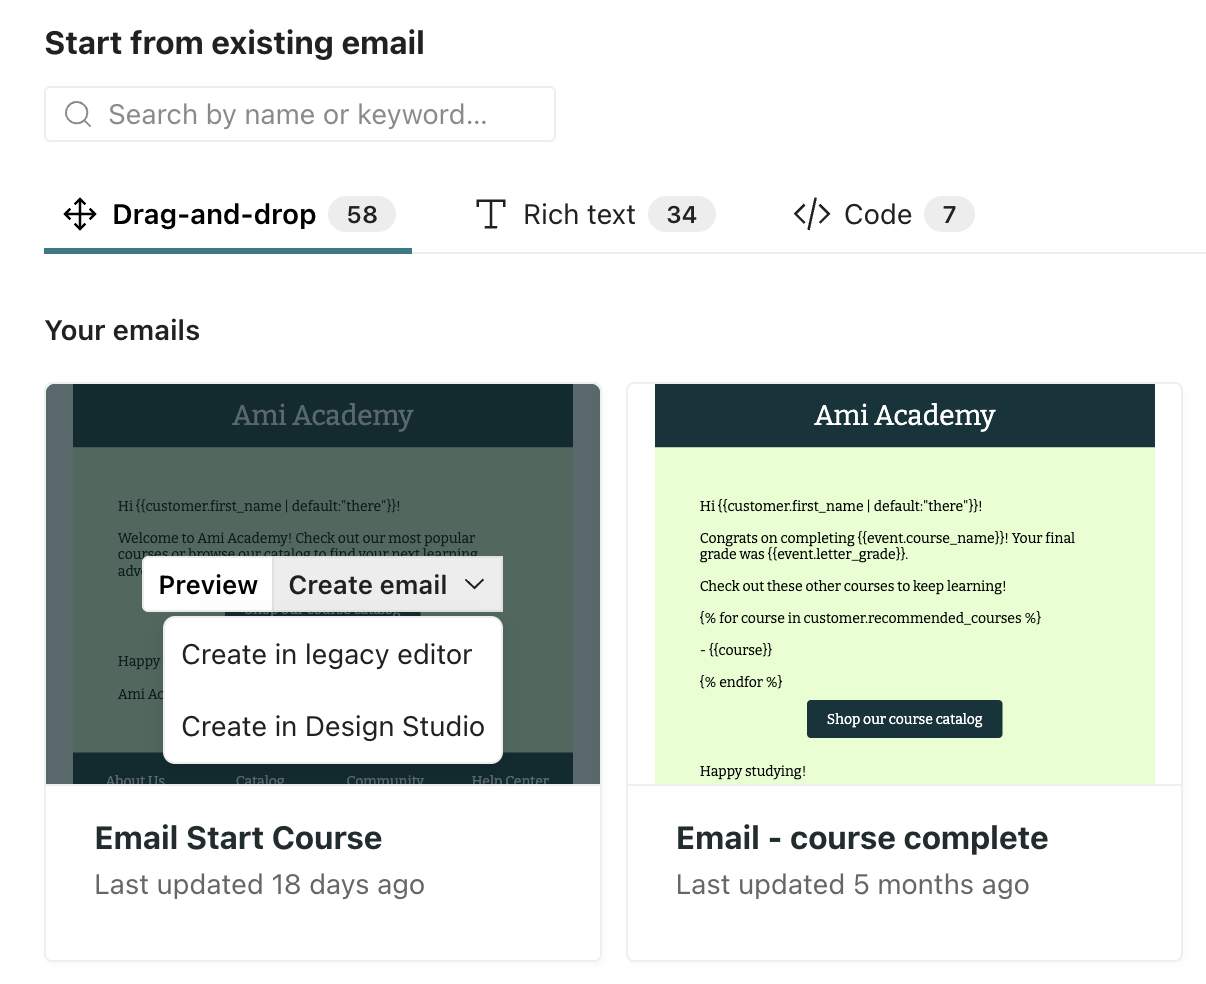
Open a new email.
- For campaigns and API-triggered broadcasts, drag an email block into your workflow and click Edit Content to land on the editor selection page.
- For newsletters and transactional messages, go to the Content step, select Email, and click the content block to open the editor.
Under the Drag-and-drop tab, hover over an existing message, click Create email, and choose Create in Design Studio.
If you don’t see the Drag-and-drop tab, click Go back to classic to view the legacy editors.

Follow the prompts to convert, preview, and save your changes.
Preview and save your changes
During conversion, you preview your changes and modify the converter’s output as you see fit. When you’re ready, save your changes to officially convert the message to Design Studio.
- After initiating conversion, compare the layout of the original email to the conversion to see what’s different. If the message has one or more translations, you can switch between each translation to preview the changes.
- Click Create in Design Studio to edit the converted email.
- Modify the email as you see fit. Check that your styles are applied correctly.
- Click Keep changes to officially convert the message.
If you converted an email in a live campaign, the campaign starts drafting or sending the converted email immediately.
Revert to the drag-and-drop editor
You can revert to the drag-and-drop editor before saving the conversion.
In the converted email, you see a banner directing you to revert back or keep your changes:

Click Revert back to cancel the conversion and return to the drag-and-drop editor.
Convert multiple drag-and-drop emails
You can’t bulk migrate drag-and-drop emails to Design Studio. Right now, you convert them one at a time. If you’d like a way to bulk migrate similar to the conversion process on this page or by way of an AI agent, leave us feedback through your Design Studio dashboard.

Migrate emails not made with the drag-and-drop editor
If you want to migrate emails made with the rich text or code editors or editors outside Customer.io, we recommend you build them from scratch using global styles and components in the visual editor. This way, you can continue to use all functionality in Design Studio and ensure brand consistency across your emails.
Recreate layouts in Design Studio
Layouts are not supported in Design Studio. If you’re migrating any emails that were made in the code or rich text editor and they use layouts, you’ll have to recreate the layout.
In Design Studio, you create reusable elements, like layouts, through custom components or templates.
Migrate reusable content
You can add both snippetsReusable content, like a company address, that you can reference with a liquid key across your messages. and custom componentsA custom block of code with content and properties you can reuse across messages made in Design Studio. to emails in Design Studio, two different ways of creating reusable content in Customer.io.
- If you want to reuse content across Design Studio emails, you should create custom components for the best experience.
- If you want to create content to reuse across any email, regardless of the editor, snippets are the only option.
If you create snippets to reuse content in Design Studio, keep the following mind:
- To preview snippets, turn on Preview mode. Snippets don’t render on the canvas while you edit because they’re liquid keys, like
{{snippets.company_address}}. - You have to manually add snippet liquid keys to text-based components. Unlike custom components, you can’t drag them in from the Insert panel.
- To translate snippets, you have to add liquid logic to the snippet content that targets a recipient’s language preference. The auto-translate feature does not work on snippet content. Auto-translate does work on custom components, if you detach them first.
Best practices if you paste or import code
If you choose to import emails or paste HTML into Design Studio’s code editor, make sure you remove the standard componentA pre-built block that helps you build beautiful, engaging messages as quickly as possible in Design Studio. <x-base></x-base>. This syntax is unique to Design Studio and would conflict with your source code.
After you paste or import code, you can edit the content of semantic HTML elements—HTML tags where the names clearly define the purpose of the element, like <p> or <img>, in the code or visual editors. You can also add CSS styles or classes through the Properties menu.
However, for non-semantic tags (<div>, <span>, and <table>) you have to take an extra step to make them editable in the visual editor. Unlike semantic tags, you can’t add CSS styles or classes through the visual editor’s Properties menu. But you can edit the text if you first wrap the text of non-semantic tags in <x-edit-text> in the code editor.

