# Add & preview liquid in the visual editor
[BetaThis feature is new and we're actively working on it.](/beta-experimental-features/#beta-features)
In Design Studio, you can personalize your emails using liquid, a templating language that lets you pull in data about your recipients, events, objects, and more. This article shows you have to add liquid using the Personalization panel in the visual editor.
Use the **Personalization panel** to add the data you want into your messages without having to memorize our syntax or remember all of your attributes.
[](#da55032f96fb252a4a7fbd399e8a7798-lightbox)
After you add your liquid, enter **Preview** mode to check that your data renders as you’d expect!
[](#0641eea23b970cf8d258dc153080a319-lightbox)
## Add liquid[](#add-liquid)
You can add liquid to text-based [standard componentsA pre-built block that helps you build beautiful, engaging messages as quickly as possible in Design Studio.](/journeys/components-overview/#standard-components) in three ways:
* Using the Personalization panel, which helps you insert attributes without remembering syntax
* Manually, by typing liquid directly into the canvas
* Using the agent, which can add liquid to your message at your request
All Design Studio messages use our latest liquid
You’ll notice two versions of liquid in our docs: legacy and latest. All messages made in Design Studio use our [latest liquid](/journeys/liquid-tag-list/?version=latest).
### Add attributes with the Personalization panel[](#add-attributes-with-the-personalization-panel)
To use the Personalization panel:
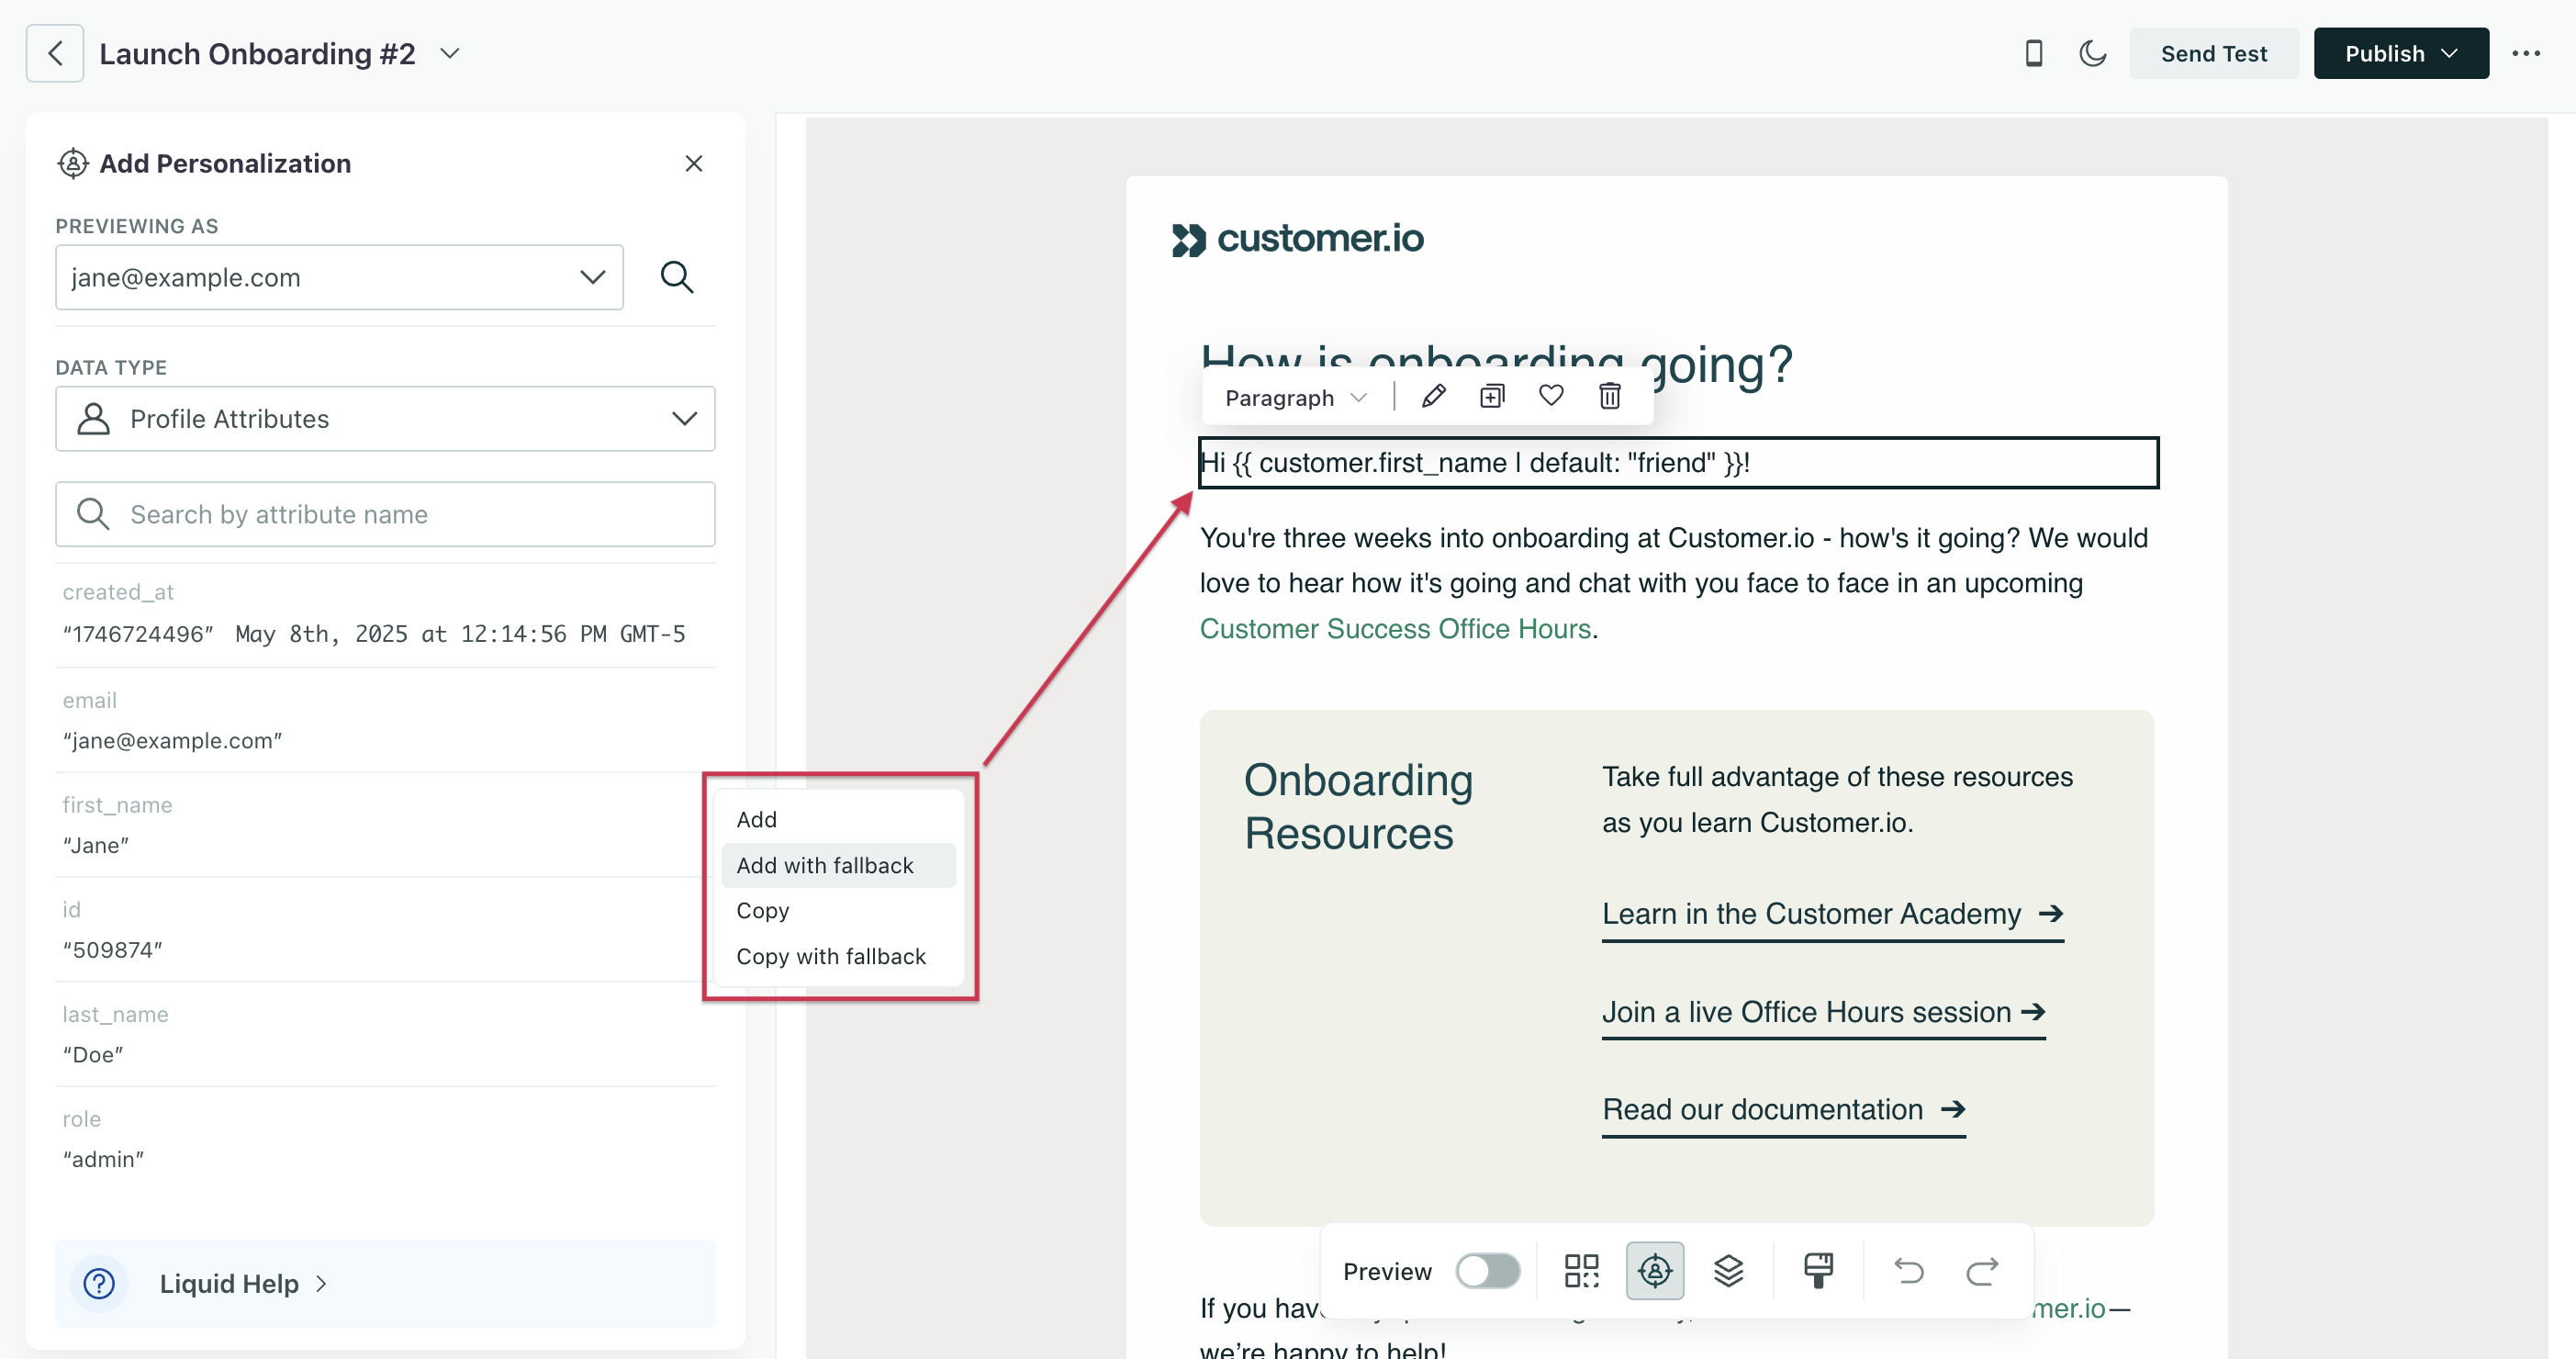
1. Click the personalization icon in the canvas toolbar. A left-hand panel will open.
[](#e9e28ac5fe27b1dd33c8f86d08cbff25-lightbox)
2. Under *Previewing As*, find a person with example data you want to add to your message. Either choose an email from the dropdown or click the magnifying glass to search by their profile attributes.
3. Under *Data Type*, [choose what kind of data you want to add](#choose-a-data-type).
4. Hover over an attribute and click .
5. Choose how you want to add the data. If you click **Add**, we’ll add your liquid wherever your cursor is. Click **Copy** for more flexibility then paste it into a text area of your canvas.
Add or copy with a fallback so your messages don’t fail to send
Emails fail to send if a recipient doesn’t have the data specified in the liquid. You can remedy this by including a [fallback conditional or filter](/journeys/using-liquid/#fallback-for-latest-liquid)!
### Conditionally render content[](#conditionally-render-content)
Use the agent to create liquid statements!
It can be a pain to create the conditions with all the logic, filters, and fallbacks you want. Prompt our [agent](/ai/agent/get-started/) to write the liquid for you! Then [preview with sample data](#preview-liquid) and ask the agent for revisions if needed.
You may want to conditionally render content to [localize your messages](/journeys/localize-ds-messages/) or [customize your email’s responsiveness](/journeys/responsive-styles/).
You can use liquid inside a component to conditionally change content in your message. You can also use liquid outside a component to conditionally render components altogether.
To conditionally render entire components, you’ll need to switch to the [code editor](/journeys/code-editor-overview/#code-your-message). Here’s an example of how to conditionally render images:
```html
{% if customer.language == "es" %}
{% else %}
{% endif %}
```
Note that the liquid conditional wraps around the components.
## Preview liquid[](#preview-liquid)
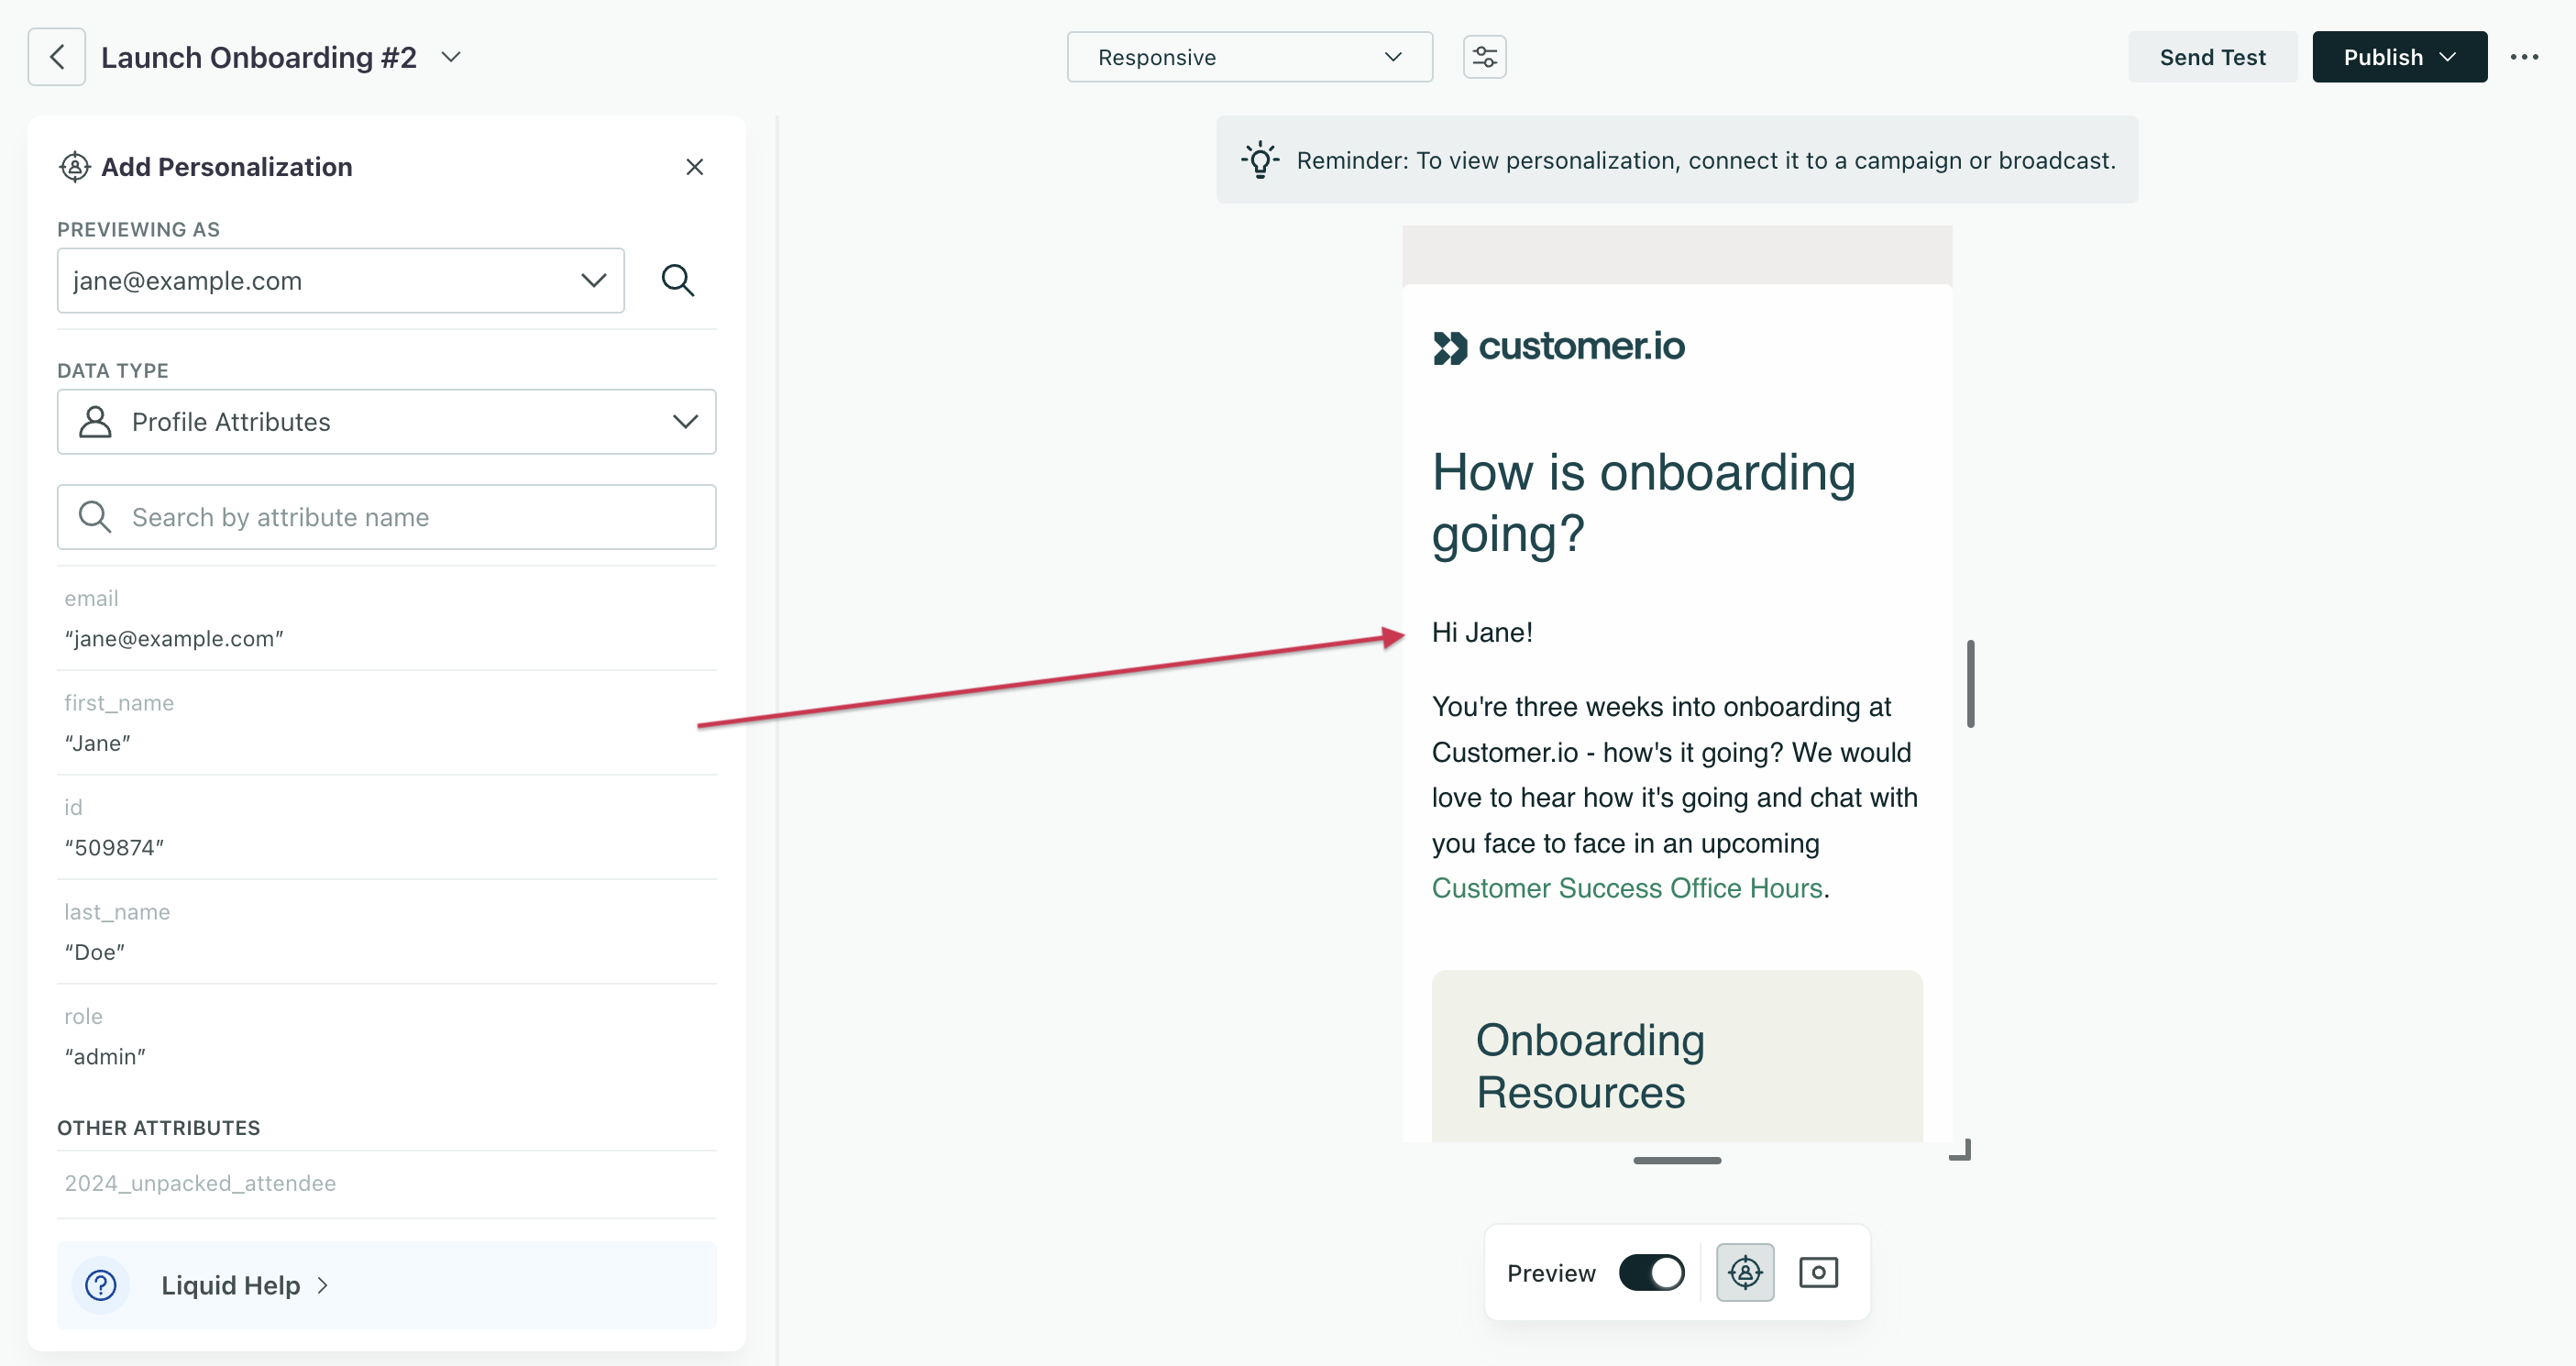
To preview your liquid with sample data, turn on **Preview** in the canvas toolbar.
[](#9d7a2fd0b6af10c0331bc9c73283856c-lightbox)
Then click the personzalization icon if the left-hand panel isn’t already open. In Preview mode, you can view sample data, but not add any new liquid.
Preview people who have your attribute data and who don’t so you know how your fallback content renders.
From here, you can also [preview across device sizes, with visual impairments in mind, and more](/journeys/preview-email-in-design-studio/).
### Review liquid errors[](#review-liquid-errors)
If there’s an issue with your liquid syntax, you’ll see “Errors found” in red at the top of the preview. Click this to see a list of issues.
Sample data won’t render if any of your liquid has errors. Messages with liquid errors will also fail to send, so make sure you fix any issue you find.
Learn more about [liquid errors and how to fix them](/journeys/composer-errors/).
## Understand data types[](#choose-a-data-type)
You can add attributes stored on people, [eventsSomething that a person in your workspace did. Events can trigger campaigns, add people to segments, etc, and you can use properties from events to personalize messages.](/events/), [relationshipsThe connection between an object and a person in your workspace. For instance, if you have Account objects, people could have relationships to an Account if they’re admins.](/journeys/relationships/), [objectsAn object is a non-person entity that you can associate with one or more people—like a company, account, or online course.](/journeys/objects/), or triggers for API-triggered broadcasts and transactional messages through the Personalization panel.
Some data types may be disabled in the Personalization panel. This could mean:
* The person you’re previewing doesn’t have any data for that type. For example, they don’t have a specific profile attribute.
* The message isn’t connected to an automation that provides the data, like a campaign.
Try switching to a different person who has the right data, or double-check that your message is connected to the correct automation.
### Profile attributes[](#profile-attributes)
You can add profiles attributes to any Design Studio message. People data is available across any type of campaign, broadcast, and transactional message.
After you add profile attribute data using the Personalization panel, you’ll see the liquid key [`customer`](/journeys/liquid-tag-list/?version=latest#customer-attributes-latest) on the canvas.
Any other data—events, relationships to objects, trigger attributes, use their own keys.
### Events[](#events)
You can add event data after you **connect to a campaign that’s triggered by an event**. You can only add attributes from the trigger event; you can’t add any other event data performed by the person you’re previewing.
When you navigate back to your Design Studio message and open the Personalization panel, we automatically surface a person who has performed the event in the trigger. Click the *Data Type* dropdown and choose **Events** to find available attributes.
If no person has performed the event in the last 30 days, you won’t be able to add event trigger data through the panel.
Event trigger data uses the liquid key `event`. [Learn more about event trigger attributes](/journeys/liquid-tag-list/?version=latest#event-properties-latest).
### Relationships[](#relationships)
You can add [relationshipThe connection between an object and a person in your workspace. For instance, if you have Account objects, people could have relationships to an Account if they’re admins.](/journeys/relationships/) and [objectAn object is a non-person entity that you can associate with one or more people—like a company, account, or online course.](/journeys/objects/) attributes to any Design Studio message. This data is available across any type of campaign, broadcast, and transactional message. You must first [set up objects](/journeys/objects-start/) to then relate them to people.
Review the limitations of object and relationship liquid
Make sure you understand the [limitations of object and relationship liquid](/journeys/objects-in-liquid/#before-you-begin) before sending your message: referencing objects is relative, and you cannot reference more than 10 objects of the same type.
Note, you can’t currently add [trigger data for objects or relationship-triggered campaigns](/journeys/objects-in-liquid/#reference-trigger-data) through the Personalization panel. But you can add it manually to a text-based component.
When referencing trigger data for object or relationship-triggered campaigns, you’ll use the `trigger` key. For non-trigger data, you’ll use the `objects` and/or `relationship` keys.
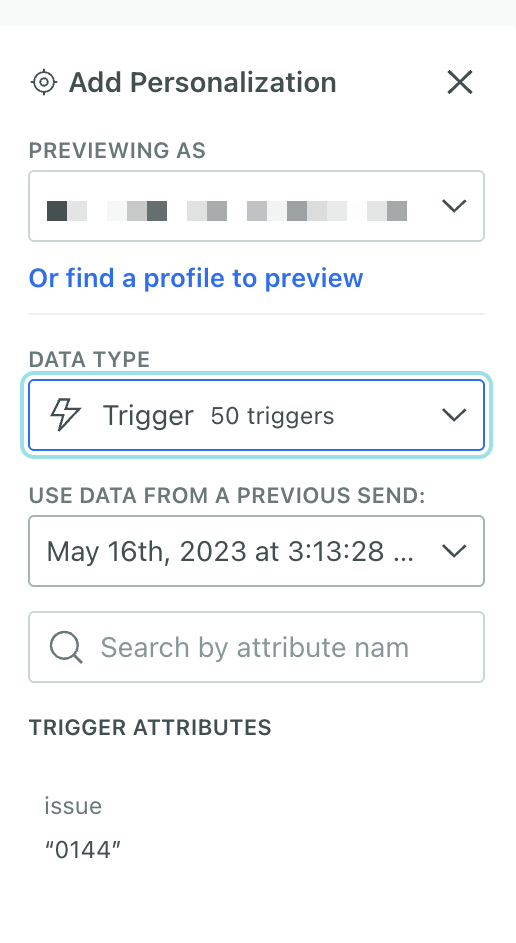
### Trigger[](#trigger)
The **Trigger** data type only applies to *API-triggered broadcasts*. [It’s easier to preview trigger data from the broadcast itself because you can add a test payload.](/journeys/previewing-broadcast-data/) In Design Studio, you can only filter for someone who’s already triggered your broadcast, which may take more steps.
To preview data from previous sends in Design Studio, [the message must be connected to a broadcast that’s already been triggered.](/journeys/add-email-to-automation/) Then in Design Studio, you can preview liquid with previously sent trigger data:
1. Click in the canvas toolbar to open the Personalization panel.
2. Choose **Trigger** under *Data Type*. Then select a previous send to pull in data from the previous 30 days.
3. Click **Preview** to check your trigger liquid.
[](#58b759f316ecc5523e50ef053035eb26-lightbox)
If no person has entered the connected API-triggered broadcast in the past 30 days, you won’t be able to add trigger data through the panel.
Trigger data for API-triggered broadcasts uses the liquid object `trigger`. [Learn more about trigger keys](/journeys/using-liquid/#trigger-properties-1).
### Transactional[](#transactional)
The **Transactional** data type lets you test trigger data for transactional messages.
To test transactional trigger data within Design Studio, you first need to connect your email to a transactional message. Then you can add attributes and values to the Personalization panel under *Transactional Data (JSON)*. This represents [the `message_data` object in the transactional API request](/integrations/api/app/#operation/sendEmail).
[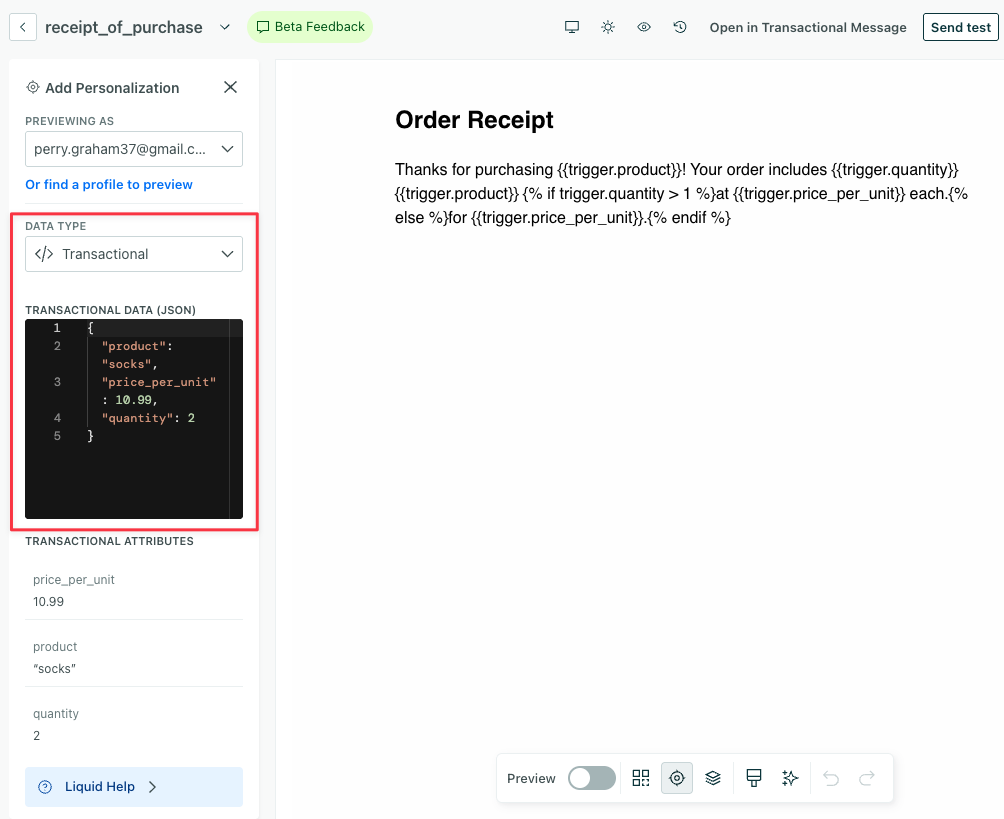](#5b066405d2b79456fc0f9af7ab0ea19b-lightbox)
Turn on **Preview** in the canvas toolbar to see your liquid render with the sample data.
You can also test trigger data within the [transactional message editor](/journeys/transactional-api/#test-transactional-messages).