Objects and relationships in campaigns
UpdatedYou can trigger campaigns based on changes to objects and relationships. You can target trigger data in messages and specify who should enter a campaign based on the relationship they have to objects.
Trigger campaigns based on objects or relationships
You can trigger campaigns based on changes to objects or relationships. You can trigger a campaign when:
- an object is updated (like an Account’s name was changed).
- a relationship between an object and person is added.
- a relationship is changed (like a person is no longer associated with an Account).
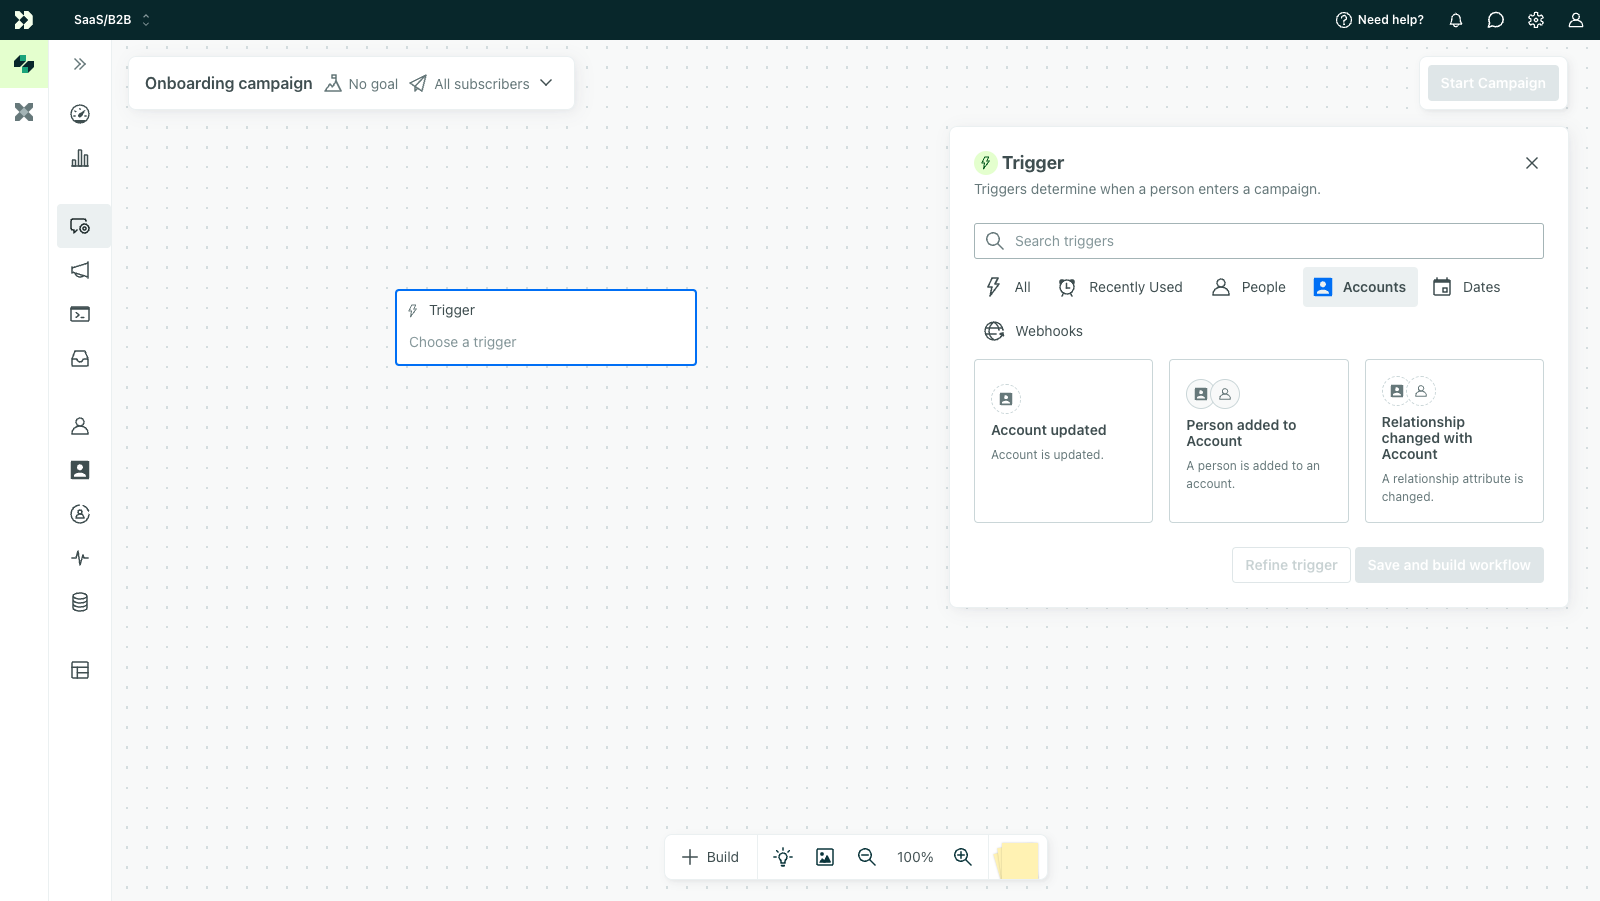

You can also narrow in on the audience for these campaigns. For both object and relationship-triggered campaigns, you can choose to send to:
- every person in the object or
- certain people in the object
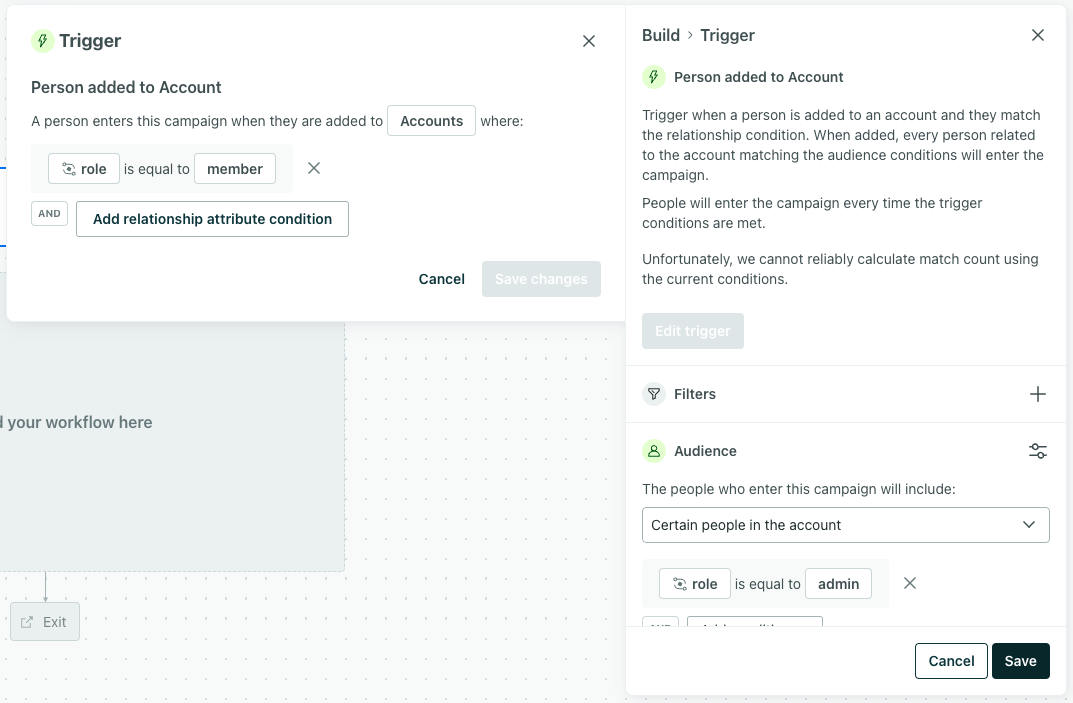

For relationship-triggered campaigns, you can also choose to send only to the person that triggered the campaign.
Your audience cannot exceed 1,000 people each time the campaign triggers.
If it does, the people will not start a journey. You will see “Failed Journeys for Object/Relationship Campaign” in your activity log. Keep this in mind anytime you choose “Every person in the object” or “Certain people in the object” as your audience settings.
Check out Considerations for audiences over 1,000 for more information.
Visit Campaign Triggers for more on object-triggered campaigns or relationship-triggered campaigns.
Considerations for audiences over 1,000
Object and relationship campaigns will not create journeys when a trigger event reaches over 1,000 people. If you think you might want to send to over 1,000 people each time the campaign is triggered, consider:
- Is there a better way to craft your automation? Do you actually mean to target a more specific audience or a more specific change to an object or relationship?
- If yes, adjust your campaign settings or consider a different type of campaign.
- If not, reach out to our Support team for assistance.
For example, let’s say you run a real estate marketplace. Each object is a house on sale. There are 1,100 people who have liked a house. You craft a campaign to send to all of them when the property is sold. But do you in fact want all 1,100 people to know this? How old is the listing? Have people on this list already purchased a different house since they liked the property? Is it better that only those who liked the house AND went to a showing know? Asking questions like this can help you craft a more specific campaign and ensure you reach exactly who you intend to.
Performance considerations
Imagine you have a few Account objects with 10 people related to each of them. Each Account has a lifetime_value attribute, and you have five segments and five campaigns that send messages based on an Account’s lifetime_value. Each time an Account’s lifetime_value gets updated, our system checks each of the 10 people related to that account to see if they should still belong to any of the segments or campaigns.
One little change - to a single Account’s attribute, in this case - caused us to check 100 things (5 segments x 10 people, 5 campaigns x 10 people). At this scale, that’s no problem.
But imagine you have hundreds of thousands of Accounts and most of them change every day. That can pretty quickly become hundreds of millions, even billions, of things for us to process. We know how to handle this - it’s our job! But if you ever get to an extreme enough scale, we’ll send you warning messages so you know well in advance if your account could be impacted. In very extreme situations, we might need to throttle the data we process from you - but again, we’ll always warn you long before we get to that.
Bottom line, the more segments and campaigns you have based on objects, the more you should make sure you’re targeting and updating the correct objects and relationships. For instance, instead of sending us your entire database every hour, send us only the object data we need. Of course, if you have any concerns, reach out to us and we’ll be happy to help!
Workflow actions for objects and relationships
You can use object or relationship data in any workflow item, including Create or update person, Send event, Send and receive data, and Batch update.
How else would you like to manipulate object and relationship data in your campaigns? Let us know at product@customer.io. We’d love to hear your use cases!
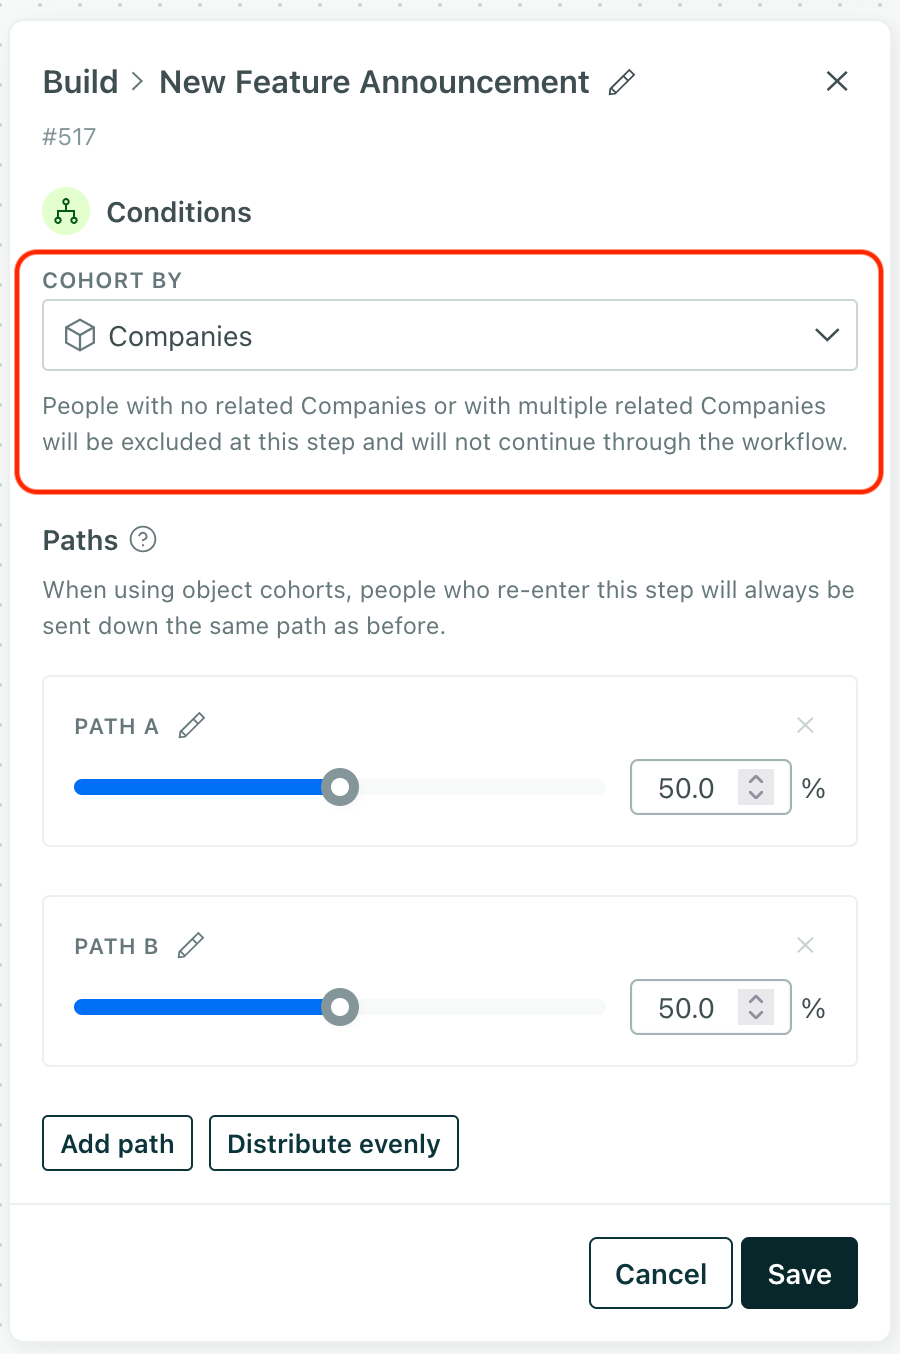
Random Cohort Branch
While random cohorts typically send people down different paths, you can use the Cohort by setting to send people related to the same custom objectAn object is a non-person entity that you can associate with one or more people—like a company, account, or online course. down the same path. This ensures that people related to the same object all have the same campaign experience.

True/false branch
In true/false branches, you can send people down different paths based on the their relationships to objects.
All campaigns, except those with webhook triggers
Drag a true/false branch onto your workflow. Click the branch, then click Add condition > Relationship to define a branch based on relationships to objects in your workspace. For instance, you could trigger a campaign when people open a page explaining a certain feature (event-triggered campaigns). Then you could branch them based on whether they’re related to any premium account to personalize messaging.
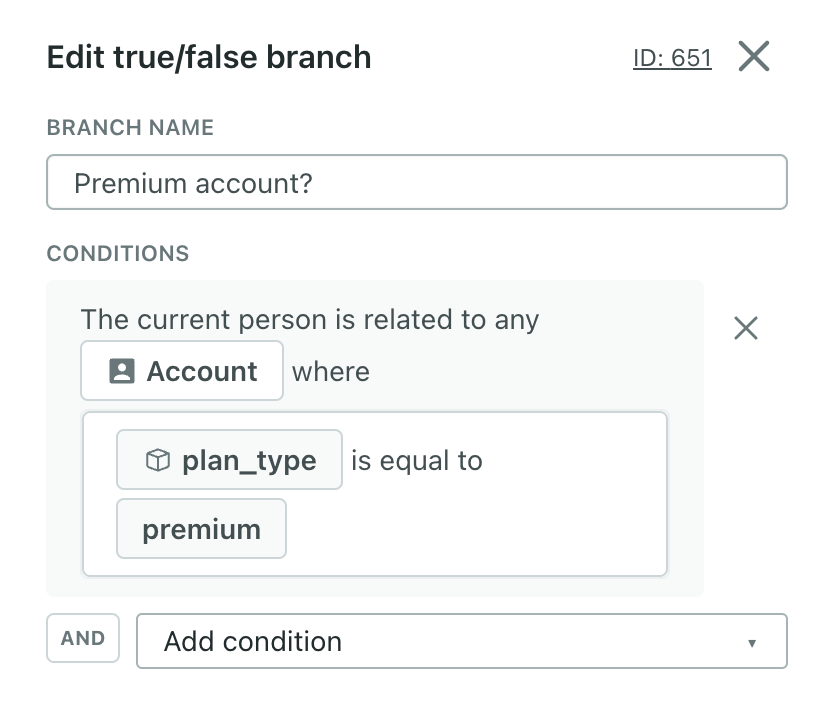

You can add other conditions to refine the path further - conditions are only joined by AND statements, not OR.
Object or relationship-triggered campaigns
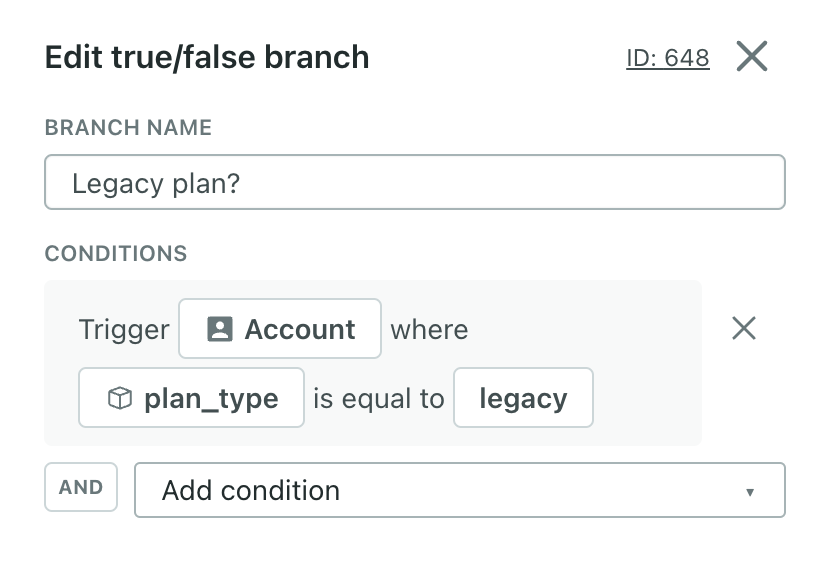
In object or relationship-triggered campaigns, you can also refine true/false branches by the trigger object. Drag a true/false branch onto your workflow. Click the branch then click Add condition > Object-type-name (Trigger) to define a branch based on the object triggering the campaign.
For instance, imagine you trigger an onboarding campaign when a person is added as an admin to any account. The onboarding flow for accounts on legacy plans is different from those on newer plans. So you add a true/false branch to your workflow and split users based on whether the account they were added to has a legacy plan type.

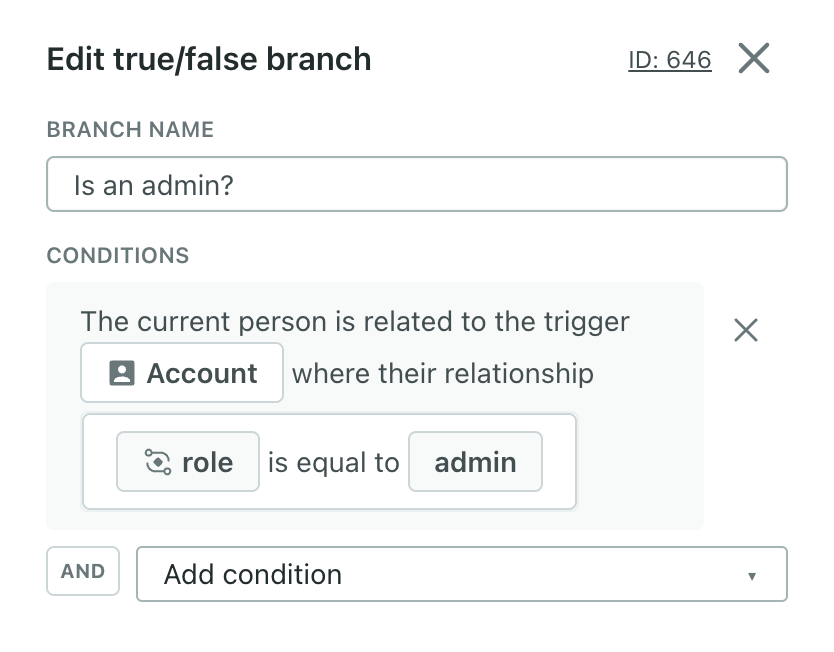
Or maybe you trigger a campaign when an account’s plan type is upgraded to a modern one. This impacts admins of your accounts differently from all other roles so you add a true/false branch based on whether their relationship attribute role is equal to admin. For this, you’ll click Add condition > Relationship.

Multi-split branch
You can send people down different paths based on object and relationship conditions in multi-split branches. Unlike true/false branches, multi-split branches allow you to split people into more than two paths.
All campaigns, except those with webhook triggers
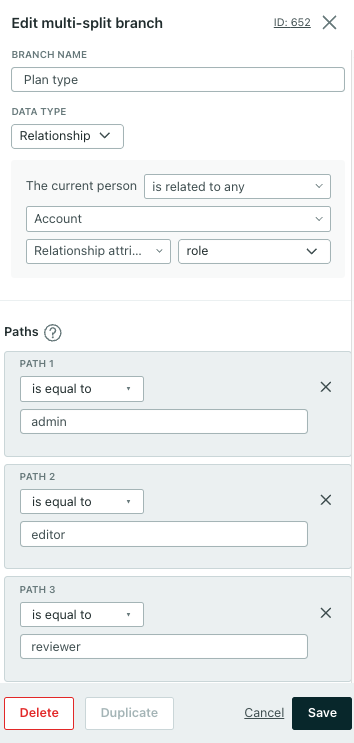
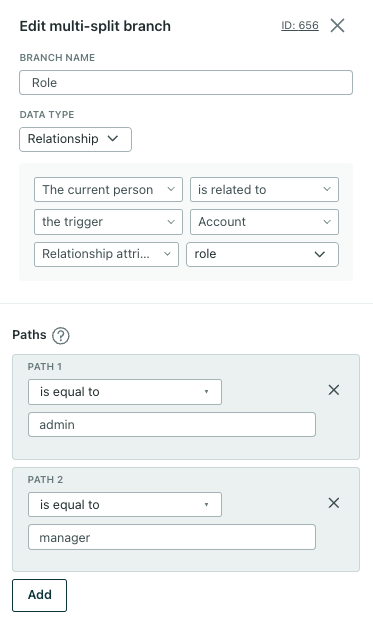
Drag a multi-split branch onto your workflow. Click the branch then click Data Type > Relationship. You can define people related to any object in your workspace.
For instance, imagine you want to encourage people to use your app after being inactive for 30 days. You could trigger a campaign when they join a segment based on inactivity then branch these users based on their plan type to personalize messaging.

Object or relationship-triggered campaigns
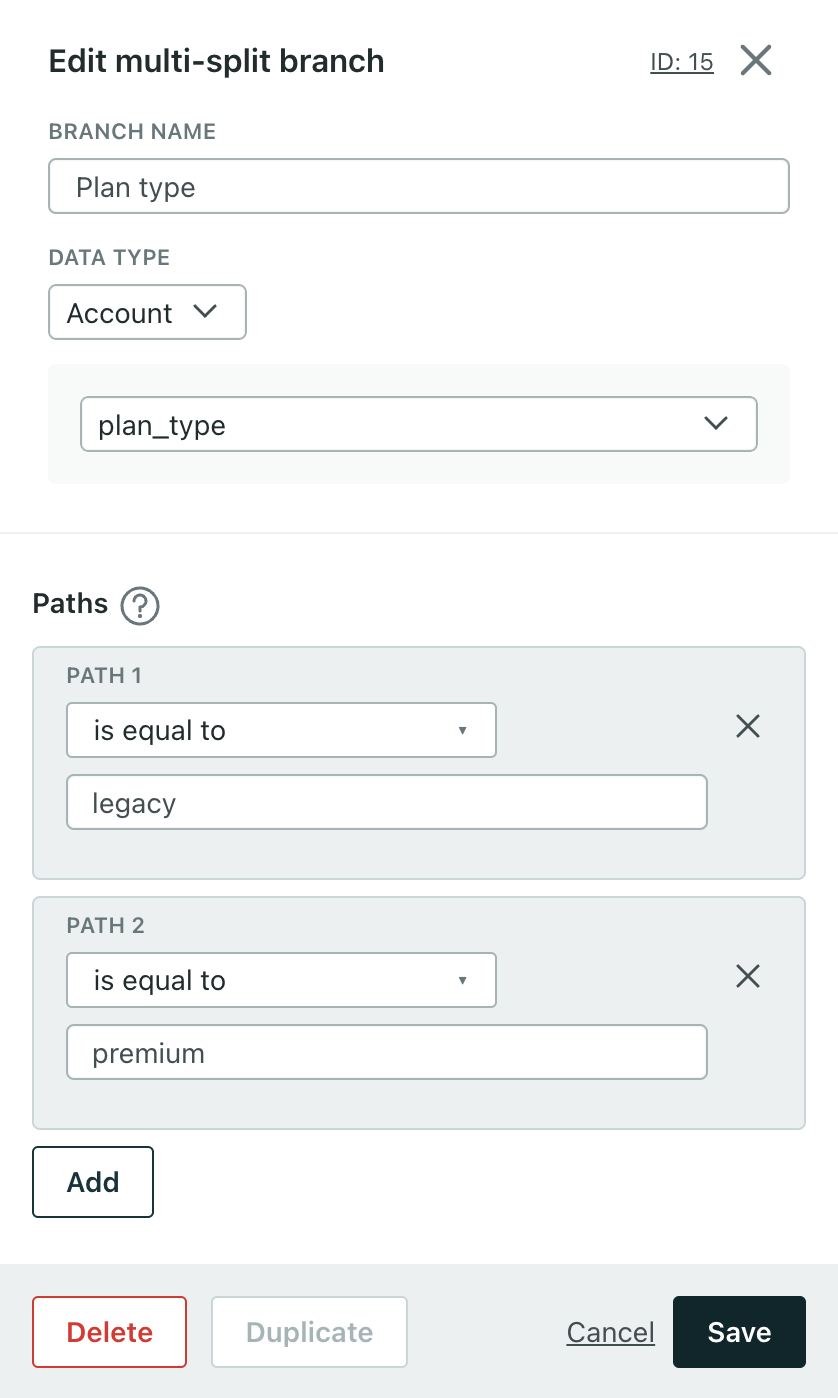
With object and relationship-campaigns, you can also refine branch conditions based on the trigger object. Drag a multi-split branch onto your workflow. Click the branch then click Data Type > Object-type-name (Trigger).
For instance, imagine you trigger an onboarding campaign when a person is added as an admin to any account. The onboarding flow for accounts on legacy plans is different from those on newer plans. So you add a multi-split branch to your workflow and split users based on plan_type. You create different messaging for those on a legacy plan, premium plan, and all others.

Or maybe you trigger a campaign when an account’s plan type is upgraded to Enterprise. This impacts people differently based on their role on the account, so you add a multi-split branch based on the relationship attribute role. You create different messaging for admins, managers, and anyone without those roles. For this, you’ll click Data Type > Relationship.

Trigger a campaign with a relationship-based segment
People enter segment-triggered campaigns when they join (or leave) a segment. But when you create a relationship-based segment, a person only joins the segment for their FIRST relationship to an object matching your criteria. Their segment membership won’t change on subsequent relationships. This means that a person will only trigger a campaign for the first relationship matching your segment criteria. To trigger a campaign for each relationship change, create a relationship-triggered campaign.
For example, imagine that you have a segment of people related to online classes, and you use that segment to trigger a campaign:
- When a person signs up for their first online class, they’ll join the segment and enter the campaign.
- When they sign up for another online class, they won’t trigger the campaign again because their segment membership didn’t change!
In this example, a person would only re-join the segment if they unenrolled from all their classes, causing them to leave the segment, and then re-enrolled in a class later.
to person)-->b{is this the first
relationship?} b-->|yes|c(person joins
segment)-->e(Person enters
campaign) b-.->|no|d(person does not
enter campaign)
Exit Conditions follow these same principles: a person won’t leave a segment (causing them to exit a campaign) until they’re no longer related to any objects matching your segment criteria.
from person)-->b{is this the only
relationship?} b-->|yes|c(person leaves
segment)-->e(Person exits
campaign) b-.->|no|d(person remains
in campaign)
Use an object in a segment
You can create object-oriented segmentsA group of people who match a series of conditions. People enter and exit the segment automatically when they match or stop matching conditions. on the Segments page, or when you create campaigns and newsletters. Learn more about how relationship-based segments work in campaigns.
- Go to Segments and click Create Segment.
- Give your segment a Name and a Description, and click Create Data-Driven Segment.
- Under Add condition or group, select Relationship and set a condition to Relationship to
your object typeexists.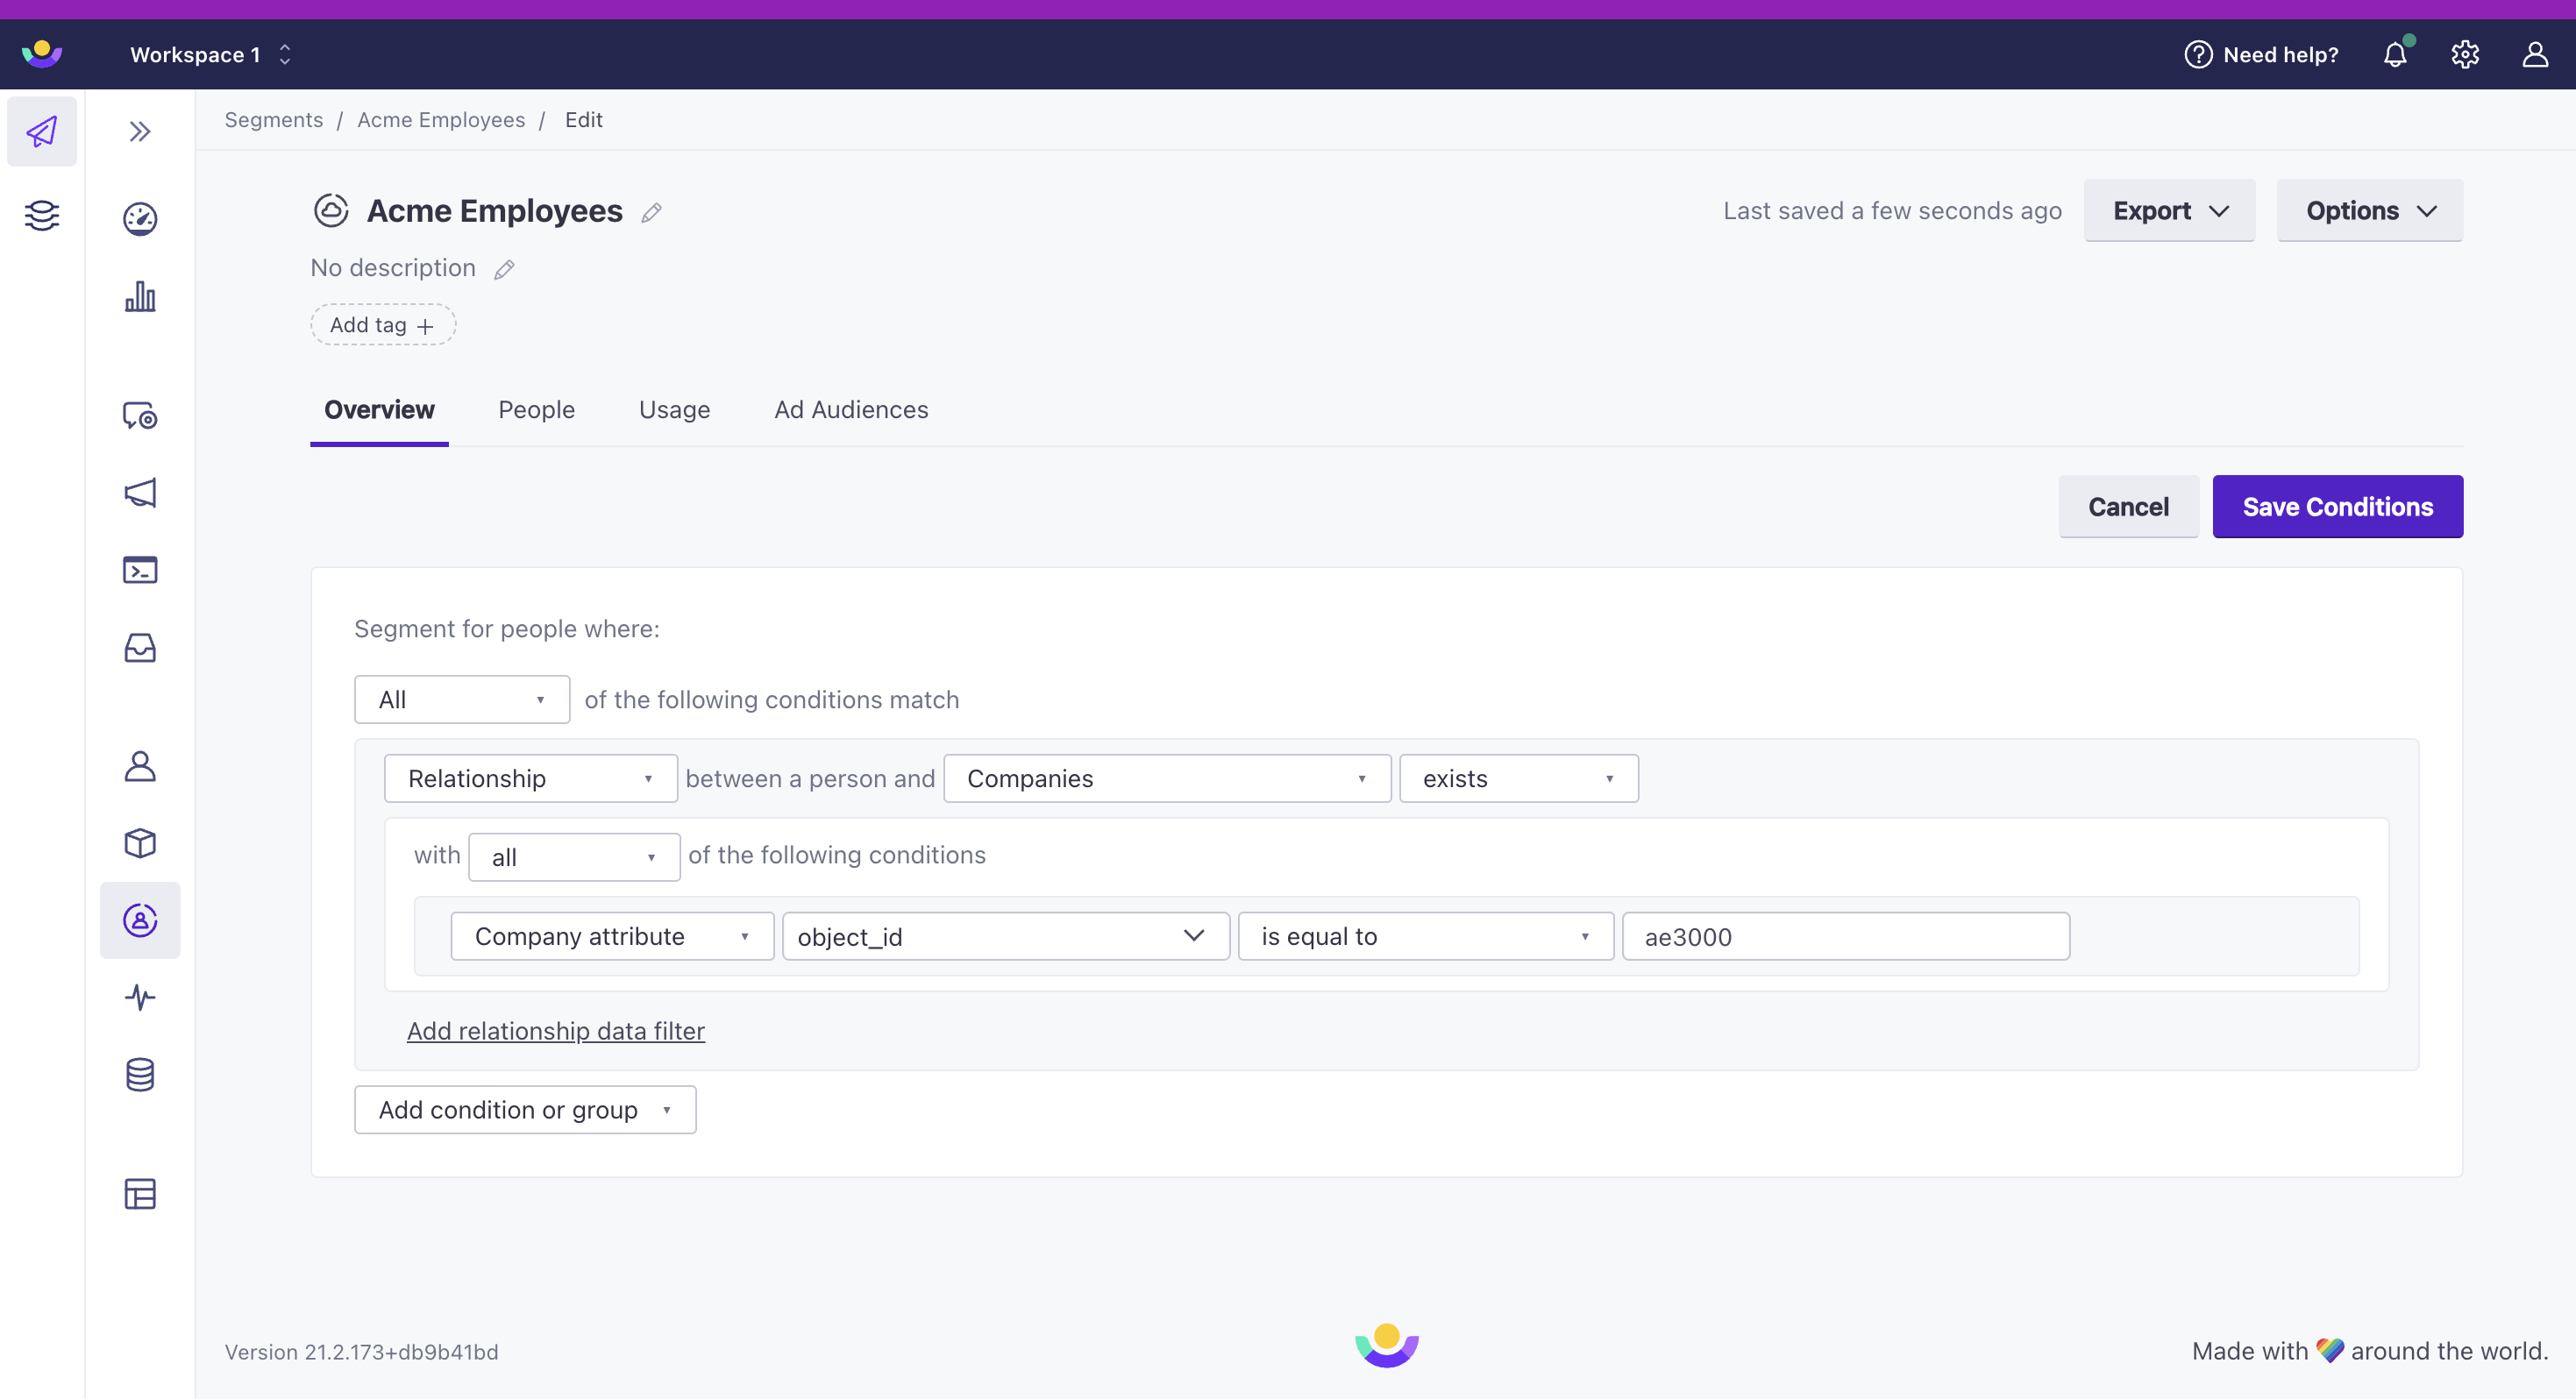

- (Optional) you can refine your selection by clicking Refine and selecting an object-based attribute condition. For example, you might want to limit a newsletter segment based on a
countryorplan_nameattribute. - When you’re done, click Save Changes.
Now you can use your segment in newsletters or to trigger campaigns.
You cannot backfill relationships
We don’t have a concept of historical relationships in Customer.io—at least not yet. For example, a person might have joined a company several years ago, but it will appear that they only recently joined the company when you set their relationship in Customer.io.
Because you can’t backfill relationships, you should be careful when using relationship-based segments to trigger your campaigns. For example, if you want to send a welcome campaign for new employees of a company, and you relate people to the company after you set up your campaign, you may inadvertently trigger a welcome campaign for those people.

