Send in-app messages
UpdatedBefore you begin
You’re welcome to try out our in-app message editor and set up campaigns with in-app messages before you integrate our SDKs. But your audience won’t be able to see your in-app messages until you integrate with our SDKs for your app or your website.
How it works
You can send in-app messages as a part of any campaign or broadcast workflow. In addition to creating your message, you’ll also determine when and where your message will show up for your audience:
- Page rules: the pages and screens a person must visit to see your message.
- Expiration: this determines how long a message will remain available to a person. It ensures that people only get relevant messages.
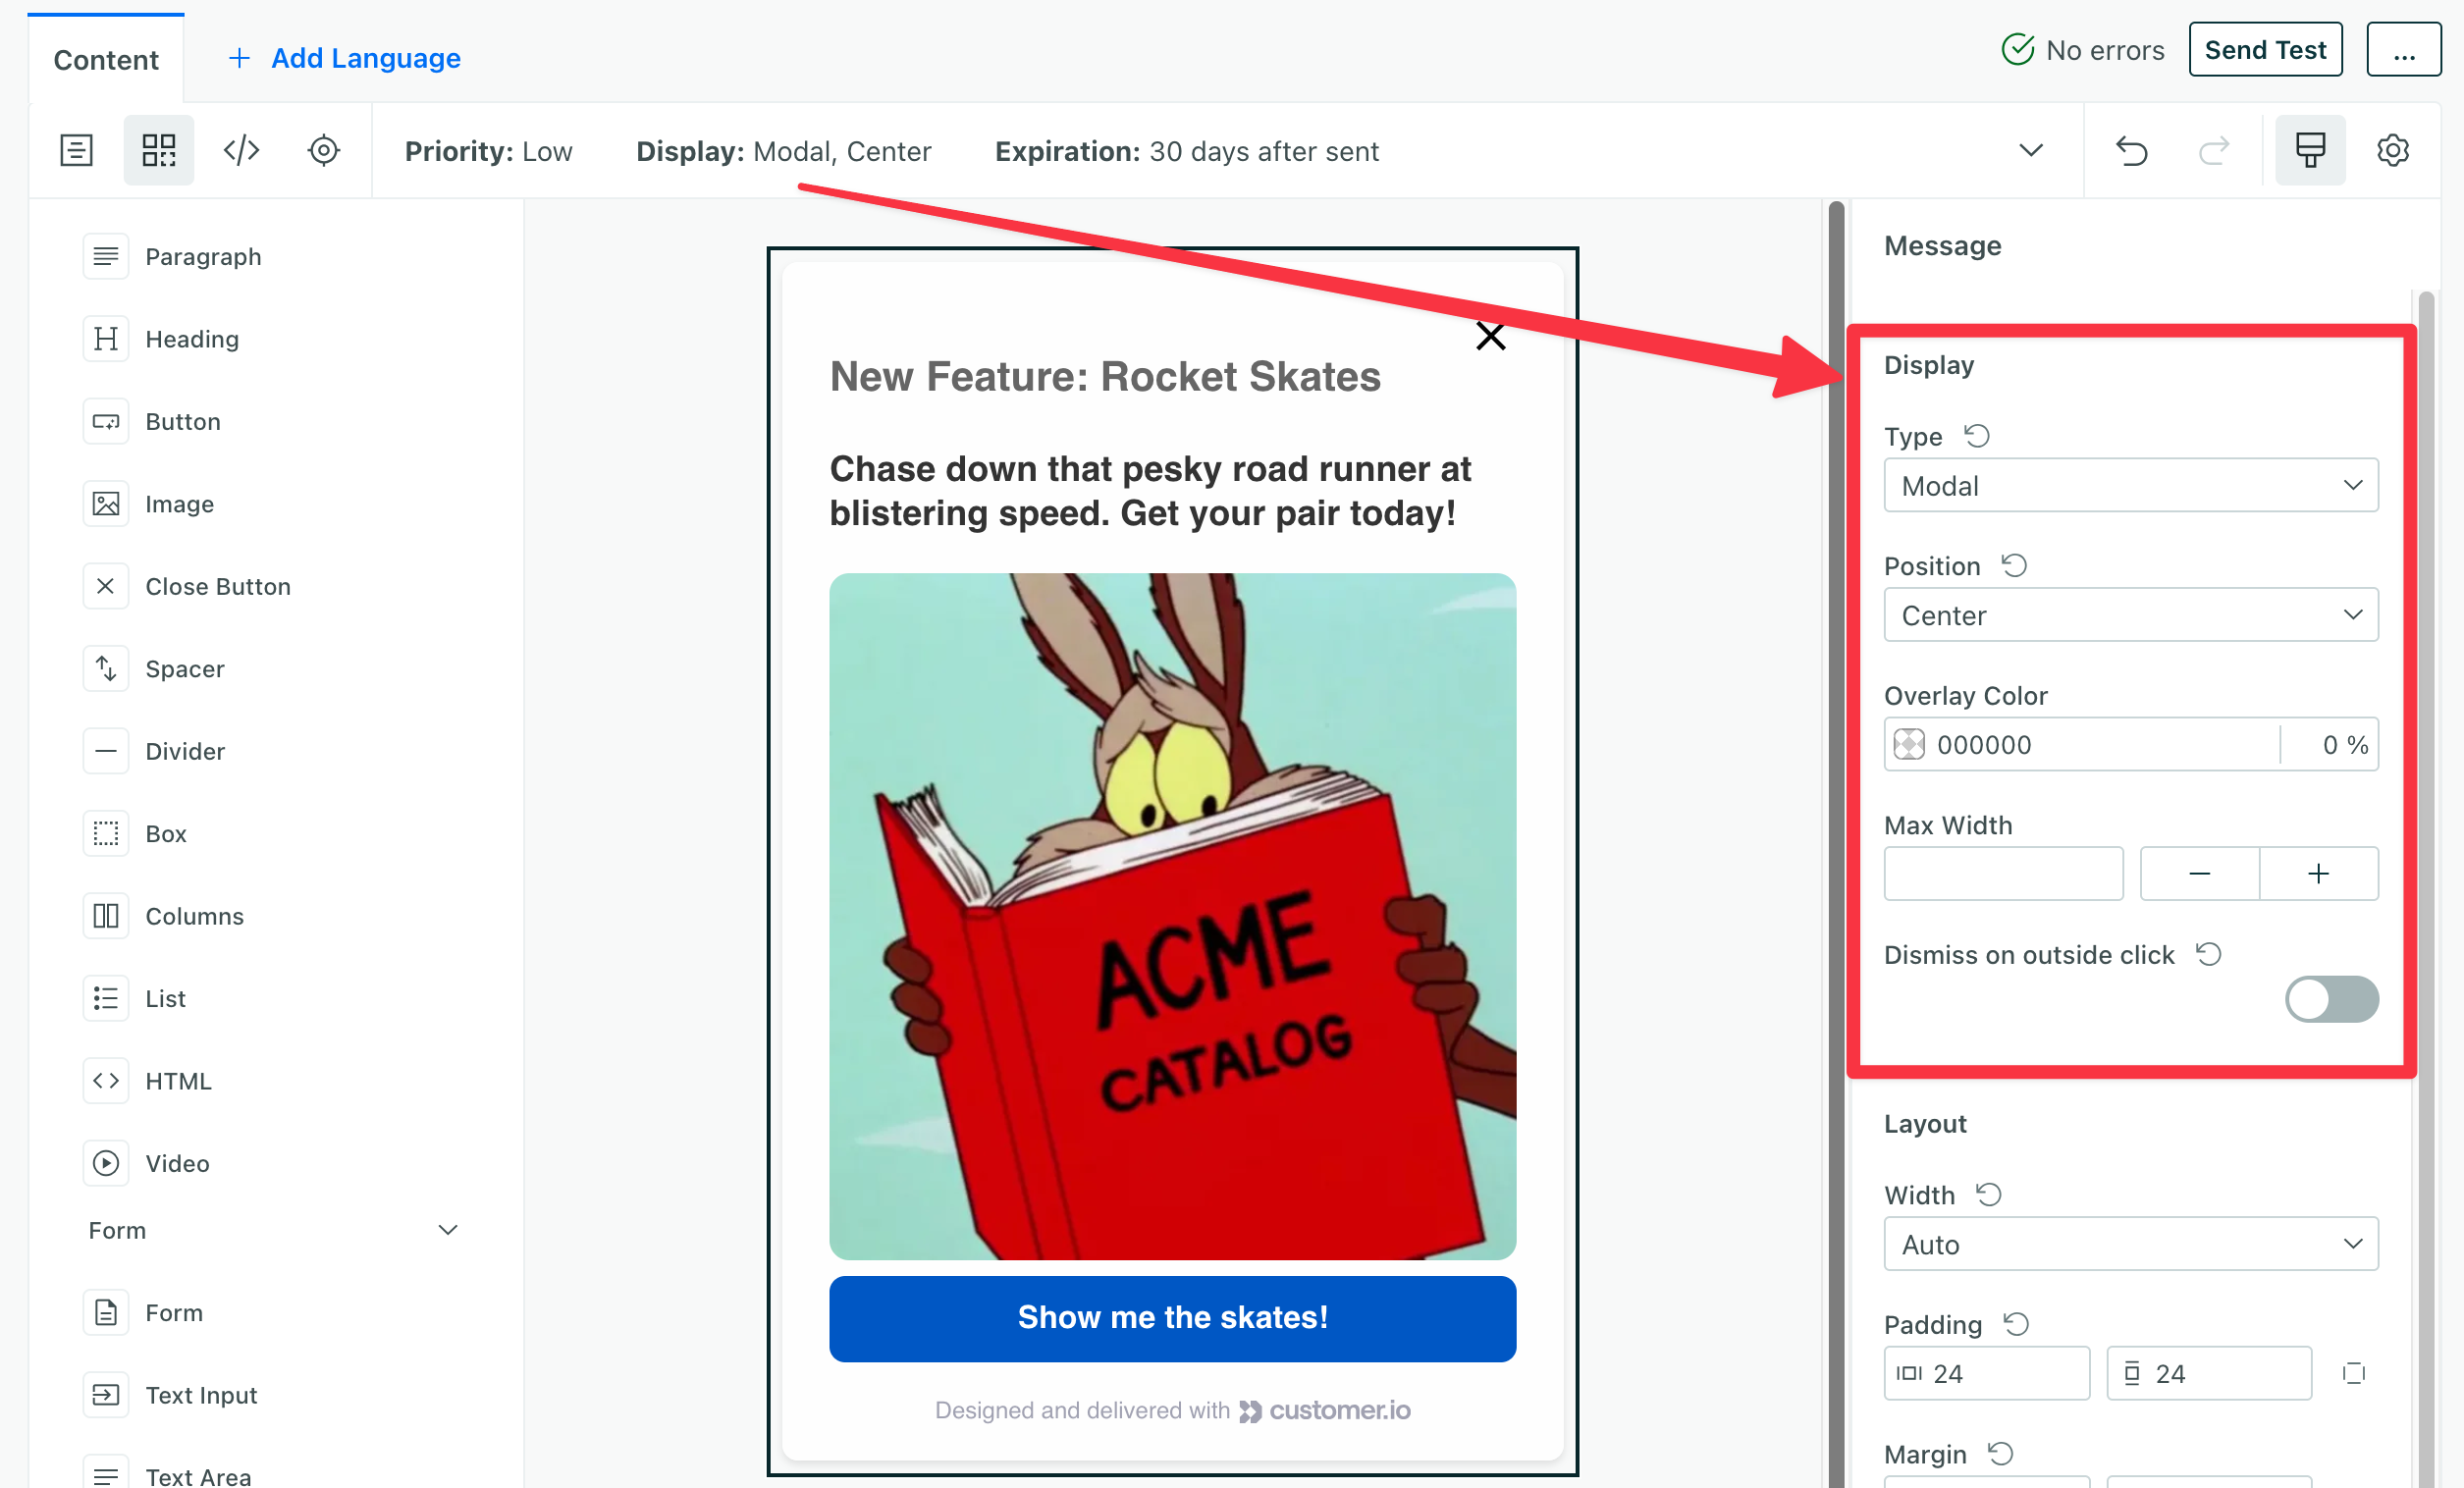
- Display and Position: where your message will appear on a page or screen. You can add different settings for steps in a multi-step message.
When you send a message, people don’t necessarily see it right away! Your audience will see your in-app message when:
- They visit a page or screen that matches your page rules.
- They’re identifiedThe Customer.io operation that adds or updates a person. When you identify a person, Customer.io either adds a person if they don’t exist in your workspace, or updates them if they do. Before you identify someone (by their email address or an ID), you can track them anonymously..
- The message has not expired.
in-app message]-->d{is the app open?} d-->|yes|f[user gets message] d-->|no|e[hold message
until app opens] e-->g{did the message
expire?} g-->|no, wait for user
to open the app|d g-->|yes|h[user doesn't
get the message]
Send an in-app message
Drag an In-App Message into your workflow.
Select your message, give it a NameThe name of a message. This is just a friendly name to help you understand the purpose of a message in your workflow., and click Add Content.
Select a starting template, a previous message, or start from scratch.
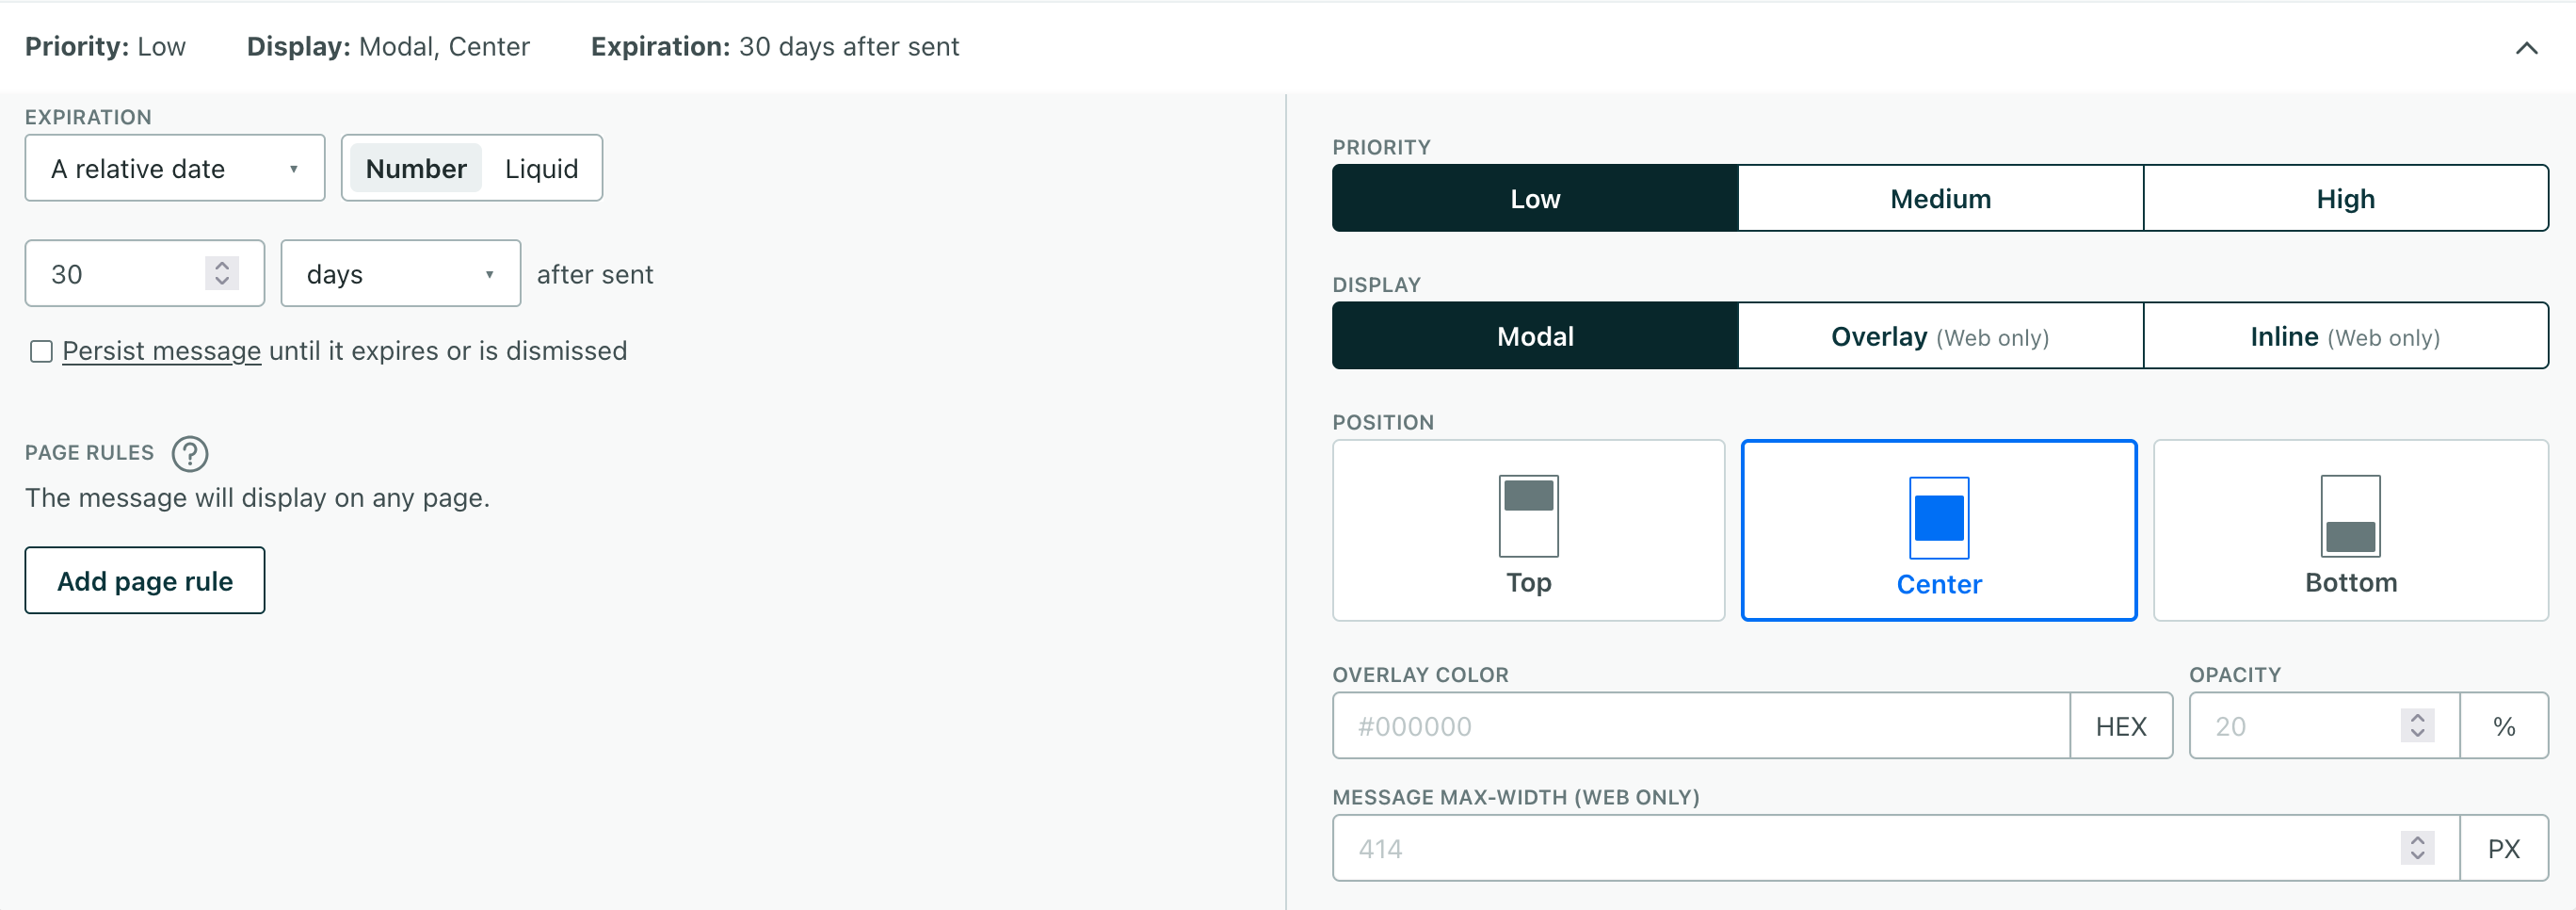
Set your message settings:
- Priority: negotiates between multiple messages with the same Page Rules and Display settings.
- Page Rules: determine the pages where a person can see your message.
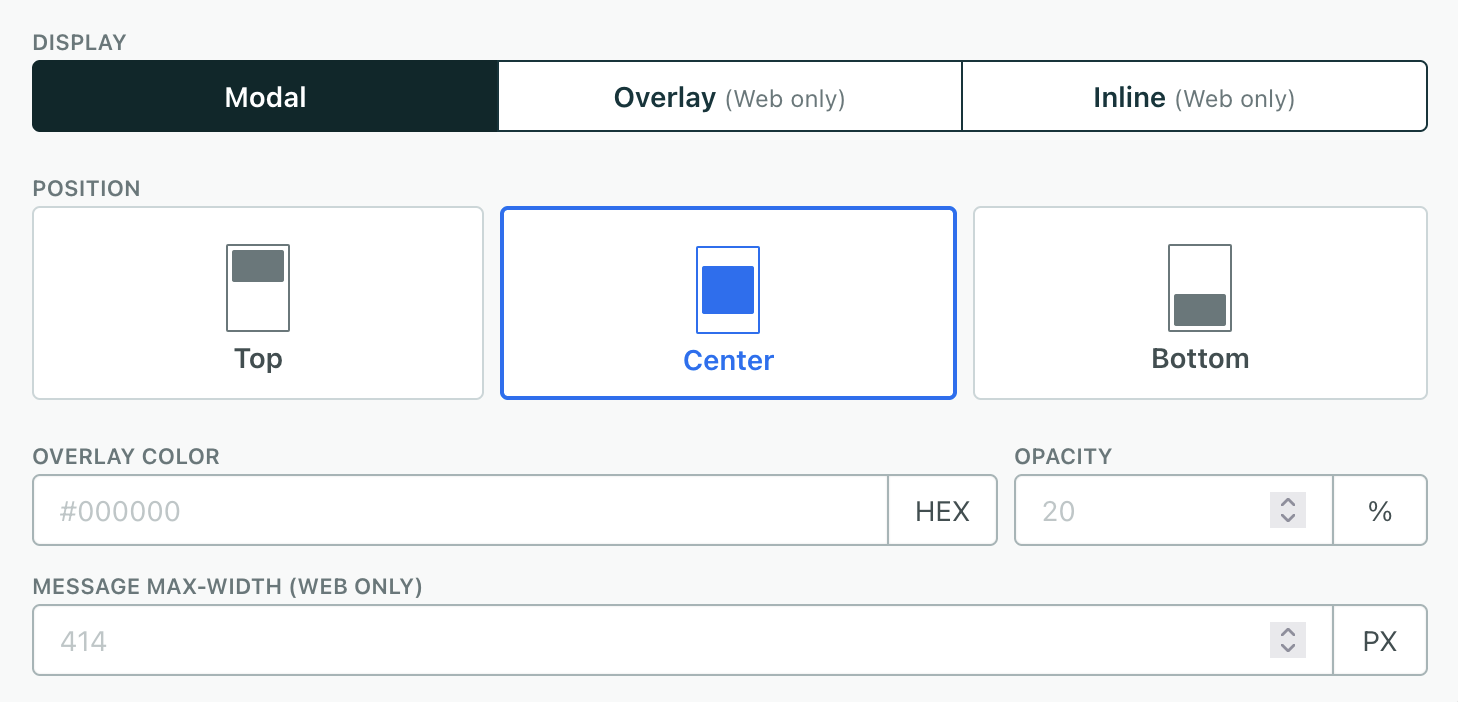
Set your message’s Display and Position. This determines where your message appears on a page. You can find these settings by selecting the message background or going to Steps and selecting the Step for your message. See Display and Position for more information.
Build your message. Remember, you can use liquidA syntax that supports variables, letting you personalize messages for your audience. For example, if you want to reference a person’s first name, you might use the variable
{{customer.first_name}}. to customize your message!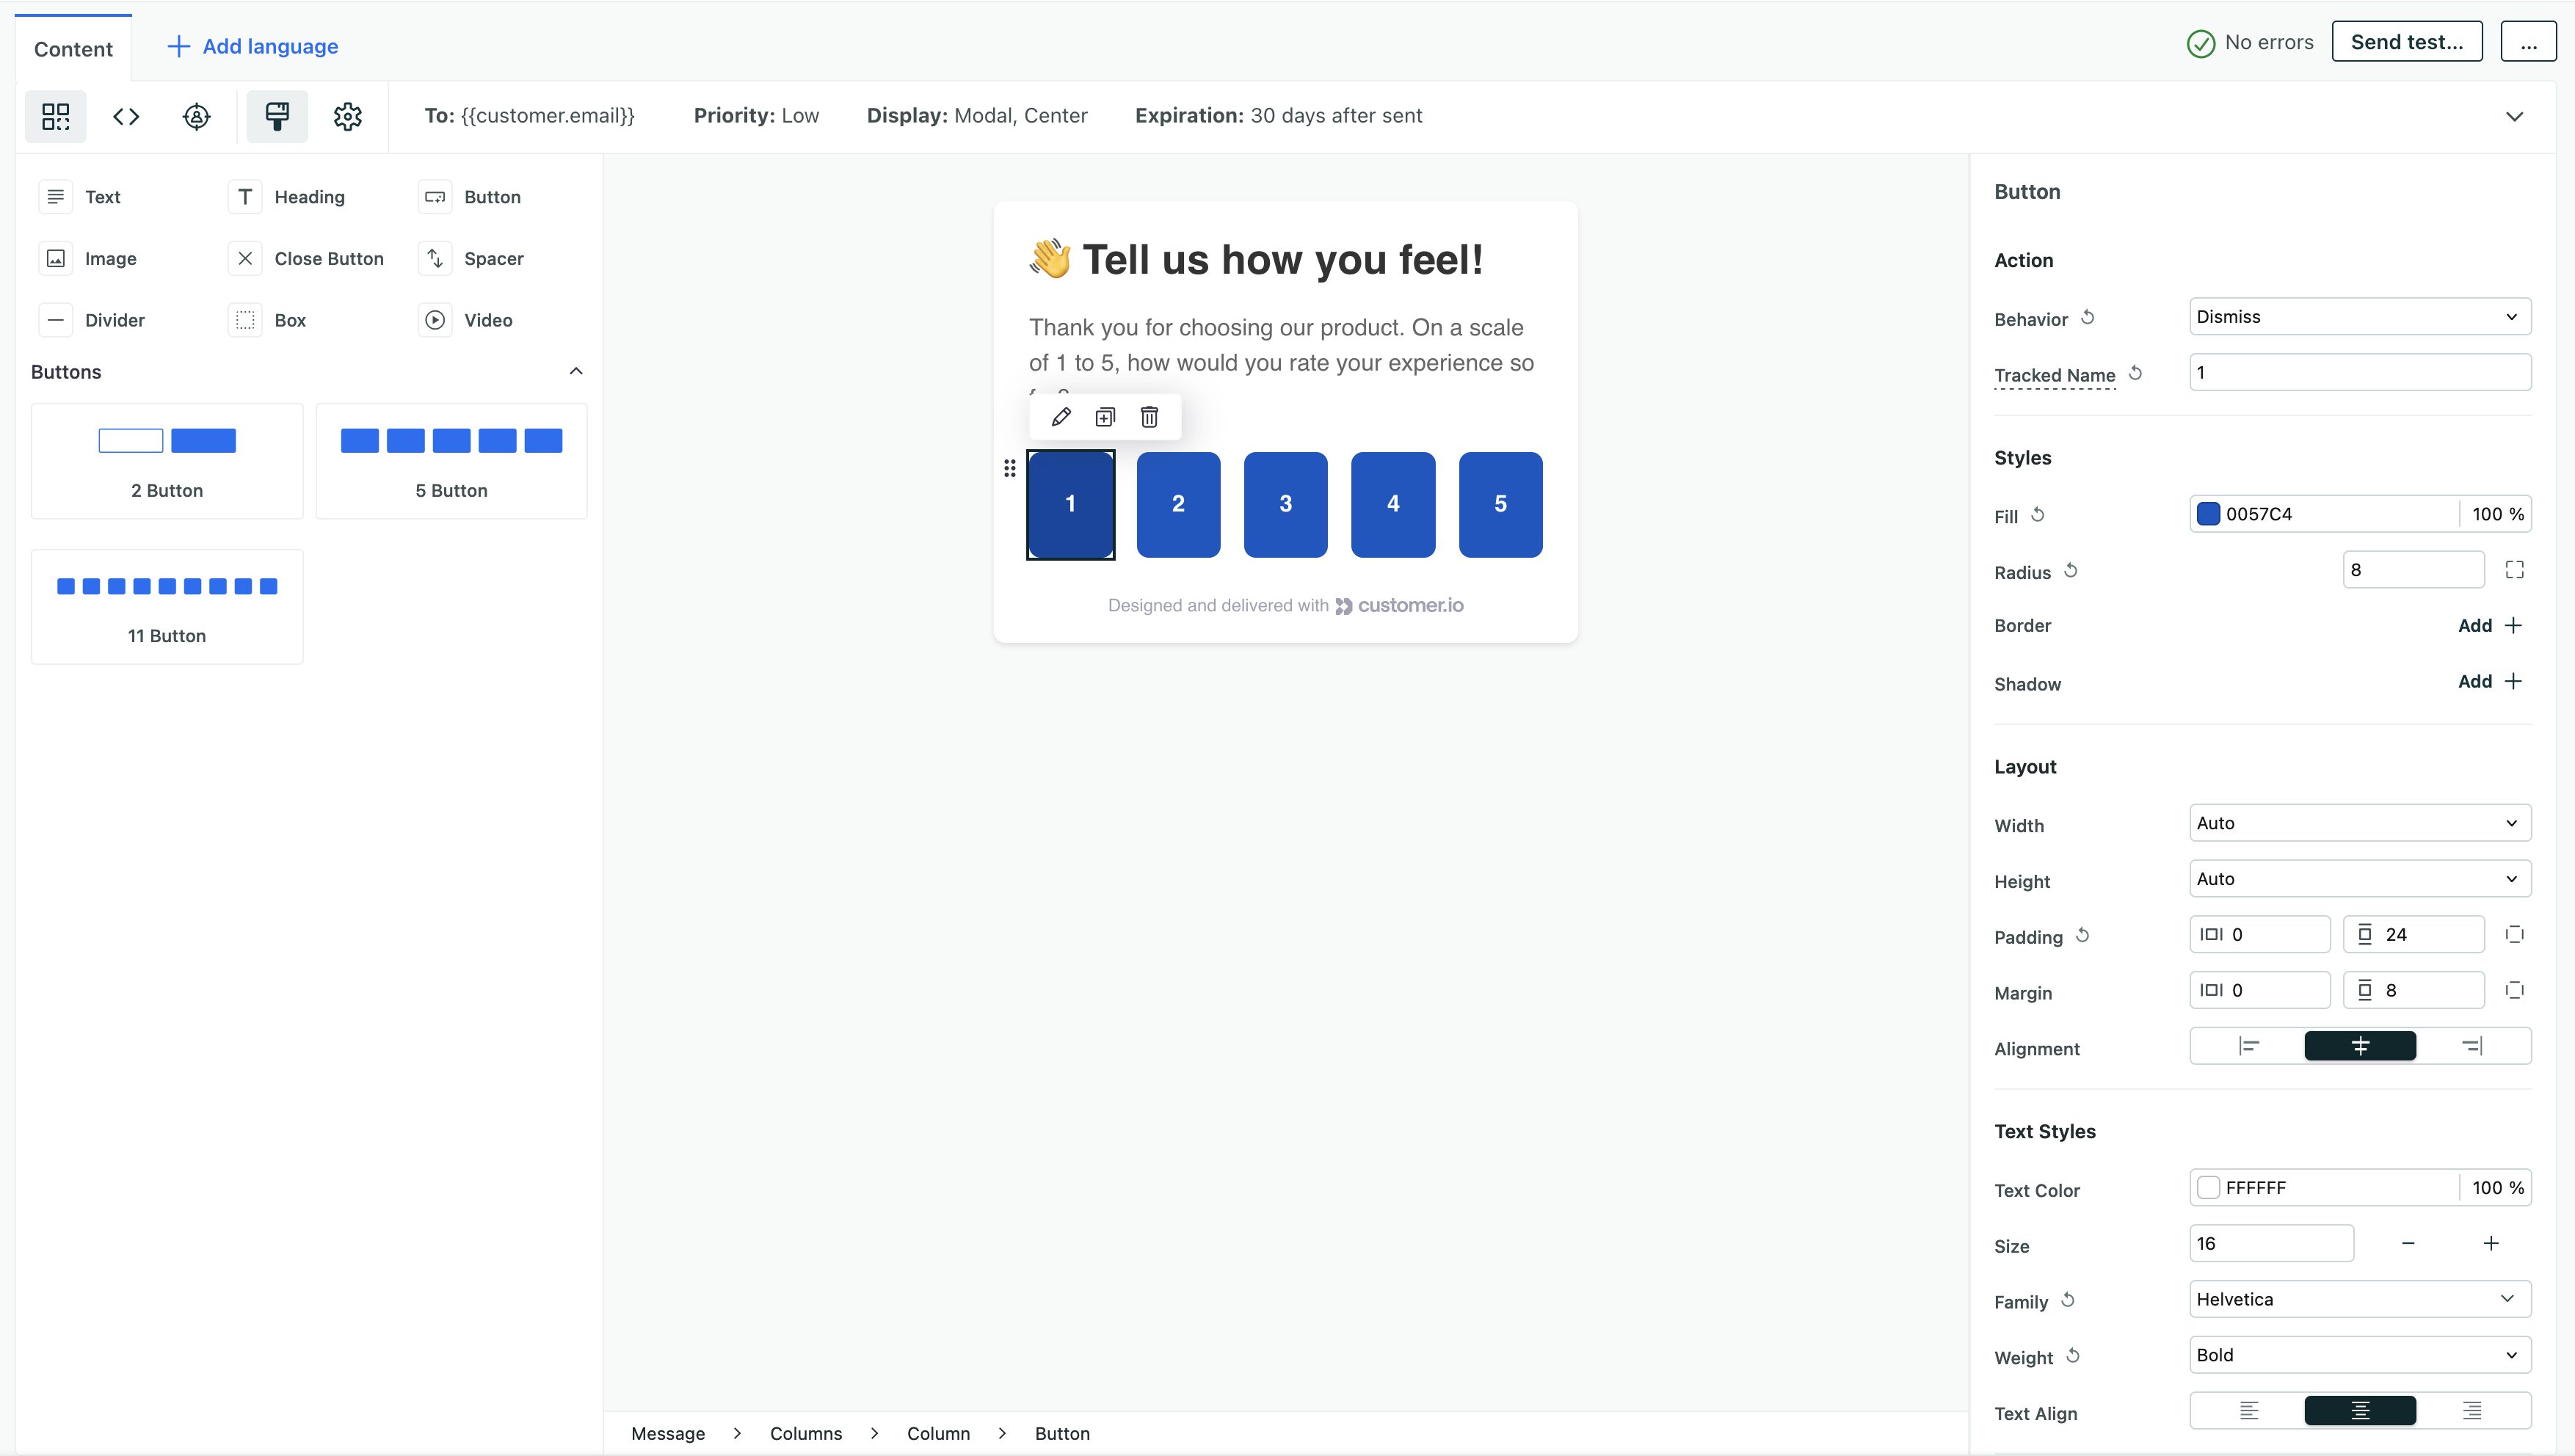
Click Save Changes.
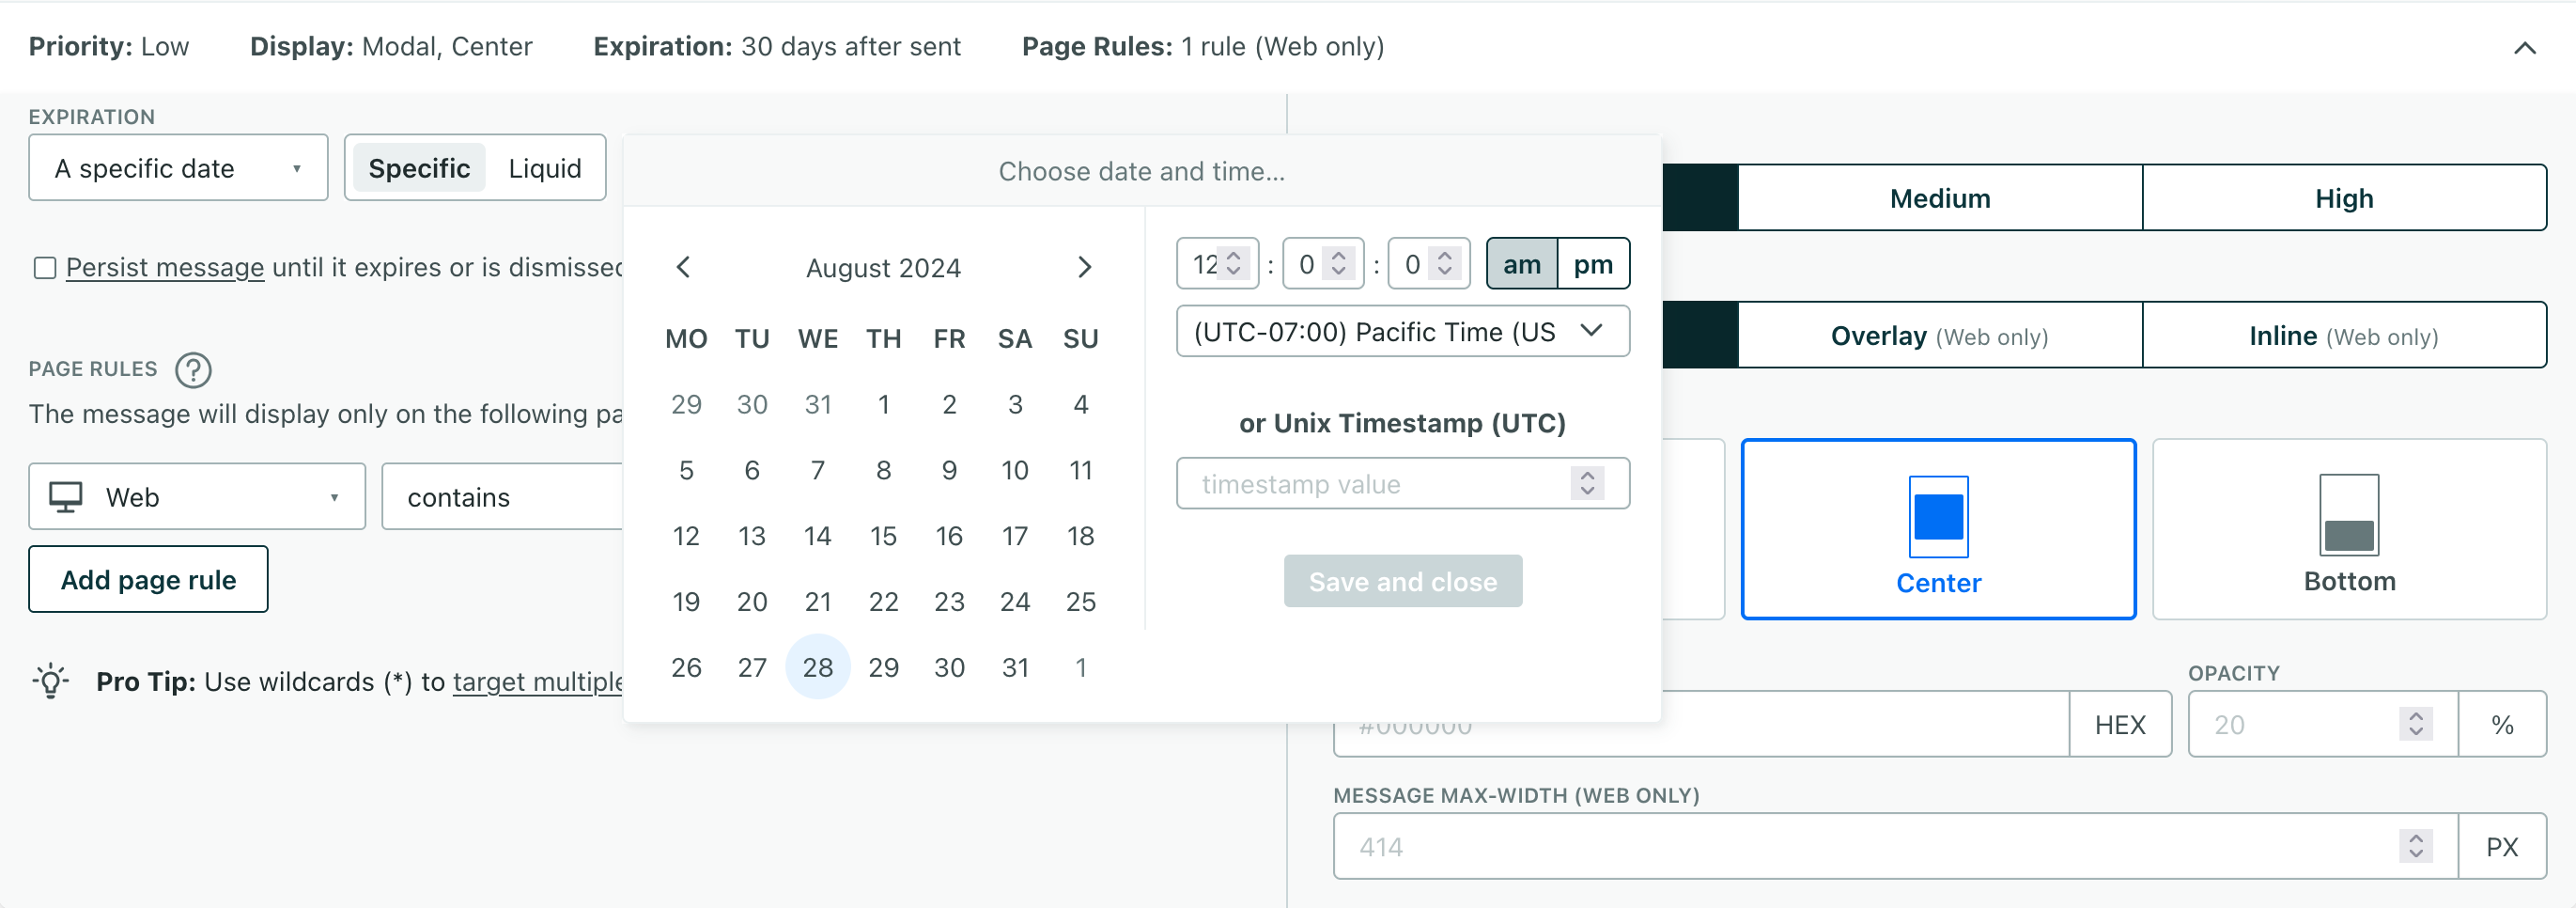
Message expiration
By default, messages expire 30 days after they’re sent, but you can change the expiration period to make sure that people only see your messages while they’re relevant. If someone doesn’t see your message within the expiration period, we’ll cancel the message.
However, many messages are more time-sensitive. For example, you wouldn’t want to send someone an expired coupon code. To prevent people from receiving old messages, make sure that you change the Expiration for your message. You can set your message to expire
- At a specific date and time
- At a relative time after the message is sent (for example, 10 days after the message is sent)
- Or using liquidA syntax that supports variables, letting you personalize messages for your audience. For example, if you want to reference a person’s first name, you might use the variable
{{customer.first_name}}. to configure the expiration date based on an event property, profile attribute, trigger variable, or snippet relative to the send time of the message.
The maximum expiration window is 60 days.
Persistent messages
By default, in-app messages only show once—the message disappears after the customer clicks, taps, or refreshes the page.
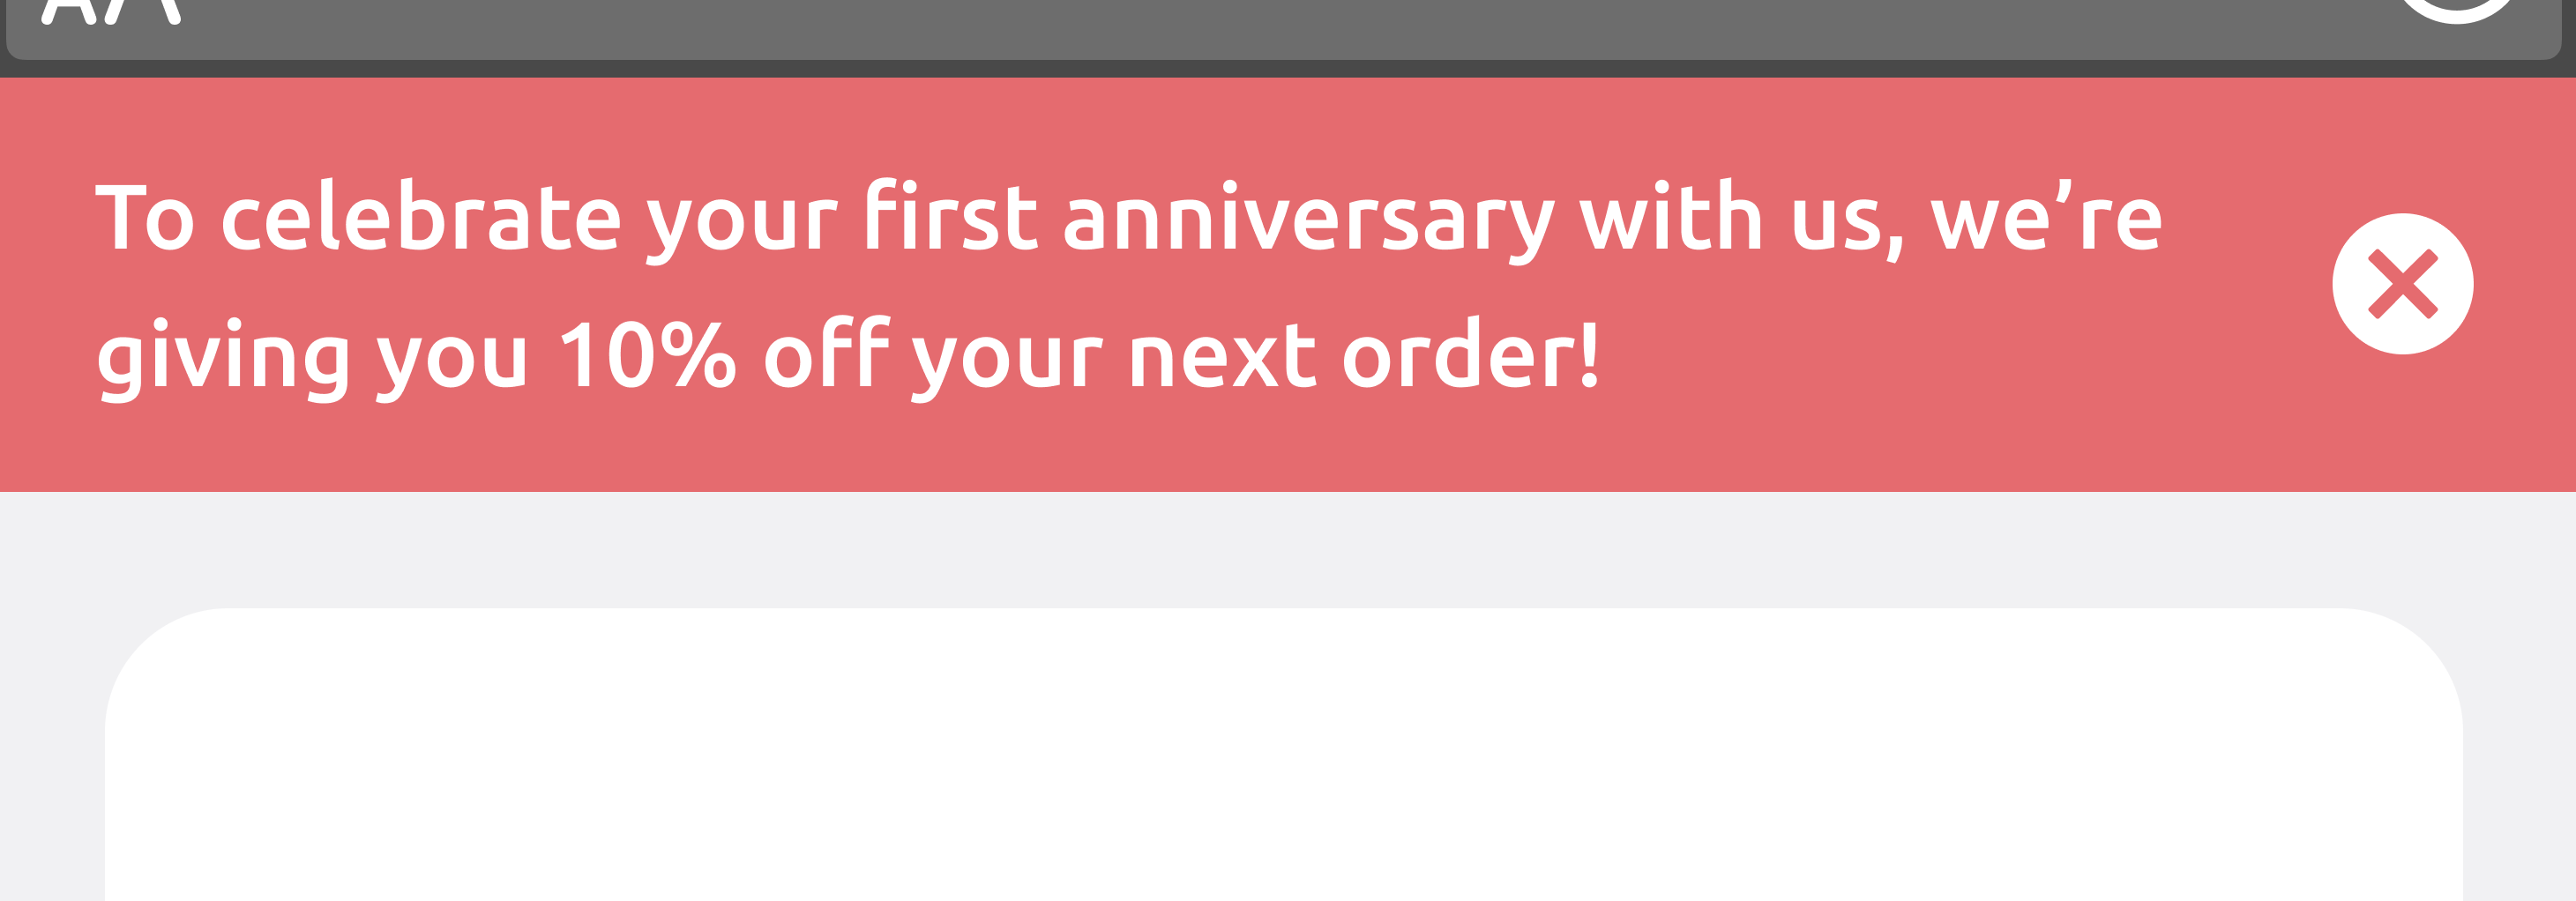
You can check the Persist Message option to show your message across multiple sessions and page views. Your audience will continue to see a persistent message until they close it or until the message expires. Make sure your messages include a Close button or an icon so that customers can permanently dismiss your message.
If you use one of our web SDKs, you’re all set to send persistent messages. For mobile devices, you must use the versions below or later to take advantage of this feature. Persistent messages are available starting in:
Test messages won’t persist
While you can test persistent messages, they won’t persist across pages like live messages do.
Message Priority
When you send a message, a user won’t see it until they visit a page or open your app. This means that a user can become eligible for multiple messages. We use priority to determine the order in which we deliver queued messages that have the same Display and Page Rule settings.
Priority affects the order in which we deliver queued messages, but it doesn’t replace messages that are already displayed. If a person visits a page and gets a low-priority message before you send a higher-priority message, they’ll see the low-priority message. Our SDKs won’t replace the lower-priority message with the higher-priority message.
Priority applies based on your Display setting:
- Modal (Position does not matter): We only display one modal at a time. If you send two modal messages, we’ll display the one with the highest priority. If you send two messages with the same priority, we’ll display the one that was sent first.
- Overlay (Position matters): We can display up to six overlay messages at a time! One for each Position—top left, center, right and bottom left, center, right.
- Inline (Position ID matters): Priority affects the order messages are queued for delivery to a specific position ID. If a message is already displayed in an inline position, higher-priority messages won’t replace it until the current message is dismissed or expires.
You can avoid competing messages using Page Rule triggers or by using conditions in campaigns to check for competing messages. Page rules cause messages to appear when a person visits specific pages in your app or website, helping you deliver messages that are relevant to the pages your audience visits.
Page rules
By default, your audience will see your message on the first page or screen they visit. Page rules let you determine the specific platforms and pages or screens that a person must be on to see a message. They help you send messages that are relevant to the places your audience visits and the things they do.
You can set two kinds of page rules:
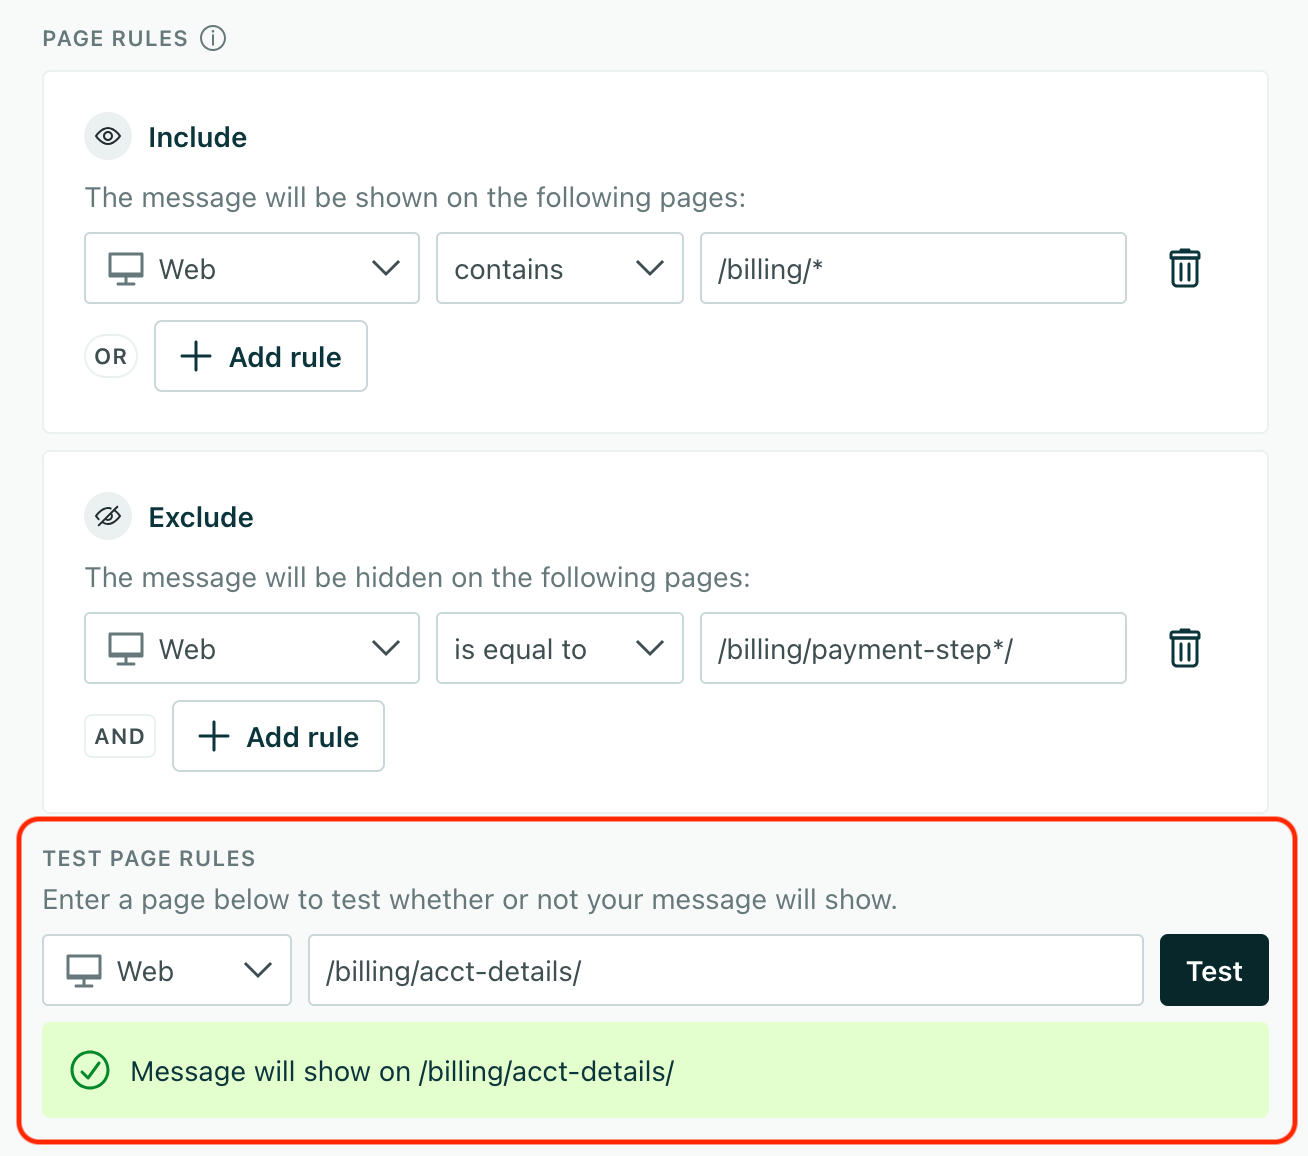
- Include: your message will appear on any of these pages.
- Exclude: your message will not appear on any of these pages.

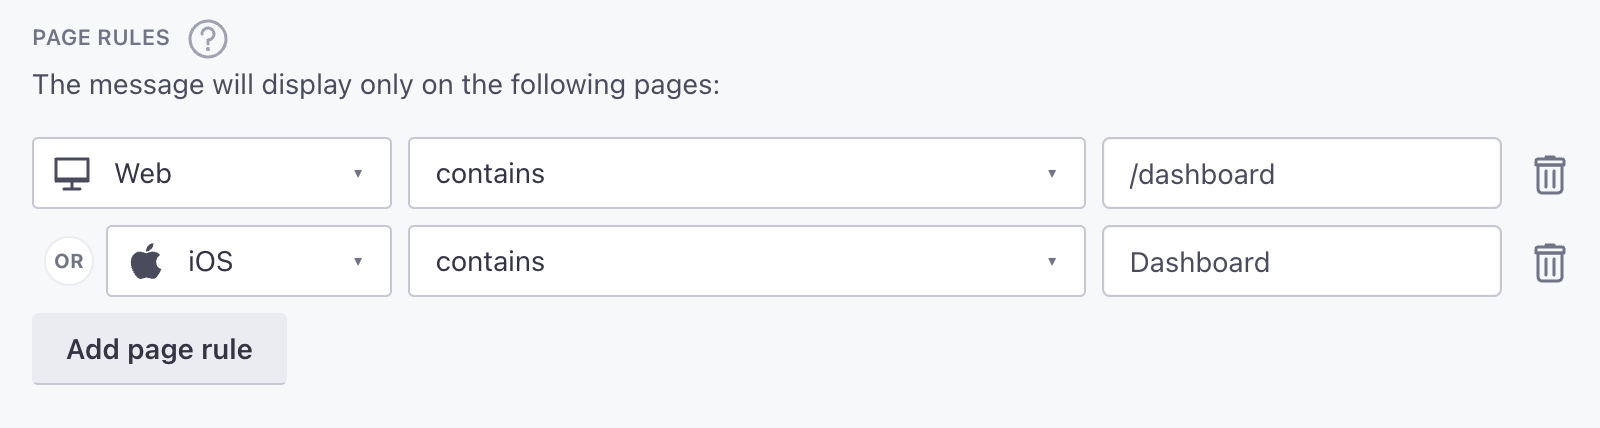
Click Add Rule to add a page rule. Click it again to add multiple rules. When you add a rule, you’ll set the platform and then the pages or screens a person must visit to see your message.
- You can use wildcards (
*) in rules to match multiple pages. For example the/journeys/path would only match a single page but/journeys/*would match all pages in the/journeys/path. - You can also use liquidA syntax that supports variables, letting you personalize messages for your audience. For example, if you want to reference a person’s first name, you might use the variable
{{customer.first_name}}. to set a page rule based on an event property, profile attribute, trigger variable, and so on. For example/{{event.product_family}}/*would match pages that begin with the value of theproduct_familyevent property. - You can look for query parameters (or values of query parameters) in the URL using the contains operator. For example,
contains utm_sourcewould match pages with autm_sourcequery parameter.
Evaluating multiple page rules
When you set multiple rules of the same type, any matching path satisfies the rule. For example, if you have multiple include rules, a page matching any of your rules will show your message. Similarly, any page matching your exclude rules will not show your message.
When you set both include and exclude rules, a person must match at least one include rule and not match any exclude rules to see your message. If a person goes to a page that matches an exclude rule, they won’t see your message even if they also satisfy an include rule.
least 1 include rule?} b-->|yes|c{Does the page match
an exclude rule?} c-->|no|d(show message) b-..->|no|e(Do not
show message) c-.->|yes|e
Test your page rules
Page rules may contain regular expressions, and the rules along which we evaluate them can be hard to understand. That’s why we have the Test Page Rules section below the page rule editor.
Here you can enter a URL or page path and see whether your message will appear or not. Use tests to fine-tune your page rules and make sure that your message appears on the right pages before you send it.
What is a “page”?
A “page” means something different for your mobile apps and website:
- Mobile Apps (iOS and Android): the page is the same as the
namevalue that you send inscreenevents. For example,billing*would cover all screens in your app that begin with “billing”. - Websites: the page is the URL (
window.location.href) unless you passpagecalls with a different name parameter. For example,https://example.com/*/billingwould cover paths on your website like your in-app billing pagehttps://example.com/ui/billingor documents about billing underhttps://example.com/billing.
Use * to represent all pages
When you select a channel, you have to enter a page rule. But, if you want to show a message on every page on your website or app, you can simply enter *. This wildcard matches all pages or screens in your app or website—even if you don’t track your audience via page or screen calls.
Page rules in single-page applications
If your website is a single page application you must send page calls to tell Customer.io what “page” a person is on.
You might use page rules to point out new features within specific areas of your app or new products on your website and you can even use liquidA syntax that supports variables, letting you personalize messages for your audience. For example, if you want to reference a person’s first name, you might use the variable {{customer.first_name}}. to set a dynamic value (like {{event.product_url}}). Page rules also help avoid conflicting messages. If you send two messages of the same priority without page rules, they’ll appear one after the other; if you set a page rule for at least one message, it’ll distribute the messages across your app, and only show when your audience is on a page matching the rule.
Keep in mind: page rules are case sensitive. If you’re targeting your mobile app, make sure your page rules match the casing of the name in your screen events. If you’re targeting your website, your page rules should always be lowercase.
Position your message
Click the message background to get to the display and position settings.
The Display and Position settings determine where your message appears on a page or screen. You can set different values for different steps in a multi-step message, giving you more control over things like product tours or other flows where you need your message to move.
The Overlay option effectively limits your message to your website visitors because mobile apps won’t display the message.
| Display setting | iOS | Android | Web | Description |
|---|---|---|---|---|
| Modal | Position your message at the top, in the center, or at the bottom of your audience’s screen. | |||
| Overlay | Position your message in the location you select, relative to your audience’s browser. | |||
| Inline | Replace an empty element with your message. For example, you may have dynamic div elements on a homepage that you periodically update with new content—like new products or features. |
Inline messages
Inline messages are a special type of in-app message that appear inline with the content on a page or screen. They’re a great way to add interactive elements to your page without interrupting the user’s experience or having to release a new version of your app.
To set up inline messages, you need to add empty elements to your website or views to your app to contain your inline messages. Then, when you send an inline message, you’ll specify the Position ID for your inline message—the empty element or view where you want to display your message.
You might need to work with your developer or marketer counterpart to work with inline messages. For example, if you’re a marketer, you might need to work with a developer to add elements or views to your app. And, if you’re a developer, you’ll need to work with whoever sends messages to figure out where you should place inline message positions and what IDs to set for them.
in-app message) a-->b{Is the recipient on
the right page?} b-->|yes, page matches
page rules|c{Does the position
ID exist?}
c-->|yes|d(Display inlinein-app message) b-.->|no, page doesn't match page rules|e(Don't display inline
in-app message) c-.->|no|e
Custom message width
By default, the max width of a message is 414 pixels, a common breakpoint for mobile devices. This might not be wide enough for certain messages—especially ones that you display on your website.
If you need more space, you can set a custom Message Max-Width (px) for your in-app message. This expands messages to the set value, while still being responsive (100% of width) when the screen size is smaller than the max-width value.
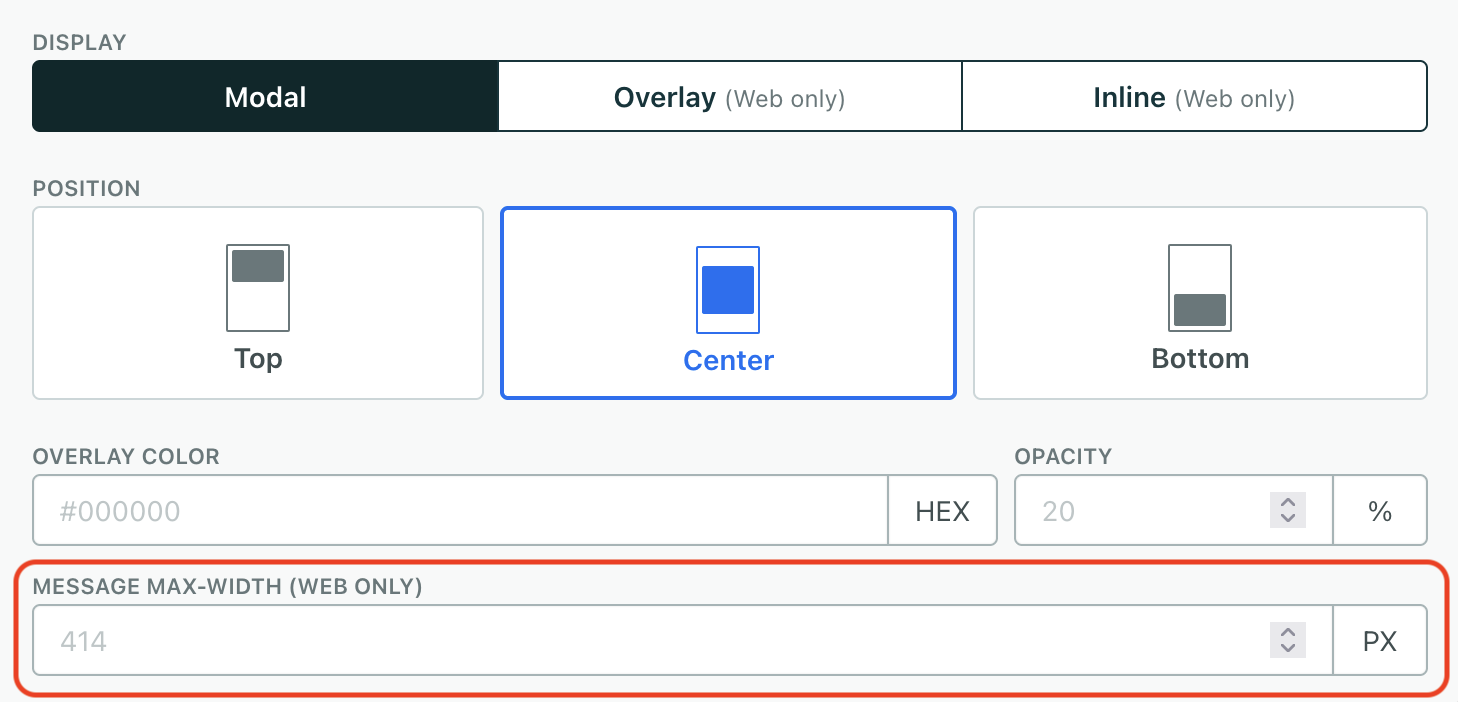
Custom background overlay color and opacity
When you use the modal display position for your in-app message, we display your message on top of a background overlay. The overlay has a default hex color of #000000 (black) with a 20% opacity.

You can change the Overlay Color and Opacity values to better fit your brand when you configure your in-app message’s display settings.
Dismiss on outside click (Web only)
The Dismiss on outside click setting lets users dismiss a message when they click outside the message on your website.
We wait 1 second after the message appears before we check for clicks outside the message. This prevents the user from unintentionally dismissing the message when they click on something on your page.
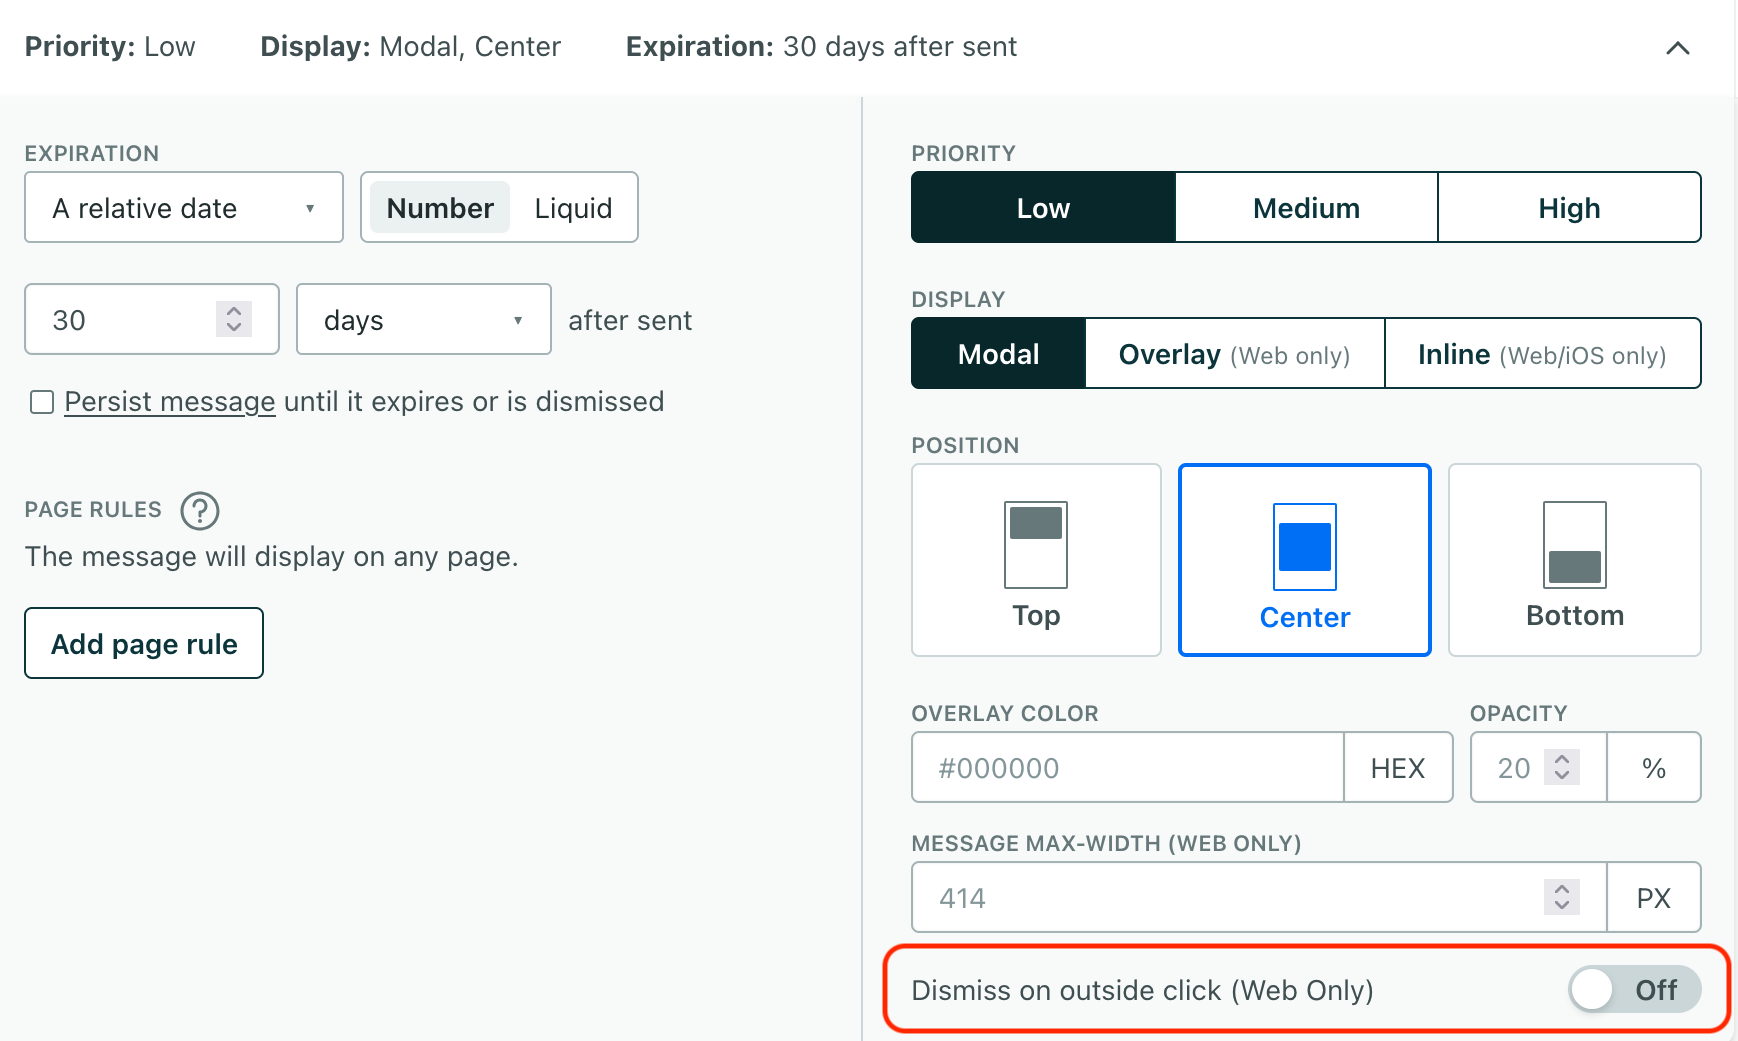
If you enable this setting, clicking outside the message also sends the in-app:message.dismissed event—just like if someone clicks the close button in your message. You can listen for this event and perform additional actions when a person dismisses a message.
Limit your message to web or mobile audiences
By default, when you set up an in-app message, your audience can see your message in your mobile app or on your website—anywhere you’ve integrated in-app notifications. You can limit your message to specific message channels using page rules.
When you set a page rule, your message will only go to the channels and pages that match your rules. If you want to send a message to any page on your website or mobile app, you can use a wildcard (*). You can also use wildcards in your path to send your message to all pages within a directory or all pages that match a pattern.
For example, if you want to send a message to all pages in the billing path on your website, you could set a page rule like Web contains /billing/*.
Segmenting an audience of app users
When you set up your campaign, you may also want to make sure your segment includes, or filters for, people who have a version of the SDKs supporting in-app messages. If someone in your audience doesn’t have a version of your app that supports in-app messages, they’ll never receive your in-app messages. Messages intended for them will be sent, but never opened, which can produce inaccurate metrics.
Our SDKs have implemented in-app messages in different versions. So, if you create segments or filters for this purpose, you should group platform AND cio_sdk_version conditions:
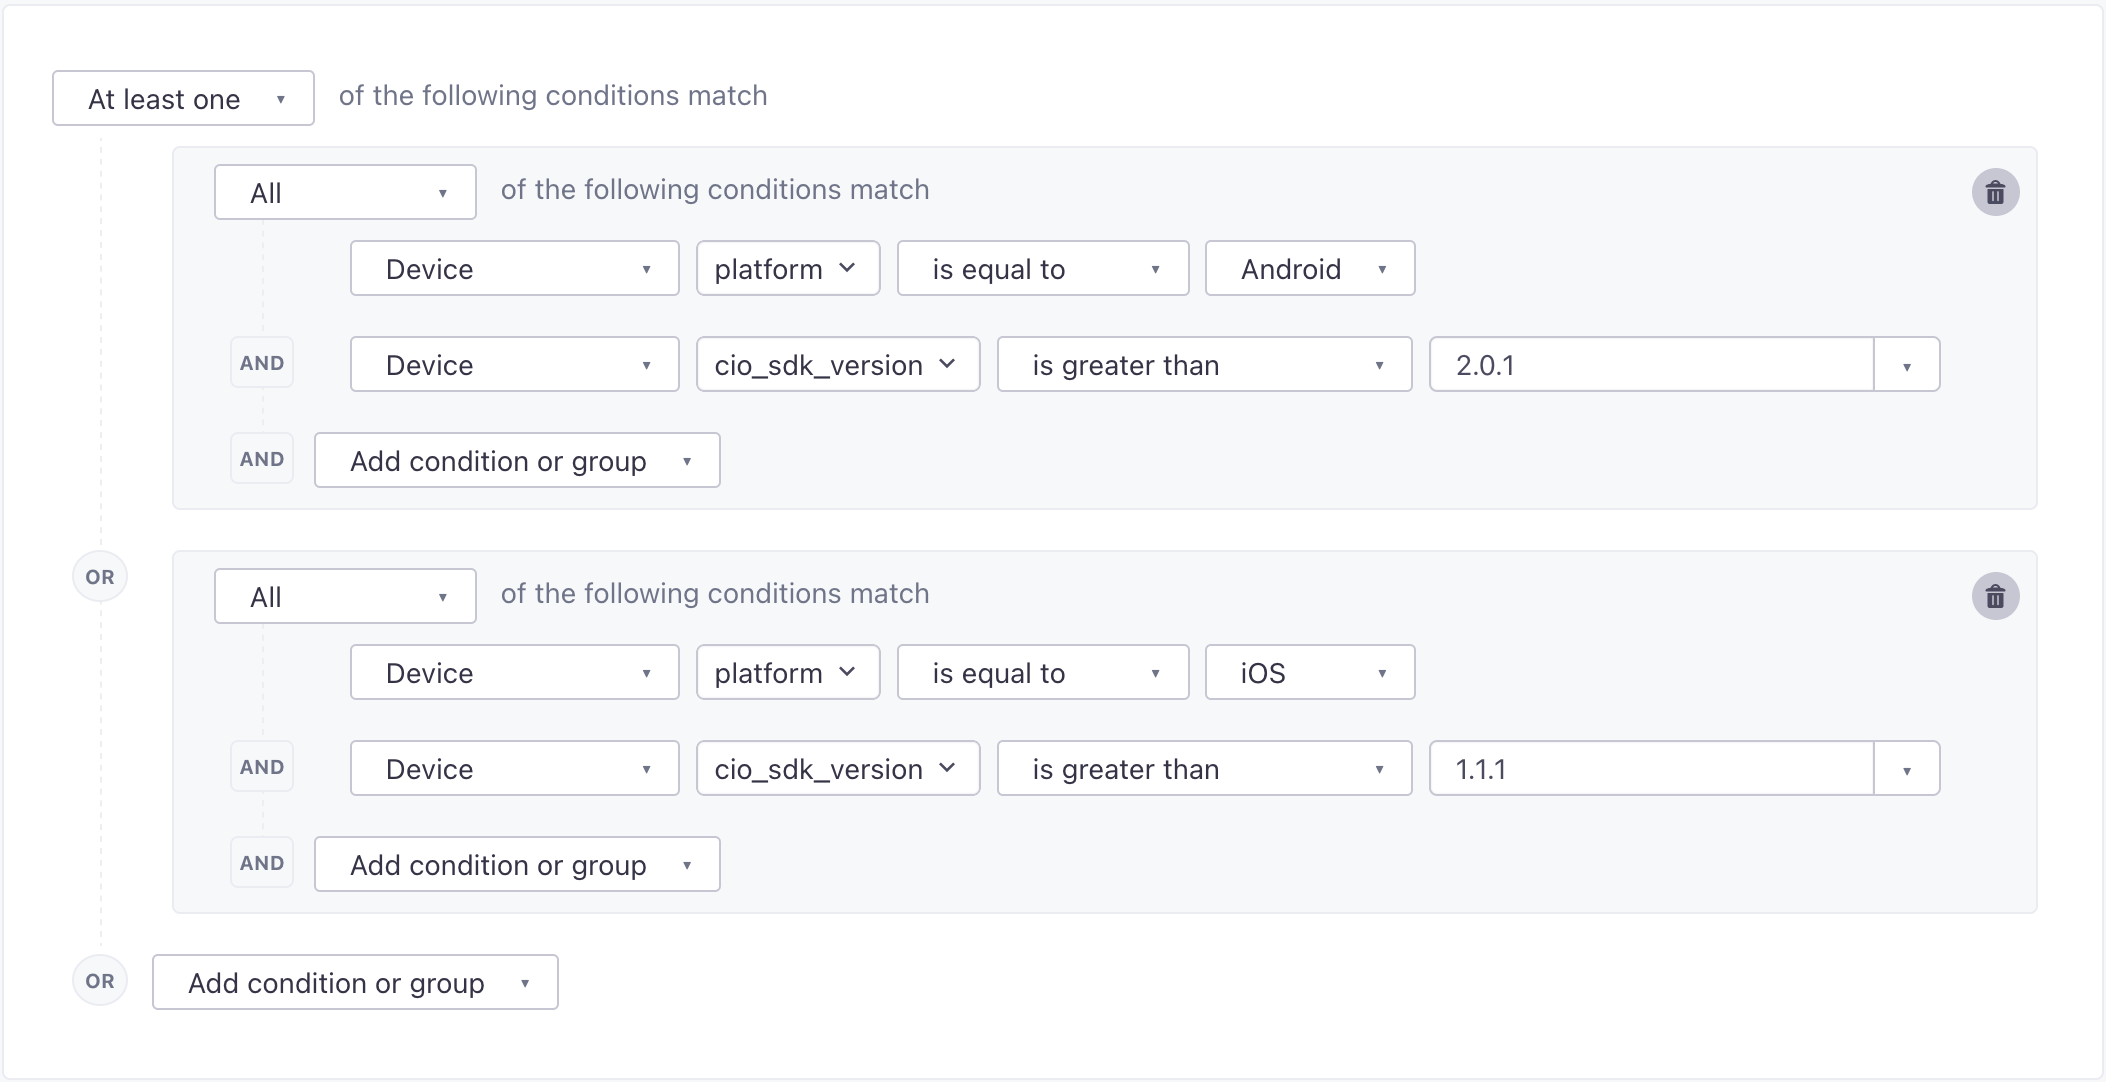
Use filters for event triggered campaigns
If you send an in-app message as a part of an event-triggered campaign, you might want to use a segment to exclude people who don’t have versions of your app supporting in-app messages.
Test your in-app message
You can send a test version of your in-app message to make sure that your message looks and behaves the way you expect it to.
Click Send test and find the person you want to send your message to.
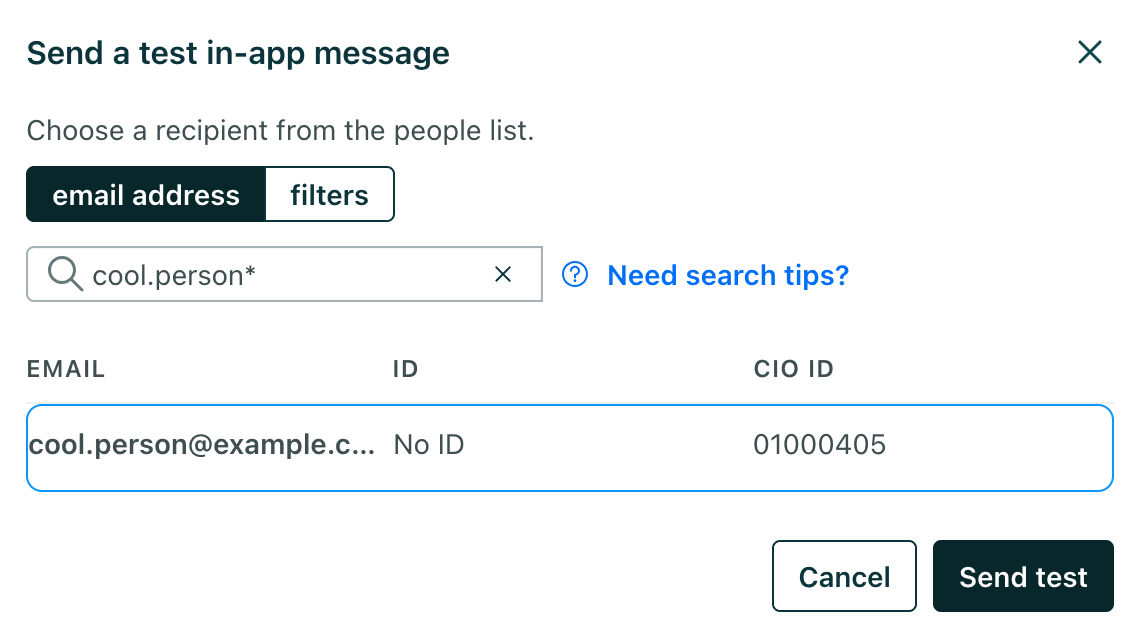
If your test looks good, then you’re all set to send! If not, you can edit your message and send more tests to check your work.
Testing your first message? Refresh your app!
Our SDKs poll to determine when we should deliver a message. But before you send your first message, we poll slowly because you haven’t sent anything yet! When you send your first test message, you should clear your cache or restart the app where you expect to get the message to kick-start our normal polling rate.

