The subscription center
UpdatedA subscription center helps you differentiate between the different types of messages you send and lets your audience decide what kinds of automations and messages they want to receive.
If you’re looking for information on global subscriptions or the unsubscribed attribute, check out our overview on subscription options.
How it works
The subscription center lets people manage what messages they get through topicsA category of message, set within your workspace’s subscription center, that people can subscribe to or unsubscribe from. Topics let your audience determine the kinds of messages they want to get from you. (content types) and channel preferences (delivery methods). If a person is unsubscribed globally, from a topic, or from a channel, they won’t receive the message. Here’s how the subscription logic works:
unsubscribed true?}
c-....->|yes|f[Person is only eligible forin-app or Slack messages] c-->|no|g{Is the subscription
center enabled?} g-->|yes|d{Is the person
subscribed to the topic?} d-->|yes|ch{Is the person
subscribed to
the channel?} ch-->|yes|e[Person receives message
according to preferences] ch-.->|no|chblock[Person does not
receive message] d-.->|no|chblock g-...->|no|i[Person receives message]
Topics control what kind of content people receive, and channel preferences control how they receive it. Both the topic and channel must be subscribed for Customer.io to send a message.
Subscription preference settings do not filter customers out of automations or broadcasts.
Default subscription status
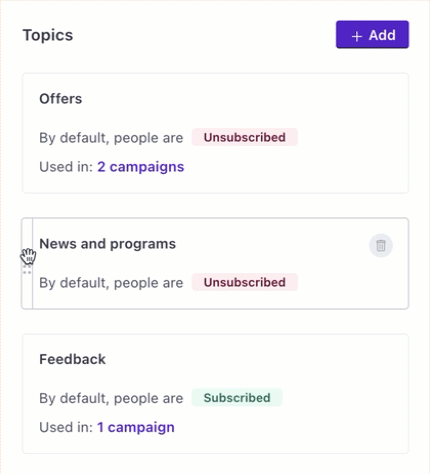
When you add topics or channels, you decide whether people are automatically opted in or opted out. You can always check your subscription center in workspace settings to remind yourself of the default status of each topic or channel:
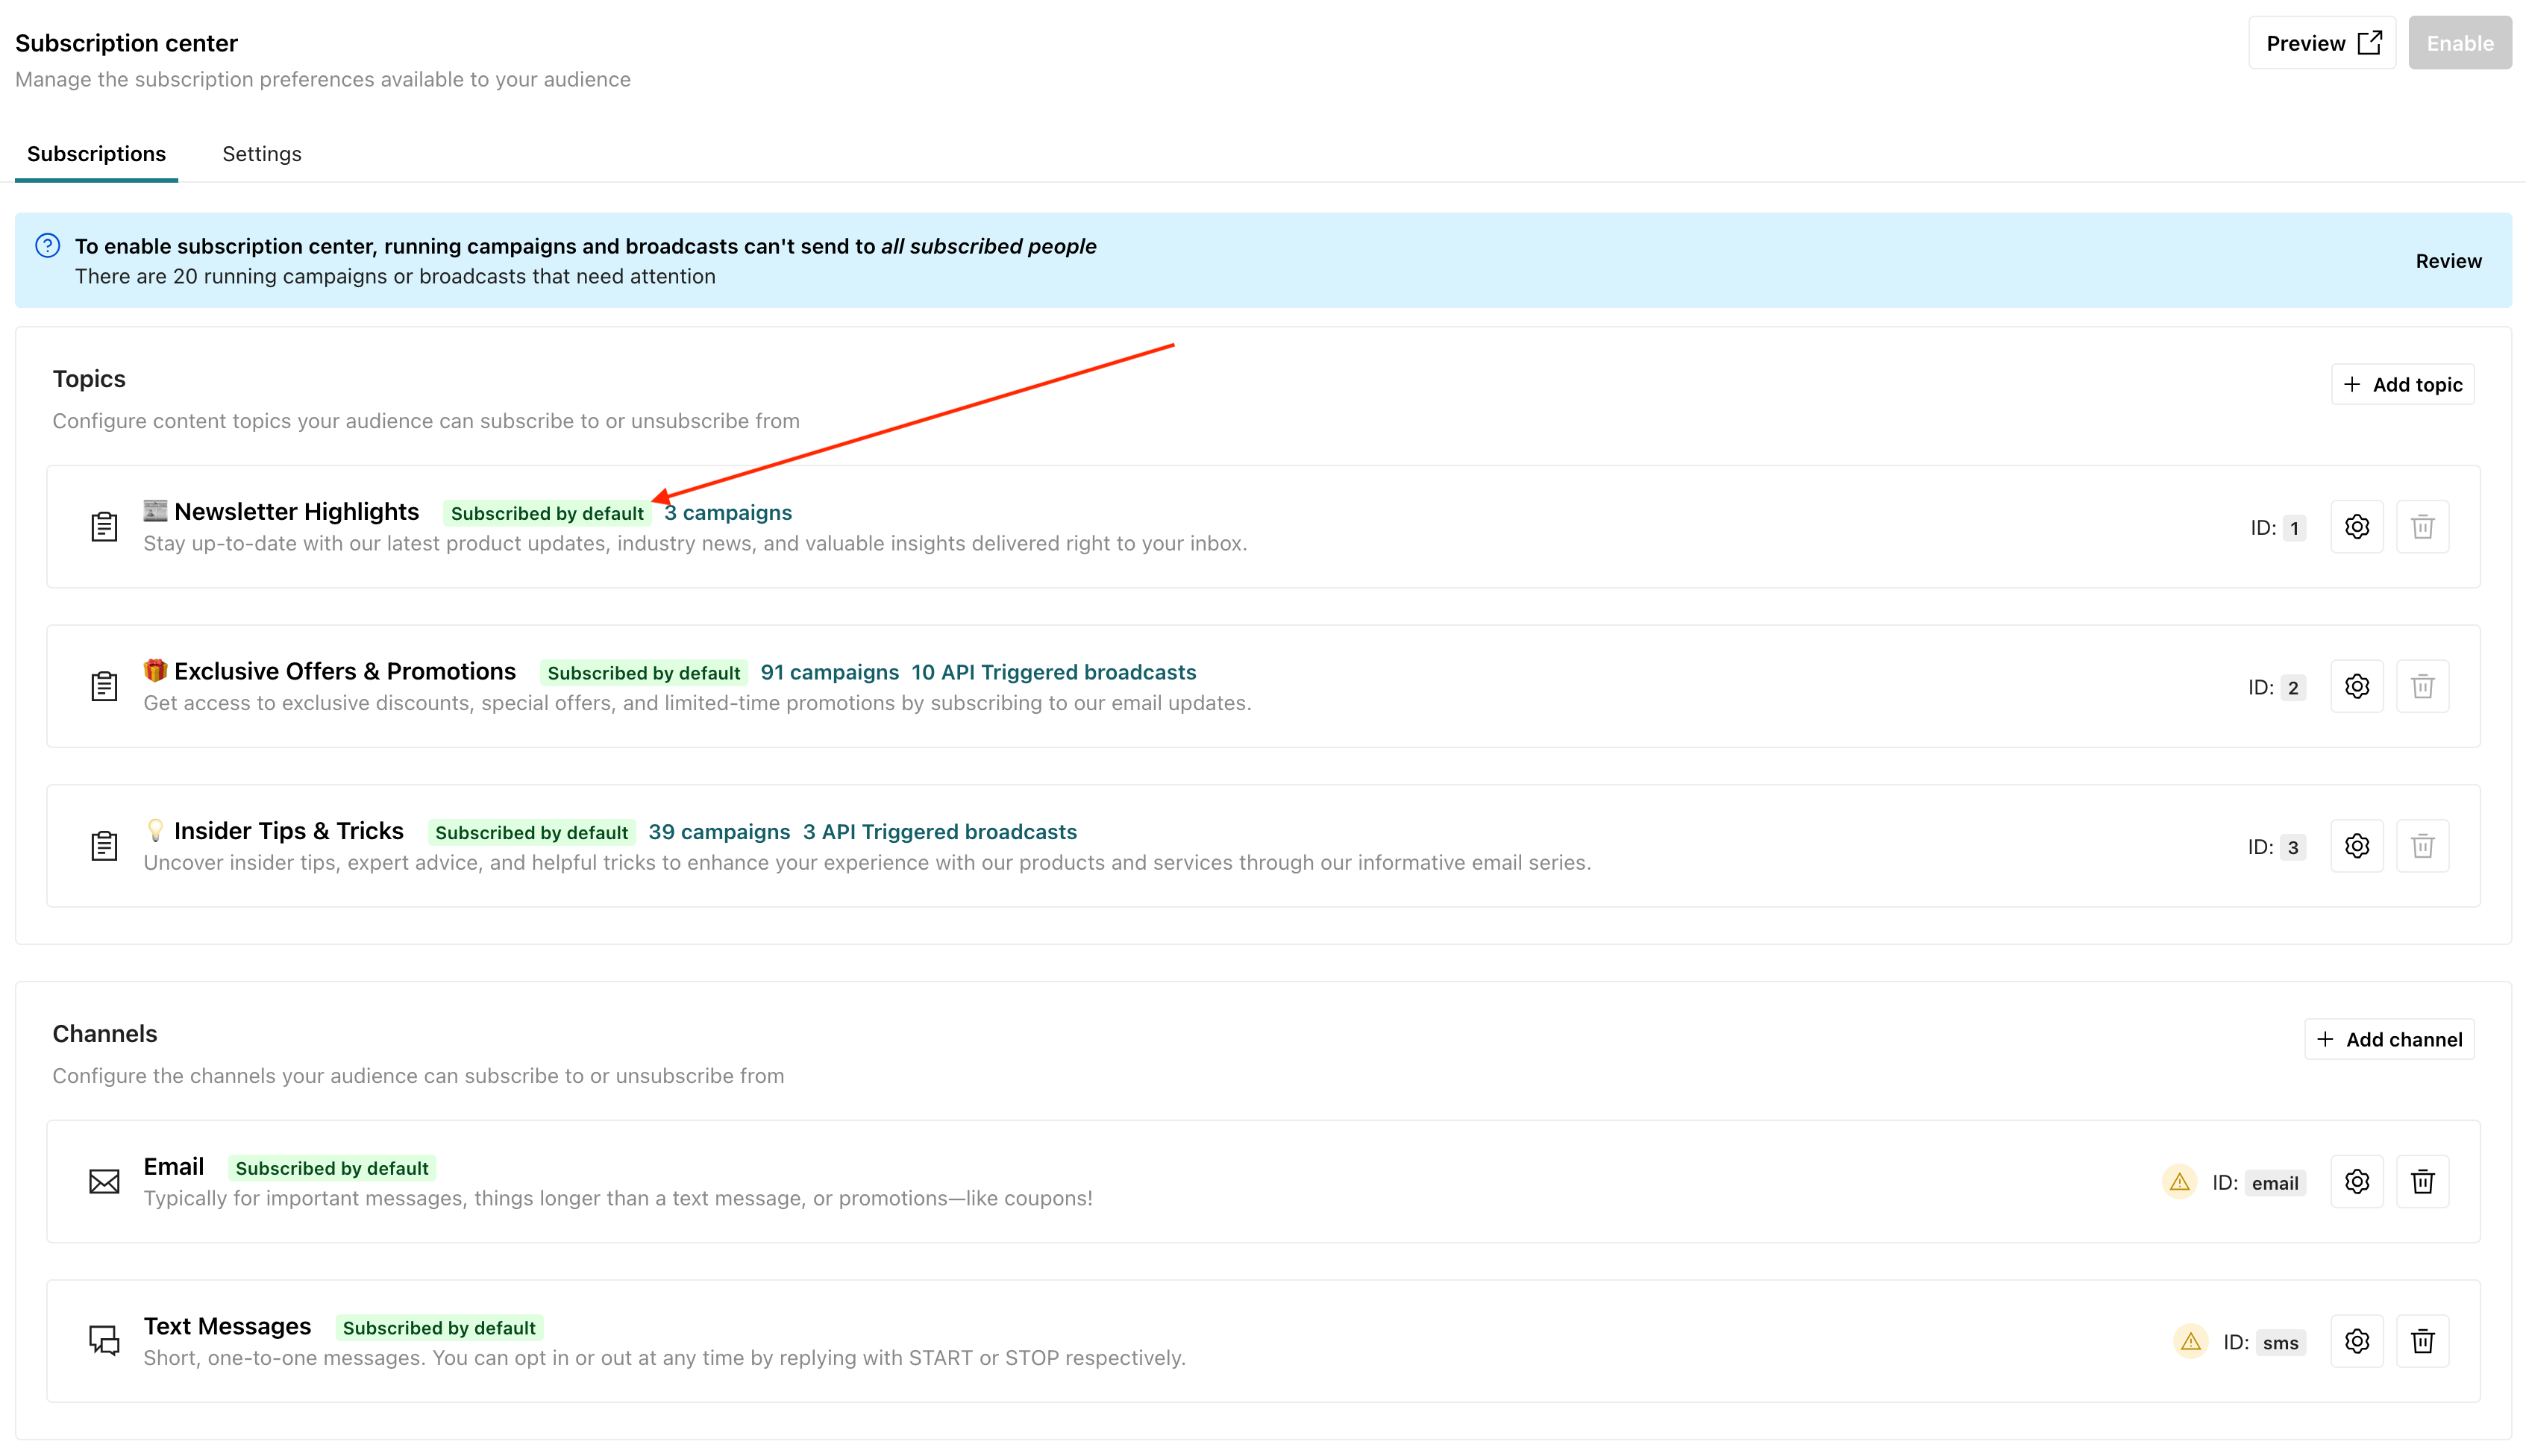
Default status options:
- Not subscribed: people must explicitly subscribe before they’ll receive messages for this topic
- Subscribed: people receive messages by default and must unsubscribe if they don’t want messages from this topic
You cannot change this setting after you’ve added the topic. The subscription center page in workspace settings shows the default status of each topic and channel.
What people see when they click Unsubscribe
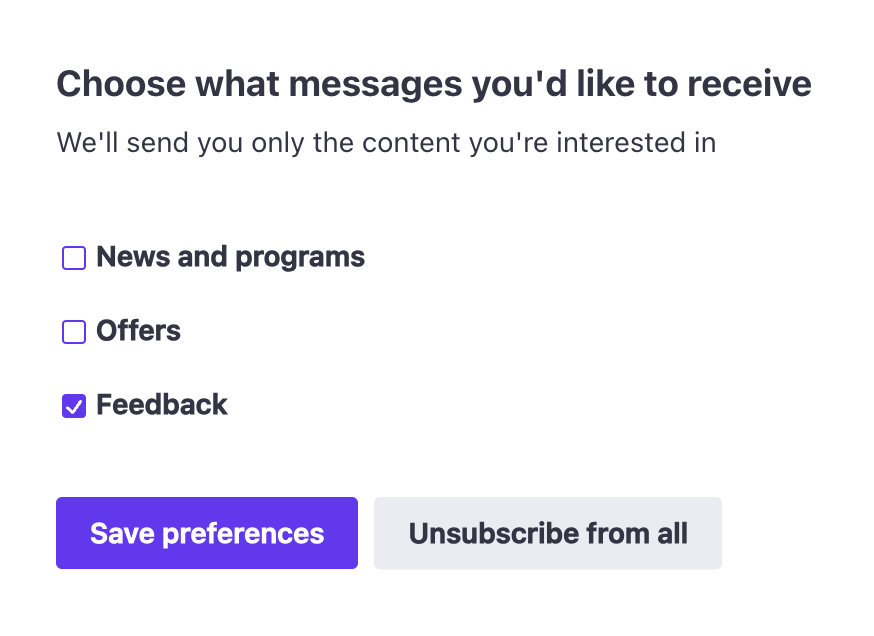
After you enable subscription center topics, the unsubscribe links in your emails will send people to a page where they can unsubscribe from the message’s topic, not all messages. From there, they can go to the subscription preferences page and subscribe to, or unsubscribe from, any topic.
| When profiles click unsubscribe, they can unsubscribe from the topic: | When profiles click "here" to manage preferences, they can check/uncheck their preferences: |
|---|---|
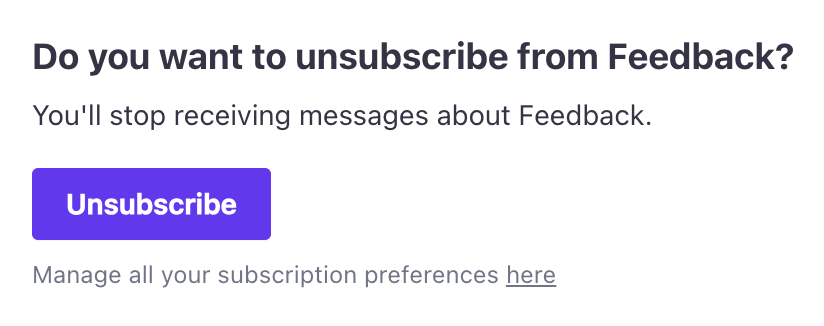 |  |
unsubscribe
in email] a-..->|person clicks
unsubscribe|c[person is
unsubscribed from topic] a-->|person clicks here
and goes to
subscription center|d{Subscription preferences
page} d-.->|person clicks
Save Preferences|f[person's subscription
preferences are updated] d-.->|person clicks
Unsubscribe from all|g[Person is globally unsubscribed
from email, SMS, and push]
If you use {% unsubscribe %} or {% unsubscribe_url %} as your unsubscribe links, a person will follow this flow. You can also link people directly to your subscription preferences page using {% manage_subscription_preferences_url %}. Considering the example above, they would bypass the first page and go straight to the second.
You can preview the subscription preferences page in Workspace Settings > Subscription Center by clicking Preview.
Set up your subscription center
Setting up the subscription center involves several steps. As a part of this process, you’ll:
- Customize your subscription center branding and language. This helps you make the subscription center look and feel like a part of your brand.
- Add topics and channels-these are the preferences your audience can choose from when they set their subscription preferences.
- Apply topics to your automations and broadcasts.
Map out your topics before you start
You need to apply topics to automations and broadcasts before you can enable the subscription center. It may help to map out and/or tag automations and broadcasts before you create topics to help you get a handle on the topics you want to create and the things they apply to. - Translate your topics and other custom copy to fit your audiences’ needs.
- (Optional) Backfill your audience’s subscription preferences using the
cio_subscription_preferencesattribute. - Enable the subscription center.
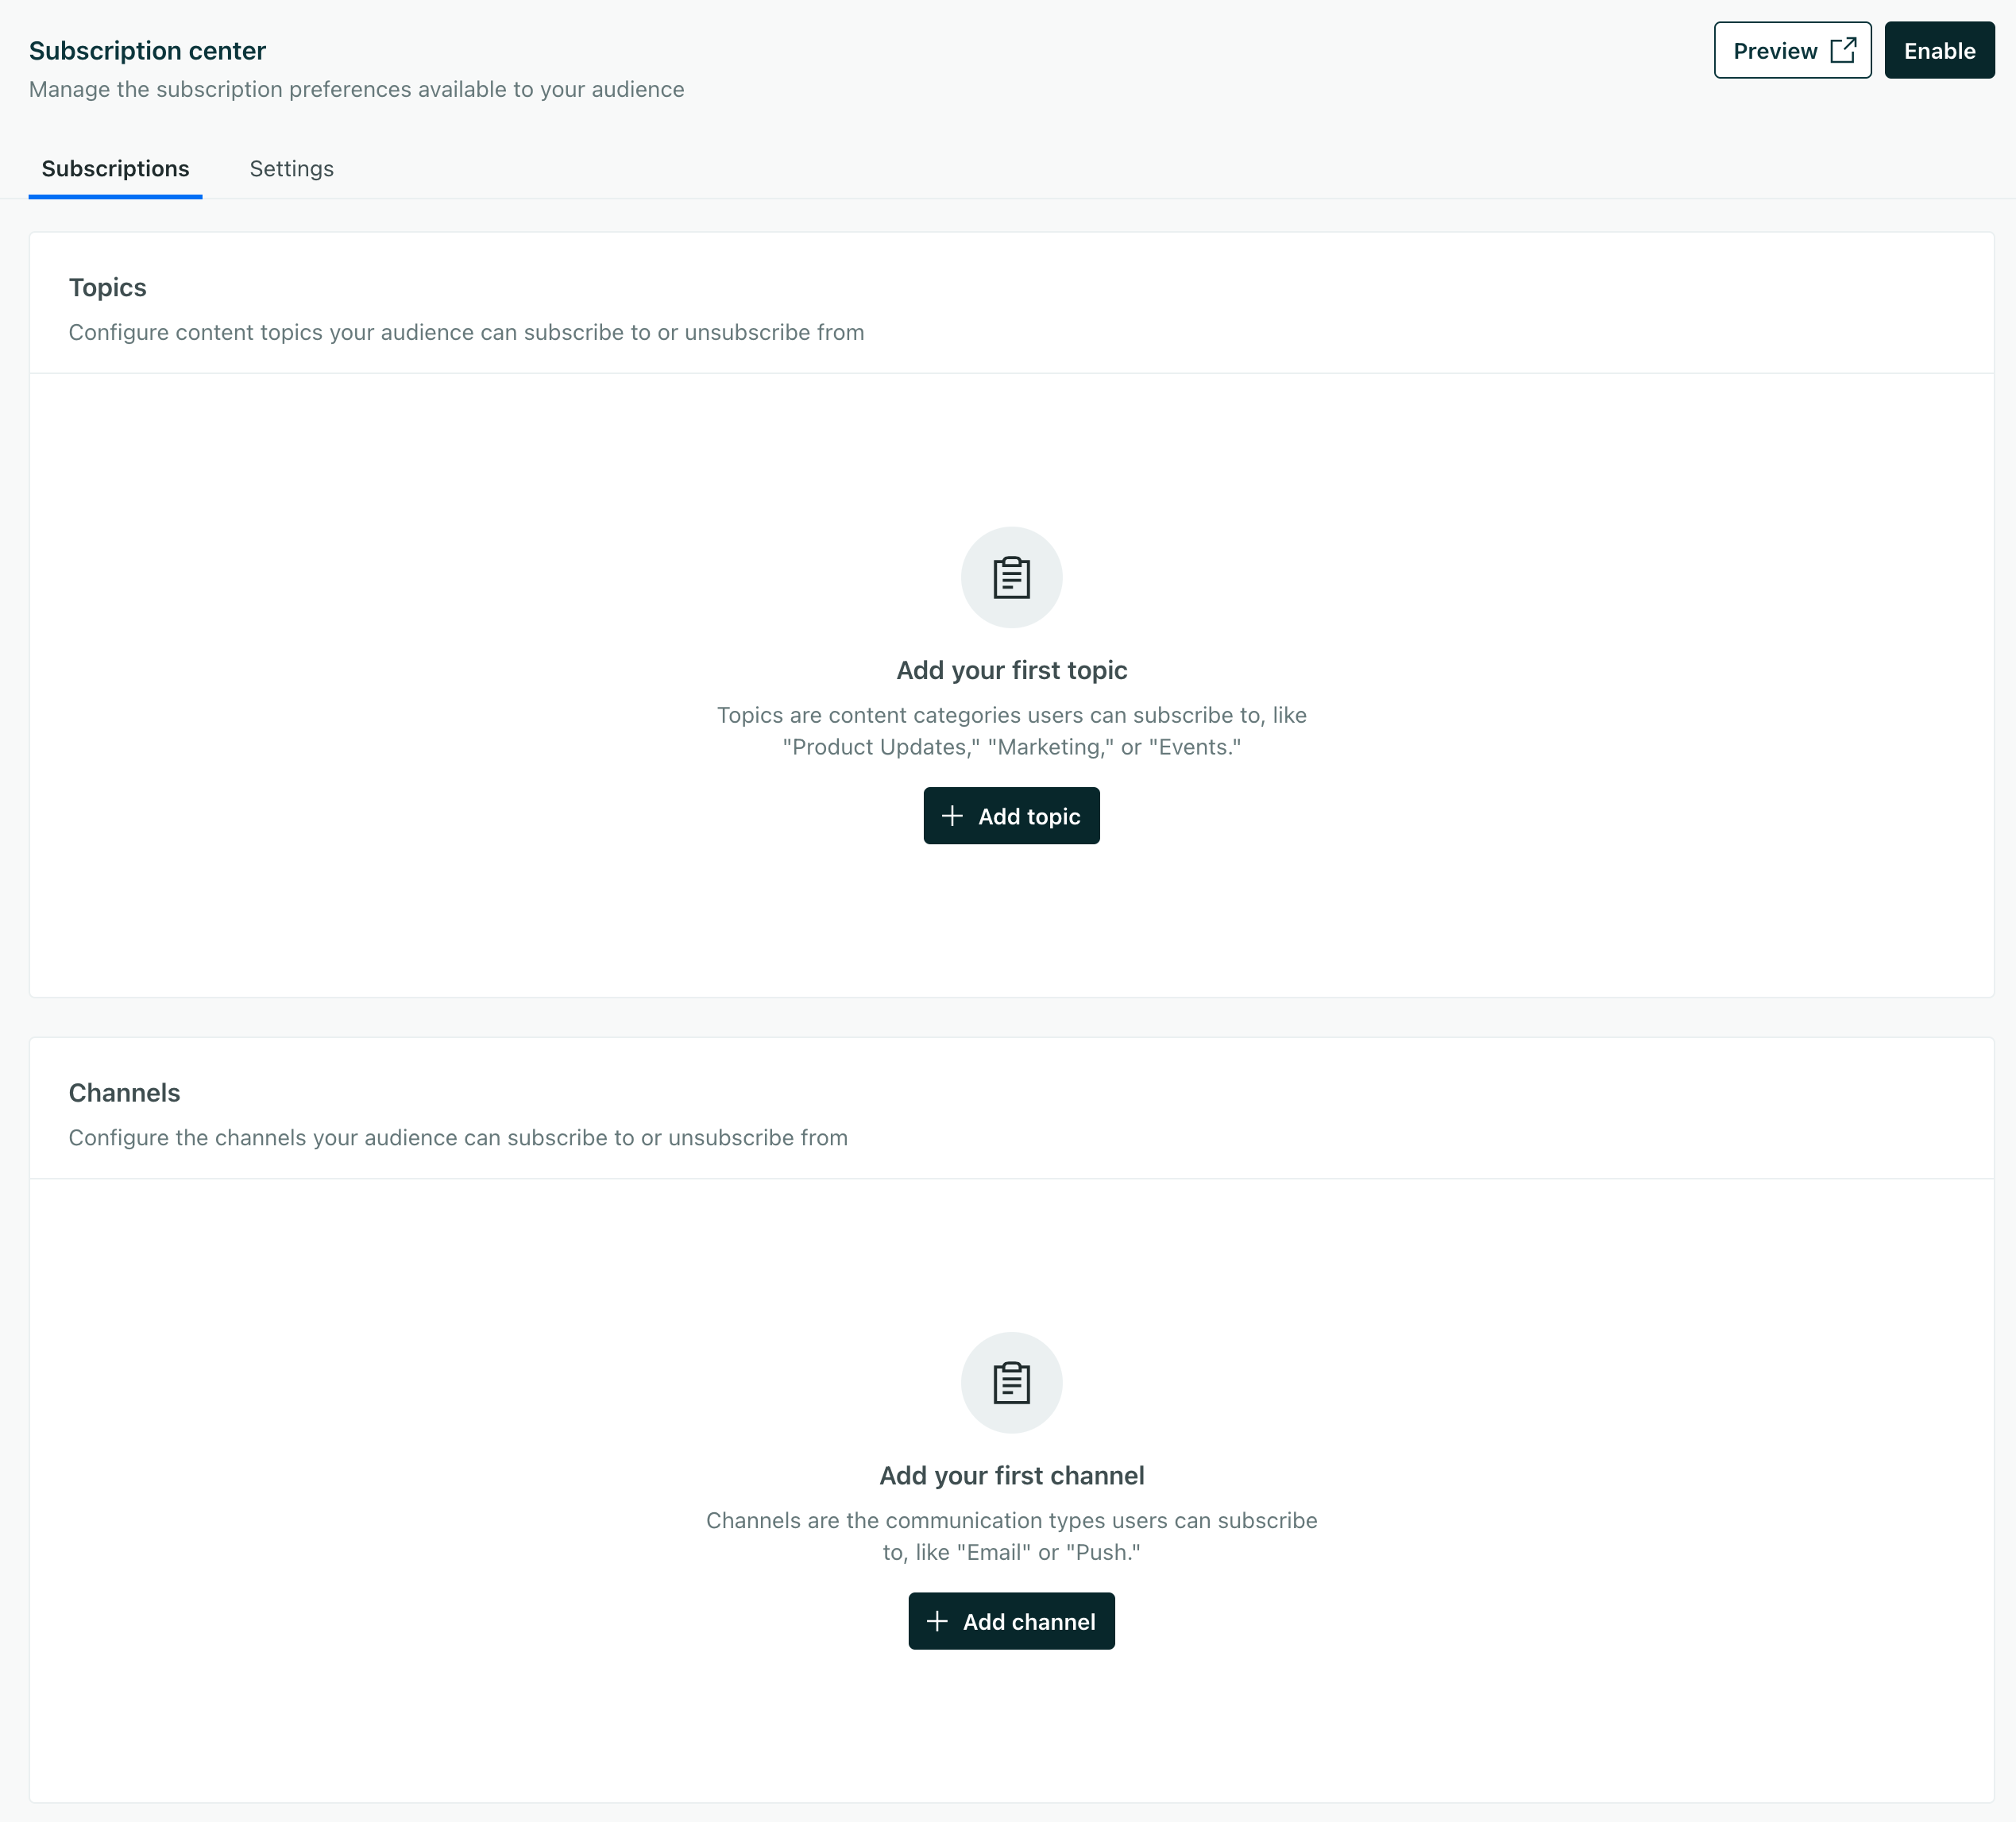
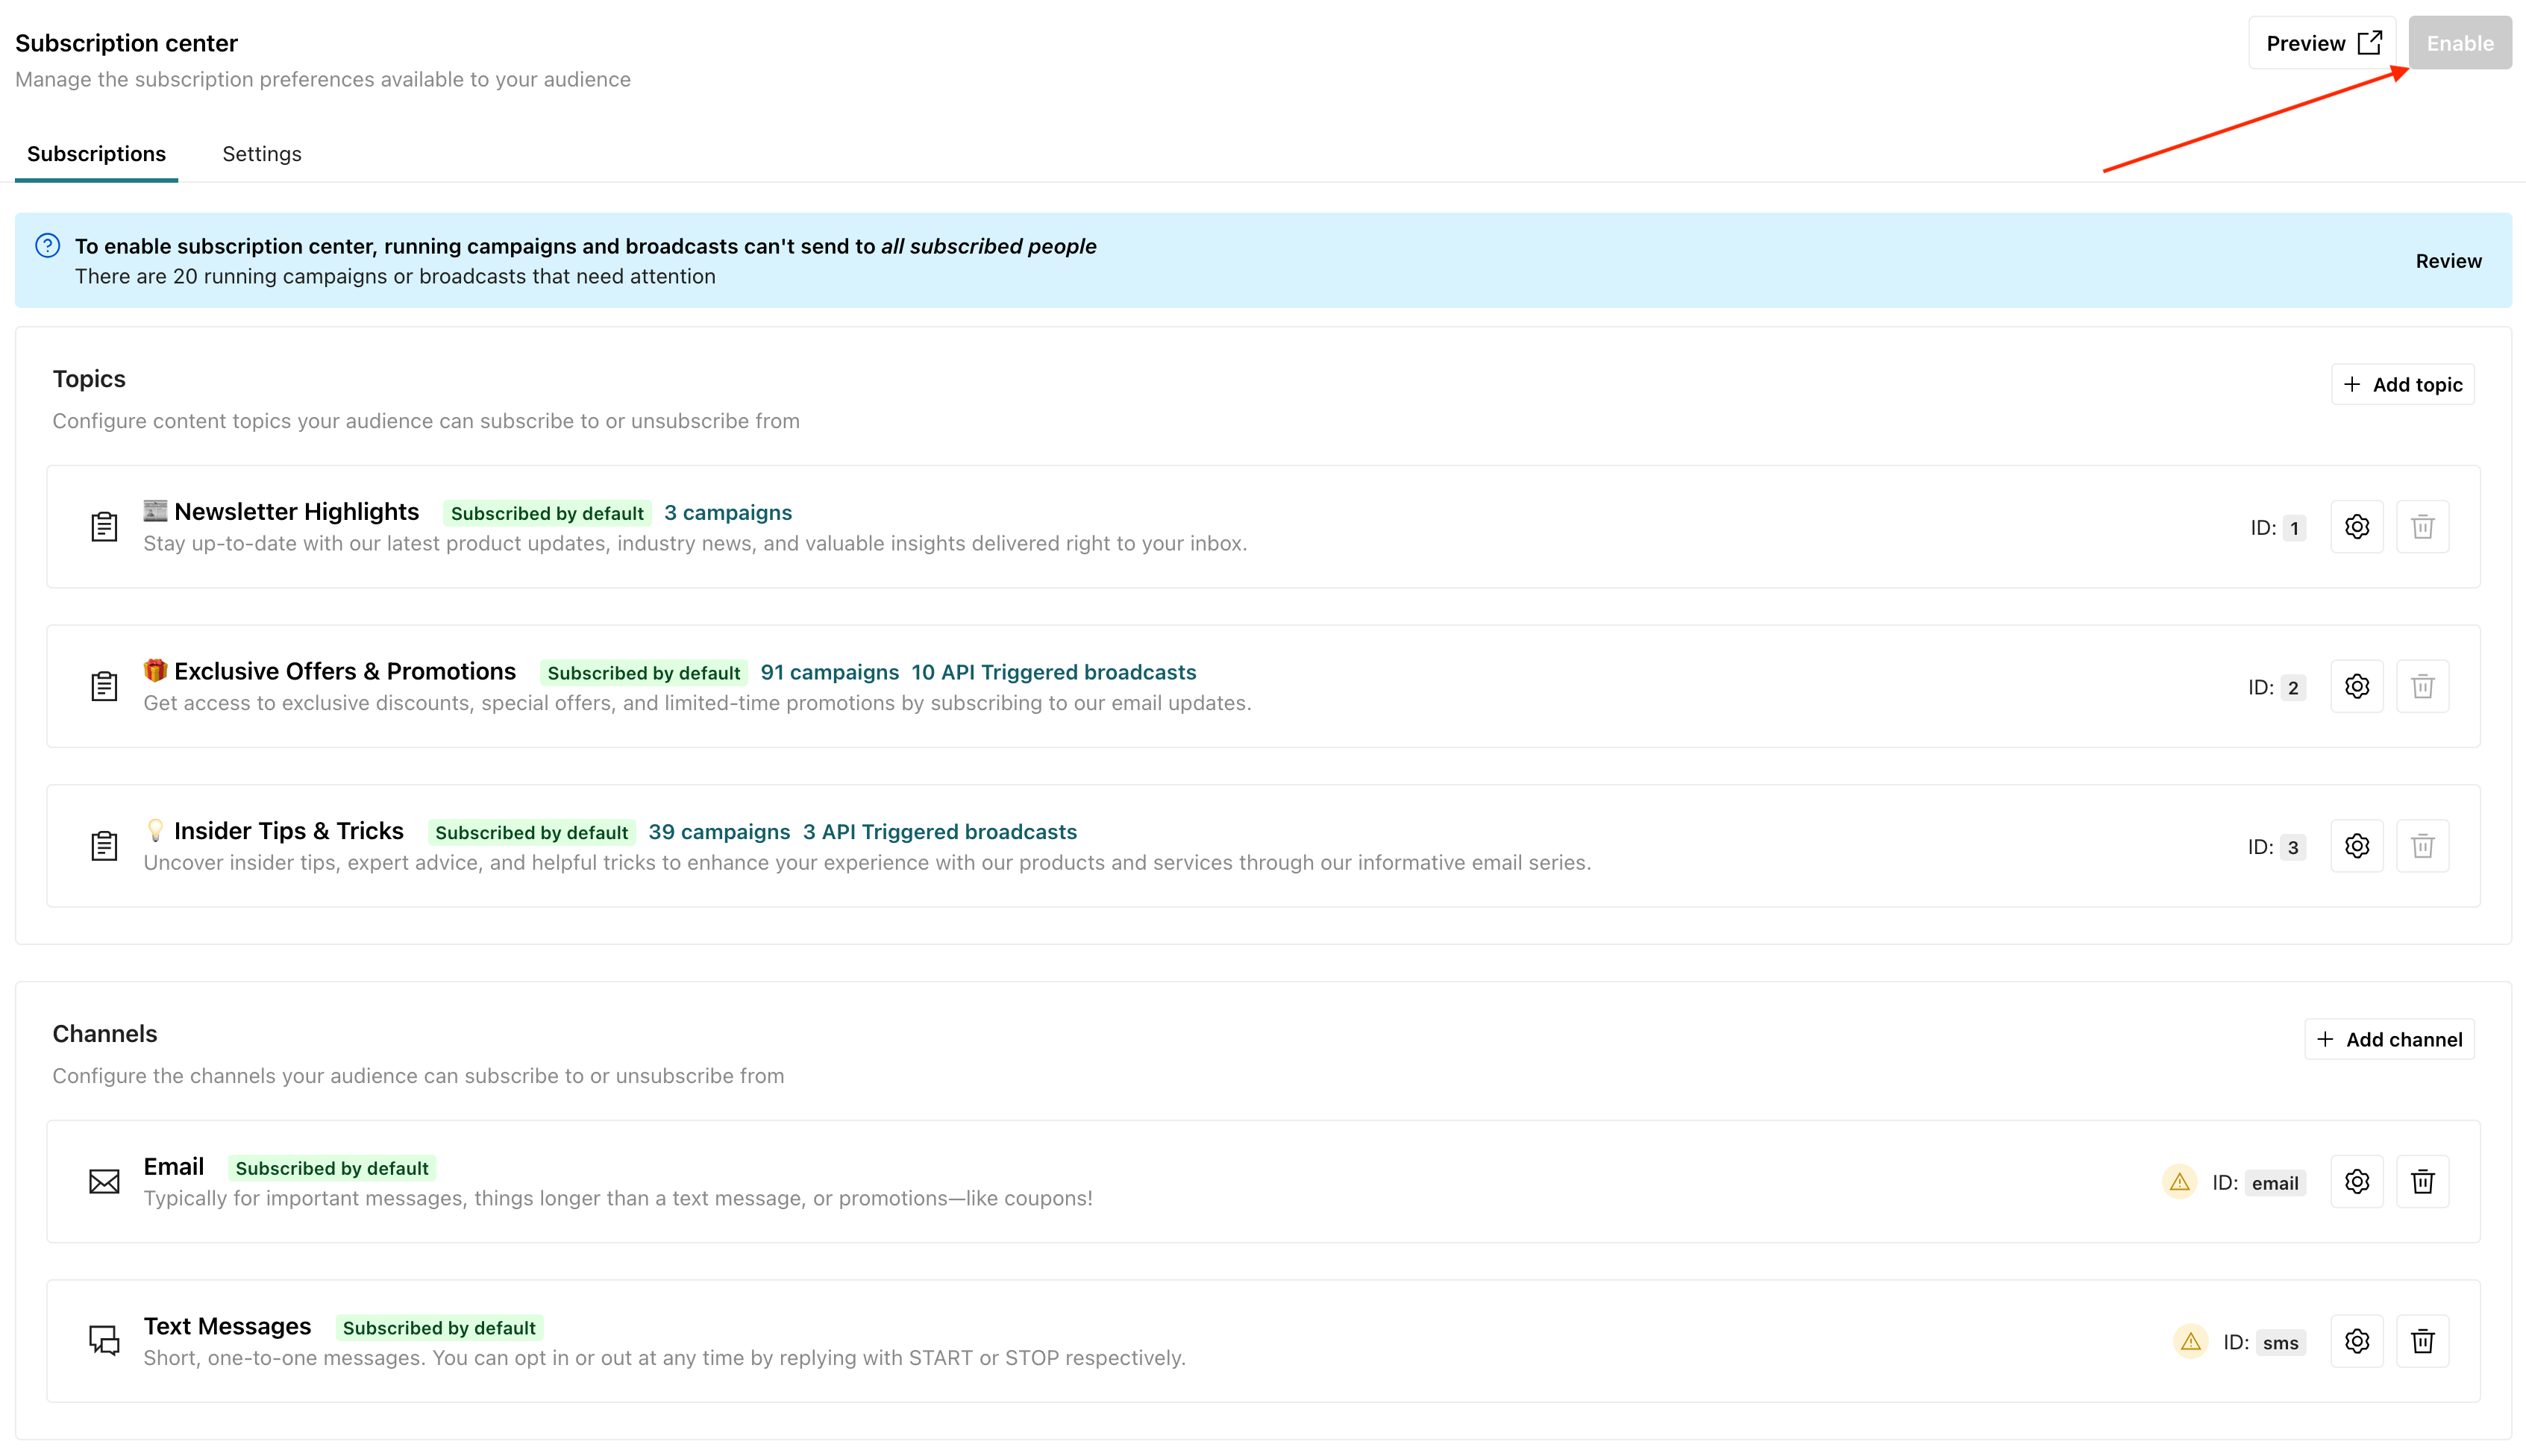
Add topics and channels
When you add a topic or channel, you can determine whether your audience must opt into it or opt out of it. By default, a new topic requires people to opt out; workflows using a new topic with default settings will send messages to everybody (who isn’t globally unsubscribed) until they opt out-of the topic.
To use channel-based subscriptions, you must add at least one topic.
- In Customer.io, go Settings > Workspace Settings.
- Go to Subscription Center. In the Subscriptions tab, click Add Topic or Add Channel.
- Set a Name and a Description. The name is how you’ll select your topic in the Subscription preference setting. Your audience will see both the Name and Description when they set their subscription preferences.
- Determine whether People are subscribed by default.
- Off: People must opt-into the topic to get messages.
- On: (Default) People will get messages for this topic unless they change their subscription preferences to opt out. Before you use the On setting, make sure that you have your audience’s consent or won’t otherwise violate their message preferences and send them messages that they might consider spam!
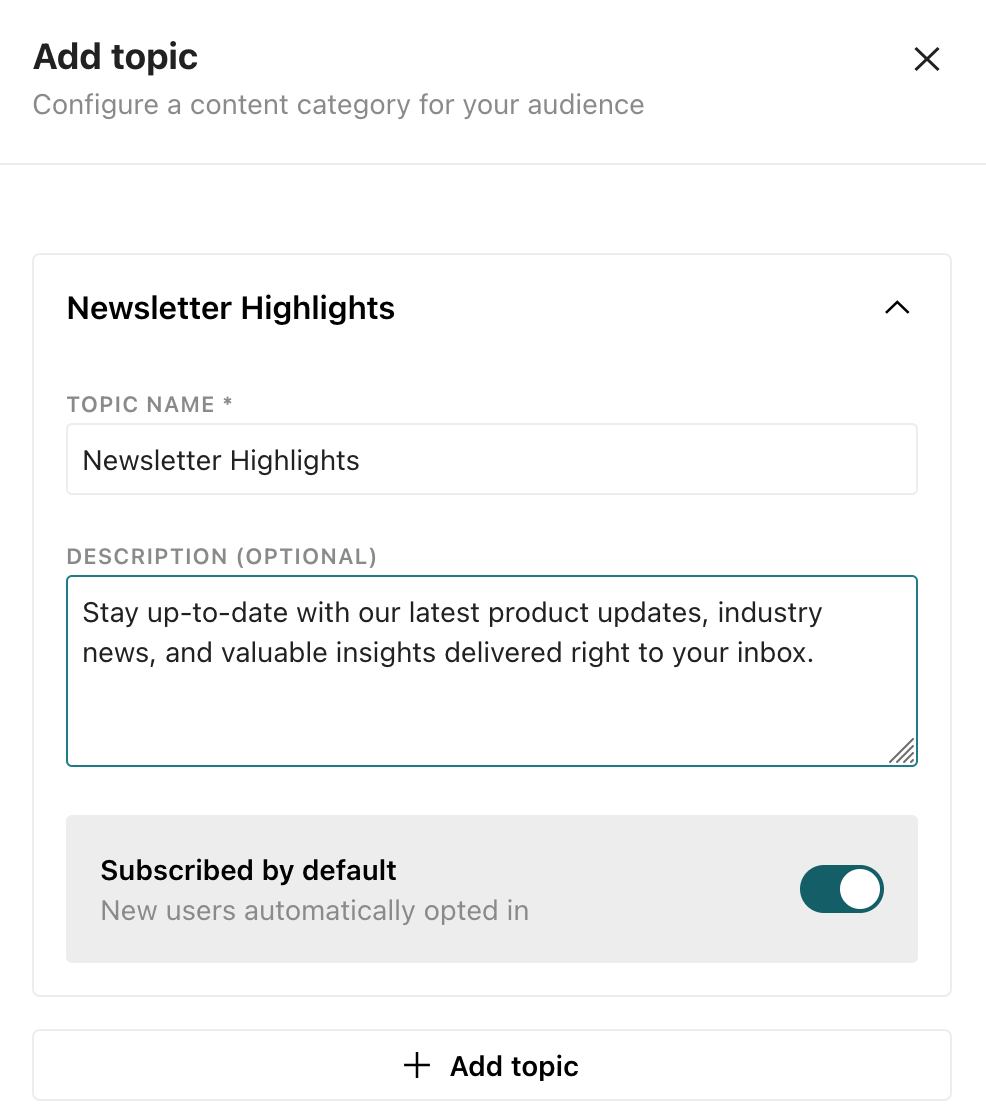
- Click Save.
When you’re done adding topics and channels, you can customize your subscription center’s branding and translate your subscription center’s content.
You’ll also need to set your topics in the Subscription preference setting for your automations and broadcasts. This is how you determine who receives messages from automations and broadcasts based on their preferences.
Reorder topics and channels
You can drag topics and channels to change the order in which they appear in your subscription center from the subscription preferences page.
You can use the Preview button to see how your changes will look to your customers. When you save your changes, people will see the new order in your subscription center.
Edit a topic or channel
You can update the Name or Description for your topic or channel. This does not affect your Subscription preference settings or profiles’ subscription preferences. It only affects what people see when they change preferences using the subscription center.
- In Customer.io, go Settings > Workspace Settings.
- Go to Subscription Center and click the item you want to update.
- Change the Name or Description.
- When you’re done, click Save.
Delete a topic or channel
You can’t delete a topic or channel that’s in use. You’ll need to change the Subscription preference setting for any running automations and broadcasts that use the topic you want to delete before you can delete it. You don’t need to worry about draft or stopped workflows.
- In Customer.io, go to Settings > Workspace Settings.
- Go to Subscription Center and hover over the topic you want to delete. On the right, you’ll see a trash can icon appear. Click this to delete the topic.
Set a topic in an automation or broadcast
To enable subscription center topics, you must assign a subscription preference to all running automations and broadcasts - both API-triggered broadcasts and scheduled one-time sends. Set any one of your subscription center topics as the subscription preference. This determines who will receive messages from your automation or broadcast, not whether they enter into a journey. Only the trigger settings determine whether someone enters a journey; the subscription preference determines who will receive messaging of those that enter a journey.
Subscription preferences apply to all messaging channels
For example, let’s say you have a segment-triggered automation. The segment is anyone who has purchased a product in the last 30 days. The subscription preference is set to people subscribed to Product Updates. People who are subscribed to Product Updates will receive messages from the automation. People who are not subscribed to Product Updates will not receive messages from the automation, but they will still enter the automation if they meet the trigger criteria.
You can also override the topic at the message level should the automation subscription preference setting not fit for all messages.
Automations and broadcasts will not take your subscription preference setting into account until you’ve clicked Enable in your subscription center.
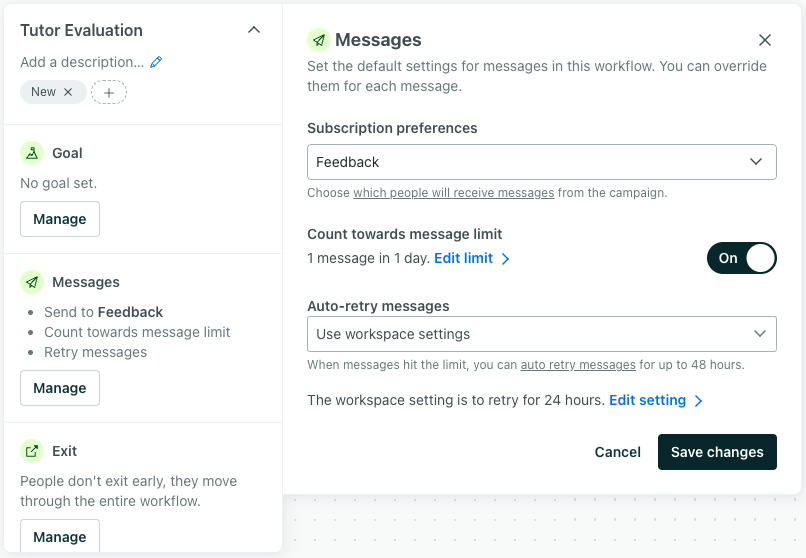
Set a topic in an automation
Under Messages in your automation’s settings, select the topic for your automation from the Subscription preference dropdown. Only people subscribed to this topic will receive messages from the automation, unless you override the topic at the message level.
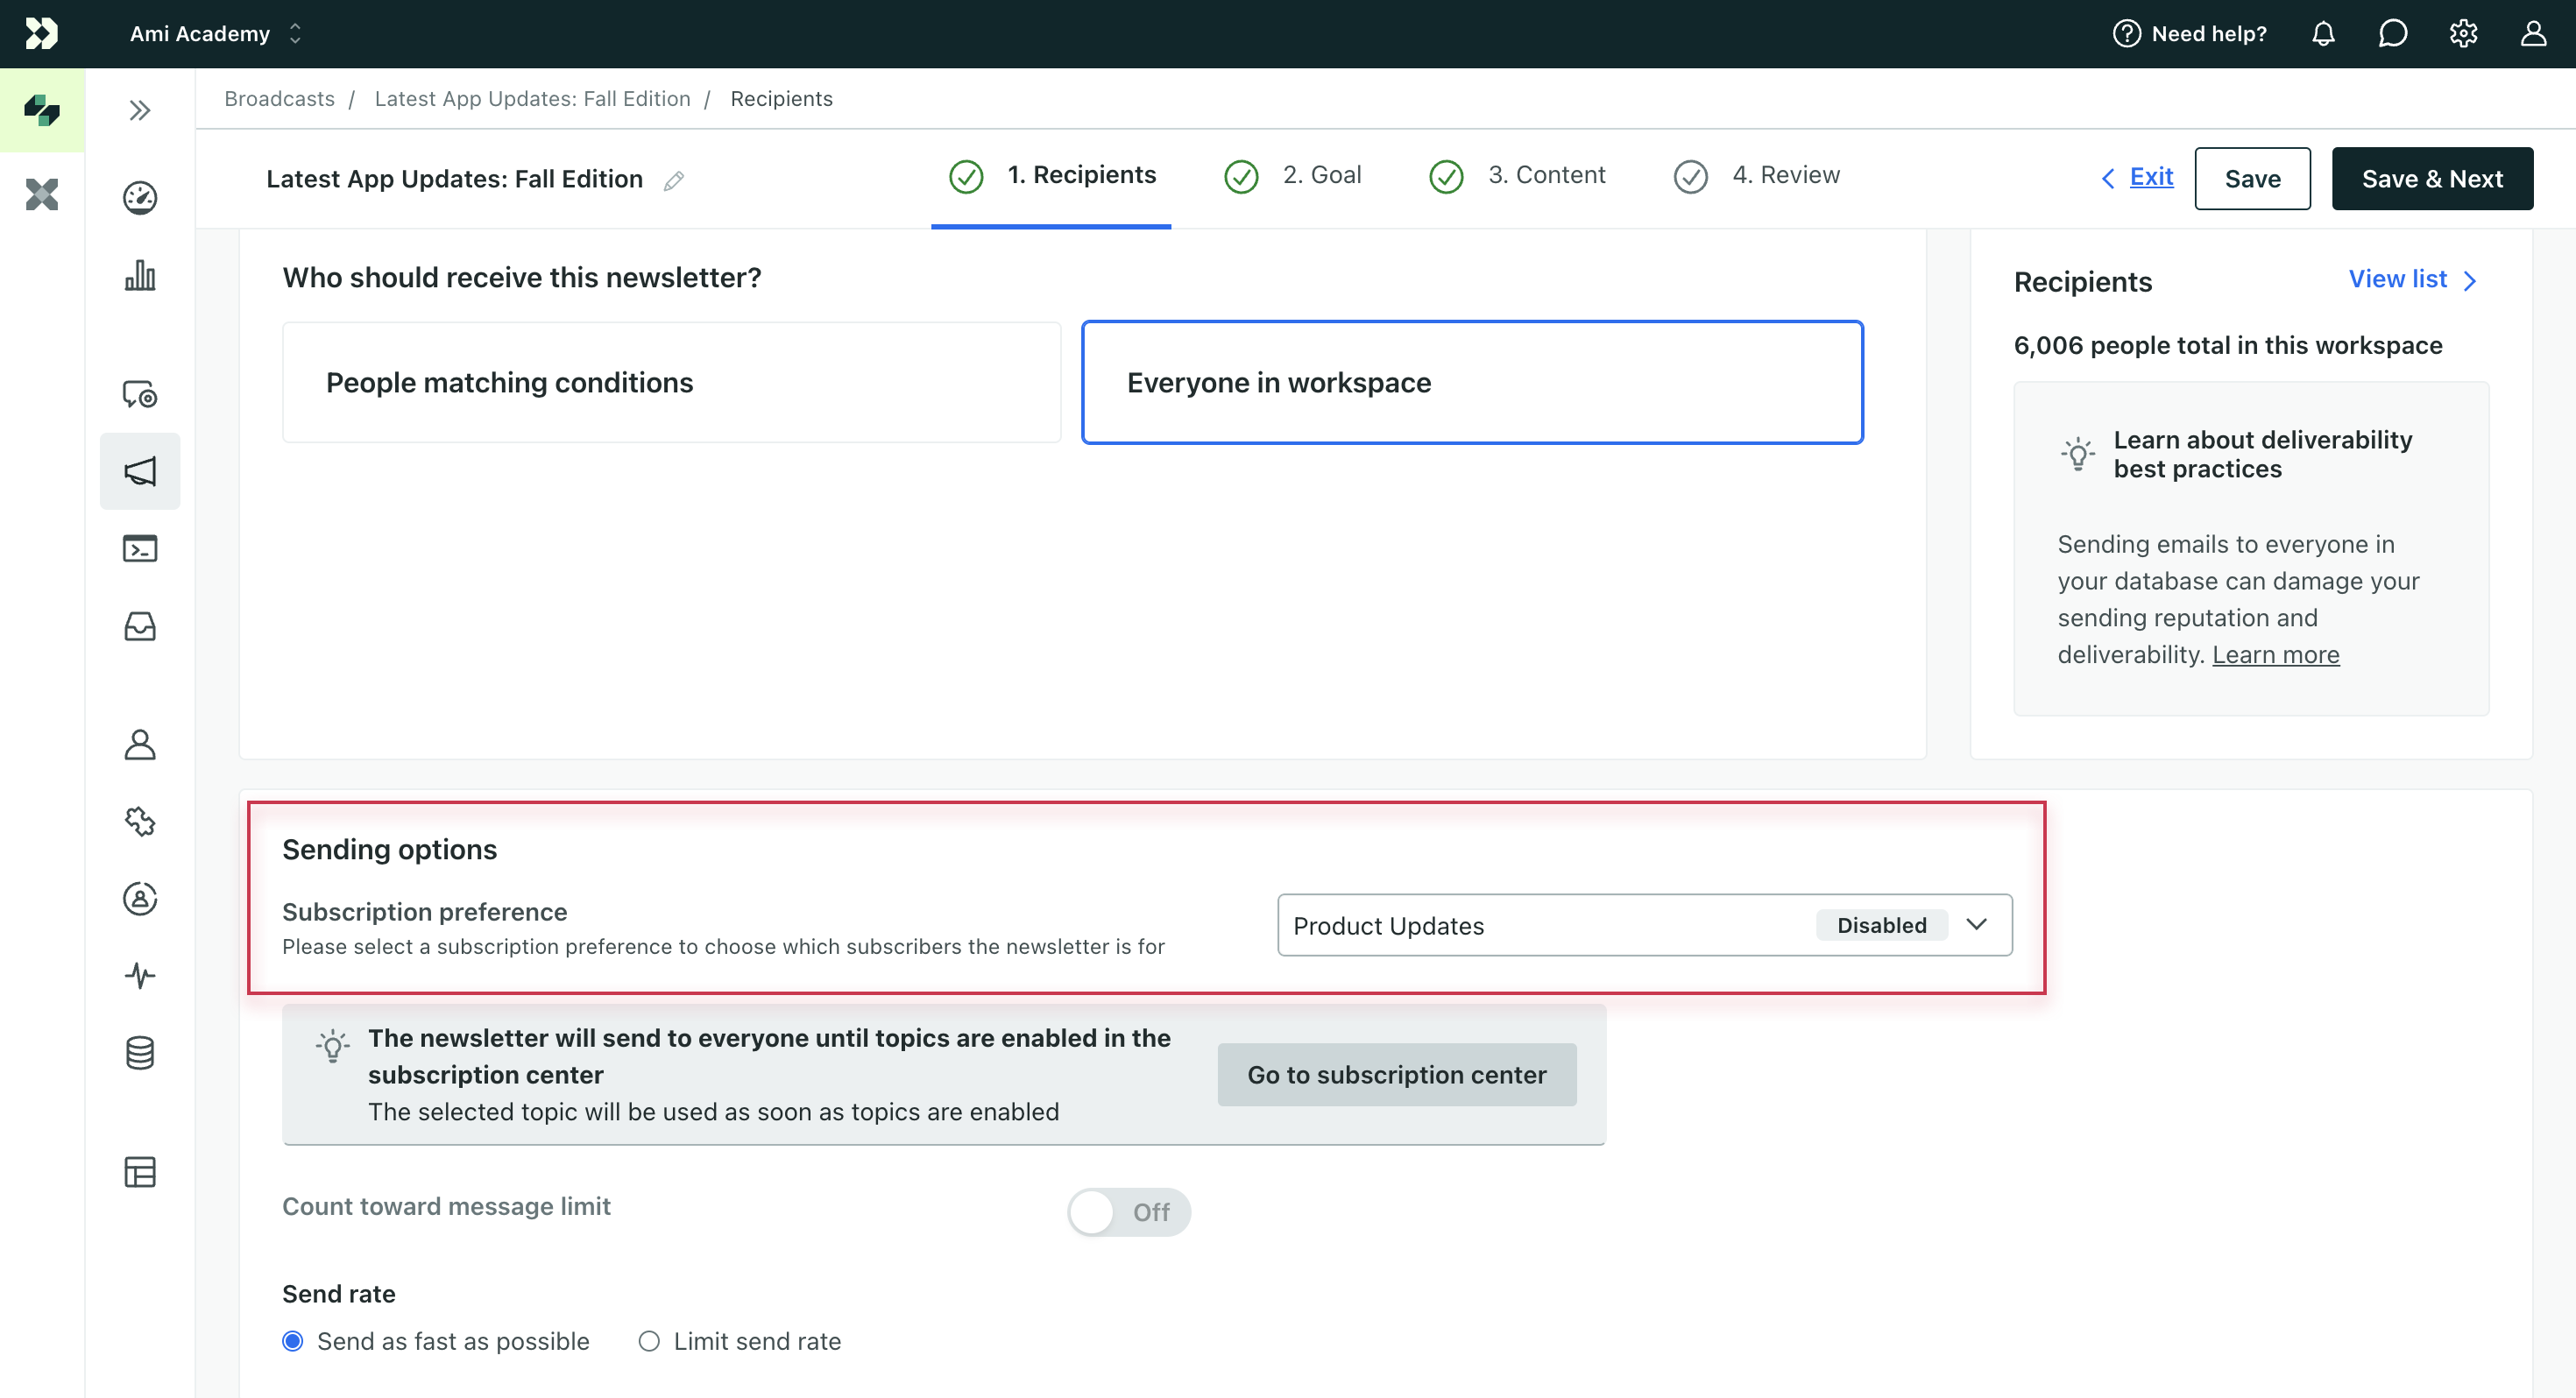
Set a topic in a broadcast
In the broadcast’s Recipients step, determine Who should receive this? Then select the topic for your one-time send or API-triggered broadcast from the Subscription preference dropdown. Only people subscribed to the selected topic will receive your one-time send or messages in your API-triggered broadcast, unless you override the topic at the message level.
Bulk update topics for running automations and broadcasts
To expedite enabling your subscription center, you can assign a topic to multiple automations, broadcasts, and one-time sends at once through Workspace Settings > Subscription center.
On the Topics table, select Review. Under the Pending tab is a list of all automations and broadcasts that are running or one-time sends that are scheduled to run and need a topic assigned.
- Select the box next to each one you want to update.
- Select which topic you want to assign as the subscription preference from the dropdown.
- Click Apply.
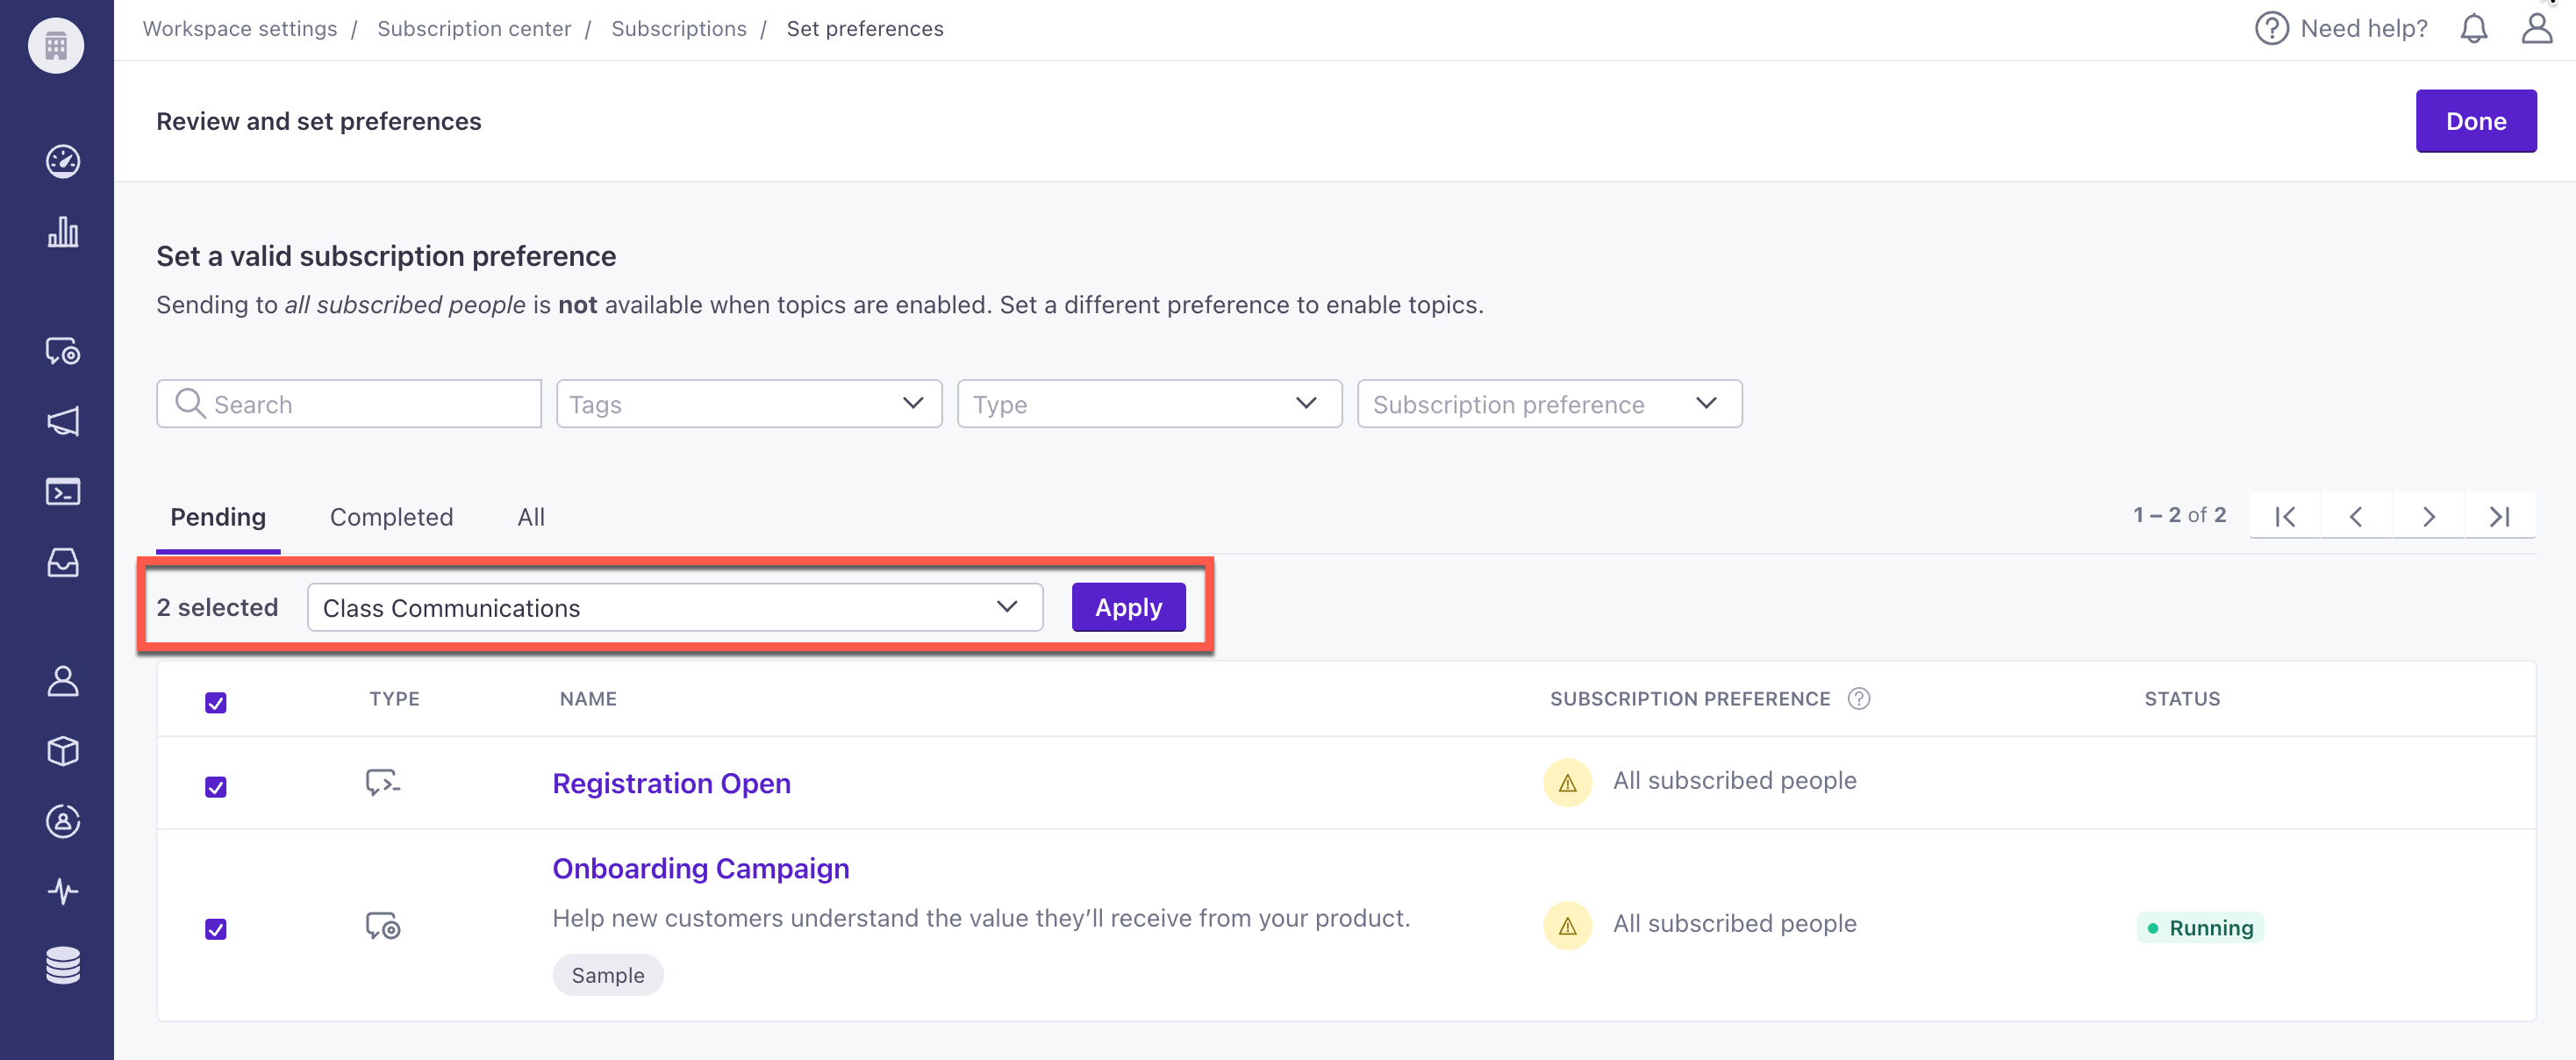
The checked automations, broadcasts, or one-time sends will move to the Completed column. The All tab shows both Pending and Completed items.
Use the filters at the top to search by name or description, tags, type of automation or broadcast, and subscription preference.
Override a topic for a message
After creating at least one topic in your workspace’s subscription center, you can assign a subscription preference to your automations. You also have the option to override the subscription preference for each email, push notification, or SMS in the automation.
To override the subscription preference:
- Select the message in your automation.
- On the left-hand pane, scroll to Override Automation Settings.
- Select the Subscription Preference dropdown and choose to send based on a different topic preference or global subscription setting. By default, we send messages based on automation settings.
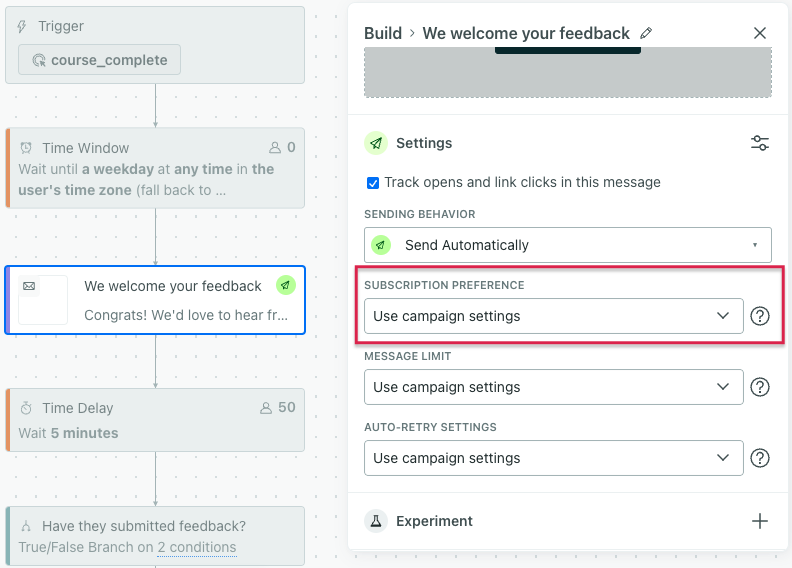
- Click Save.
Moving forward, Customer.io will draft or send this message based on the message-level override of the subscription preference.
Enable the subscription center
Before you can enable your subscription center, you must have created at least one topic, and applied topics to the Subscription preference setting for your active automations, scheduled one-time sends, and API-triggered broadcasts. You may also want to backfill or migrate existing subscription preferences. When you enable the subscription center, the Unsubscribe link in your messages also lets people set their topic preferences.
To enable your subscription center:
- Go to Settings > Workspace Settings.
- Click Subscription Center and then click Enable.
After you set up your subscription center, see Manage subscription preferences to learn how to set, find, and filter preferences. For tracking and reporting, see Subscription preference metrics.

