Set up a transactional email
UpdatedTransactional messages are email or push notifications that your audience implicitly opts-into, like a transaction receipt or a password reset request. You can send transactional messages programmatically through Customer.io.
New to transactional messaging?
Before you begin
Before you can send transactional emails, you need to:
- Confirm your registration email and verify your account.
- Authenticate your sending domain. If you configured a custom SMTP server, contact us to manually authenticate your sending domain.
- Get your app API key. This is the bearer token that you’ll use when calling the transactional API. app API keys are not the same as the Track API keys that you use to update profiles and trigger events. Customer.io does not store app API keys (only a hashed version) and you can restrict app API keys to specific IP addresses for extra security.
We also recommend that you use a different, specialized domain or subdomain for transactional messages. A sending domain is the domain of the “From email address” when you send emails, and you can request that we add your transactional domain to our specialized, transactional IP pool. Email providers like Gmail monitor the sending domain for unusual behavior and spam complaints. Separating your transactional domain from your marketing domain—something like marketing.example.com and transactional.example.com—prevents your marketing messages from affecting your critical transactional messages. Learn more about domain reputation.
Create a transactional email
Try our Postman collection!
You can use our Postman collection and associated environment to get started with the Customer.io API. Our environment is based on our US endpoints; if you’re in our EU region, you’ll need to add -eu to track_api_url and app_api_url variables.
Go to the Transactional page and click Send your first message or Create message—depending on whether there are already transactional messages in your workspace.
Name your message and provide a description. These fields help your team members understand what kind of message this is (like “Password Reset Instructions”). You can also use the Name of your message instead of the
transactional_message_idwhen you send your message.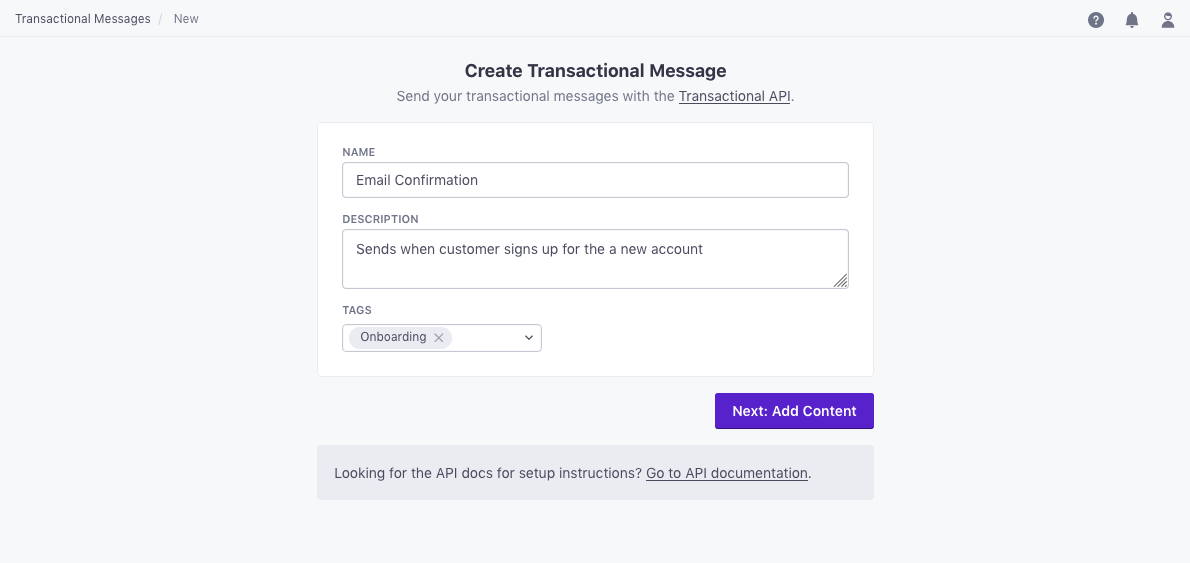
Click Add Content and set up your message. You’ll choose your editor or start from an existing email. When you build your email, you can personalize messages using attributes (
{{customer.<attribute>}}) or API trigger data ({{trigger.<data-object-property>}}) to customize your message.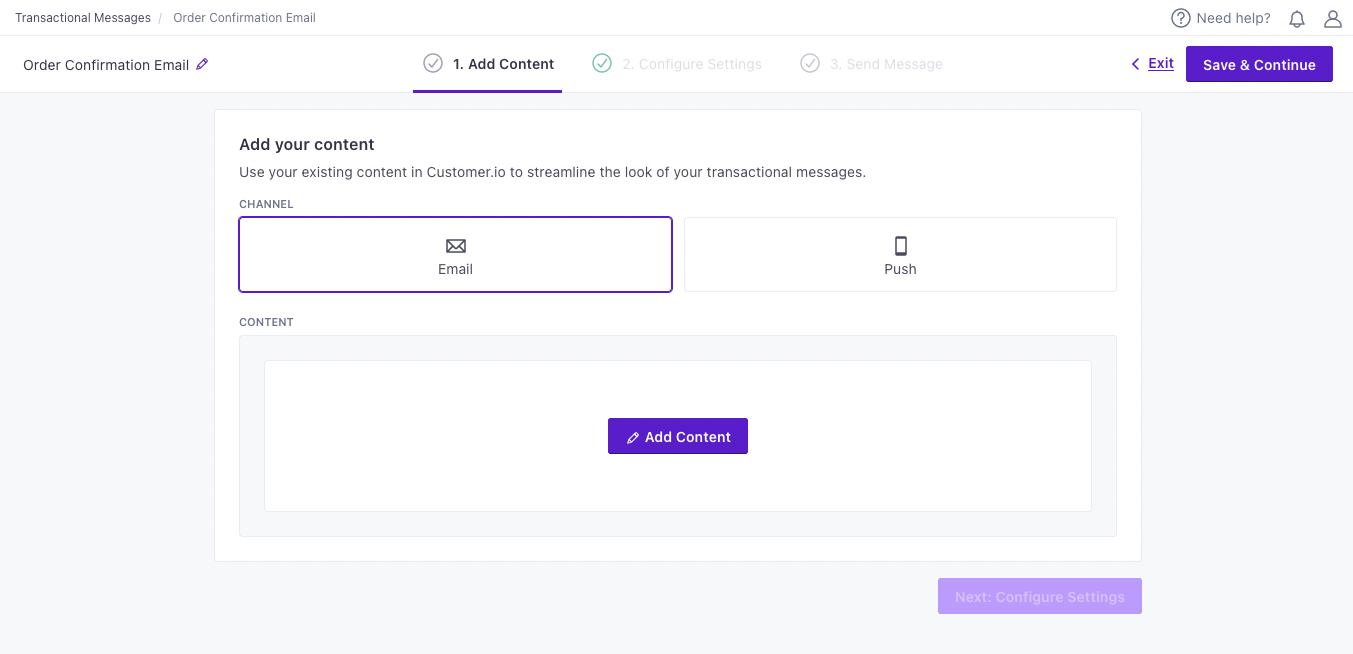
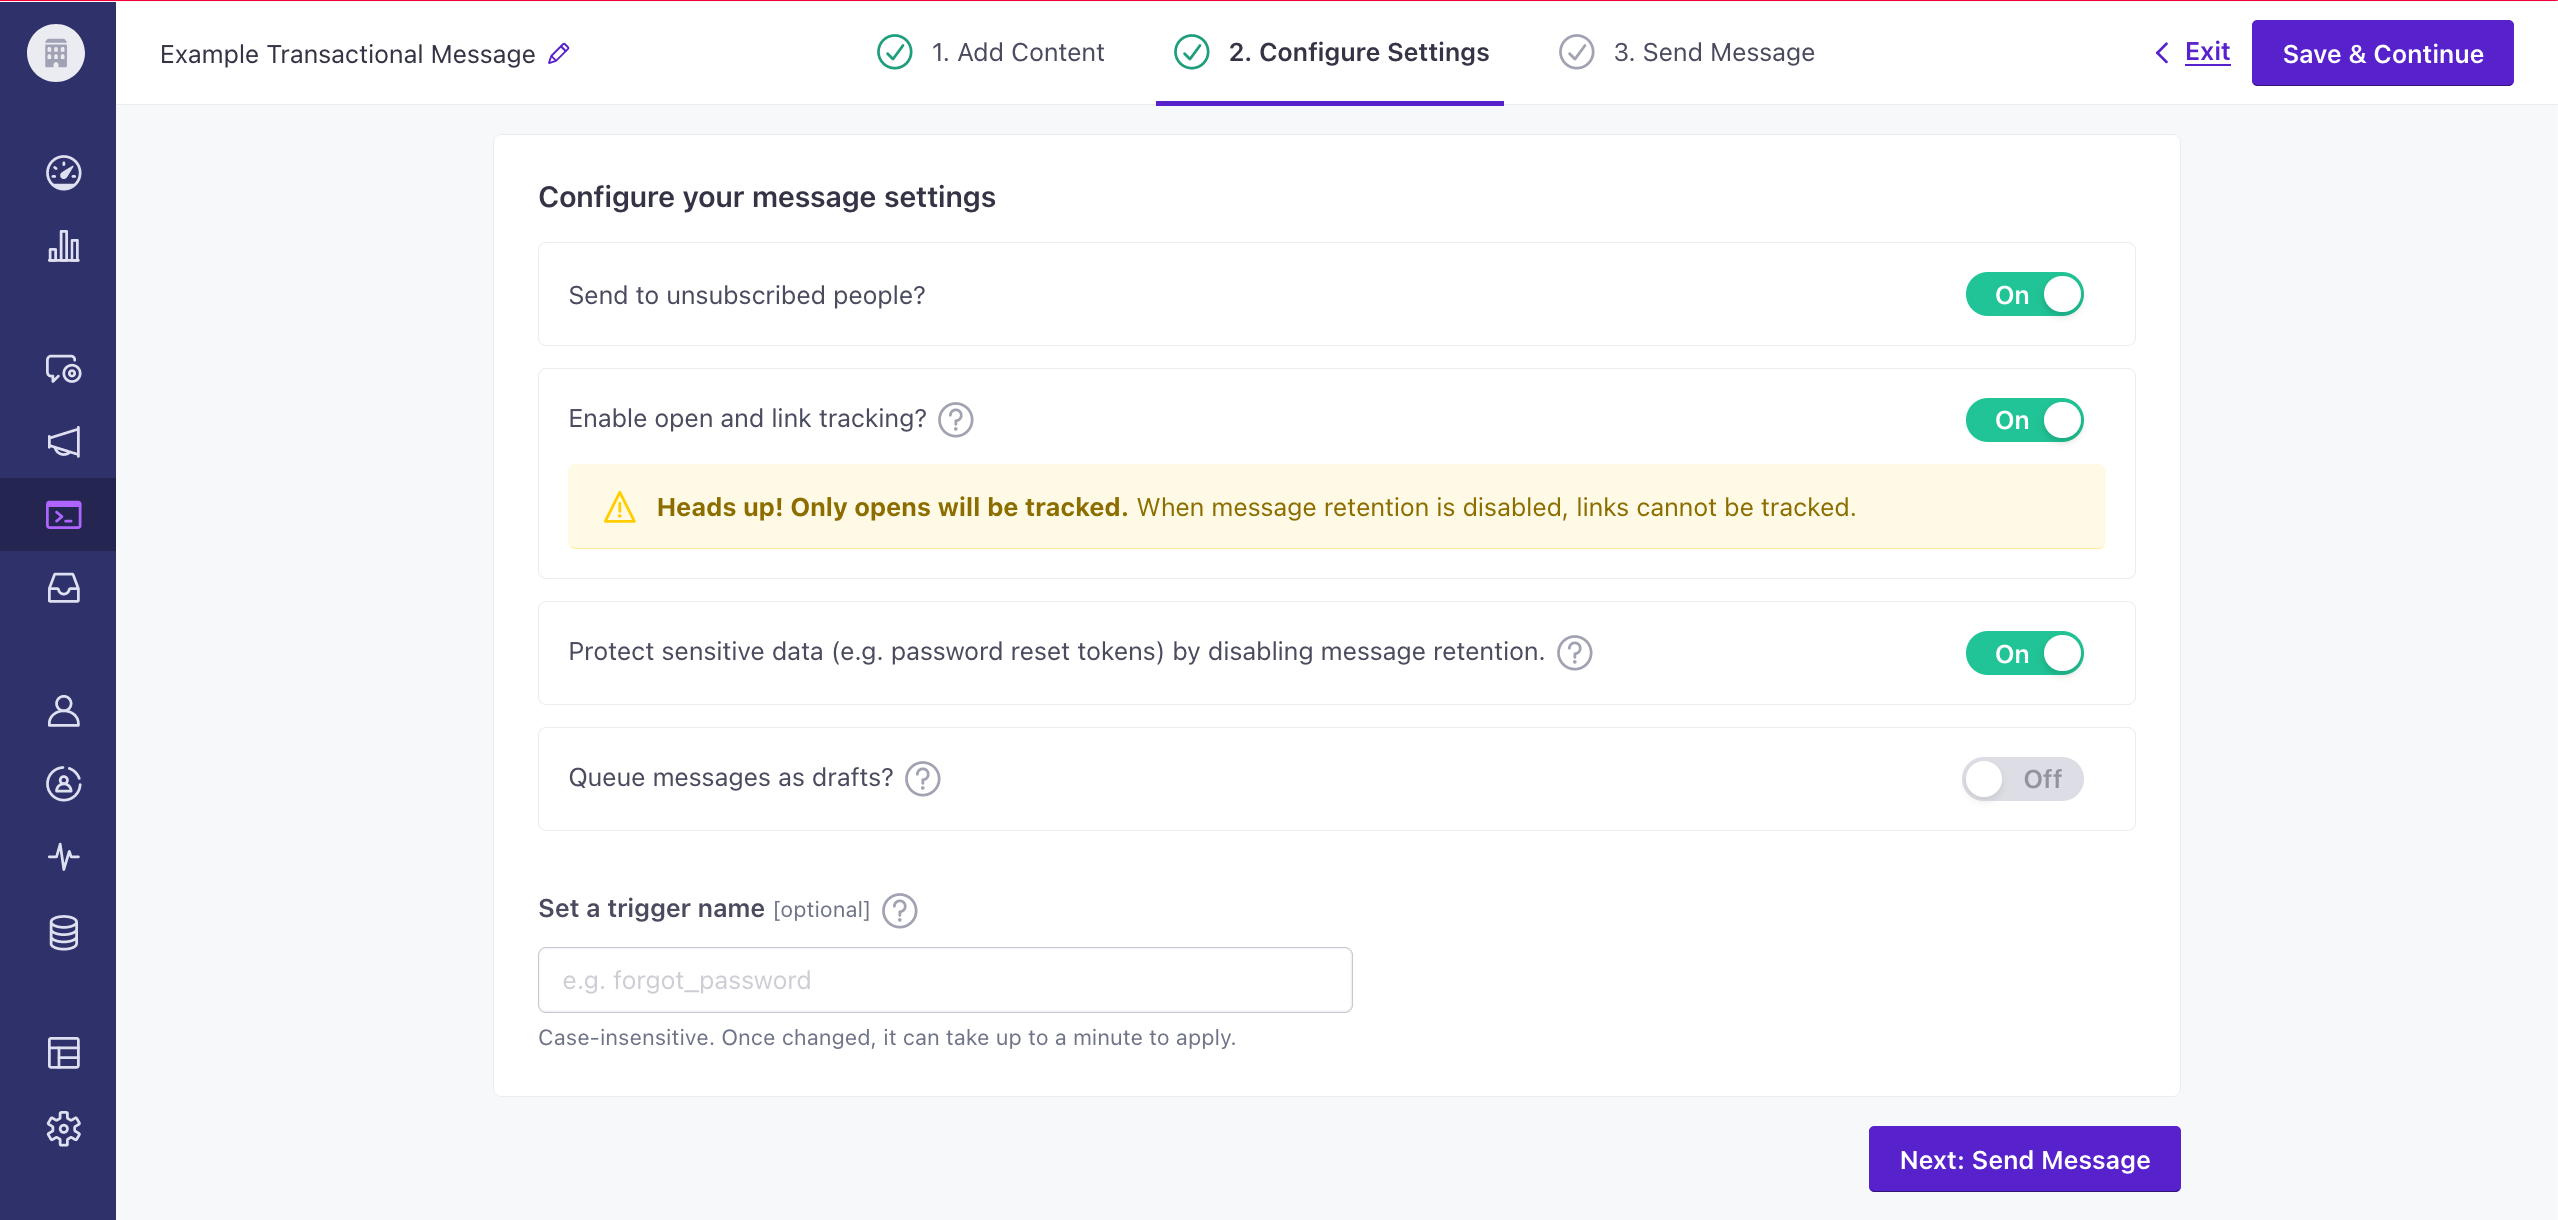
Configure your message settings.
Enable open and link tracking? Enable this setting if you need to know if profiles open or click links in your transactional messages.
Protect sensitive data by disabling message retention? This setting prevents Customer.io from retaining your message content in delivery history and associated API calls. You might want to do this to conceal sensitive content, like password reset tokens.
Queue messages as drafts? This setting generates a draft for every message you trigger, rather than sending them automatically. You can review these messages under the “Drafts” tab and decide whether to send or delete them.
Set a Trigger Name: This is a friendly name for your message that you can use instead of the
transactional_message_idwhen you send your message. It may help make your integration more human-readable if you use triggers that represent the kinds of messages you send—likepassword resetororder confirmation.
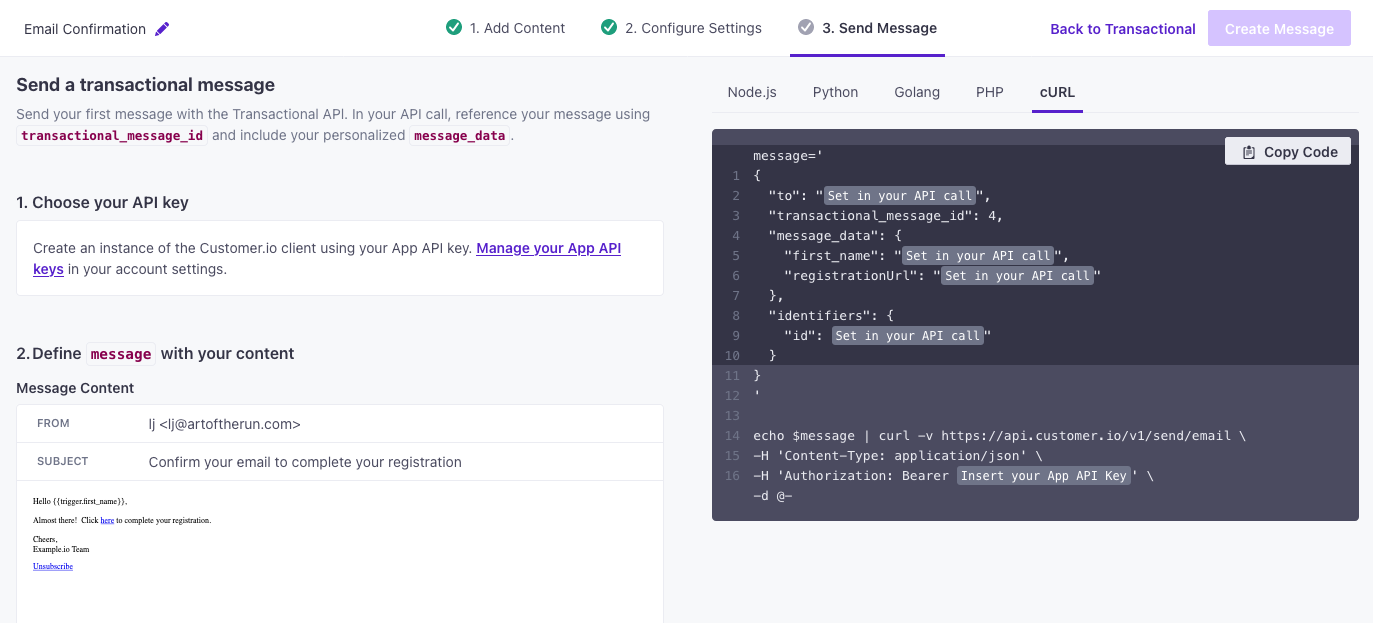
To complete the setup, you need to call the API and trigger a message. If you’re not yet ready to send a message directly from your code, you can use an HTTP client like Postman or send a cURL request from your terminal to test your message and complete the setup process.
Identify recipients
When you send a message, you’ll specify who you’re sending your message to. If the profile you want to send a message to doesn’t exist yet, we’ll create them for you. This lets you send transactional messages to profiles even when they haven’t signed up for your marketing messages.
You can identify recipients by their email address in the to field or with an identifiers block.
When to is a single literal email address, you don’t need to pass an identifiers block; we treat the address as the identifier. In every other case—to with multiple addresses, using liquid in the to field, or omitting to so you use your transactional_message_id’s templated recipient—you must include identifiers.
Default from address
If you omit the from field in your request and the template you reference doesn’t have a from either, Customer.io falls back to your workspace’s default sender at render time. This requires at least one verified sending domain in your workspace; if your workspace has no verified domains, the request fails with a 400. Authenticate a sending domain before relying on this fallback.
Auto-create transactional message records
If you’re working with Our CLI tool or otherwise building your message from code, you can include the auto_create parameter along with a transactional_message_id string the first time you send a message.
Then you’ll include the transactional_message_id in subsequent sends to attribute metrics to the same “message” in Customer.io.
If you don’t include a transactional_message_id in your request, Customer.io attributes metrics to "transactional_message_id": 1. And, if you send different kinds of messages with the same transactional_message_id, they’ll all roll up under that single ID in your metrics, making it difficult to see metrics for each type of message.
Transactional messages created with auto_create don’t contain message content. You’ll pass full message payload (the body, subject, and from fields) with every send. If you want to store message content in Customer.io, you’ll need to use our UI or work with our command line interface (CLI) to populate your template with message content.
Examples and API parameters
Below is a basic transactional email payload, followed by the full list of parameters. Your payload changes based on whether you reference a transactional_message_id (a template) or not. See our REST API documentation for the full reference, including code samples in cURL and several languages.
{
  "transactional_message_id": 44,
  "to": "cool.person@example.com",
  "subject": "Did you really login from a new location?",
  "identifiers": {
    "email": "cool.person@example.com"
  },
  "message_data": {
    "password_reset_token": "abcde-12345-fghij-d888",
    "account_id": "123dj"
  },
  "send_to_unsubscribed": true,
  "tracked": true,
  "disable_css_preprocessing": true
}
- body stringThe HTML body of your message. If you provide a
transactional_message_id, this overrides the template’s body. It’s also the fallback when you send AMP email (body_amp) to a client that doesn’t support AMP. - body_plain stringThe plaintext body of your message. If you provide
transactional_message_id, this overrides the template’s plaintext body. - from stringThe address your email is from. It must be a verified sender. Quote any display name, like
\"Person\" <person@example.com>. This overrides the template’s sender; omit it to use the template or your workspace default. - language stringOverrides language preferences for the person you want to send your transactional message to. Use one of our supported two- or four-letter language codes.
- subject stringThe subject line for your message. If you provide
transactional_message_id, this overrides the template’s subject. - transactional_message_idThe transactional message template you want to use. You can call the template by its numerical ID or by the Trigger Name that you assigned to the template in the UI (case insensitive).integerThe ID of the transactional message you want to send.
Update the content of your email
You can update the contents of your message through our user interface or API.
We’ve exposed an API endpoint so you can manage your message contents programmatically. This request takes a body, which represents the complete HTML content of your message.
You’ll reference the message you want to update by transactional_id and content_id. You can find both in the URL when you look at the content of a message in the format https://fly.customer.io/messaging/env/last/composer/transactional/:transactional_message_id/templates/:content_id. For example, if I look at a transactional message with this URL: https://fly.customer.io/messaging/env/last/composer/transactional/3/templates/139, then the transactional_id is 3 and the content_id is 139.
curl --request PUT \
  --url https://api.customer.io/v1/transactional/{transactional_id}/content/{content_id} \
  --header 'Authorization: Bearer REPLACE_BEARER_TOKEN' \
  --header 'content-type: application/json' \
  --data '{"body":"string"}'
Did you just update a snippet?

