Personalize messages with liquid
UpdatedLiquid is a templating language that lets you personalize messages based on your audience’s data. Any part of your message can contain liquid, meaning that you’re not just limited to personalized message content: you can use liquid to personalize your sender information, email subjects, and so on.
New to liquid? Check out our tutorial for marketers!
Our tutorial can help you understand the fundamentals of message personalization and how to use your data to send engaging messages that increase conversion rates.
When you’re ready, you can find examples of liquid for a variety of use cases in Liquid recipes.
How it works
Liquid lets you use variables and other logical statements in messages to personalize content. These can be customer attributesA key-value pair that you associate with a person or an object—like a person’s name, the date they were created in your workspace, or a company’s billing date etc. Use attributes to target people and personalize messages., event data, and more. When you send a message through Customer.io (also called a deliveryThe instance of a message sent to a person. When you set up a message, you determine an audience for your message. Each individual “send”—the version of a message sent to a single member of your audience—is a delivery.), we process the liquid syntax in your messages to personalize the content for your recipient.
We can break liquid down into three concepts:
- Tags define logic and control flow (like a
forloop). - Keys contain objects and attributes that dynamically render based on your recipient, like
{{customer.first_name}}, wherecustomeris the object andfirst_nameis the attribute saved on your customer’s profile. - Filters modify liquid output (you can filter a key) (like
{{customer.first_name | capitalize}}).
For example, if you store a person’s name as an attribute called first_name, you can reference the name with this key: {{customer.first_name}}. Then when you send the message, the person’s actual name replaces the liquid.
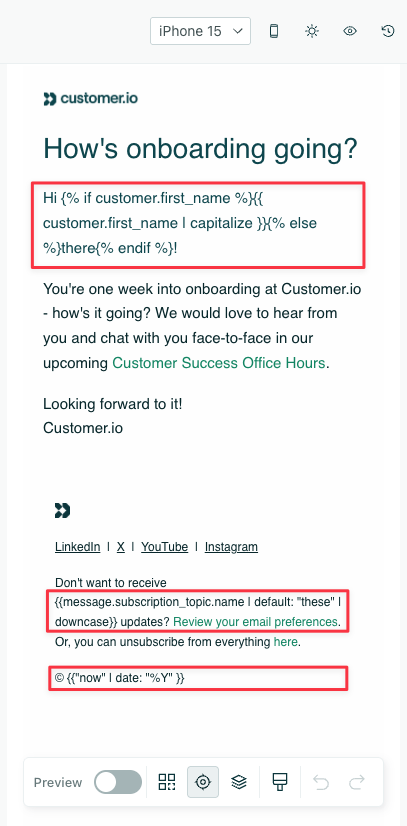
If your liquid statements don’t evaluate properly—like if a person doesn’t have a first_name attribute—the message won’t send. This is to prevent people from receiving incomplete messages! You’ll see Failed in your message logs. To prevent messages from failing due to liquid errors, add fallback statements that render when someone doesn’t have an attribute.
Hi {{customer.first_name | default:"Buddy"}}!
{{customer.first_name}}"] a-->b{Does customer have
first_name attribute?} b--->|yes|c[Hi Alex!] b--->|yes|d[Hi Blair!] b-.->|no|e{Is there a fallback?} e-->|yes|f[Hi Buddy!] e-.->|no|g[Message failure] style c fill:#B5FFEF,stroke:#007069 style d fill:#B5FFEF,stroke:#007069 style f fill:#B5FFEF,stroke:#007069 style g fill:#FFC4CF,stroke:#69002C
The default filter only works with our latest version of liquid.
Find out which version you’re on with our Liquid upgrade article. If you’re using our legacy liquid, you can use if/else statements for fallbacks.
Reference nested attributes
Liquid uses JSON dot notation to access nested properties—data that’s not a single value, but an object or array of information.
For example, imagine that someone refers a customer to you, and you store that referral as an attribute. You might have an attribute called referrer that contains information like how the referring party is related to the new customer.
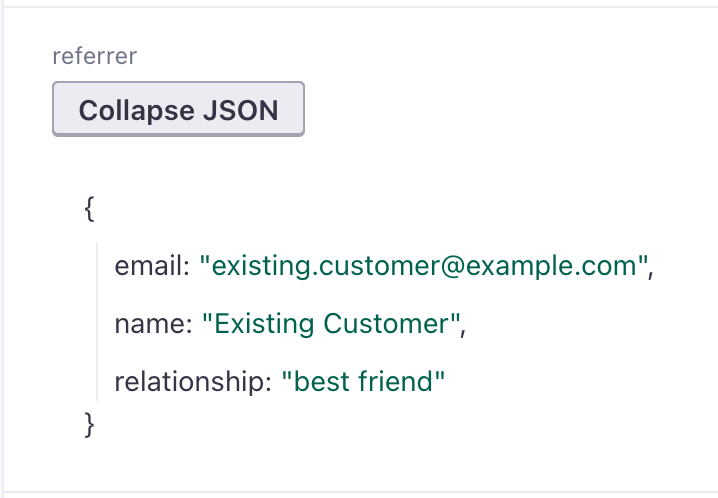
You could access those nested properties in your workflows with {{customer.referrer.relationship}} or {{customer.referrer.name}}.
If you’re new to JSON and organizing data, check out our introduction to JSON.
Preview liquid
When you create a message, you can search for people and other data to check how your liquid renders.
| Liquid while editing | Liquid with preview data |
|---|---|
 | 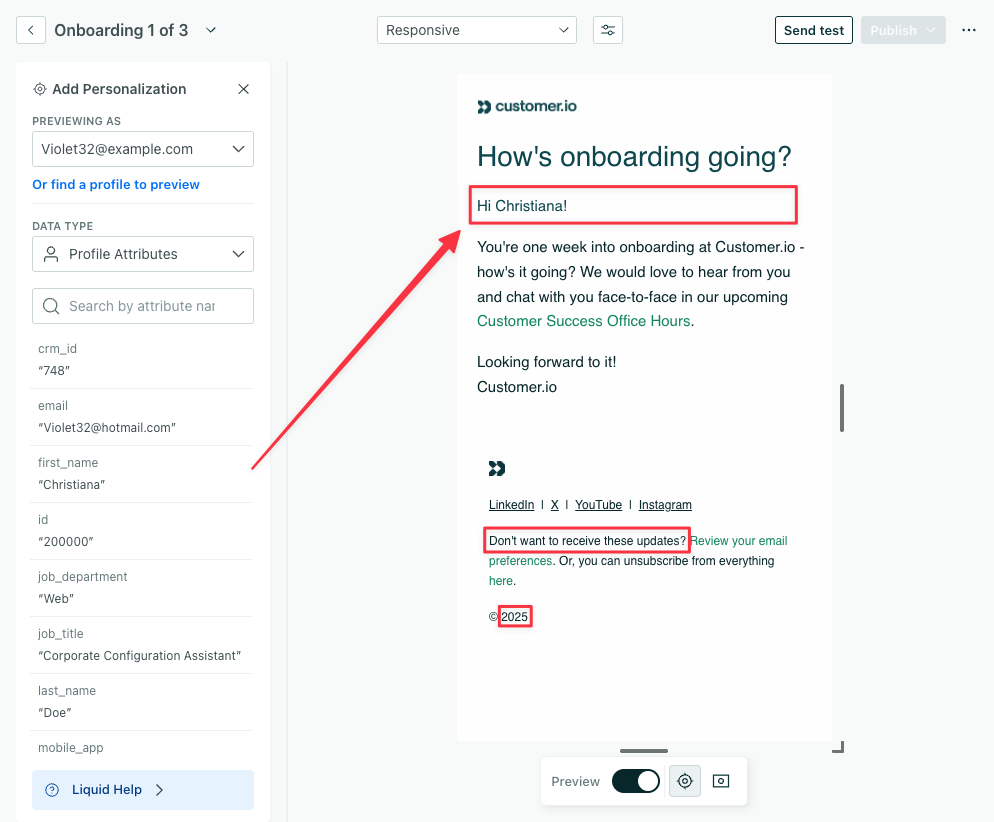 |
At the top, the customer’s attribute first_name renders according to the person in the preview, Christiana. Towards the bottom, the message.subscription_topic.name key renders the fallback “these” because there is no subscription topic associated with the message. Then the now key renders the year.
Personalize messages with Customer.io objects
You’ll generally use three types of objects to personalize messages based on customers’ profiles and workflow trigger data: customer, event, and trigger objects.
| Object | Liquid syntax | When to use |
|---|---|---|
customer | {{customer.<attribute_name>}} | Use this to personalize messages with customer information. |
journey | {{journey.<attribute_name>}} | Use this to personalize messages with data from webhook actions. We store this data temporarily in a campaign, instead of a customer’s profile, so you can streamline your workspace data. |
event | {{event.<attribute_name>}} | Use this to personalize messages with data from an event that triggers a campaign. |
trigger | {{trigger.<attribute_name>}} | Use this to reference data that triggers a transactional message or API-triggered broadcast. You can also use this in webhook-triggered campaigns. |
{{trigger.<object_type_name>.<attribute_name>}} | Use this to reference data from an objectAn object is a non-person entity that you can associate with one or more people—like a company, account, or online course. that triggers a campaign. | |
{{trigger.relationship.<attribute_name>}} | Use this to reference relationshipThe connection between an object and a person in your workspace. For instance, if you have Account objects, people could have relationships to an Account if they’re admins. data for an object or relationship-triggered campaign. |
You can reference attributes (using the customer or journey keys) in any message, but you can only use event keys in event-triggered campaigns. To reference data for other trigger types, use the trigger key.
Check out other Customer.io-specific keys!
We have keys for unsubscribing from messages and meta keys that help you track your messages.
Customer attributes
The {{customer.<attribute_name>}} key represents attributes associated with people. You can reference customer data, except anonymous data, in any message or action. Check out anonymous in-app messages for ways to reach unidentified users.
For instance, to greet a customer, you could add their name:
Hi {{ customer.first_name | capitalize }}!
It’s best practice to set up a fallback, in case a recipient doesn’t have a first name. Learn more about fallback options below.
Hi {% if customer.first_name %}{{ customer.first_name | capitalize }}{% else %}there{% endif %}!
If you capture customers’ full names in a single field, you could break them apart with the split filter. This renders the first word in the field.
{{ customer.full_name | split: " " | first }}
You can find a complete list of our tags and filters in our liquid syntax article.
Journey attributes
Journey attributes are temporary attributes that you can set and update throughout a person’s journey. You can use them to store data essential for someone’s journey that doesn’t need to be stored for use outside of the campaign. Learn more about setting journey attributes.
For example, if you wanted to send a person information about the weather in their area, you could use a webhook to fetch the forecast and store this on a journey attribute.

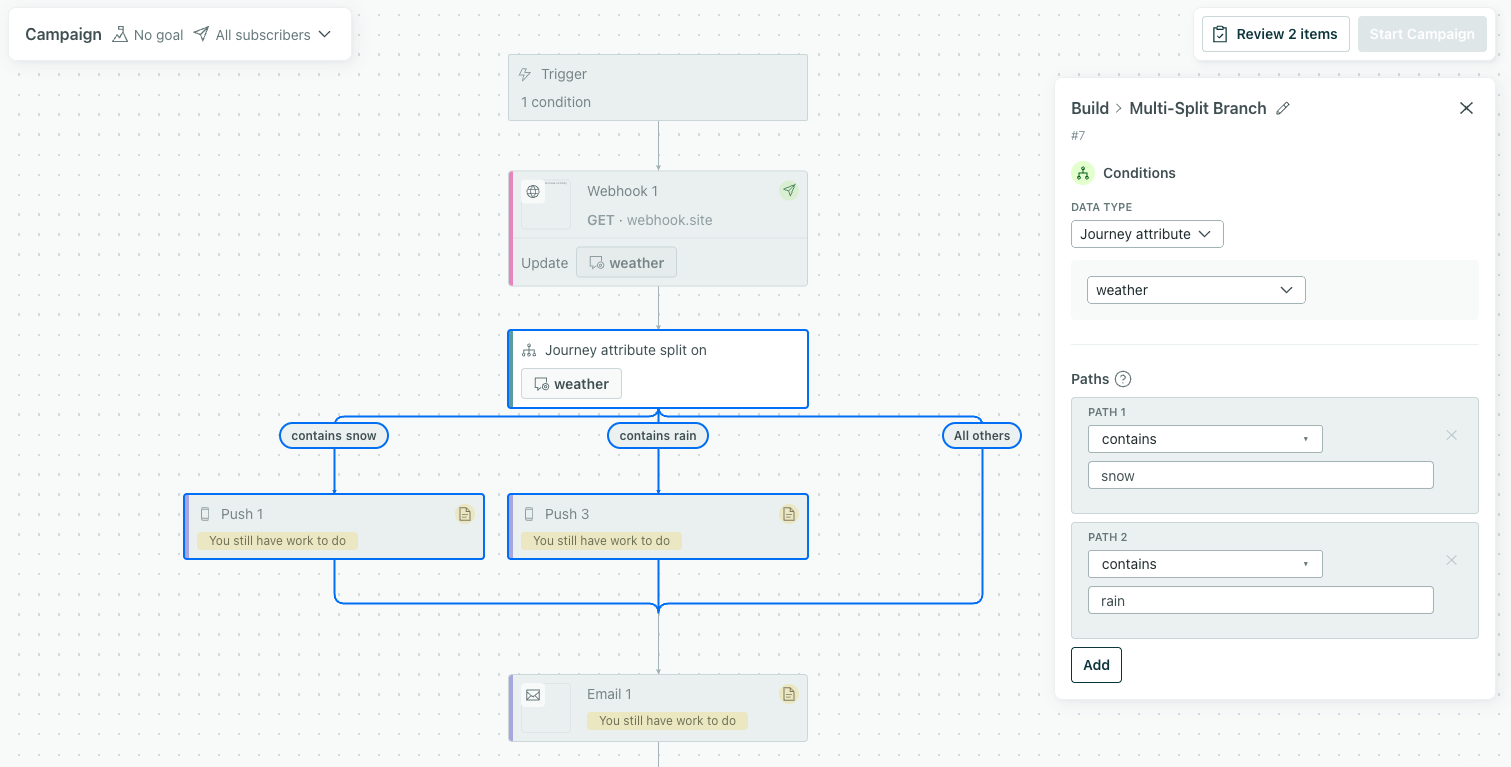
Reference journey attributes in conditions
After you set a journey attribute, you can reference it in any condition in your workflow. For instance, in this branch, people go down different paths based on the journey attribute weather:
Reference journey attributes in messages
After setting journey attributes, you can add them to messages or other webhooks using the liquid object journey.
Following the example above, the syntax would be {{journey.weather}}, where weather is the journey attribute name you set in the webhook.
To preview journey attributes in a message, you have to provide your own data. Go to the Sample data panel, and select the Journey tab. Input any useful value under your attribute name.

Events that trigger workflows
Use the trigger key to reference trigger data for these workflows:
- Transactional messages
- API-triggered broadcasts
- Webhook-triggered campaigns
- Object or relationship-triggered campaigns
For event-triggered campaigns, you’ll reference trigger data with the event key.
Event-triggered campaigns
Event objects let you include data from events that trigger campaigns; you can’t use this to target any other events performed by people.
You might create an event-triggered campaign around purchases. Imagine a customer bought a pair of socks, and you want to give them a discount on their next pair. To do that, you send Customer.io a purchase event with how much the socks cost.
If you look at a person’s recent activity, the event might look like this:
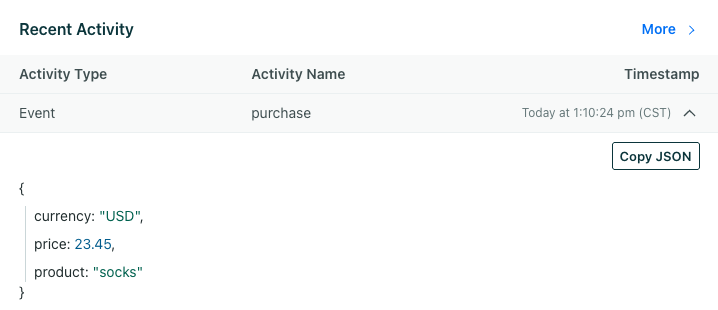
You could then pull that data into your message content. In this example, the message includes the product and a conditional that shows a different discount code depending on the amount of money they spent.
Thanks for your purchase! We hope you enjoy your new {{ event.product | default: "items" }}.

{% if event.price > 20 %}
Save 20% on your next purchase over $20 with code SAVE20!
{% else %}
Save 10% on your next purchase with code FIRST10!
{% endif %}
Based on the recent activity above, the person would receive this message:
Thanks for your purchase! We hope you enjoy your new socks.

Save 20% on your next purchase over $20 with code SAVE20!
You’ll always use the object event to reference event trigger data, never the actual name of the event.
You can also reference event trigger meta data through these keys:
event_namerepresents the event name, as sent into Customer.io.event_idrepresents the ID as logged by Customer.io; this value is always unique.event_timestampis the event timestamp in Unix epoch format.
You can only pull in data from the event that triggered your campaign
Even if you reference other events in your campaign—like in a Wait until action or in your conversion criteria, you can only use the event key to access trigger data.
Webhook-triggered campaigns
Unlike other types of campaigns, you can’t send messages to customers in webhook-triggered campaigns. Rather, you use these campaigns to trigger workflows that send events or update customers based on the incoming data.
For example, let’s say you have a survey tool, but don’t have the resources to integrate it with Customer.io right now. But you want to reach out to customers who submit a low score. You could use a webhook-triggered campaign to transform the incoming data to trigger a message for customers in another campaign. The process would look like this:
- Create your webhook in your third-party tool.
- Trigger a campaign by this webhook.
- Add a Send Event action to the campaign. This transforms the incoming data into an event and saves it to a customer’s profile.
- Trigger a campaign based on this event.
- Add a message to the event-triggered campaign to follow up on their survey results.
While {{trigger.<property>}} is available in webhook-triggered campaigns, you’ll only use this to reference incoming data in a Send and receive data action. This action lets you send a webhook out of Customer.io and include trigger data. Otherwise, you’ll use our condition builders to transform trigger data into events or attributes; you won’t need this liquid syntax.
Follow our step-by-step guide for third-party survey tools or check out our other recipes to get started with webhook trigger data.
Object and relationship-triggered campaigns
Objects are non-people entities you can relate to people. For instance, a person might belong to an account object in your workspace. The connection between a person and object is called a relationship. You can trigger campaigns by objects and relationships and include the trigger data in your workflows.
For example, say you want to inform people when accounts they manage upgrade their plans from premium to enterprise. You could trigger a campaign when an account’s plan name is updated and send a message informing the managers:
Good news! {{trigger.account.name}} has upgraded to enterprise!
To include trigger data for objects, you must include the object type name: {{trigger.<object_type>.<attribute_name>}}. In this example, “account” is the object type, which groups all accounts together.
You could also include information on the recipient’s relationship to this account.
You're receiving this message because you're a {{trigger.relationship.role}} on this account.
To include relationship data, you don’t include the object type name, just “relationship”: {{trigger.relationship.<attribute_name>}}.
The message content might look like this:
Good news! Acme Inc.0 has upgraded to enterprise!

You're receiving this message because you're a manager on this account.
Check out Objects in liquid for more examples.
Transactional messages and API-triggered broadcasts
When you create a transactional message or an API-triggered broadcast, you may want to include data from the payload that triggered the message or workflow. You can reference properties from the trigger event as {{trigger.<property>}}.
For example, you could send a transactional message that’s a purchase receipt with information on shipping. The trigger event might include the product name and range of time it could take to deliver the package.
"message_data": {
  "product": "trampoline",
  "minShipTime": 4,
  "maxShipTime": 6,
  "unitOfTime": "weeks"
}
Then the message could include liquid like this:
Thanks for your purchase! Your {{trigger.product}} has shipped! It will arrive in {{trigger.minShipTime}} to {{trigger.maxShipTime}}
{{trigger.unitOfTime}}.
Based on the trigger data, the message would send with the following info:
Thanks for your purchase! Your trampoline has shipped! It will arrive in 4 to 6 weeks.
Learn more about personalizing messages with trigger data for API-triggered broadcasts.
Add message and workflow metadata
This section talks about liquid keys that output high-level data around your messages, campaigns, and more. You can personalize messages with customer or trigger data using the keys above.
When you preview a message or we generate a delivery, we produce metadata about your message, the campaign it came from, and more that you can reference with liquid. Generally, you wouldn’t want to expose this data in a message, but you might use them behind-the-scenes to construct custom unsubscribe links or send info to your email analytics tools.
The meta data available changes based on the type of workflow, message, or action you’re editing. While many keys are available when you preview a message, some, like delivery_id, only populate at send time. You can find a full list of them on the liquid syntax page under Customer.io Meta Keys.
Liquid fallbacks
Messages will fail to send if they include data that doesn’t exist—like when a person doesn’t have an attribute or an event doesn’t have a property you reference. To prevent message failure due to liquid errors, you should add fallback logic or filters.
We have two versions of liquid: “legacy” liquid and our “latest” liquid. Most of our syntax works across both liquid versions. However, there are some tags and filters that behave differently. For instance, default is available only on the latest liquid version. Learn about our liquid upgrade and how to see which version you’re on.
Common conditionals like this would work across both versions, so depending on the syntax you need, it may not matter what version you’re on:
Hi {% if customer.first_name %}{{ customer.first_name | capitalize }}{% else %}there{% endif %}!
Use the Add Liquid option in the drag-and-drop email editor
If you’re using our drag-and-drop email editor, and you want to add liquid that involves logical or comparison operators (&, >, or <), click Add Liquid in a text block to ensure the liquid renders correctly.
Fallback that covers both liquid versions
Most of our syntax works across both liquid versions. However, there are some tags and filters that behave differently.
If you’re on an account that has messages that use both the legacy and liquid versions, you may want to ensure that any snippets or content reused across messages render correctly for both versions. For content that renders based on liquid version, check out our article on liquid versions..
Fallback for latest liquid
In addition to standard if/else conditions, you can use the default filter as a shorthand to set a fallback value. For example, if some people don’t have a plan_name, you could create a fallback that renders for them:
You are currently on our {{ customer.plan_name | default:"custom" | capitalize }} plan.
Without a plan name, the person will receive this message: You are currently on our Custom plan.
In our rich text email editor, we also have a shortcut for you!
Fallback for legacy liquid
For legacy liquid, create a fallback with an if statement. You can use the following shortcut to add a legacy liquid fallback in our rich text email editor.
For all other editors, here’s how you would write the liquid logic from scratch.
{% if customer.plan_name != blank %}
  You are currently on our {{ customer.plan_name | capitalize }} plan.
{% else %}
  Please choose a plan.
{% endif %}
If the person has a plan_name of Trial, then the liquid will display, You are currently on our Trial plan. If the person’s plan_name is blank, the liquid will display, Please choose a plan.
Alternatively, if you don’t want to show anything for people without an attribute, exclude the else statement:
{% if customer.plan_name != blank %}
  You are currently on our {{ customer.plan_name | capitalize }} plan.
{% endif %}

