

Wait until...
How it works
A Wait Until action holds a person in a journey until they meet a condition, like entering a segment, performing an event, or waiting a certain amount of time.
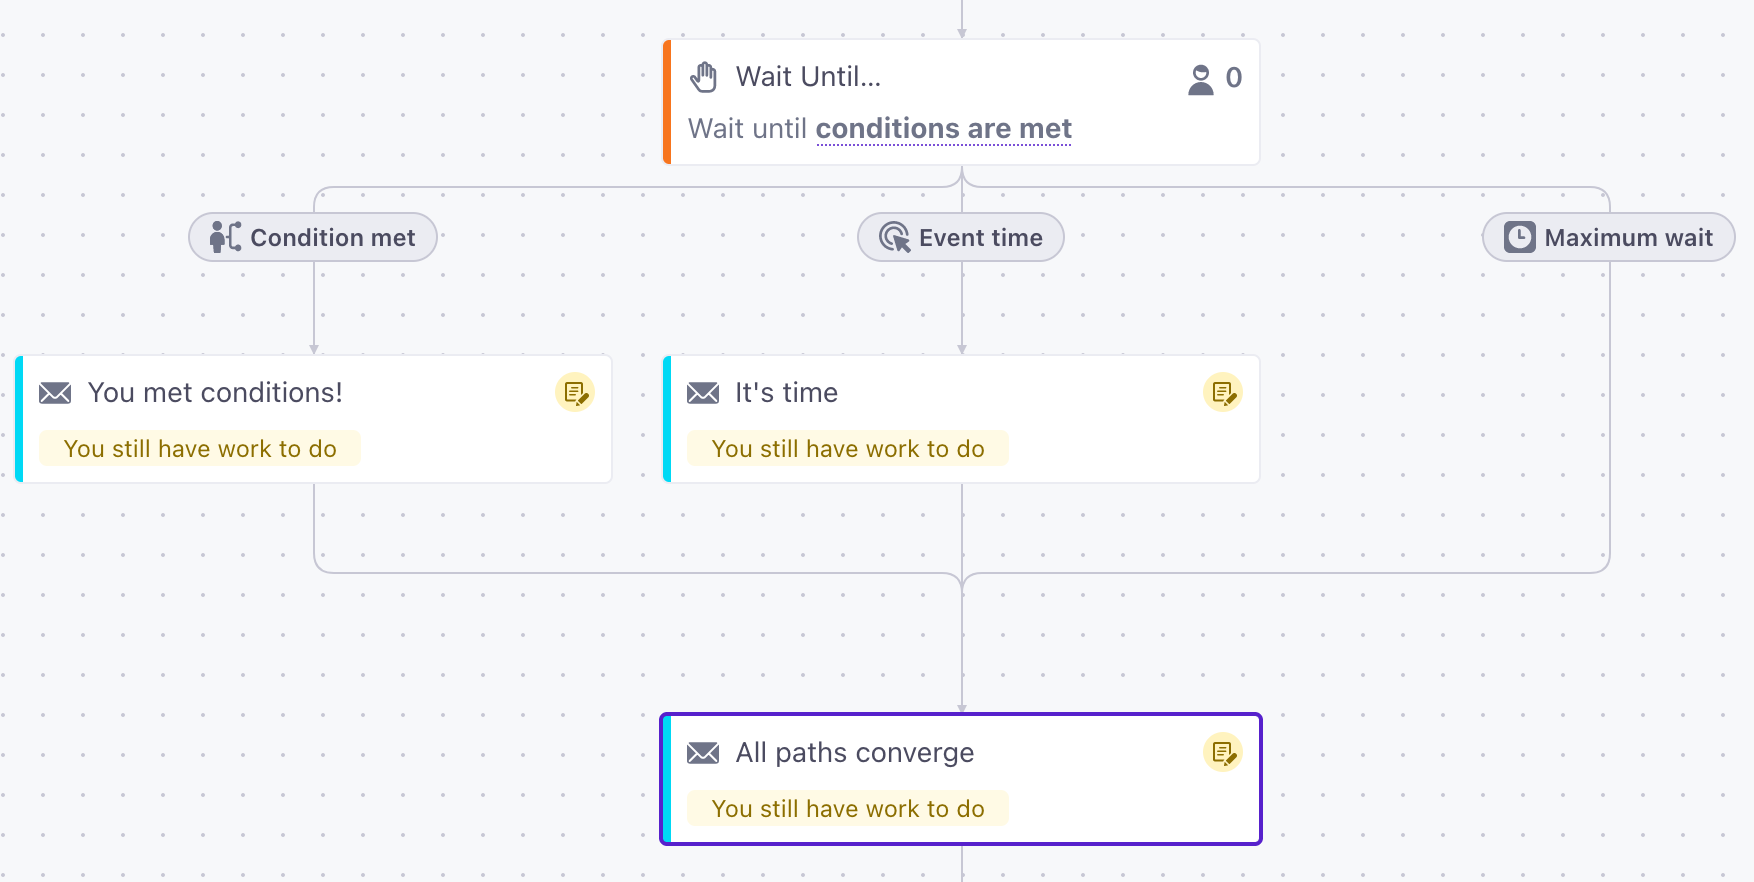
You can add a wait until block to automations and API-triggered broadcasts.
Each wait until action can have up to 20 paths. A person progresses down the first path they satisfy; if a person satisfies more than one path at the same time, they take the path farthest to the left. For example, if you set attribute conditions and a max time, a person will progress in your automation if they either meet your attribute conditions or they reach the maximum wait time.
To create a path, you first choose a type:
- Conditions: Determine whether a person needs to have certain attributes, perform an event, join a segment, and so on before they can progress through the automation. You can combine conditions with And, Or, and by nesting groups of conditions.
- Delay: Chain delay steps—like a Time Delay, a Time Window, and a Randomized Delay—into a single, specific wait. See Delay.
- Event time (Event-triggered automations only): Base your wait on a timestamp in your trigger’s event data.
- Max time: Set the maximum time a person can wait. If a person reaches the maximum wait time without achieving any other conditions, they’ll progress through the workflow.
A path can’t contain multiple types, but you can use other workflow actions to chain together your desired outcome. For instance, you could create a condition-based path then add a delay block for people who progress down that pathway.
Each type of delay starts a new path
You can set up different types of waits in the same actions, creating multiple paths for people in the journey. A person will progress down the first path they meet conditions for.
You can either take advantage of different paths to send different messages based on the conditions the person met or, if the result of a conditional wait or a maximum wait is the same, you can place actions after the paths converge.
Set up a Wait Until
This video shows each of our delay options. Click to fast forward to the Wait Until section.
- Drag Wait Until… into your workflow.
.png)
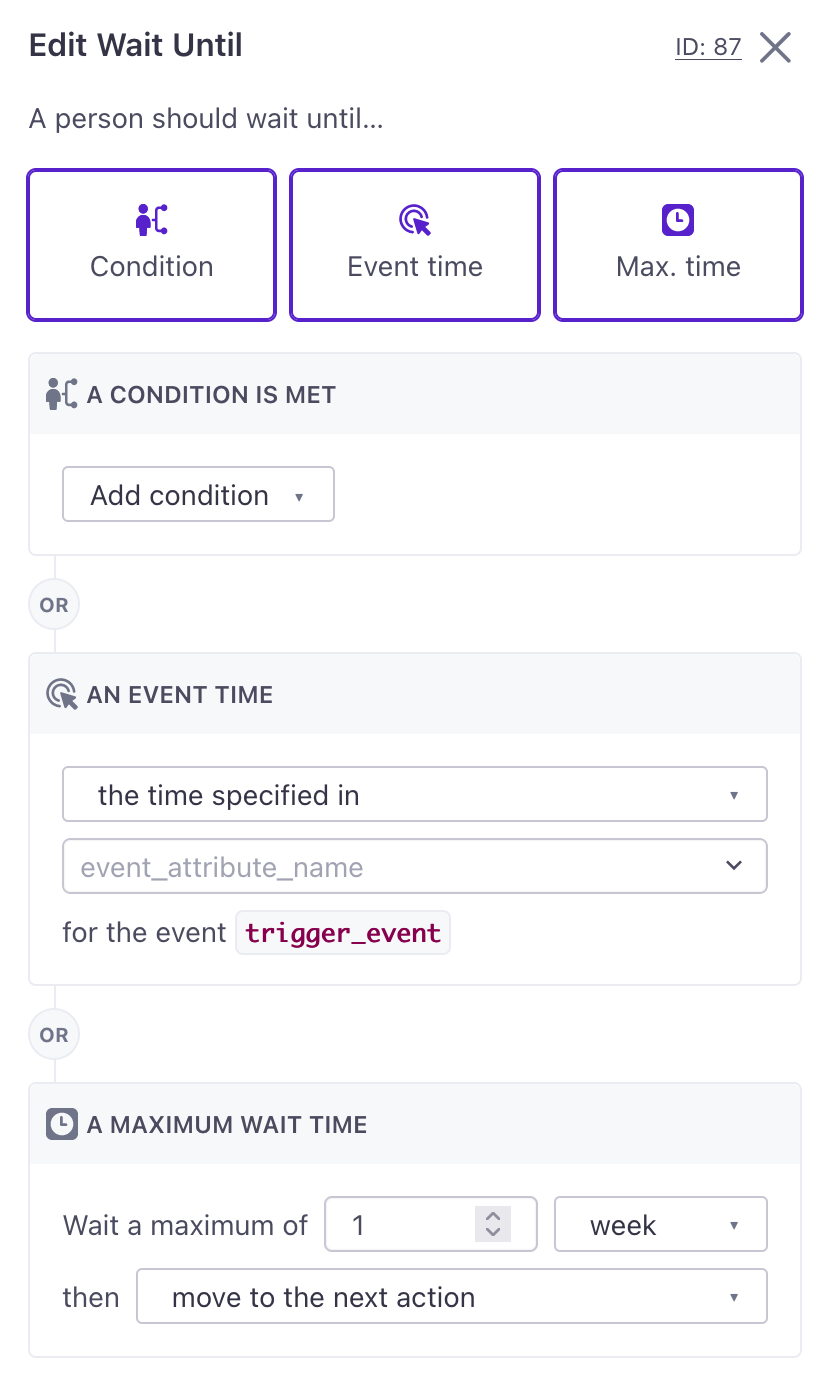
- Click Add path and select a type from the dropdown. Define the criteria a person must meet before they continue the automation:
- Conditions: Attribute, event, segment, message, geofence, object, or relationship conditions that a person must meet (or not meet) to move on. Combine multiple conditions in a path with And or Or; you can also set up multiple, separate paths.
- Delay: Chain delay steps together into a single path, like a minimum wait followed by a specific day and time.
-
Event time: A timestamp specified in an event that triggers your campaign.
For example, if you trigger your automation with an event calledevent_reminderyou could Wait until theremind_me_attimestamp in your event to send a reminder message. Your timestamp should be in Unix seconds since epoch. - Max time: The maximum time that a person waits before moving on in the workflow.
.png)
Path types
Conditions
When you set your Wait until delay, you can use attribute, event, segment, message, or geofence set conditions. Within a single path, you can combine multiple conditions with And or Or, and nest groups of each to build more complex logic.
You can also set multiple conditional paths. See the section below for more information about setting up multiple condition-based paths.
- Attribute: Wait until a person matches a profile attribute
A key-value pair that you associate with a person or an object—like a person's name, the date they were created in your workspace, or a company's billing date etc. Use attributes to target people and personalize messages.
condition—whether a person has an attribute, doesn’t have an attribute, matches an attribute value, etc. - Event: Wait based on whether a person has, or has not, performed an event. Unlike Event time delays, this does not have to be an event that triggered your automation. You can also specify event properties to narrow down the condition.
- Segment: Wait based on whether or not a person belongs to a segment. See the Not in segment condition for more information about matching folks who aren’t in a segment.
- Message: Set a condition to check if someone has been sent or is sent a message. You can also base message conditions on other statuses like delivered, opened, clicked, and more. Choose messages from any automation, broadcast, or transactional message in your workspace. For example, if your automation follows up on a person’s order, you might wait until after they receive a transactional message containing their receipt.
- Geofence set
A named group of geofences that you act on together—for example, trigger a campaign when a person enters any geofence in the set. When a person crosses a geofence, our mobile SDKs send a
: Wait based on whether a person enters or exits a geofence set.Geofence Transitionevent for each geofence set the geofence belongs to. - Relationship: Wait until a relationship
The connection between an object and a person in your workspace. For instance, if you have Account objects, people could have relationships to an Account if they're admins.
meets certain criteria. For example, if your objects are online courses, you could have a person wait until their relationship attributeenrolledis equal totrue.
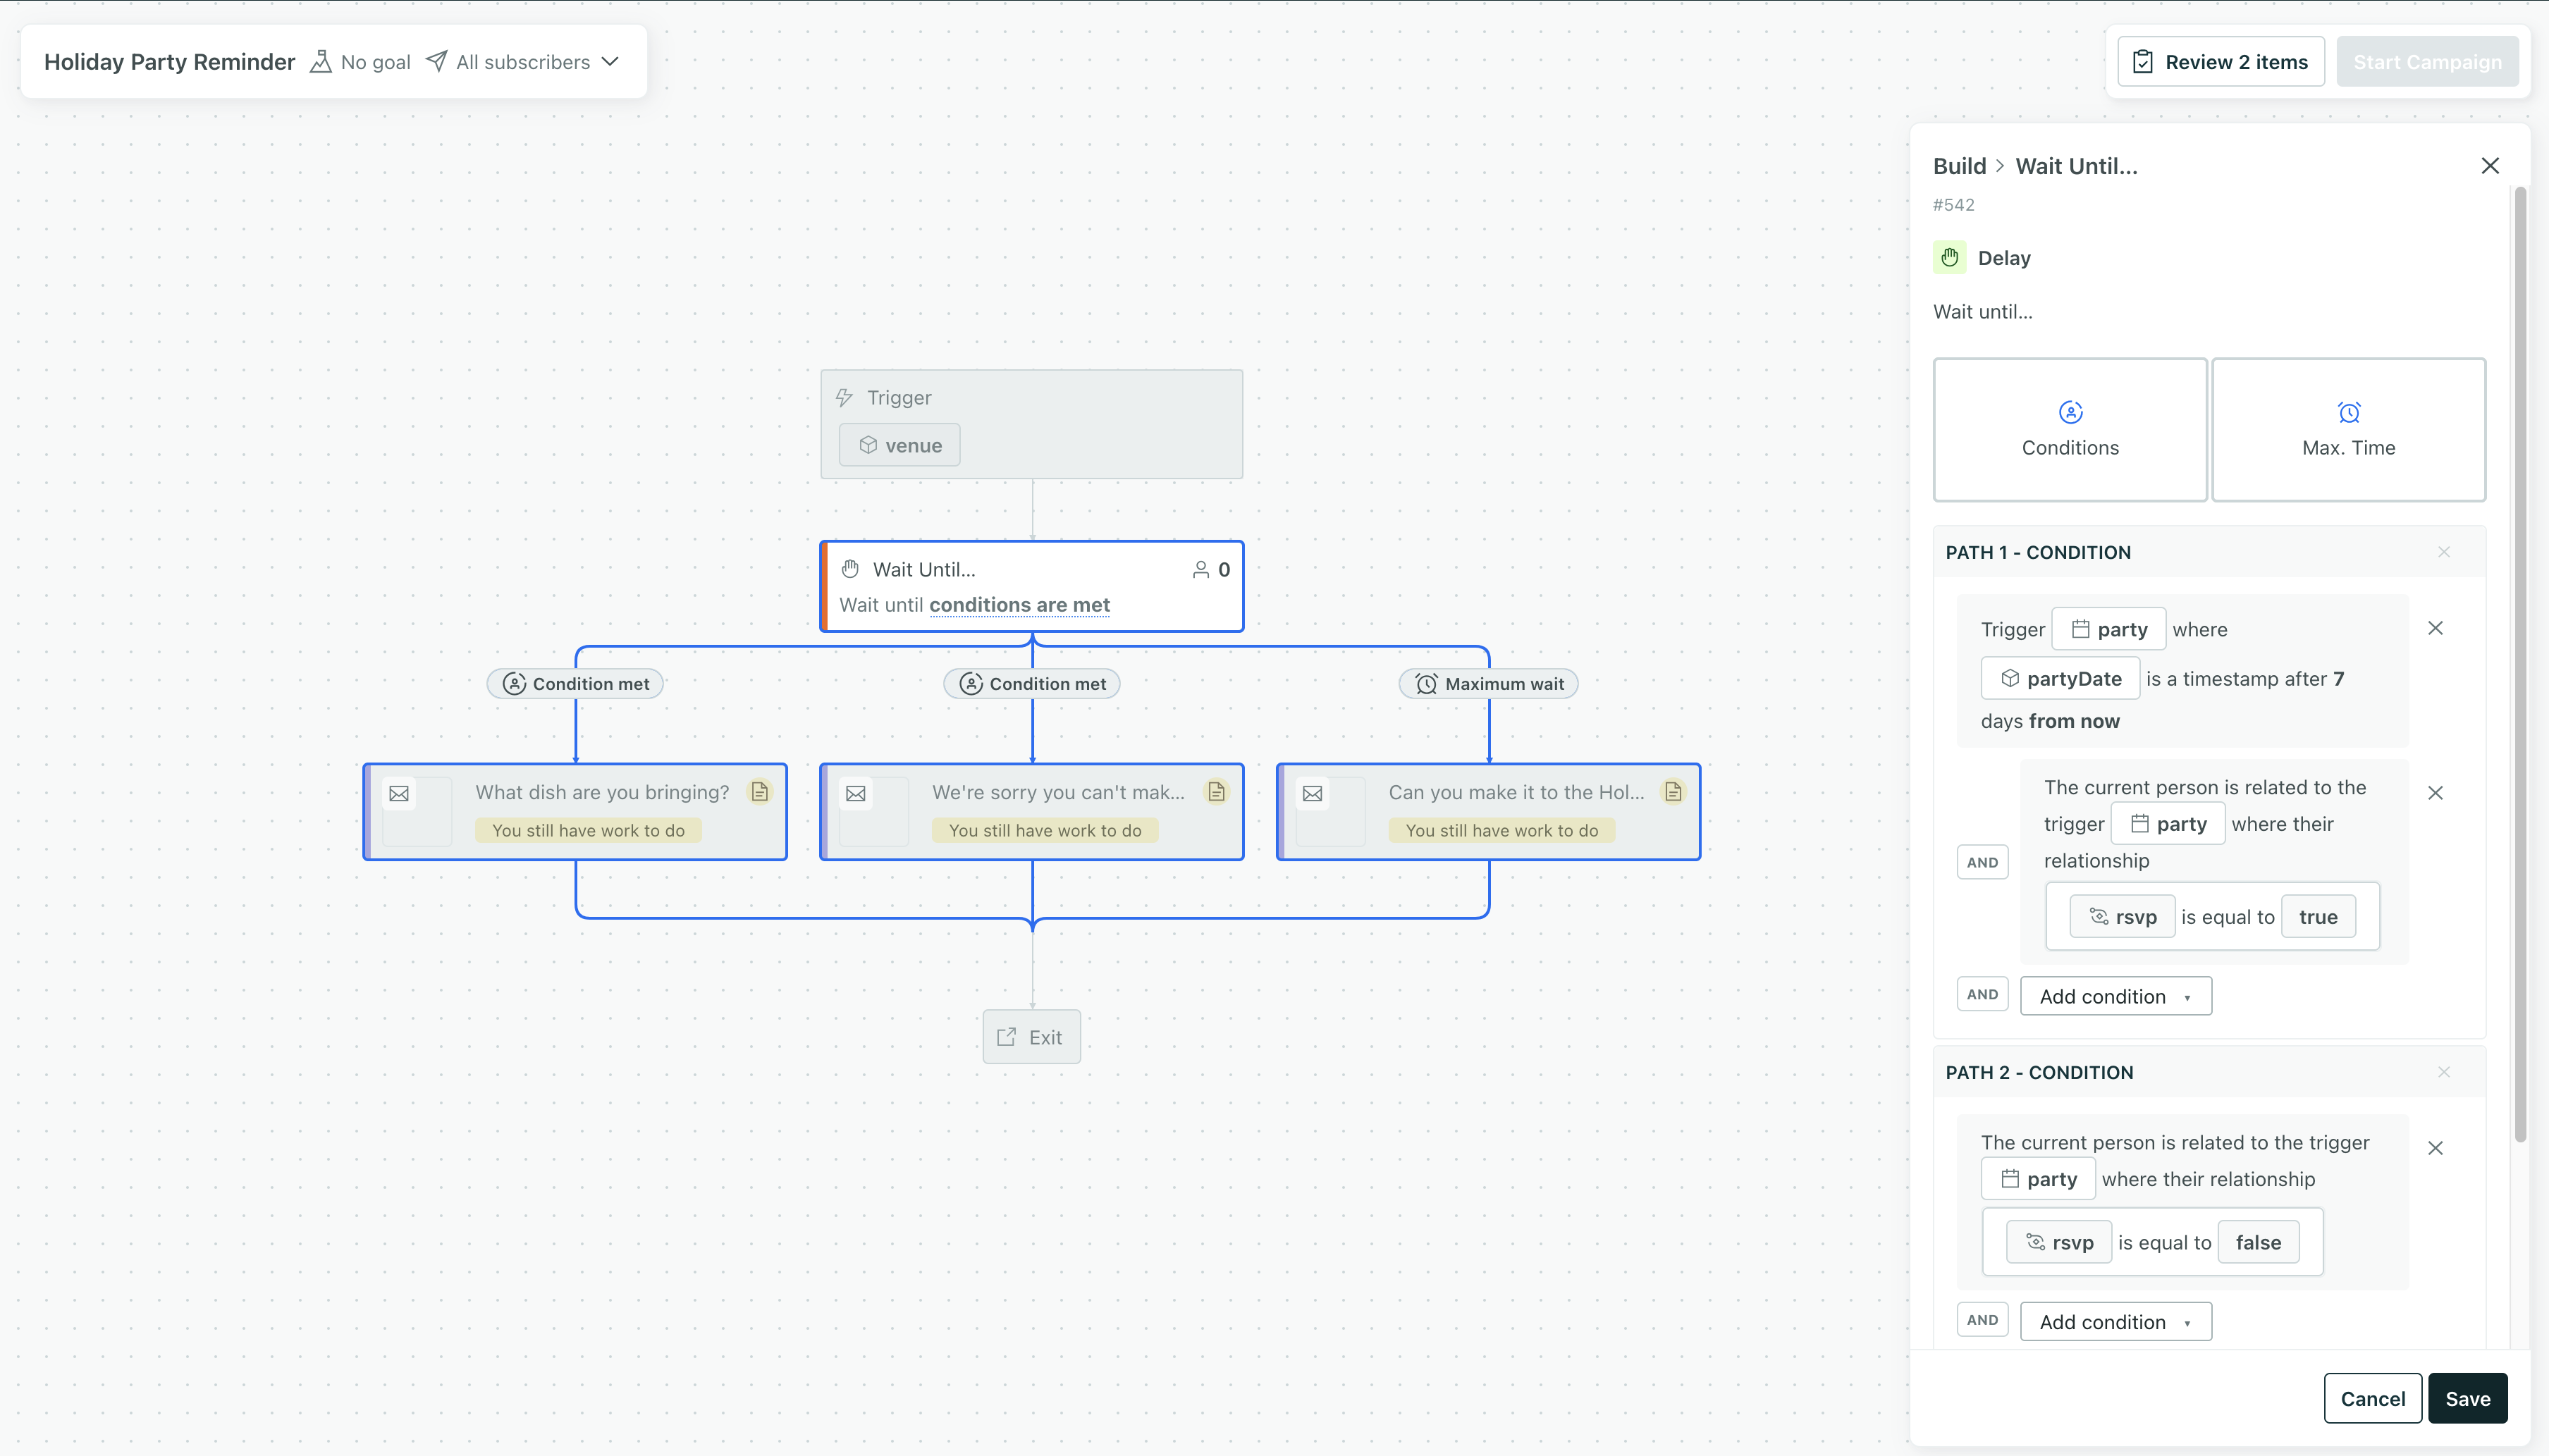
For automations triggered by an object, a relationship, or an important date stored on a custom object, you can also create conditions based on the triggering object or relationship. For example, if an order triggered the automation, you could have a person wait until Order.status is equal to delivered or Subscription.active is equal to true.
Segment “Not in…” conditions
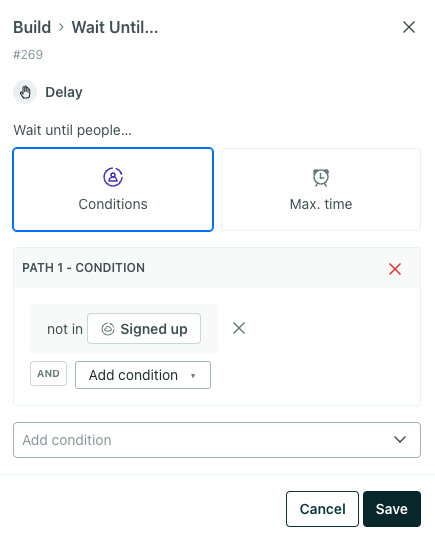
If you base your wait condition on whether people are not in a segment, people who were never in the segment will skip the wait. People must already be in the segment to wait in a condition defined by “not in” a segment.
Event property conditions
When your Wait Until condition is an event, you can click Add event data filter to evaluate the wait condition based on fields in an incoming event. You can even evaluate properties in your condition against a person’s attributes A key-value pair that you associate with a person or an object—like a person's name, the date they were created in your workspace, or a company's billing date etc. Use attributes to target people and personalize messages.
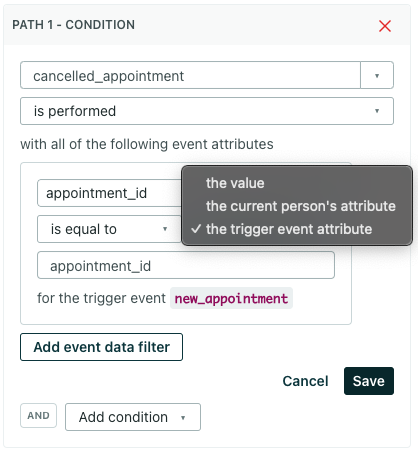
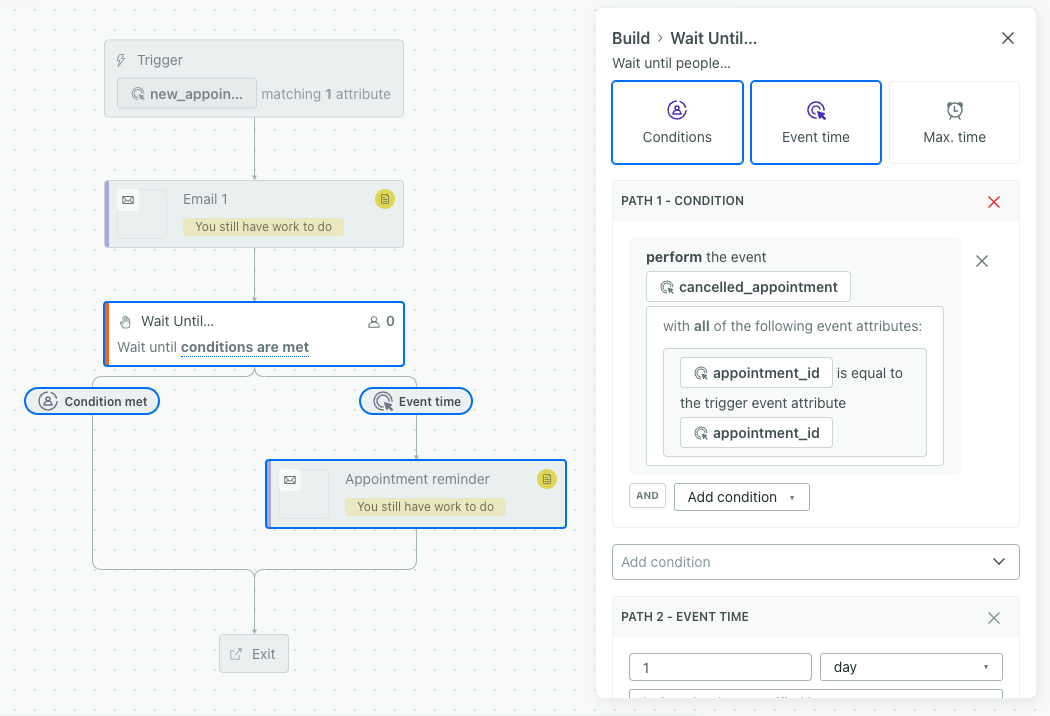
For example, imagine that a person enters an automation when they set up an appointment—they generate a new_appointment event with an appointment_id. You want to wait until the day before the event to send an email reminding a person about their appointment—but you don’t want to send a reminder if they already canceled the appointment.
In this case, you can set up a Wait Until… condition to look for a cancelled_appointment event where the appointment_id matches the trigger event’s event.appointment_id. If the two values match, you don’t send the appointment reminder.
Learn more about editing wait until blocks in live automations.
Combine conditions with And, Or, or nested groups
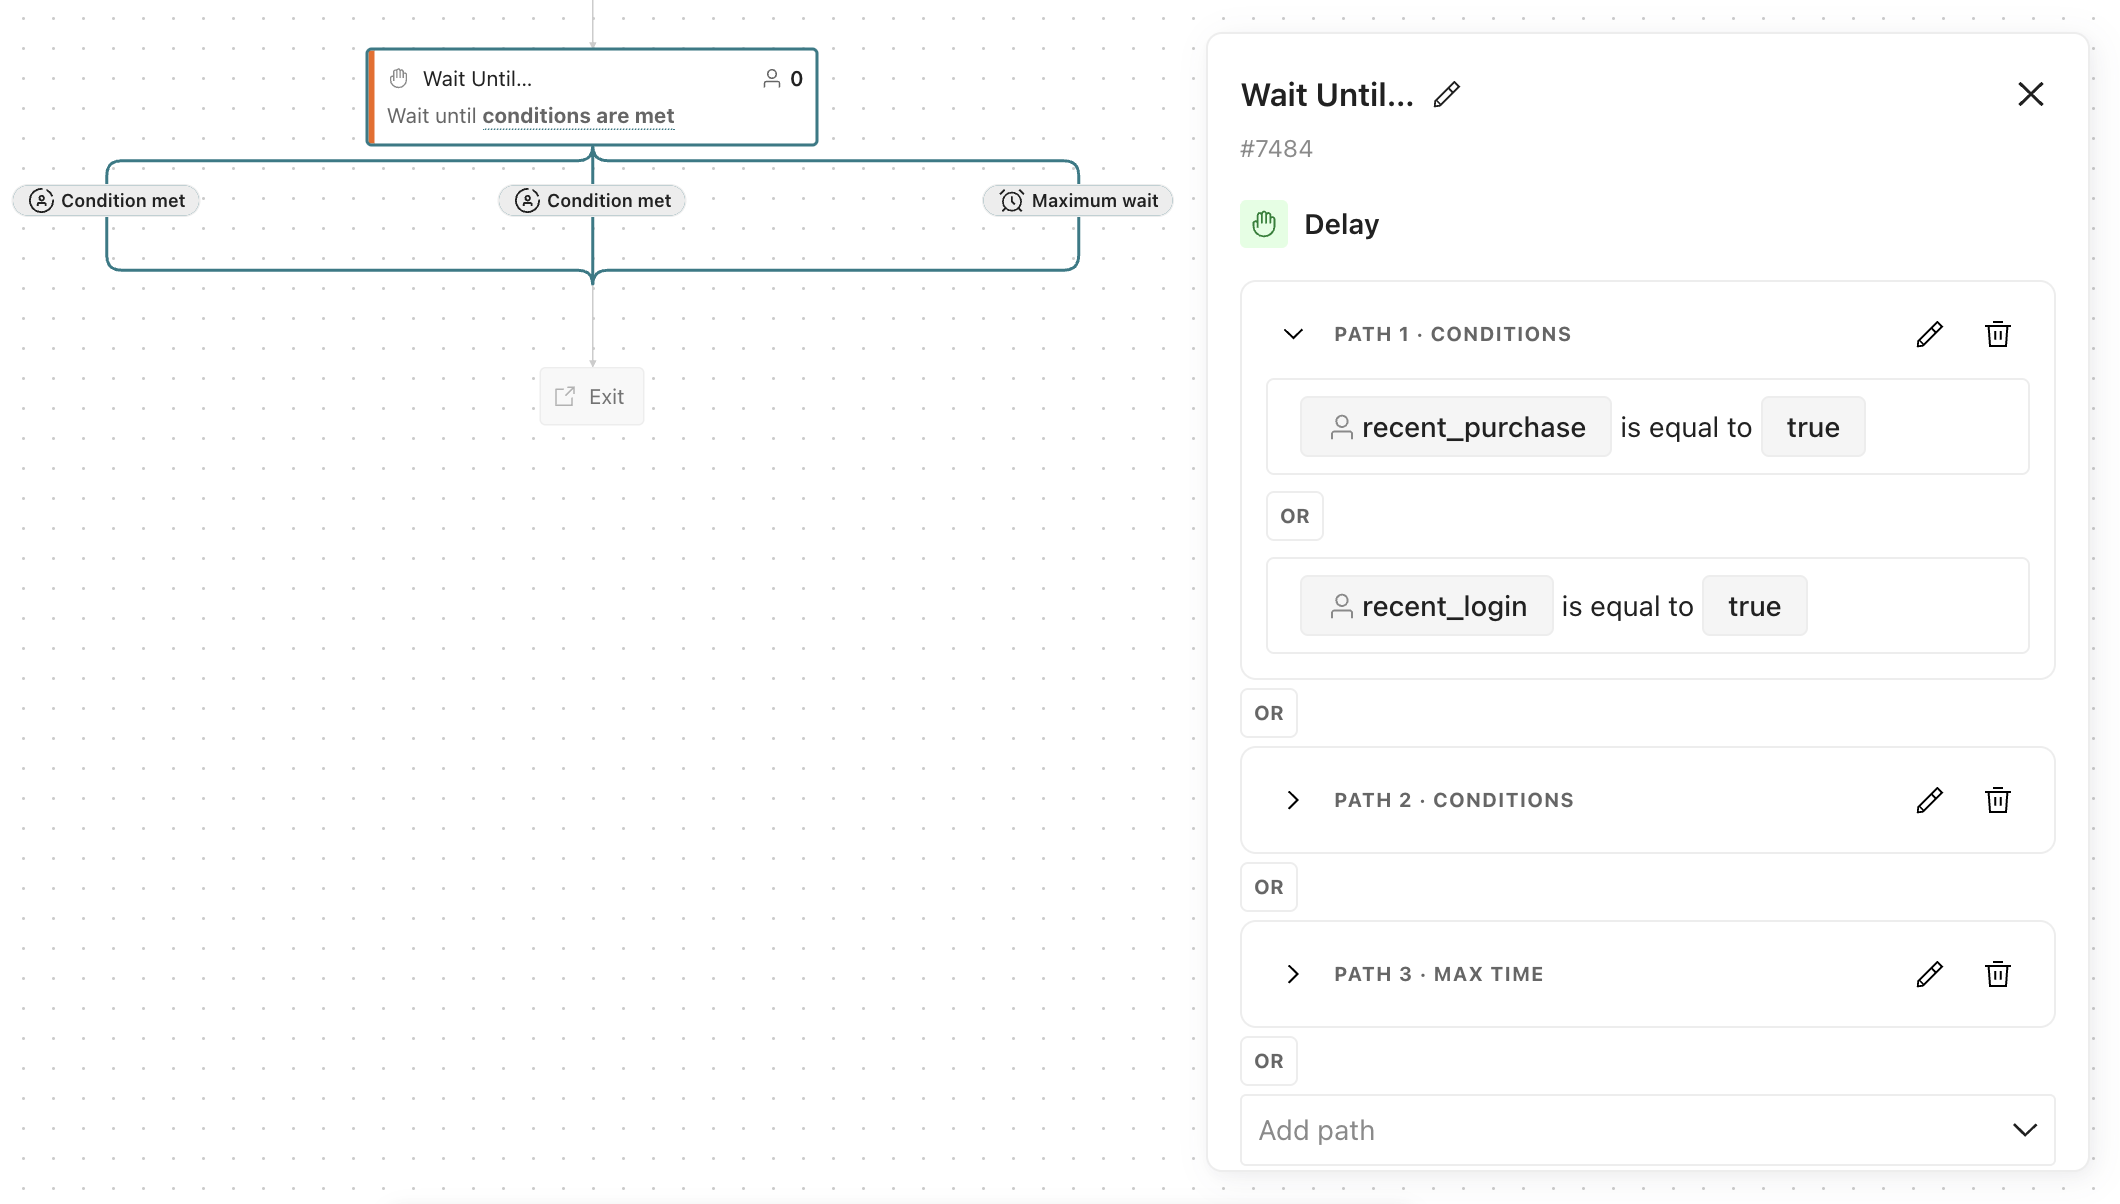
You can group conditions together in a single path. Add an Or condition to require just one of a set of conditions in a path, and nest additional groups to build more complex logic, like (attribute A and attribute B) or (segment C).
You can also set up multiple, separate paths of any type—Conditions, Delay, Event time, or Max time. A person progresses down whichever path resolves first. Paths are numbered starting at 1 and read left-to-right in your workflow; if a person satisfies more than one path at the same time, they take the path closest to 1 (farthest to the left).
Message conditions
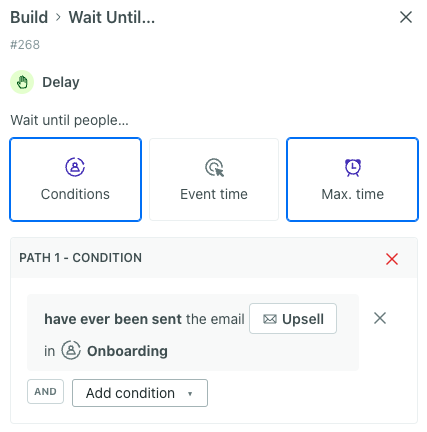
You can set conditions based on whether a person has ever been sent or is sent a message. You can also base message conditions on other statuses like delivered, opened, clicked, and more. Choose messages from any automation, broadcast, or transactional message in your workspace. In a message condition, you can check if a person has ever been sent a message, or wait until a message is sent after a person enters the wait.
The has ever condition is based on whether or not a person has ever been sent (or another message status like delivered) a particular message. If you specify “has ever been sent,” and the person was sent a message before they entered the wait until, they meet the condition and will move on in the workflow.
The is condition is only satisfied if a person is sent (or another message status like delivered) a message after they enter the wait. This prevents people from inadvertently meeting wait until conditions based on messages sent long before a person entered your automation or wait. If you specify “is sent,” and the person was sent a message before they entered the delay, they do NOT meet the condition. If they were sent a message after entering the wait until, they do meet the condition and will move on in the workflow.
Object and relationship conditions
In a Wait until block, you can set relationship-based conditions for any automation except automations triggered by webhooks. If your automation is triggered by an object, relationship, or an important date for an object, you can also make people wait based on the triggering data for the object or relationship.
You can set conditions based on any object or relationship in your workspace or based on your trigger data.
Here are a few examples:
- Object trigger condition: You want someone to wait until a date associated with your triggering object, like an appointment time, before they receive a message.
- Relationship to trigger object: An automation triggers when people express interest in a webinar (a relationship is created with a webinar object). You want people to wait until a week before the webinar before you send them a reminder.
- Relationship to object that’s not the trigger: An automation triggers when someone signs up for your product (i.e. an account object is created). You want people to wait until they’ve activated a subscription, where subscriptions are separate objects, before sending them further messages.
- Date-triggered automation on a custom object: An automation triggers 14 days before an account’s
renewal_date. You want people to wait until the account’splan_typechanges before you send an upgrade confirmation.
In this example, you’ll see a couple conditions based on the trigger object:
Delay
A Delay path lets you chain delay steps into a single, specific wait, which is useful for something like wait a minimum of 2 days, then until the next Friday, without stringing together separate blocks in your workflow.
Add delay steps in the order that makes sense for your customers’ journeys:
- Time Delay: wait a fixed period, like 2 days or 4 hours.
- Time Window: wait until a specific day and time, like the next Friday at 9 AM. You can choose which occurrence to wait for (for example, the second Friday).
- Randomized Delay: add a random amount of time if you expect a large number of people to leave the delay at once. This can help you avoid overloading rate-limited API endpoints with webhook requests.
See Combining delay blocks for cases where you might still want separate Time Delay, Time Window, or Wait Until blocks instead of a single Delay path—for example, when you need to send a message or perform another action partway through the wait.
Event time
If your automation is triggered by an event, you can make people wait until a timestamp value in the triggering event before they move on to the next step in the workflow. For example, if you trigger your automation with an event called new_appointment, you could make people wait until the day before the appointment_time in the triggering event and then send a reminder message.
The timestamp in your event can be either:
- Unix timestamp (in seconds)
- RFC 8601-formatted time (for example,
2022-06-04T10:24:34-0400).
Unlike event conditions, your timestamp must be a part of the event that triggers your automation. You can’t base this time on a different event.
Note, people will wait until the current time is equal to or after the time specified by the wait condition. For instance, if you set an event time path of “2 days before the time specified in the appointment-time” of the trigger event, then people will meet the condition and move forward when it reaches not just before 2 days, but also within 2 days of the appointment_time. It’s possible then that some people move down this wait until condition if it’s 1 day before the appointment time.
To demonstrate that last statement, let’s continue with the example of an automation triggered by scheduling an appointment:
- It is June 13, and an appointment is just now scheduled for June 14 which triggers the automation.
- The first step in the automation sends a confirmation email immediately.
- The second step is the wait until set for two days before the appointment, which means before or after 2 days. Because it’s 1 day before the appointment, the person passes the condition immediately and moves down that path.
- The automation immediately sends an email reminder for the appointment.
Since the current time is already after the wait until condition of “2 days before appointment_time”, the person is not held in the wait until and we consider that they’ve successfully met the condition. In this example, the person would receive the confirmation email and reminder email close together.
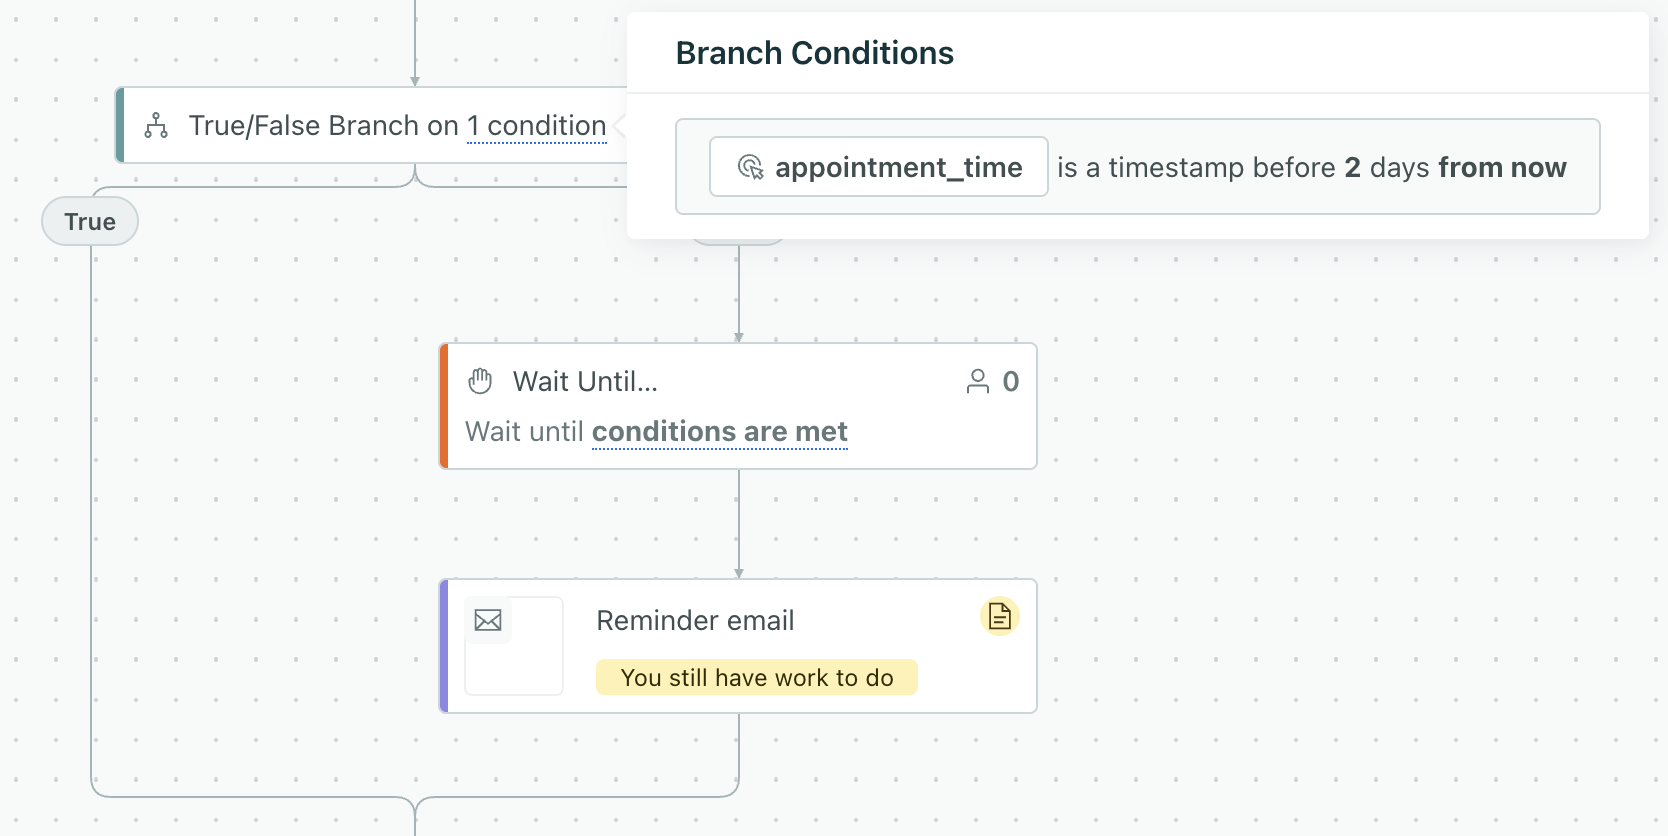
To avoid this behavior, you can add a True/False branch to your workflow. For this example, you could set an event attribute condition to “appointment_time is a timestamp before 2 days from now”. When this is true, people move forward but don’t receive a reminder email. If this is false, people would enter a wait until and eventually receive a reminder email only 2 days before the appointment time.
Max time
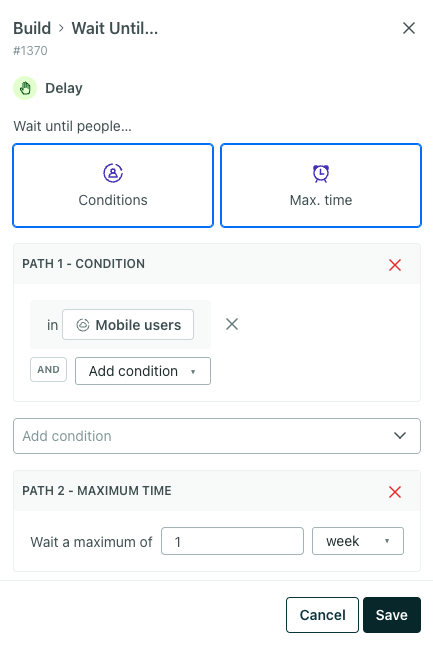
By default, people will wait until they meet your conditions. If they never meet your conditions, they could get stuck waiting in your automation forever! Use the Max time option to let people exit the automation or move on to the next action.
In this example, if a person isn’t in the specified segment after one week, they’ll move on to the next action in the workflow.
Why did someone skip the wait?
If a person meets your wait conditions before they enter the wait, they’ll skip it entirely. We evaluate the conditions as soon as someone reaches the Wait until block; someone doesn’t have to meet the conditions again to progress past it.
For example, imagine that someone performs an event—they signed up for a class at a local school. You want to send them a reminder message a week before the class starts.
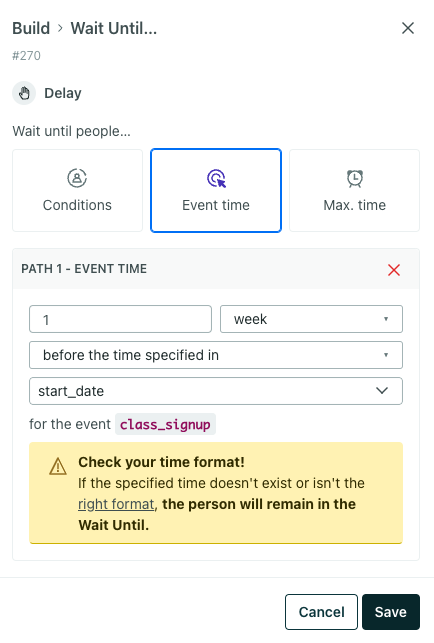
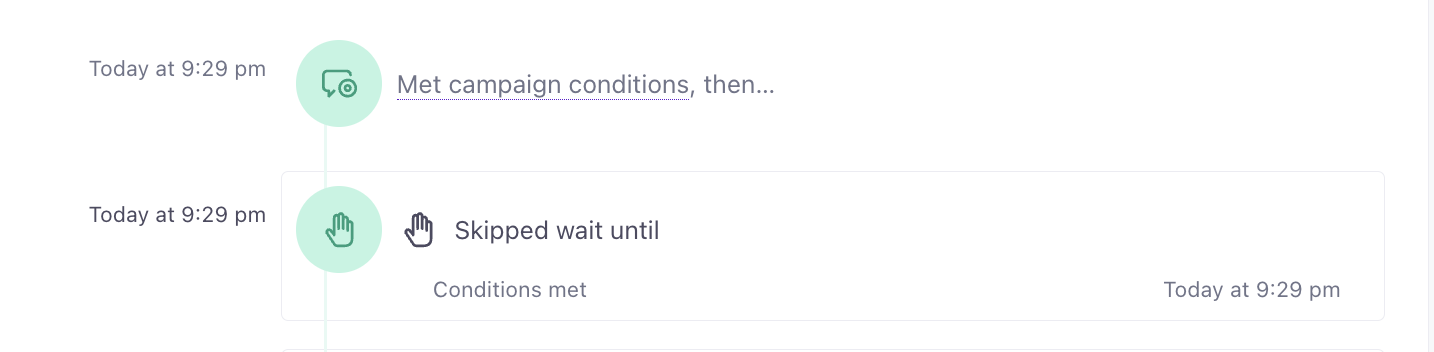
If someone signed up late for the class, and the class starts in less than a week, they’ll skip the wait and move on to the reminder message, which you can see on the person’s journey.
Modify Wait Until blocks in live automations
Change event conditions
You can edit the conditions of your Wait Until if the automation is live; just be aware that doing so might cause people to quit waiting.
For example, if you reduce an Event time condition from seven days to two days:
- People who have already waited more than two days will move on (or exit the automation)
- People who have not yet waited two days will continue waiting
Delete a Wait Until
If you delete a Wait until, you can choose what to do with anybody currently waiting.
- Continue to the next action in the automation
- Exit the automation immediately
It’s up to you! If people have been waiting a long time, you may not want to continue sending messages in the automation.
Copy a Wait Until to other automations
It’s easy to copy the Wait Until between automations within the same workspace, because your segment conditions remain the same.
If copying between workspaces, you’ll need to re-add your conditions, and we’ll show you a warning note both in the workflow and when editing the item.
Combining delay blocks
Meeting wait until conditions doesn’t ensure that someone receives your message at the right time; and it being the right time doesn’t mean that someone’s met your conditions yet. You can use conditions together so people meet your conditions and receive messages in the right timeframe!
For instance, you could wait for people to match specific conditions using a Wait Until block, but you’d need to use a Time Window if you also wanted people to only receive a subsequent message during a specific timeframe.
If you just need to chain delay steps together—without a condition, message, or other action in between—add them to a single Delay path instead of separate blocks. Use separate blocks, as described below, when you need something else to happen partway through the wait.
Combine Wait Until and Time Delay
You might add multiple flow control blocks to an automation to ensure people don’t receive a message too soon. For instance, maybe you want people to minimally wait 7 days after receiving their first message, and then they should receive their next message only if they’re a member of a specific segment.
- Time Delay: Wait 7 days
- Wait Until: Person enters the segment
Make sure you check the order of your blocks so you don’t make people wait unnecessarily in your workflow. You might switch the delay with the Wait Until if you want to make sure that people wait exactly seven days after satisfying the wait condition.
- Wait Until: Person joins the segment
- Time Delay: Wait 7 days
For Wait Untils, consider adding a second condition, like a max wait, so people aren’t held forever in the flow. This is also important if the subsequent message is time sensitive.
Combine Wait Until and Time Window
With both Time Windows and Wait Until blocks, you can add conditions to determine which people wait before continuing through your automation or just specify a static time or timeframe to wait. You’ll only need to combine them if you need to set a specific timeframe to wait.
For instance, if you want people to belong to a segment before receiving a message in a certain timeframe, you’d start with a Wait Until block, followed by a Time Window:
- Wait Until: Person joins a segment
- Time window: Monday between 9AM and 5PM
In this case, people wait until they’re in a segment, and then wait for 9am on a Monday (assuming it isn’t already that time). If the person stops matching the segment condition while they’re waiting for the time window, they would still get the email on Monday at 9AM. If you want them to skip the message if they stop matching, add the segment condition to the email too.
For instance, let’s say you want an automation to send a reminder email 1 day before an appointment. Your automation could flow like this:
- Trigger: When a person books an appointment
- Wait Until: 1 day before the appointment
You might think to add a Time Window before the message so they receive it at a reasonable time. However, the Time Window could prevent them from receiving the message exactly 1 day before, especially if they booked their appointment less than a day ago. If receiving the message exactly 1 day before is the most important thing, don’t add a time window.