> This page is part of the [Customer.io documentation](https://docs.customer.io). For the complete index, see [llms.txt](https://docs.customer.io/llms.txt).
> Last updated: July 10, 2026
# Integrate your app
Before you can send push notifications, you need to set up your workspace to send push notifications through your push provider and configure your app to receive push notifications. You can do this with or without our SDKs providing flexibility in how you send and receive push notifications.
When you integrate with us, you have some choices depending on the push platform you use (APNs, FCM) and whether or not you want to use [our SDKs](/sdk)—though **we strongly recommend that you use our SDKs** if possible to simplify your integration process.
But, before you can send and receive push notifications with Customer.io, **you must**:
1. Generate and add certificates for your push service, Apple Push Notification service (APNs) and/or Firebase Cloud Messaging (FCM).
2. Configure push in your app. You can do this with [our SDKs](/integrations/sdk/) or integrate directly with our API. Our SDKs provide a ready-made interface to configure push. If you want to integrate Customer.io without using our SDKs, you’ll need to write your own code to:
* Identify people and set their device token
* Send events representing your users’ actions back to Customer.io
3. Send yourself a push notification to test your implementation.
## Generate and add push certificates
Before you can send a push notification, you need to generate certificates from Apple’s push notification service (APNs) and/or Google’s Firebase Cloud Messaging service (FCM) and add them to your workspace. This authorizes Customer.io to send notifications to your app through your push provider(s).
### Firebase Cloud Messaging (FCM) setup
To send notifications through Firebase Cloud Messaging, you’ll need to upload a JSON server key that authorizes Customer.io to send notifications. If you already have your key, skip ahead to step 4 below.
The JSON server key must match the Sender ID that you use in your Firebase project.
1. Log into the Firebase Console for your project.
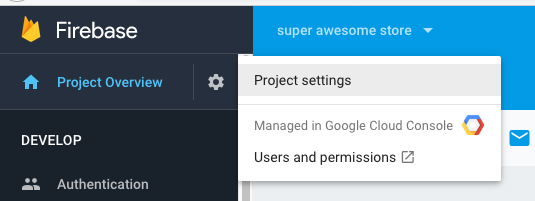
2. Click in the sidebar and go to **Project settings**.
[](#f0e4e4c5092f6c0e9e76463da609a7f8-lightbox)
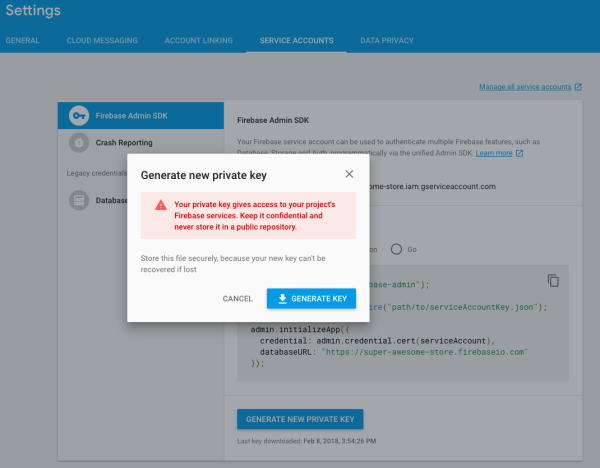
3. Go to **Service Accounts** and click **Generate New Private Key**. Confirm your choice and download the credential file.
[](#7cde629b570345da48323d76ead58719-lightbox)
4. In Customer.io, go to your workspace’s **Settings** > **Workspace Settings** and click **Settings** next to *Push*.
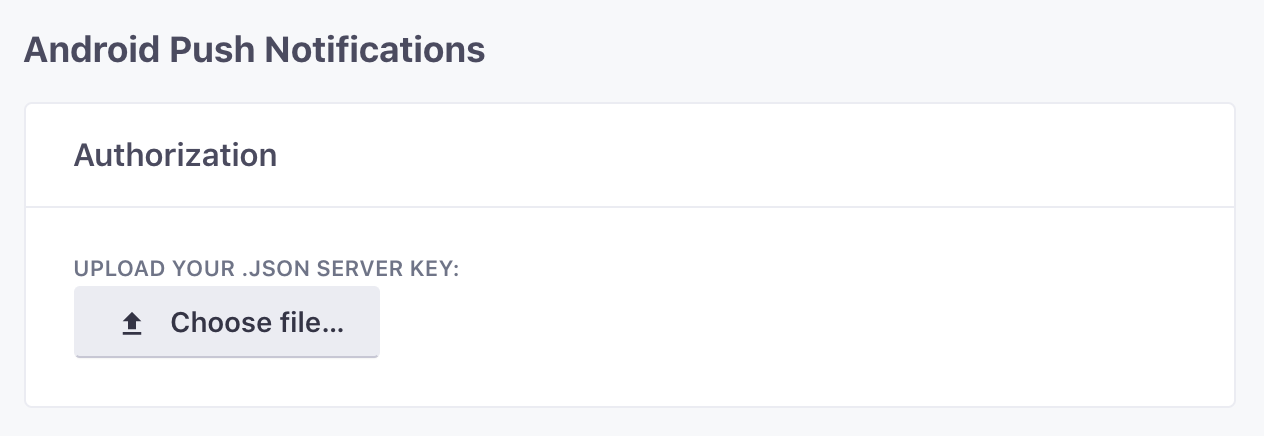
5. For *Android*, click **Enable**, and then click **Choose file…** to select the JSON server key you generated in previous steps. When you’re done, your workspace is setup to send notifications through Firebase to Android devices.
[](#3104c92250dd4d200c393747016cb9c2-lightbox)
#### Send to iOS via Firebase
After you’ve set up Firebase for Android, you can enable Firebase as your iOS push-provider.
1. In Customer.io, go to [**Settings > Workspace Settings**](https://fly.customer.io/workspaces/last/settings/) and click **Settings** next to *Push*.
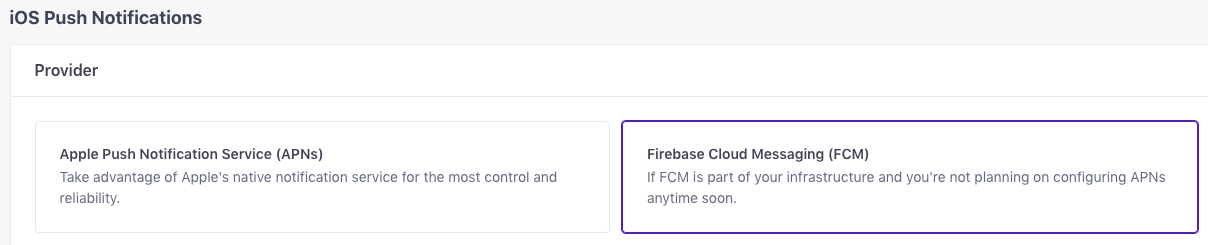
2. For *iOS*, click **Enable**, and select the *Firebase Cloud Messaging (FCM)* option.
[](#85c4ce7cd841a1b35322730d323ee860-lightbox)
### Apple Push Notification service (APNs) setup
You can send push notifications to iOS devices using the [Apple Push Notification service (APNs)](https://developer.apple.com/documentation/usernotifications/setting_up_a_remote_notification_server/generating_a_remote_notification).
To authorize your Customer.io workspace to send notifications to iOS devices over Apple’s Push Notification service, you’ll need to upload your APNs `.p8` certificate and enter your Apple Developer *Key ID*, *Team ID*, and *Bundle ID*. If you already have your p8 certificate, you can skip ahead to step 5 below.
1. Log into your Apple Developer account and go to **[Certificates, Identifiers & Profiles > Keys](https://developer.apple.com/account/resources/authkeys)**. Click the blue button to create a new key.
2. Click **Apple Push Notifications service (APNs)** and enter a name for the key.
3. Click **Continue** and then **Register** to create the key.
4. Download your keys and put it somewhere you’ll remember. You can only download your key once!
5. In Customer.io, go to your workspace’s **Settings** > **Workspace Settings** and click **Settings** next to *Push*.
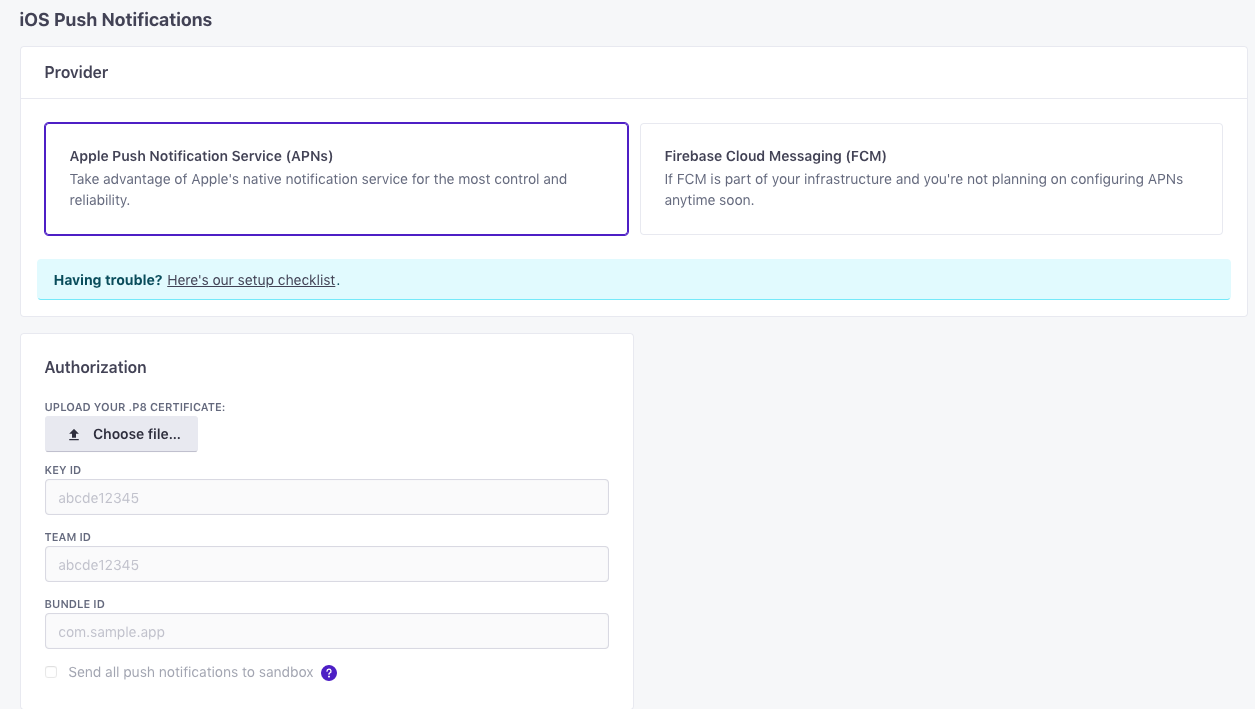
6. Click **Enable** under *iOS*, and select the *Apple Push Notification service (APNs)* option.
7. Click **Choose file…** and upload your .p8 certificate.
8. Enter your *Key ID*, *Team ID*, and *Bundle ID*. You can find these in your [Apple Developer Account](https://developer.apple.com/).
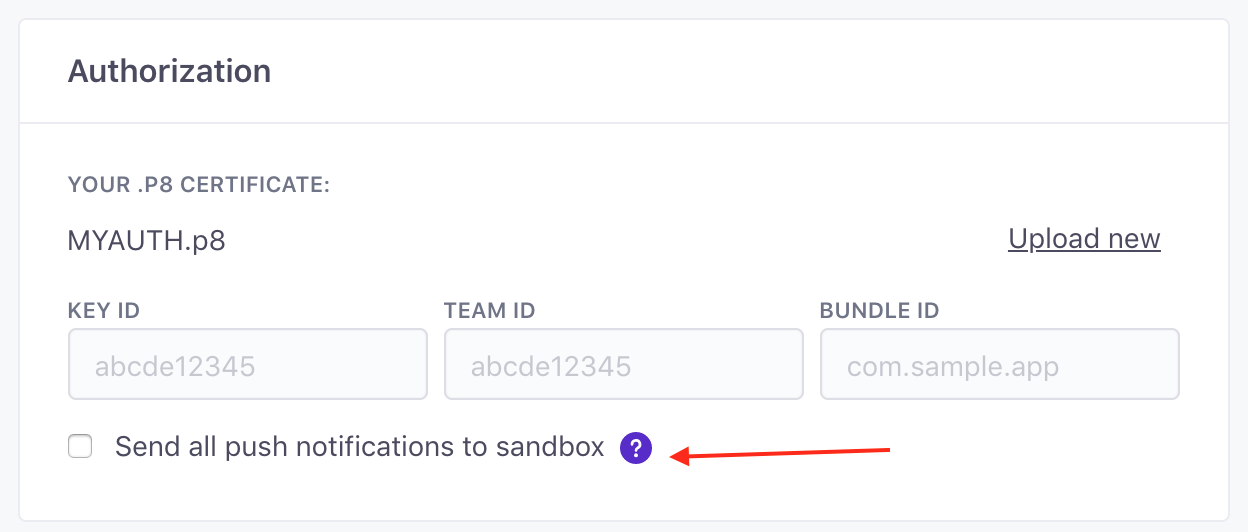
9. (Optional) Enable the *Send all push notifications to sandbox* option.
Your iOS certificate may have both sandbox and production environments; this option sends push notifications to both environments.
[](#1a9ffb2cbe8c4e2106f48cfcc60a845a-lightbox)
We recommend [creating a separate workspace](/messaging/channels/push/qa-testing#testing-push-notifications) for your sandbox environment.
10. Click **Save Changes**
[](#f062f3fd15a85996eea68c36da00a1df-lightbox)
#### Rotating your APNs credentials
You provide credentials for your developer account and app bundle. If you need to move your app to a new developer account or bundle, you’ll need to generate a new .p8 certificate and update your credentials in Customer.io.
**If you’ve already rotated your credentials and push notifications are failing**, stop and restart any campaigns, broadcasts, and/or transactional messages that send push notifications. Stopping and restarting establishes new connections to APNs using your updated credentials so push notifications will send properly.
1. Stop any campaigns or active messages (Newsletters, Broadcasts, or Transactional messages) that send push notifications. If you don’t, push notifications will fail when you update your credentials. You can search for push notifications and trace those to relevant campaigns on the **[Content > Message Library](https://fly.customer.io/workspaces/last/journeys/message-library?channels=%5B%22push%22%5D)** page.
2. Generate your new .p8 certificate in your [Apple Developer Account](https://developer.apple.com/).
3. In Customer.io, go to **[Settings > Workspace Settings > Push > iOS](https://fly.customer.io/workspaces/last/settings/actions/push/ios)**.
4. Click **Edit authorization** and set your new credentials.
5. Click **Save Changes**.
6. Restart the campaigns, broadcasts, and/or transactional messages you. They’ll begin sending using your new credentials.
## Configure push without our SDKs
In general, we suggest that you integrate using [our SDKs](/integrations/sdk/), which provide ready-made methods to interpret messages, identify devices, and send client-side events.
However, if you want to write your own integration with Customer.io, we’ve provided some code samples below to help you get started with push notifications. You’ll need to familiarize yourself with your integration platform to understand the range of configuration options that you have available.
If your mobile app is already set up to receive push notifications, you won’t need to make many changes to work with Customer.io. But, you should be aware that we send two custom parameters in the payload of push notification: `CIO-Delivery-ID` & `CIO-Delivery-Token`. These are used for [sending Open events](#send-events) back to us.
### iOS App Setup
The following shows an example to help you register for remote notifications in iOS.
1. Open the project editor, and go to the **Signing & Capabilities** tab.
[](#c2e7ad064a314ea651a452c62d713af2-lightbox)
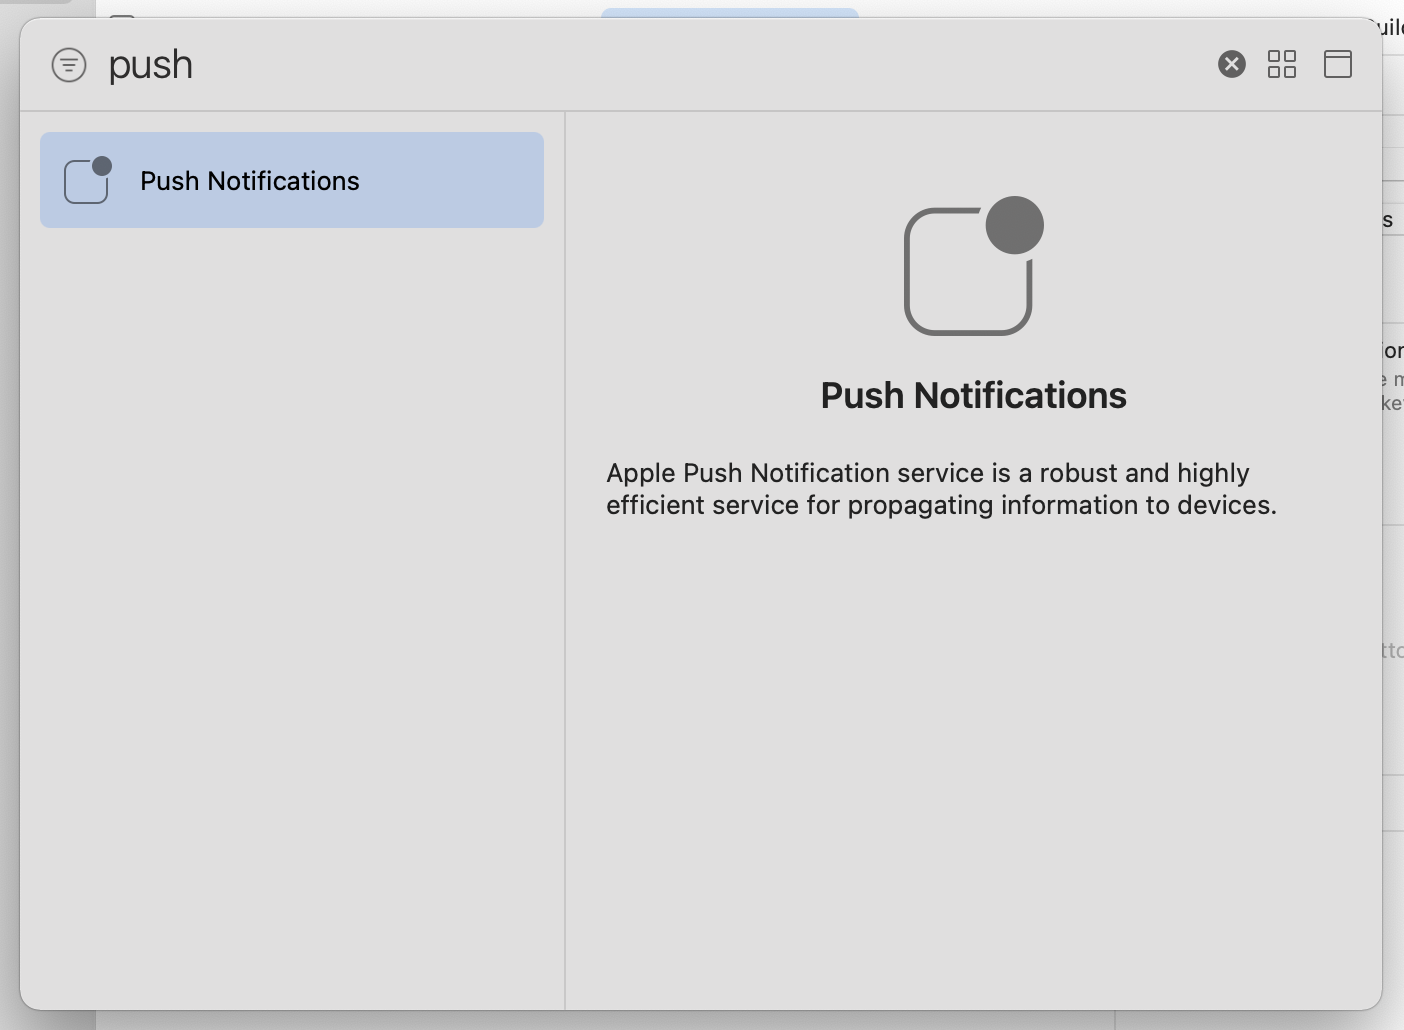
2. Click **Capability** and and select **Push Notifications**.
[](#b038c9811fac70e1c7ac0044d4dab1c3-lightbox)
3. Update the `didFinishLaunchingWithOptions` callback in the `AppDelegate.swift` to request the device token.
```swift
func application(_ application: UIApplication, didFinishLaunchingWithOptions launchOptions: [UIApplicationLaunchOptionsKey: Any]?) -> Bool {
// Configure user interactions
self.configureUserInteractions()
// Register with APNs: this might change based on iOS versions you want to support
UIApplication.shared.registerForRemoteNotifications()
return true
}
```
4. Add the following methods to handle the behavior when the token request succeeds or fails.
```swift
// Handle remote notification registration.
func application(_ application: UIApplication, didRegisterForRemoteNotificationsWithDeviceToken deviceToken: Data){
self.enableRemoteNotificationFeatures()
// Convert token to string
let deviceTokenString = deviceToken.reduce("", {$0 + String(format: "%02X", $1)})
// Forward the token to your provider, using a custom method.
self.forwardTokenToServer(token: deviceTokenString)
}
func application(_ application: UIApplication, didFailToRegisterForRemoteNotificationsWithError error: Error) {
// The token is not currently available.
print("Remote notification support is unavailable due to error: \(error.localizedDescription)")
self.disableRemoteNotificationFeatures()
}
```
5. Handle the notification.
```swift
// Push notification received
func application(_ application: UIApplication, didReceiveRemoteNotification data: [AnyHashable : Any]) {
// Print notification payload data
print("Push notification received: \(data)")
// Customer.io push notifications include data regarding the push
// message in the data part of the payload which can be used to send
// feedback into our system.
var deliveryID: String = "";
if let value = data["CIO-Delivery-ID"] {
deliveryID = String(describing: value)
}
var deliveryToken: String = "";
if let value = data["CIO-Delivery-Token"] {
deliveryToken = String(describing: value)
}
}
```
### Android App Setup
The following shows an example of how to register with Firebase in Android. The easiest way to integrate Firebase Cloud Messaging into your Android app is to use the `Firebase Assistant Tool` in Android Studio. It walks you through the required steps.
1. Add the Firebase SDK as a dependency into your `build.gradle` file.
```gradle
compile 'com.google.firebase:firebase-messaging:12.0.1'
```
2. Create a new service that extends the `FirebaseInstanceIdService` class. Within this class you need a `onTokenRefresh` function in which you can use `FirebaseInstanceId.getInstance().getToken()` to retrieve the device message token.
Note that this function is only called when the device token changes, so if you need access to it at other activities you may want to save it in a variable for later use.
```java
public class FirebaseIdentifierService extends FirebaseInstanceIdService {
public FirebaseIdentifierService() {
}
@Override
public void onTokenRefresh() {
// Get updated InstanceID token.
String refreshedToken = FirebaseInstanceId.getInstance().getToken();
Log.d("firebase", "Refreshed token: " + refreshedToken);
}
}
```
3. Update the `AndroidManifest.xml` to add the service.
```xml
```
4. Now that you can generate tokens, you can handle incoming messages. Create a new service, extending `FirebaseMessagingService`, to handle messages.
```java
public class NotifierService extends FirebaseMessagingService {
private static final String TAG = "messaging";
public NotifierService() {
}
@Override
public void onMessageReceived(RemoteMessage remoteMessage) {
// Check if message contains a data payload.
// You can have data only notifications.
if (remoteMessage.getData().size() > 0) {
Log.d(TAG, "Message data payload: " + remoteMessage.getData());
// Customer.io push notifications include data regarding the push
// message in the data part of the payload which can be used to send
// feedback into our system.
String deliveryId = remoteMessage.getData().get("CIO-Delivery-ID");
String deliveryToken = remoteMessage.getData().get("CIO-Delivery-Token");
}
// Check if message contains a notification payload.
if (remoteMessage.getNotification() != null) {
handleNotification(remoteMessage.getNotification());
}
}
private void handleNotification(RemoteMessage.Notification notification) {
Log.d(TAG, "Message Notification Body: " + notification.getBody());
}
}
```
5. Update the `AndroidManifest.xml` one more time to add the new service.
```xml
```
### Identify Device Tokens
Before you can send a push notification, you need to identify the person—and their device—using your app. Typically, you should send this information every time someone launches your app on their client device.
We recommend that you make calls using [one of our client libraries](/integrations/data-in/connections/servers/) from your backend system rather than directly from your app. If you can’t do this, and you need to make calls from within your app, you’ll want to make sure that they run asynchronously.
To add a device to the customer profile, call the following endpoints in either our Pipelines API (recommended) or our Track API. If your account is in the EU region, make sure you use the appropriate `-eu` URLs.
Pipelines API (Recommended)
#### Pipelines API (Recommended)
```bash
Method: POST
URL: https://cdp.customer.io/v1/track
JSON Payload:
{
"type": "track",
"event": "Device Created or Updated",
"userId": "42",
"properties": {
"device": {
"token": "string",
"type": "ios"
}
},
"timestamp": "2021-07-14T19:10:25.000Z"
}
```
Classic Track API
#### Classic Track API
```bash
Method: PUT
URL: https://track.customer.io/api/v1/customers/{customer_id}/devices
JSON Payload:
{
"device": {
"id": "messaging token",
"platform": "ios/android",
"last_used": UNIX timestamp when the device was used
}
}
```
We store up to 25 devices
If you add a 26th device, we’ll remove the device with the oldest `last_used` timestamp.
You can remove a device from a person’s profile as well. A person can have up to 25 devices, but you should prune device tokens when your push provider invalidates them.
Pipelines API (Recommended)
#### Pipelines API (Recommended)
```bash
Method: POST
URL: https://cdp.customer.io/v1/track
JSON Payload:
{
"type": "track",
"event": "Device Deleted",
"userId": "42",
"properties": {
"device": {
"token": "string",
"type": "ios"
}
},
"timestamp": "2021-07-14T19:10:25.000Z"
}
```
Classic Track API
#### Classic Track API
```bash
Method: DELETE
URL: https://track.customer.io/api/v1/customers/{customer_id}/devices/{token}
```
### Push payloads sent from Customer.io
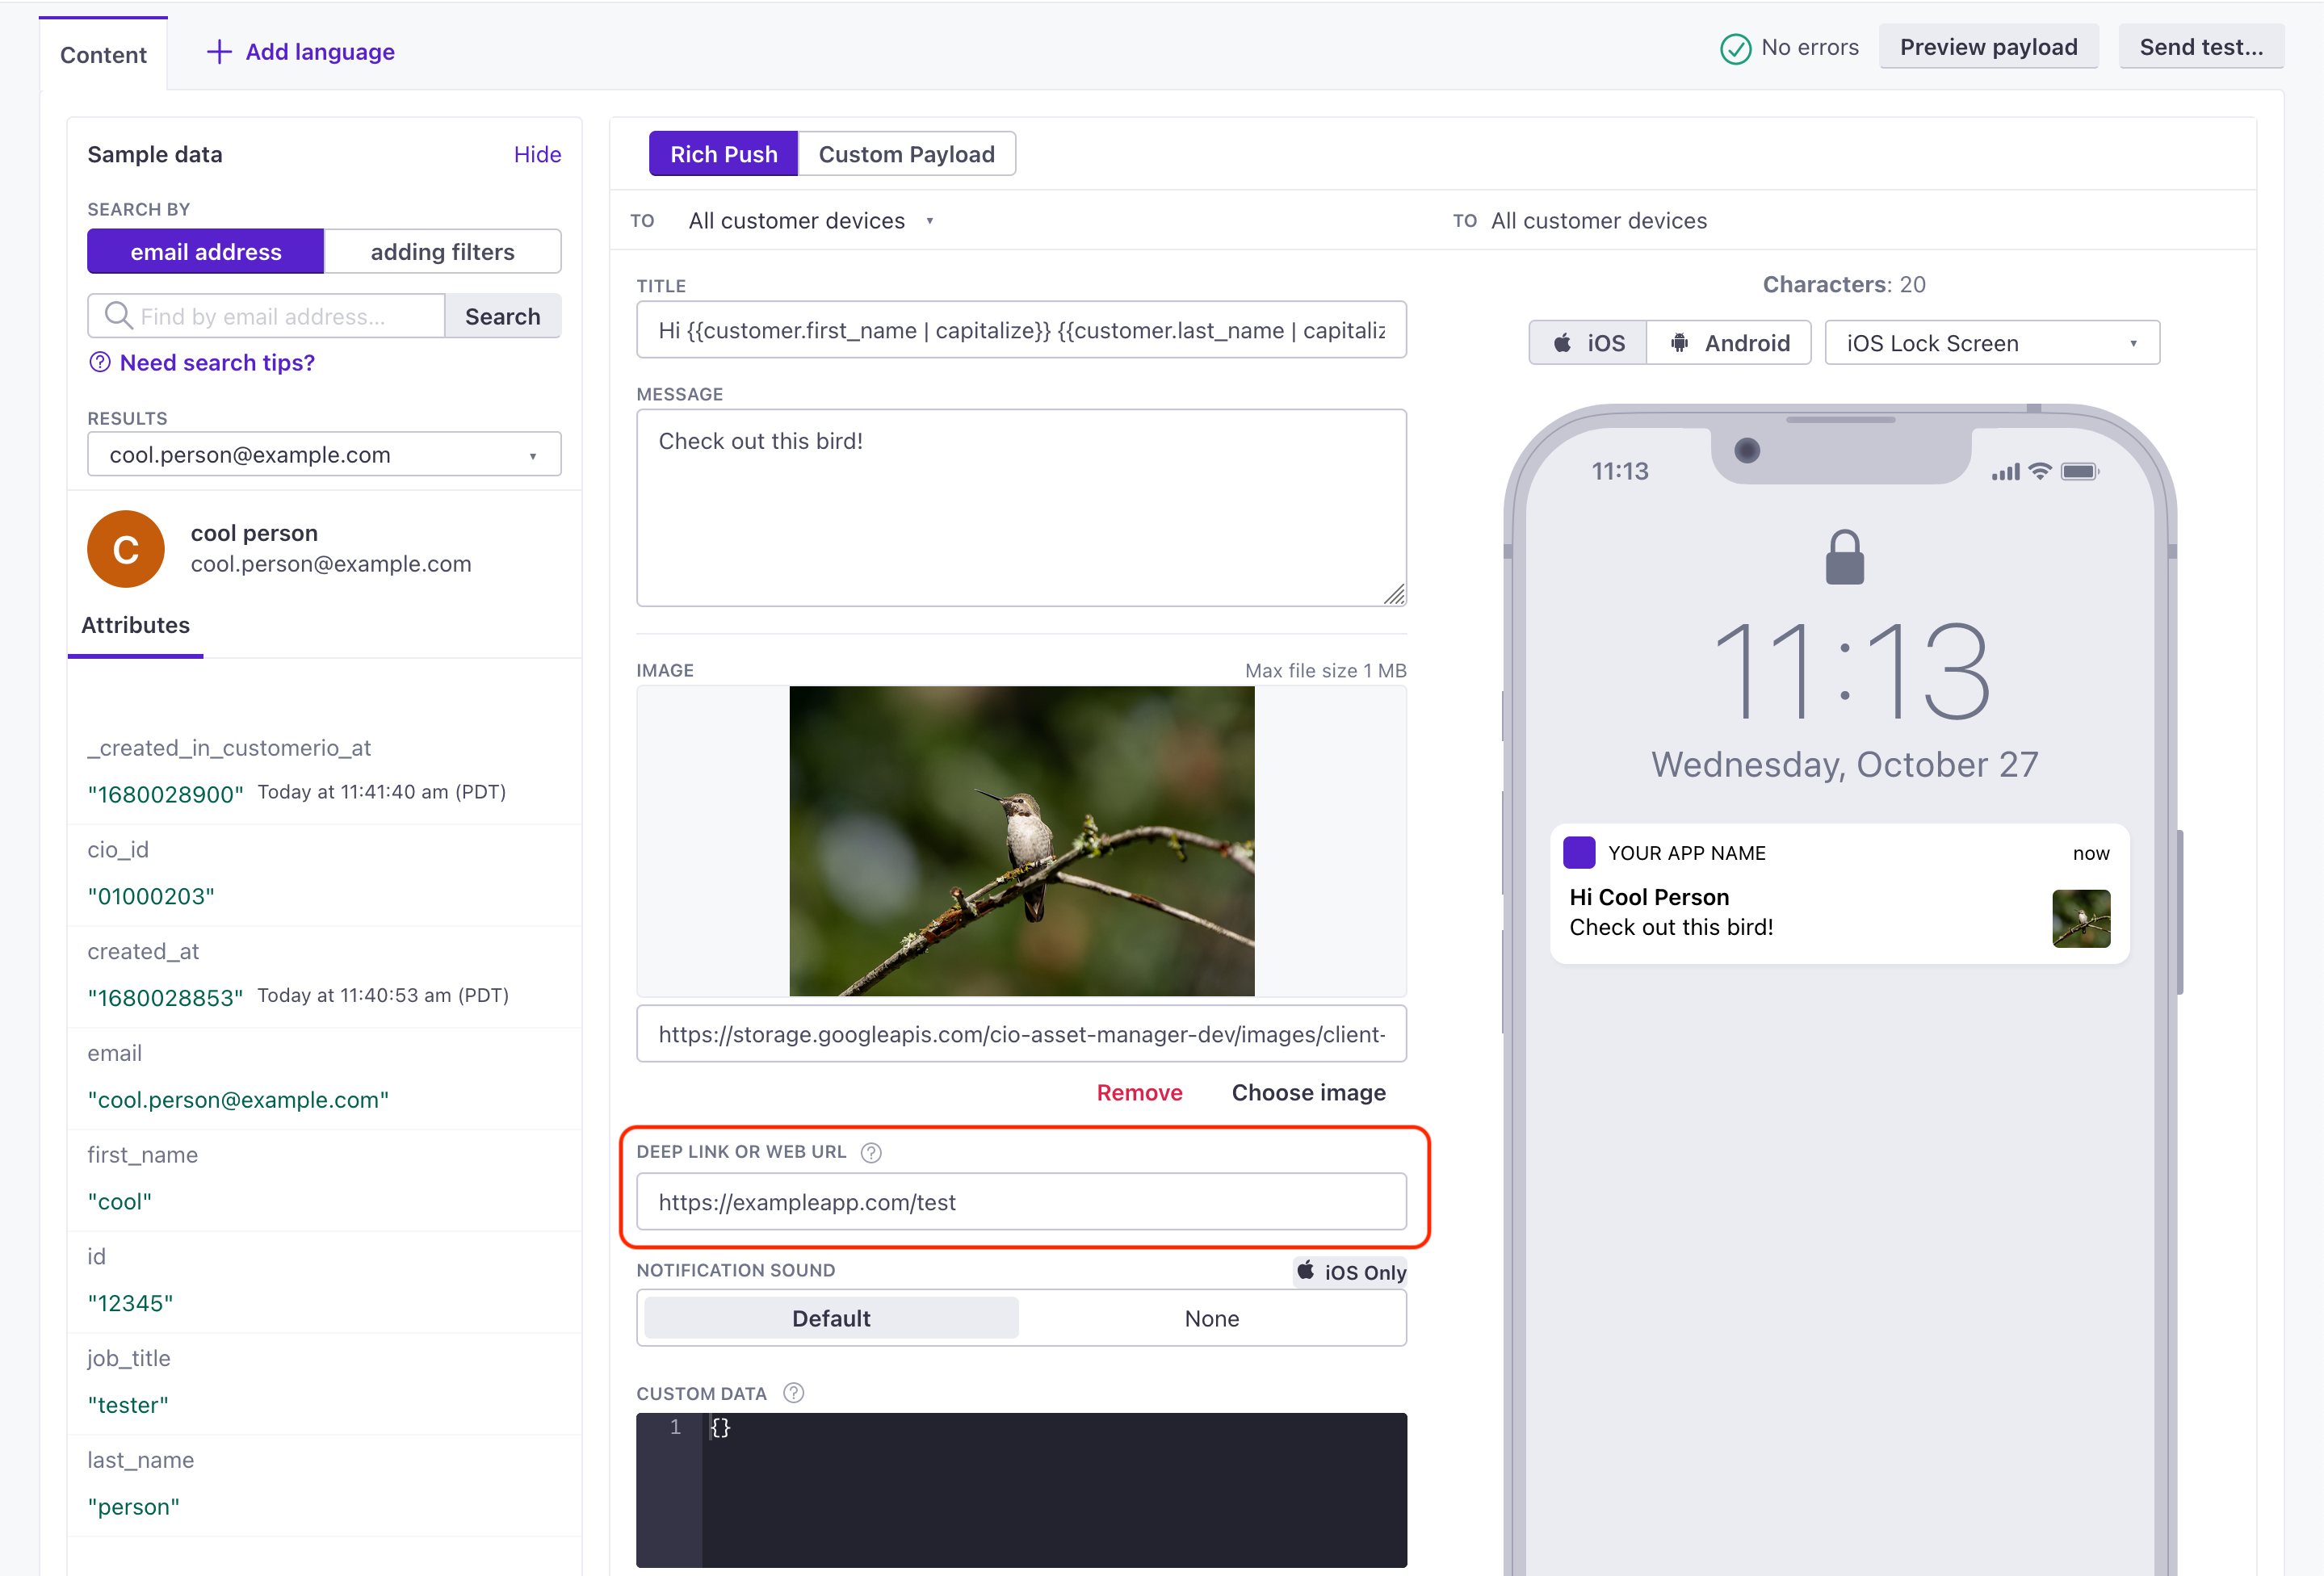
We have a simple user interface for sending push notifications, including images and links. However, if you want to use our UI, you should either:
* Integrate with [our SDK(s)](/integrations/sdk/)
* Write your own integration, expecting to handle payloads in the following format.
[](#4e089ac68a22d5b994db09266a531737-lightbox)
If your app is already set up to receive push notifications in different formats, you can send a [custom push payload](/messaging/channels/push/custom-payloads) instead.
APNs (iOS)
#### APNs (iOS)
Your *Image URL* and *Deep link or web URL* go inside a `CIO.push` object. *Custom Data* resides in the payload but outside the `CIO` and `aps` objects.
```json
{
"CIO": {
"push": {
"link": "string",
"image": "string"
}
},
"aps": {
"alert": {
"title": "Title of your push goes here!",
"body": "Body of your push goes here!"
},
"sound": "default"
},
//custom keys go here
"customKey": "a custom key"
}
```
FCM (iOS)
#### FCM (iOS)
The `CIO.push` object contains the *link* and *image* fields from notification. *Custom Data* resides in the `payload` but outside the `CIO` and `aps` objects.
```json
{
"message": {
"apns": {
"payload": {
"CIO": {
"push": {
"link": "string",
"image": "string"
}
},
"aps": {
"alert": {
"title": "string",
"body": "string"
},
"sound": "default"
},
// custom keys go in the payload but outside the CIO and aps objects
"customKey1": "custom keys",
"customKey2": "another custom key"
}
}
}
}
```
FCM (Android) basic push
#### FCM (Android) basic push
For a basic push, the push title and body reside in the `message.notification`. If you add an image, link, or custom data, we move the entire payload moves under the `message.data` object.
```json
{
"message": {
"notification": {
"title": "string", //(optional) The title of the notification
"body": "string", //The message you want to send
}
}
}
```
FCM (Android) rich push
#### FCM (Android) rich push
For a basic push, the push title and body reside in the `message.notification` object—similar to [Firebase’s standard notification payload](https://firebase.google.com/docs/reference/fcm/rest/v1/projects.messages#notification). If you add an image or link, the entire payload moves under the `message.data` object.
```json
{
"message": {
"data": {
"title": "string", //(optional) The title of the notification
"body": "string", //The message you want to send
"image": "string", //https URL to an image you want to include in the notification
"link": "string", //Deep link in the format remote-habits://deep?message=hello&message2=world
// other "custom keys" are sent inside this object
}
}
}
```
### Send events for key customer actions
You can send events representing your audience’s activities in your app. When you send an event, you’ll set the `name` of the event: this is how you’ll find your event when creating [segmentsA group of people who match a series of conditions. People enter and exit the segment automatically when they match or stop matching conditions.](/journeys/segmentation/data-driven-segments/) or [campaignsCampaigns are automated workflows you set up to send people messages and perform other actions when they meet your criteria.](/journeys/send/campaigns/overview/).
You can also send “screen view” events, representing the screens that your audience visits in your app. See [screen view events](#screenview) for more information.
Pipelines (Recommended)
#### Pipelines (Recommended)
The `userId` in the request can be either an email address or an ID, associating the event payload with that person. But you can also send anonymous events.
```bash
Method: POST
URL: https://cdp.customer.io/v1/track
JSON Payload:
{
"event": "set favorites",
"userId": "42",
"properties": {
"fav-food": "pizza"
},
"timestamp": "2021-07-14T19:10:25.000Z"
}
```
Classic Track API
#### Classic Track API
The `identifier` in the request can be either an email address or an ID, associating the event payload with that person. But you can also send anonymous events.
```bash
Method: POST
URL: https://track.customer.io/api/v1/customers/{identifier}/messaging/people/events
JSON Payload:
{
"name": "set favorites",
"timestamp": 1638393518,
"data": {
"fav-food": "pizza"
}
}
```
We track push metrics using a different endpoint
To report push opened, converted, and delivered metrics for a specific push notification, see [push opened events](#push-opened).
#### Screen view events
Screen events track the screens that people visit in your app. You can use screen view data not only to track the parts of your app that people find most engaging, but also to create segments or tailor campaigns to people who use specific parts of your app.
If you use our Pipelines API, which we recommend, you can send screen view events with a `screen` call. In our classic Track API, you can send screen view events with a `type` of `screen`.
When you send a screen view event, the `name` should be the name of the screen a person viewed. You can also send additional properties in the event—these are things you might want to reference using [liquidA syntax that supports variables, letting you personalize messages for your audience. For example, if you want to reference a person’s first name, you might use the variable `{{customer.first_name}}`.](/journeys/liquid/using-liquid) in your campaigns and messages.
Pipelines (Recommended)
#### Pipelines (Recommended)
The `userId` in the request can be either an email address or an ID, associating the event payload with that person. But you can also send anonymous events.
```bash
Method: POST
URL: https://cdp.customer.io/v1/screen
JSON Payload:
{
"userId": "97980cfea0067",
"name": "mlb-scores",
"properties": {
"fav-team": "giants"
}
}
```
Classic Track API
#### Classic Track API
The `identifier` in the request can be either an email address or an ID, associating the event payload with that person. But you can also send anonymous events.
```bash
Method: POST
URL: https://track.customer.io/api/v1/customers/{identifier}/messaging/people/events
JSON Payload:
{
"name": "mlb-scores",
"type": "screen",
"timestamp": 1638393518,
"data": {
"fav-team": "giants"
}
}
```
### Track push opened metrics
You can report three metrics from the client side to help track the performance of your push notifications: `delivered`, `opened`, and `converted`.
If you use our [iOS](/integrations/sdk/ios/push/#capture-push-metrics) or [Android](/integrations/sdk/android/push/#capture-push-metrics) SDK, we can automatically track `delivered` and `opened` metrics for you.
Otherwise, you’ll need to send events to Customer.io to report metrics from your messages. When we deliver a push notification, we include `CIO-Delivery-ID` and `CIO-Delivery-Token` properties. You must include these properties in your `delivered`, `opened`, or `converted` events to tell us which message corresponds to the metric you’re reporting.
Pipelines (Recommended)
#### Pipelines (Recommended)
```bash
Method: POST
URL: https://cdp.customer.io/v1/track
JSON Payload:
{
"event": "opened",
"userId": "42",
"properties": {
"delivery_id": "CIO-Delivery-ID from the notification",
"device_id": "CIO-Delivery-Token from the notification"
},
"timestamp": "2021-07-14T19:10:25.000Z"
}
```
Classic Track API
#### Classic Track API
Our classic Track API uses a different endpoint for push metrics than other types of events.
```bash
Method: POST
URL: https://track.customer.io/api/v1/push/events
JSON Payload:
{
"delivery_id": "CIO-Delivery-ID from the notification",
"event": "opened",
"device_id": "CIO-Delivery-Token from the notification",
"timestamp": UNIX timestamp when the event occurred
}
```
## Send yourself a test notification
Verify that you’ve configured everything correctly by sending yourself a test push notification. There are a couple of ways to make sure that your initial configuration is working. You can send a single test message from the settings, or (if you have an iOS app) use a separate sandbox environment for your tests.
You can send yourself a test push from the Push Notification Settings page after you’ve uploaded your certificate(s).
[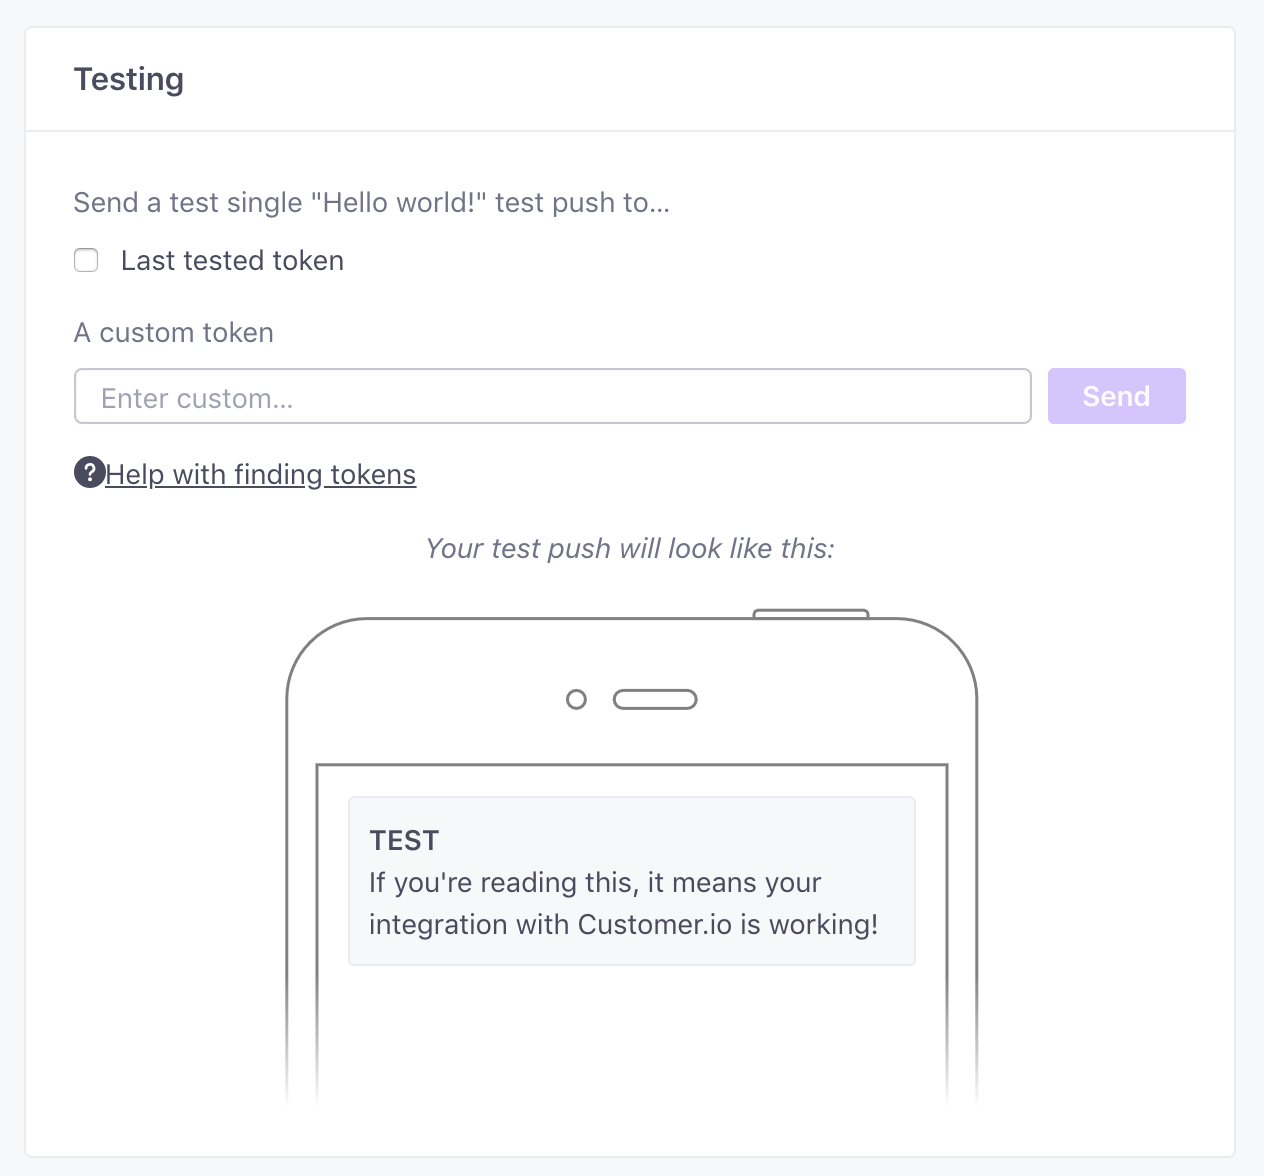](#68e6a75f0da730ea29c20085d90b1cb9-lightbox)
Enter your device token. and you’ll hopefully get a test push to that device with the following content: “If you’re reading this, it means your integration with Customer.io is working!” and you’re ready to start adding push notifications to your campaigns.
You can find your device token on the **People** page; click the person you want to send a test message to and go to the **Devices** tab.
[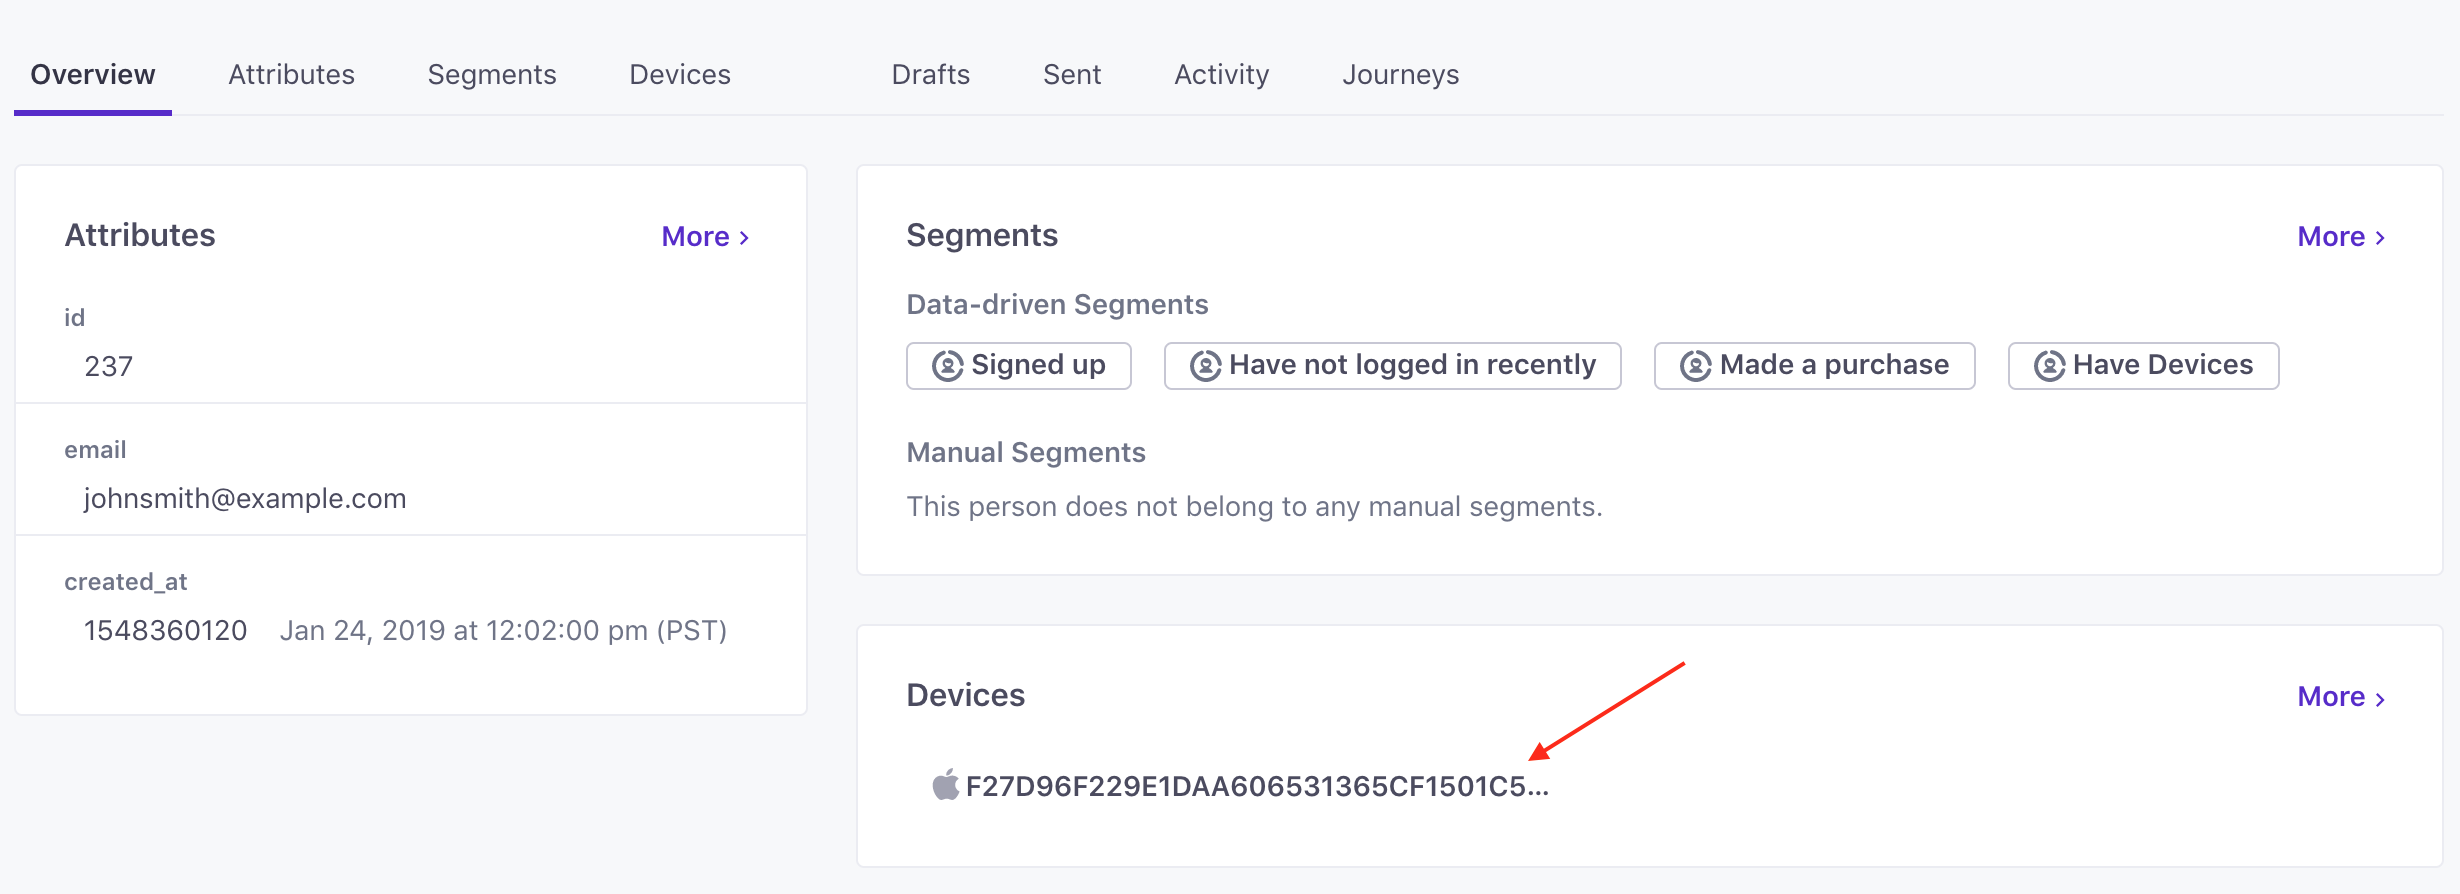](#e8e94ed791de0e0a4f14aaed7726c611-lightbox)
* * [Generate and add push certificates](#generate-certificates)
* [Firebase Cloud Messaging (FCM) setup](#fcm-setup)
* [Send to iOS via Firebase](#fcm-to-ios)
* [Apple Push Notification service (APNs) setup](#apns-setup)
* [Rotating your APNs credentials](#rotating-your-apns-credentials)
* [Configure push without our SDKs](#configure-push)
* [iOS App Setup](#ios-app-setup)
* [Android App Setup](#android-app-setup)
* [Identify Device Tokens](#identify-device-tokens)
* [Push payloads sent from Customer.io](#push-ui)
* [Send events for key customer actions](#send-events)
* [Screen view events](#screenview)
* [Track push opened metrics](#push-opened)
* [Send yourself a test notification](#send-test-notification)
Copy page
Copy page [Download .md](/messaging/channels/push/developer-guide.md)
Is this page helpful?
 
# How can we make it better?
Close
Do you need help from Customer.io support? No
Yes
What part of Customer.io do you need help with?
How can we improve this page?
Email (optional): Please provide a valid email address
I am not a bot
We appreciate your feedback!
Our support team will contact you as soon as possible