

Twitter Pixel destination
Getting started
- Go to Data & Integrations > Integrations and select the Twitter Pixel entry in the Directory tab.
- (Optional) Select the data sources that you want to connect to your outbound integration. You can always connect data sources later. We'll only show you data sources that work with your integration.
-
Configure your integration.
- Pixel ID: The Pixel ID is a unique identifier for your Twitter Pixel installation. It can be found in the "Tools" -> "Events Manager" section of your [Twitter Ads](https://ads.twitter.com) account.
- Restricted Data Use: The Restricted Data Use (RDU) parameter enables an advertiser to limit Twitter's use of certain data for specific business purposes only on that advertiser's behalf. More information is available [in the documentation](https://business.twitter.com/en/help/campaign-measurement-and-analytics/conversion-tracking-for-websites/restricted-data-use-guide.html).
- Click Enable Destination.
When you’re done, you’ll need to go to the Actions tab and add actions The source event and data that triggers an API call to your destination. For example, an incoming identify event from your sources adds or updates a person in our Customer.io Journeys destination.
If you’re migrating from Segment
You’ll notice that our destination has fewer settings than Segment’s. We’ve moved some settings into our Actions, where we think they make more sense. We use Twitter’s current Pixel paradigm. We do not support the legacy Universal Website Tag and Single Event Website Tags web tags.
This means that you must define the events you want to send to Twitter in your Twitter Ads account before you map source data to those events in Customer.io. Twitter generates an event ID for each type of event you want to track, and uses that ID to group and categorize events rather than the simple event name that you send with track calls. You’ll need to provide this ID with each action you set up, so that we can properly map source data to events in your Twitter Ads account.
If you previously used the Universal Website Tag, Twitter has effectively migrated you to Single Event Website Tags. You’ll find the Website Tag for each of your events in your Twitter Pixel Events Manager. You’ll use this tag when you set up actions in Customer.io.
Actions
By default, Identify User is the only enabled action. You’ll need to add actions for each event you want to report to Twitter Pixel. We support a number of default Twitter Pixel events, but you can also add custom actions for any events you’ve set up in Twitter Pixel.
When you're done setting things up, you can go to the Actions tab to see how we map incoming data to your integration.
| Action | Default Trigger | Description |
|---|---|---|
| Identify User | type = "identify" | Send user data to Twitter Pixel |
| Track Page View | type = "page" | Track the current page |
| Track Custom Event | type = "track"andevent != "Products Searched"andevent != "Product Viewed"andevent != "Product Added"andevent != "Order Completed"andevent != "Product Added To Wishlist"andevent != "Checkout Started"andevent != "Payment Info Entered" | Track a custom conversion event |
| Track Checkout Started Event | type = "track"andevent = "Checkout Started" | Track the Checkout Started event which maps to the |
| Track Order Completed Event | type = "track"andevent = "Order Completed" | Track the Order Completed event which maps to the |
| Track Payment Info Entered Event | type = "track"andevent = "Payment Info Entered" | Track the Payment Info Entered event which maps to the |
| Track Product Added Event | type = "track"andevent = "Product Added" | Track the Product Added event which maps to the |
| Track Product Added To Wishlist Event | type = "track"andevent = "Product Added To Wishlist" | Track the Product Added To Wishlist event which maps to the |
| Track Products Searched Event | type = "track"andevent = "Products Searched" | Track the Products Searched event which maps to the |
| Track Product Viewed Event | type = "track"andevent = "Product Viewed" | Track the Product Viewed event which maps to the |
Predefined Track Events
We’ve defined a number of ecommerce events for Twitter Pixel based on our own ecommerce specification. If you use our ecommerce specification for other things, you’ll likely want to use these events as well to track conversions in Twitter. These events are all triggered by common event names defined in our ecommerce specification.
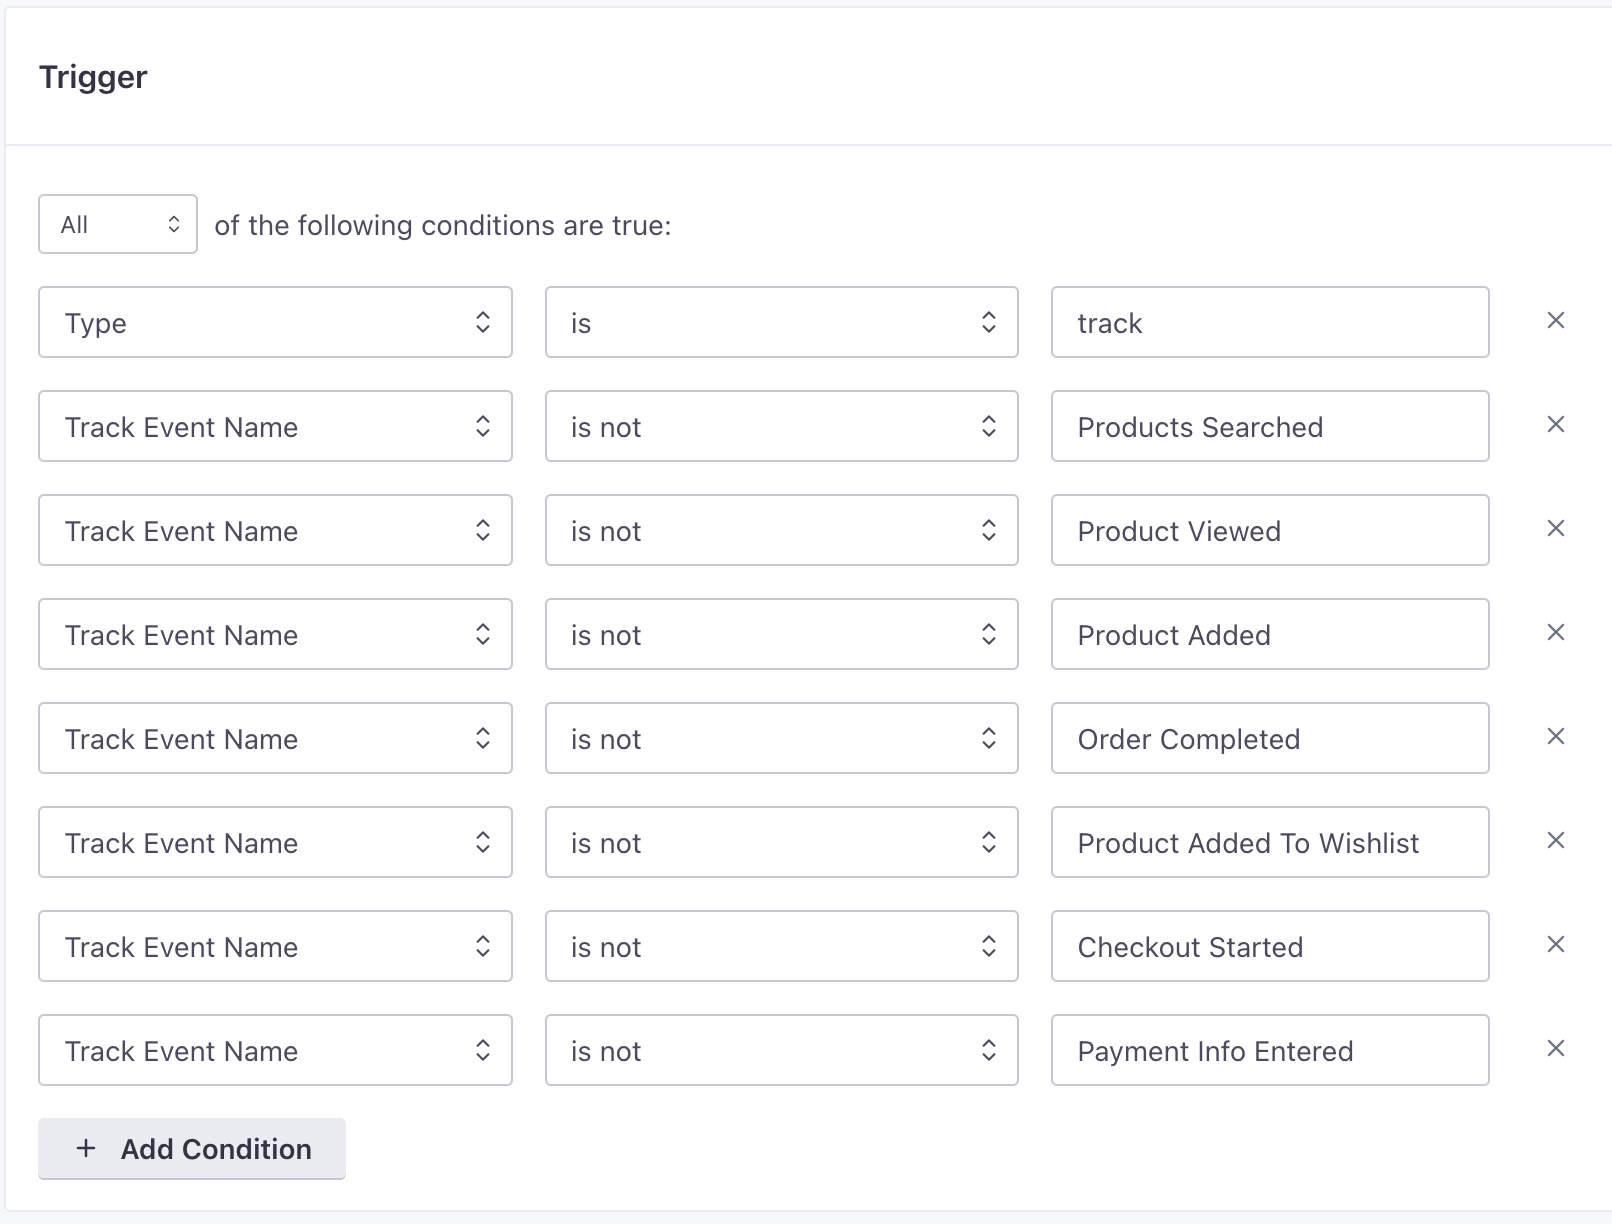
For all other events, you’ll want to use the Custom Event Action and set your own trigger based on the Track Event Name. By default, our Custom Event action excludes all of our predefined events, but you may want to set the trigger to simply match on the event name that you send from your sources. Remember: for each event you want to send to Twitter, you need to define it in your Twitter Ads account first.
Set up a Twitter Pixel action
Before you set up a new action, make sure that you’ve defined your event in Twitter Pixel. See Twitter’s Documentation for help setting up new events. When you set up events, you’ll need to get the Website Tag for this event. We don’t expect you to store this pixel in your sources. Rather, you set it up in Customer.io and we’ll automatically append it to data that we send to your destination.
-
In your Twitter Pixel destination, go to the Actions tab and click Add Action.
-
Set your Trigger conditions. In general, you’ll use Track Event Name to determine when we’ll send event data to Twitter.
-
Under Data Structure, set your Event ID: this is the Website Tag for the event you defined in Twitter Pixel.

-
In the next field down, you can set the Conversion ID. In general, we use the
messageIdfrom incoming source events, because it deduplicates source data and ensures that we report unique conversions to Twitter. -
Set the Click ID if you want to force conversions to a particular click—like the Add to cart button for
added_to_cartevents, or something similar. If you don’t set a click target, Twitter will provide the Click ID itself. -
Determine the fields that you want to pass to Twitter. You can send all
$.properties, or you can select individual event properties. You can also map specific fields for Currency and Revenue.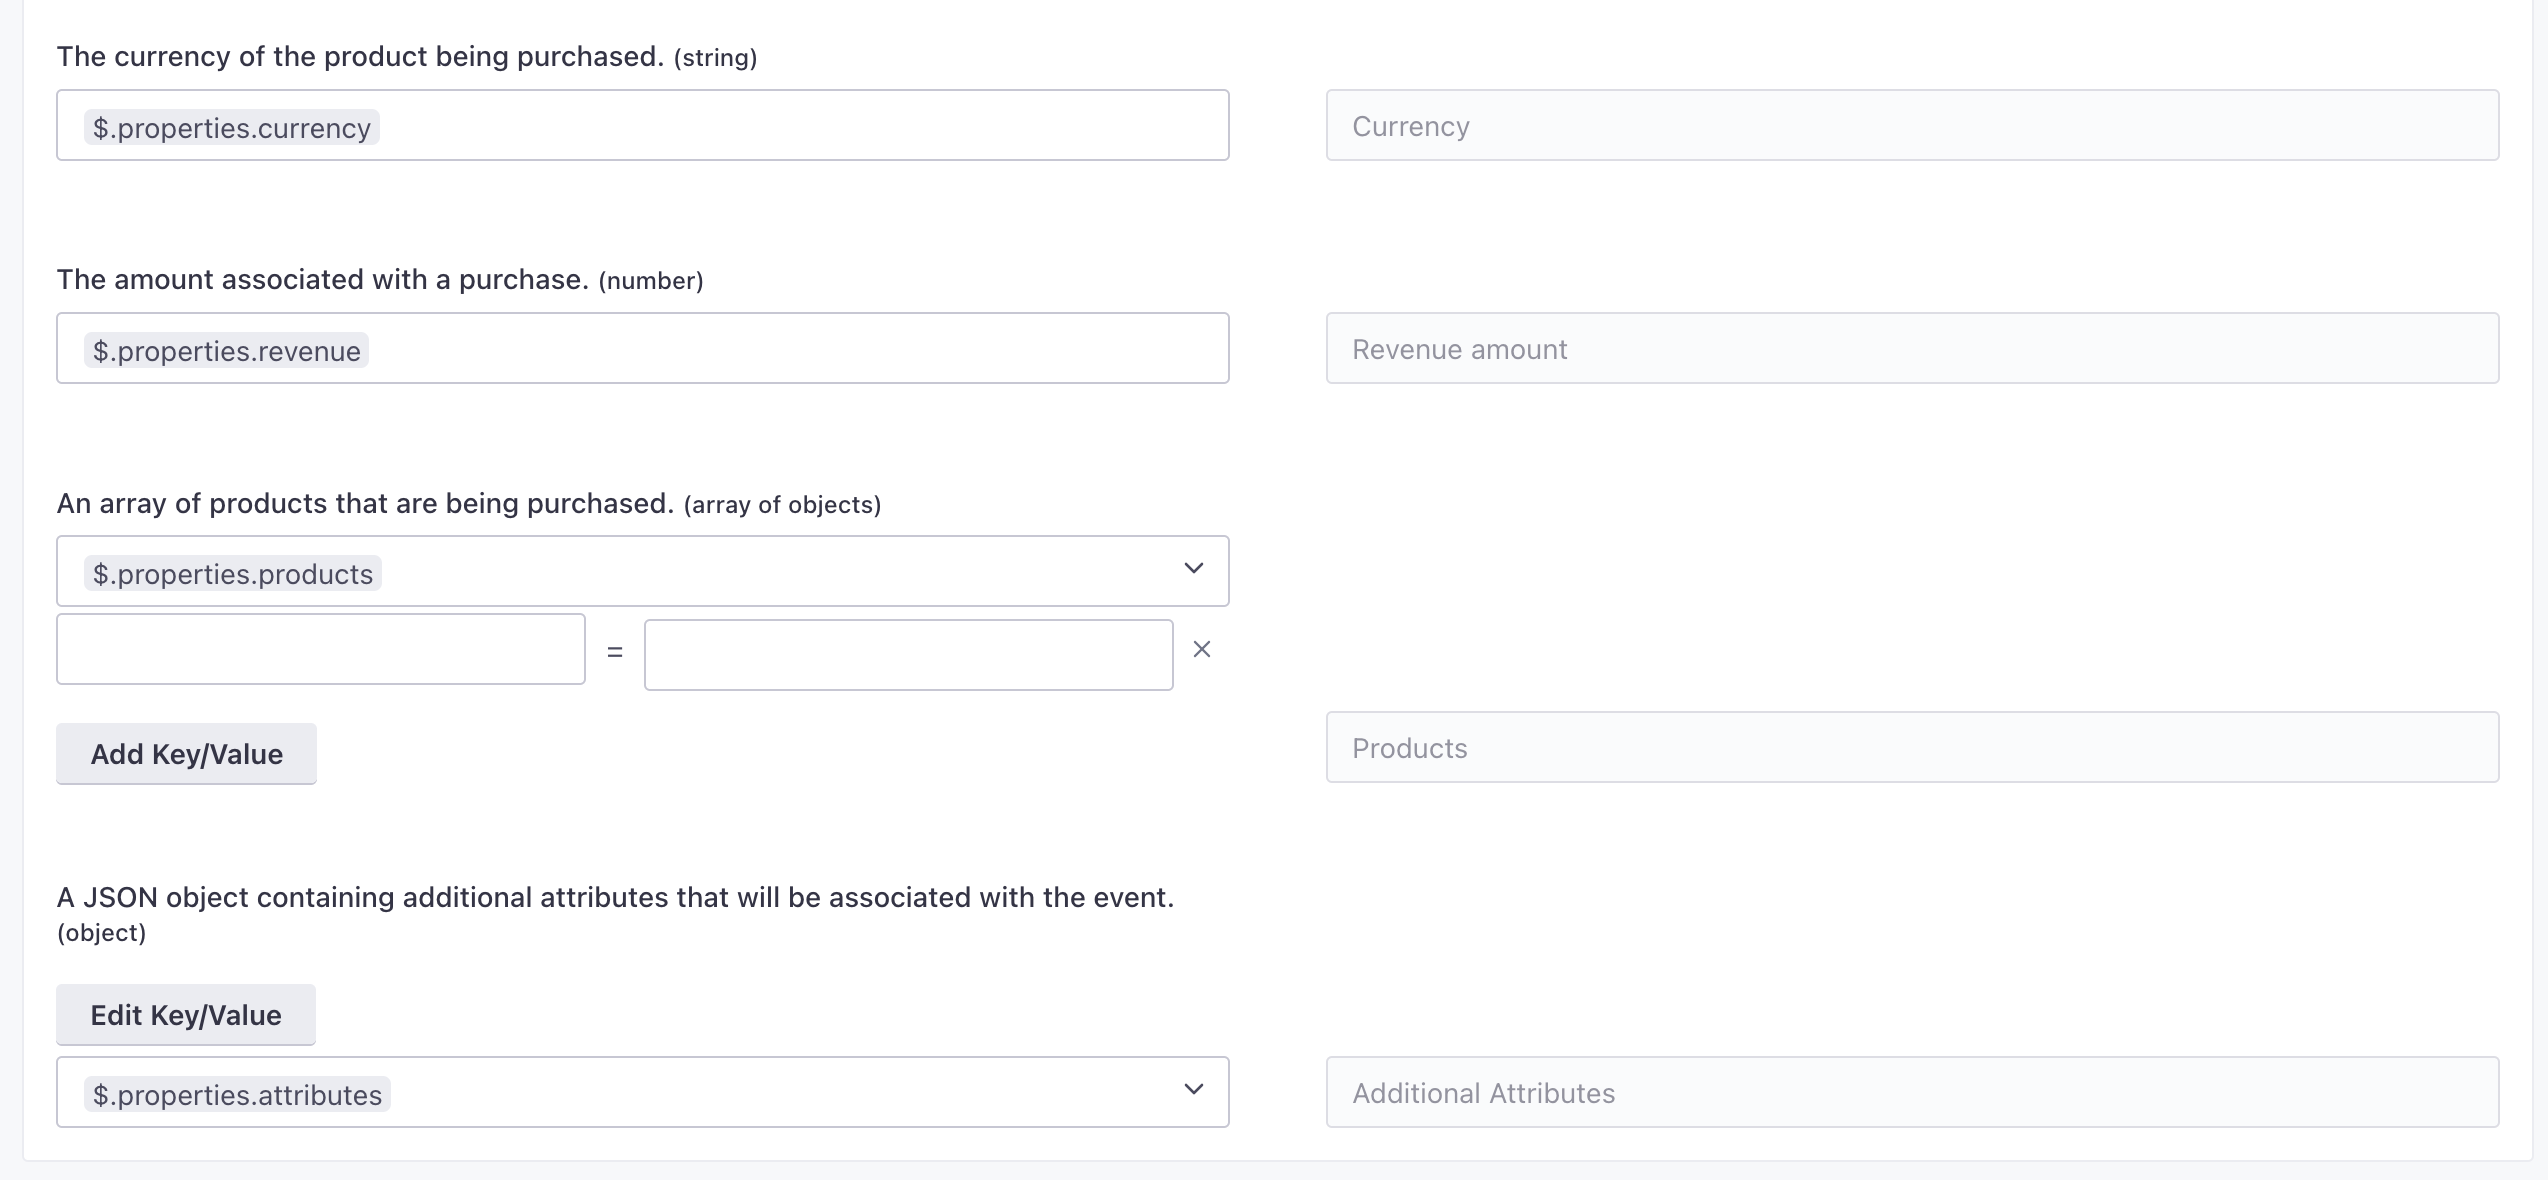
-
Click Save Action.
Sending product information to Twitter
In general, when you send events containing product information, Twitter expects you to identify products by SKU. But they’ll also support an ID if you don’t have the product SKU. So, when you send an event that contains properties.products, we’ll automatically identify products by SKU if it exists or ID if the SKU does not exist.
You can change this mapping by editing the array of products, but, if you do this, you’ll also want to define the other product keys that you want to pass along to Twitter.