

PostgreSQL reverse ETL
Best Practices
Before you add a Reverse ETL source, you should take some measures to ensure the security of your customers’ data and limit performance impacts to your database and Customer.io workspace.
-
Create a new database user/service account. Implement a database user with minimal privileges specifically for Customer.io import/sync operations. This account only requires read permissions with access limited to the tables you want to sync from.
-
Avoid using your main database instance. Consider creating a read-only database instance with replication in place, lightening the load and preventing data loss on your main instance.
-
Sync only the data that you’ll use in Customer.io. Limiting your query can improve performance, and minimizes the potential to expose sensitive data. Select only the columns you care about, and make sure you use the
{{last_sync_time}}to limit your query to data that changed since the previous sync. -
Limit your sync frequency so you don’t sync more than necessary and consume unnecessary resources. If the previous reverse ETL operation is still in progress when the next interval occurs, we’ll skip the operation and catch up your data on the next interval. You should monitor your first few reverse ETL intervals to ensure that your sync doesn’t impact your system’s security and performance—frequently skipped operations may indicate that you’re syncing too often.
Granting us access to your database
We officially support PostgreSQL 12 and newer. An older database version might work, but we can't guarantee it.
We support both SSL and non-SSL database connections. As a part of setup, you'll need to provide the credentials of a database user with read-access to the tables you want to select data from.
If you use a firewall or an allowlist, you must allow the following IP addresses so we can connect to your database. Make sure you use the correct IP addresses for your account region.
| US Region | EU Region |
|---|---|
| 34.29.50.4 | 34.22.168.136 |
| 35.222.130.209 | 34.78.194.61 |
| 34.122.196.49 | 104.155.37.221 |
| 34.9.152.53 | 34.78.153.242 |
| 34.170.216.131 | 34.78.94.137 |
| 35.222.84.131 | 34.140.151.135 |
| 34.57.129.127 | 34.62.147.132 |
Set up your PostgreSQL integration
As a part of this setup, you’ll provide Customer.io with PostgreSQL user credentials that we’ll use to query your database. We recommend that you create a new user with Read Only access specifically for Customer.io, so you can manage Customer.io access to your database independent of any other PostgreSQL users you have.
-
Go to Integrations. In the Directory tab, pick PostgreSQL.
-
Provide your database information, including credentials to connect to your database, and click Save database.
- The Name is a friendly name you’ll use to recognize your database whenever you reference it in Customer.io.
- Enter Host address and the name of the database you want to connect to.
- Enter a database user’s credentials and click Add database. We suggest that you use someone with read-only credentials for your database. While our integration won’t write to your database, using read-only credentials ensures that you can’t inadvertently make changes to your database through your query.
- Toggle the options for SSL or SSH tunneling if necessary.

-
Set up a Sync. A sync is the type of data (
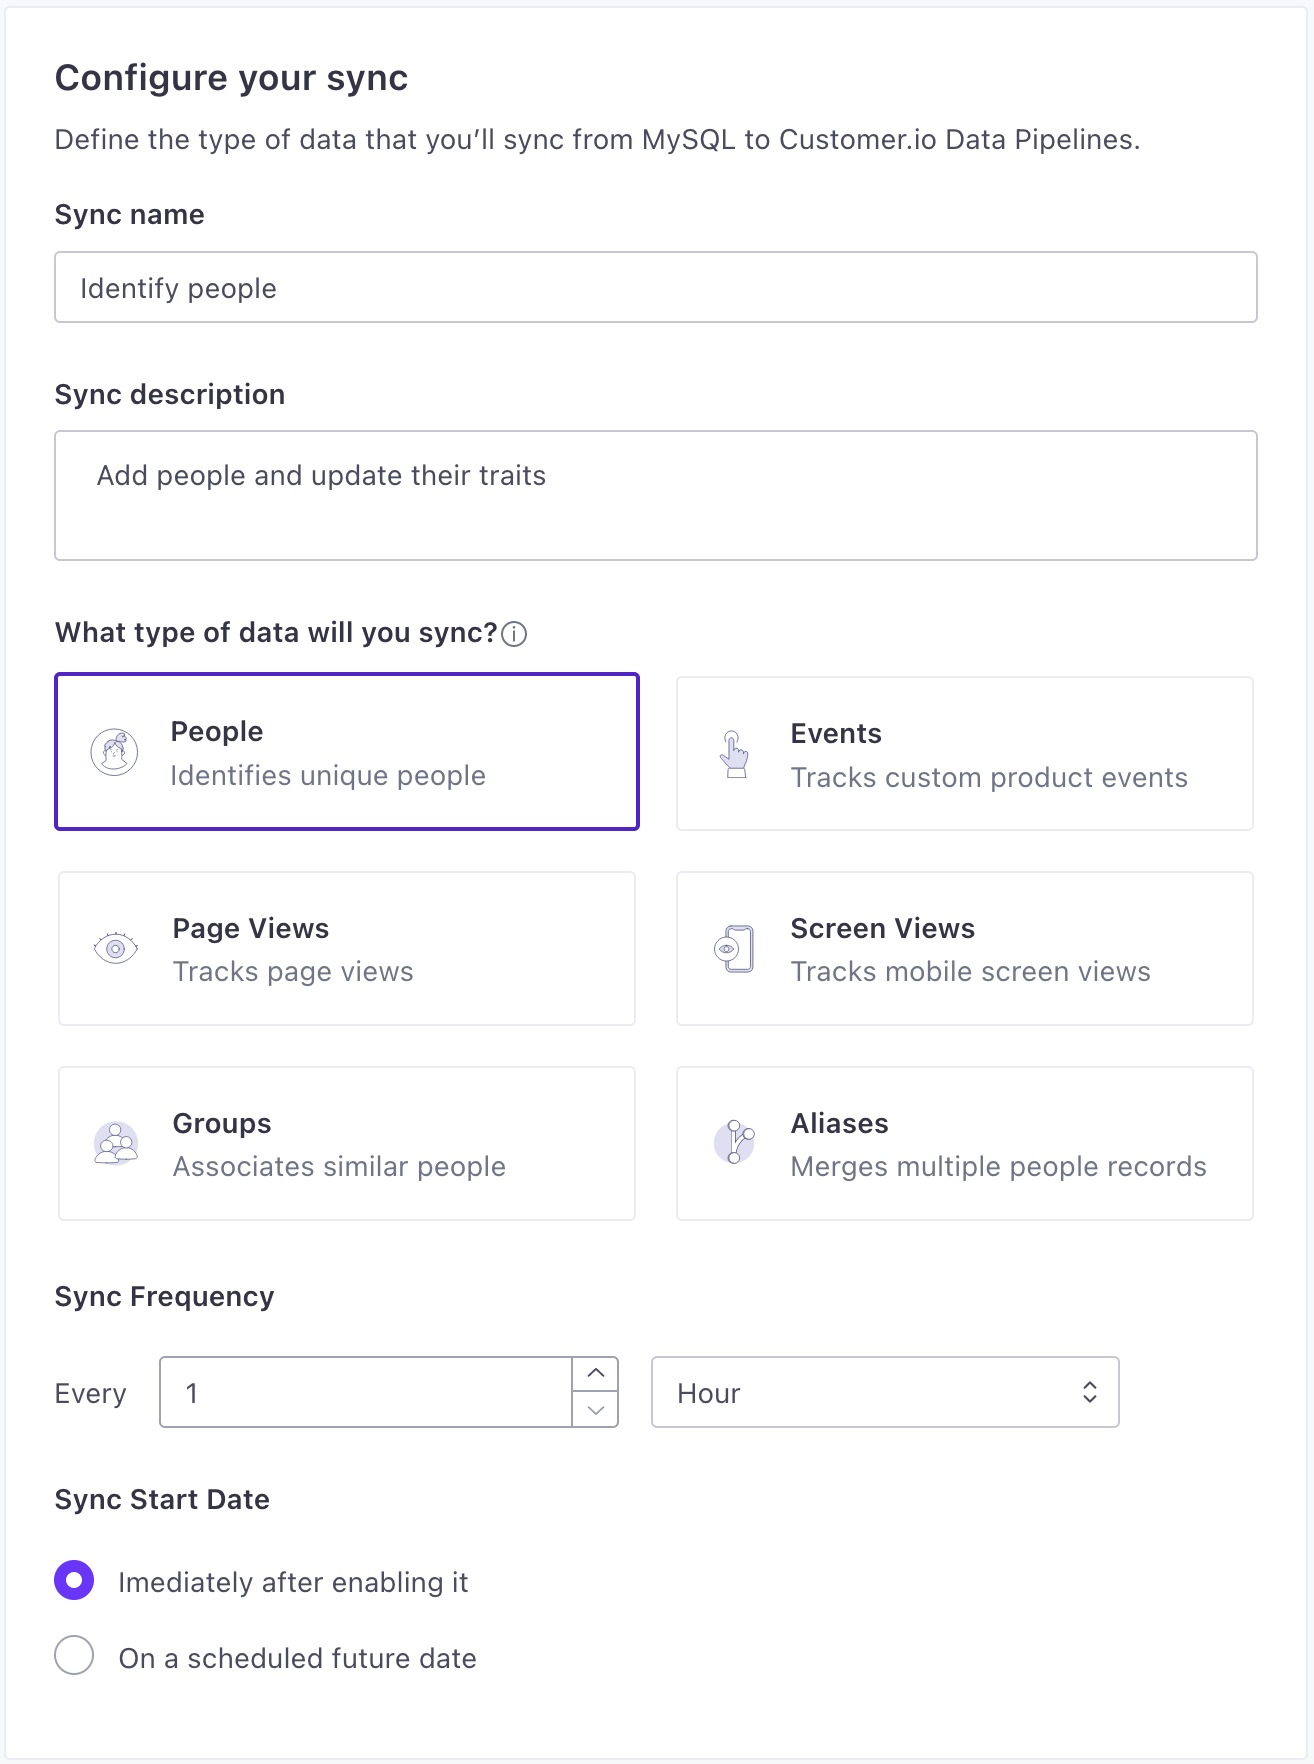
identify,track, etc) you want to import from your database and click Next: Define Query. You can set up syncs for each type of data you want to import.- Provide a Name and Description for the sync. This helps you understand the sync at a glance when you look at your integration’s Overview later.
- Select the type of data you want to import.
- Set the Sync Frequency, indicating how often you want to query your database for new data. You should set the frequency such that sync operations don’t overlap. Learn more about sync frequency.
- Select when you want to start the sync: whether you want to begin importing data immediately, or schedule the sync to start at a later date.
-
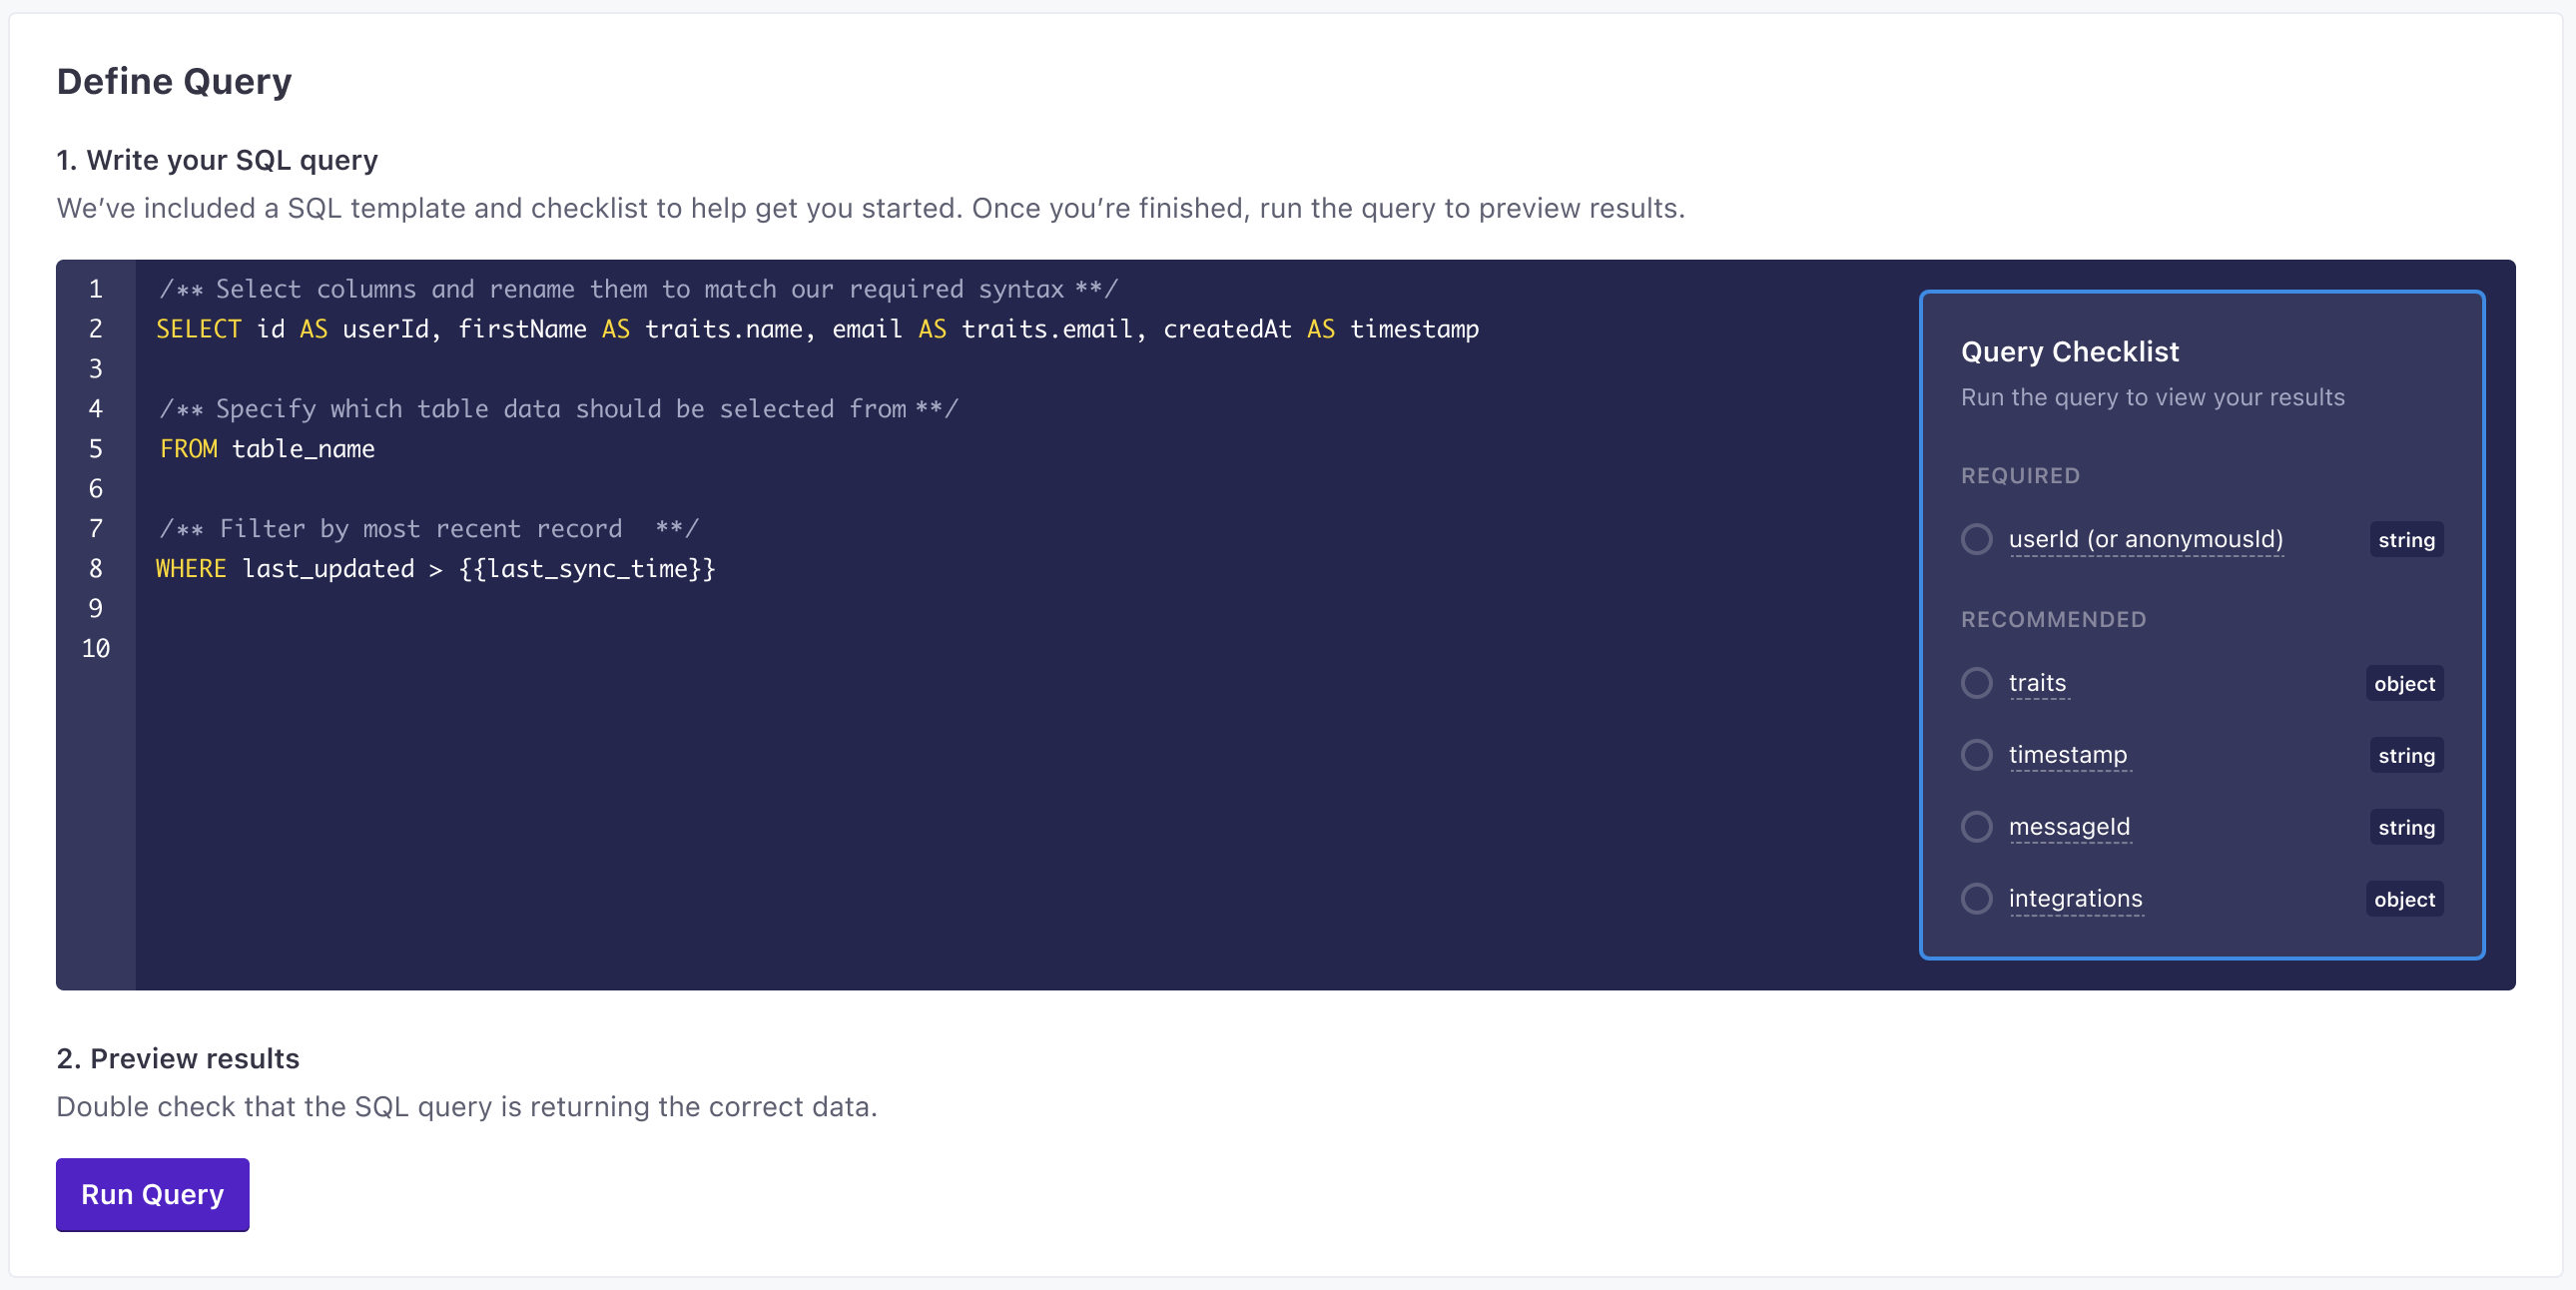
Enter the query that selects the data you want to import. See Queries for each sync type for what each sync type expects and for examples written for your database. Click Run Query to preview results and make sure that your query selects the right information.
-
Click Enable to enable your sync.
Now you can set up additional syncs and connect your integration to one or more destinations.
Adding syncs
After you set up your incoming integration, you can add additional syncs to import different types of data from your database. For example, you might want to import identify data for your users, and track data for their actions. Subsequent syncs can rely on your existing database, or you can add another database within your integration.
- In your integration, go to the Syncs tab and click Add Sync.
- Select your database or add a new one and click Next: Create Sync.
- Set up a sync
A sync is the type of source data (
and click Next: Define Query. You can set up syncs for each type of data you want to import.identify,track, etc) you want to import from your database. A sync is essentially the type of source call you want to make.- Provide a Name and Description for the sync. This helps you understand the sync at a glance when you look at your integration’s Overview later.
- Select the type of data you want to import.
- Set the Sync Frequency, indicating how often you want to query your database for new data. You should set the frequency such that sync operations don’t overlap. Learn more about sync frequency.
- Select when you want to start the sync: whether you want to begin importing data immediately, or schedule the sync to start at a later date.
- Enter the query that selects the data you want to import. See Queries for each sync type for what each sync type expects and for examples written for your database. Click Run Query to preview results and make sure that your query selects the right information.
- Click Enable to enable your sync.
Sync Frequency
You can sync data as often as every minute. However, we recommend that you set your sync frequency such that sync operations don’t overlap. If you schedule syncs such that a sync operation is scheduled to start while the previous operation is still we’ll skip the next sync operation.
Semantic events: Deleting people, groups, and more
You may notice that this integration doesn’t have sync types to delete people, groups, or other objects. To do these kinds of operations, you’ll use what we call semantic events. These are events with specific names that indicate a delete operation. When your Track sync picks up events with an event name we recognize, we’ll perform the associated action—like deleting a person or group.
For example, if you send an event with the name User Deleted, we’ll delete the person from your workspace. See Customer.io Semantic Events for more information.
The semantic events we support are:
| Event Name | Action |
|---|---|
Device Created or Updated | Add or update a mobile device. |
Device Deleted | Delete a mobile device. |
User Deleted | Delete a person. |
Object Deleted | Delete a custom object. |
Relationship Deleted | Delete a relationship. |
User Suppressed | Suppress a person. |
User Unsuppressed | Unsuppress a person. |
Report Delivery Event | Report in-app message events (like delivery, open, click) outside of our JavaScript integration. |