

Salesforce data-in integration
Quick start video
Here’s a quick overview of the setup process for our incoming Salesforce integration. In this video, we set up Salesforce to send Contacts and Accounts to Customer.io.
Before you begin
Customer.io gets data from Salesforce through syncs. Each sync brings in one kind of Salesforce record, maps it to a Customer.io data type, and runs on an interval that you control.
Setup happens in two stages. First, a Salesforce admin installs the Customer.io External Client App in your Salesforce org. Then a Customer.io admin connects Customer.io to Salesforce and sets up syncs.
Prerequisites
To connect Salesforce to Customer.io, you need:
- A Salesforce Data Cloud (sometimes called Sales Cloud) account that is either:
- At the Professional or Enterprise level, or higher.
- Includes Web Services API access.
- A Salesforce user with access to the data you want to send from Salesforce to Customer.io. In general, we suggest that you set up a user specifically for your syncs, making it easy to limit the data Customer.io can access and control your integration independently of your day-to-day Salesforce users.
- A Salesforce admin who can install the Customer.io External Client App in Salesforce.
- A Customer.io admin who can connect Customer.io to Salesforce using that Salesforce user.
The Salesforce admin must be using a Salesforce person with the “Download AppExchange Packages” permission. This permission is required to install the ECA.
If your Salesforce account restricts access by IP address, allow the following IP addresses so Customer.io can connect to Salesforce and refresh OAuth tokens. Make sure you use the correct IP addresses for your account region.
| US Region | EU Region |
|---|---|
| 34.29.50.4 | 34.22.168.136 |
| 35.222.130.209 | 34.78.194.61 |
Set up your Salesforce integration
Setting up the integration takes three steps:
- A Salesforce admin installs the Customer.io External Client App in Salesforce.
- A Customer.io admin connects Customer.io to Salesforce.
- A Customer.io admin sets up at least one sync; this determines which Salesforce data you’ll bring into Customer.io.
If you connected Salesforce before June 17, 2026, you also need to migrate your existing connection to the External Client App.
Install the Customer.io External Client App
Before you can connect Customer.io to Salesforce, you (or another Salesforce admin) need to install the Customer.io External Client App (ECA) package in your Salesforce org. Customer.io provides this link during setup, but you can also install the package directly using one of the static links below:
- Production: Salesforce ECA install (prod)
- Sandbox: Salesforce ECA install (sandbox)
If the installation fails due to insufficient privileges, check whether the Salesforce user has been assigned to a Salesforce person with the “Download AppExchange Packages” permission. This permission is required to install the ECA.
For more about Salesforce’s changes to how integrations connect, see Salesforce’s partner changes documentation.
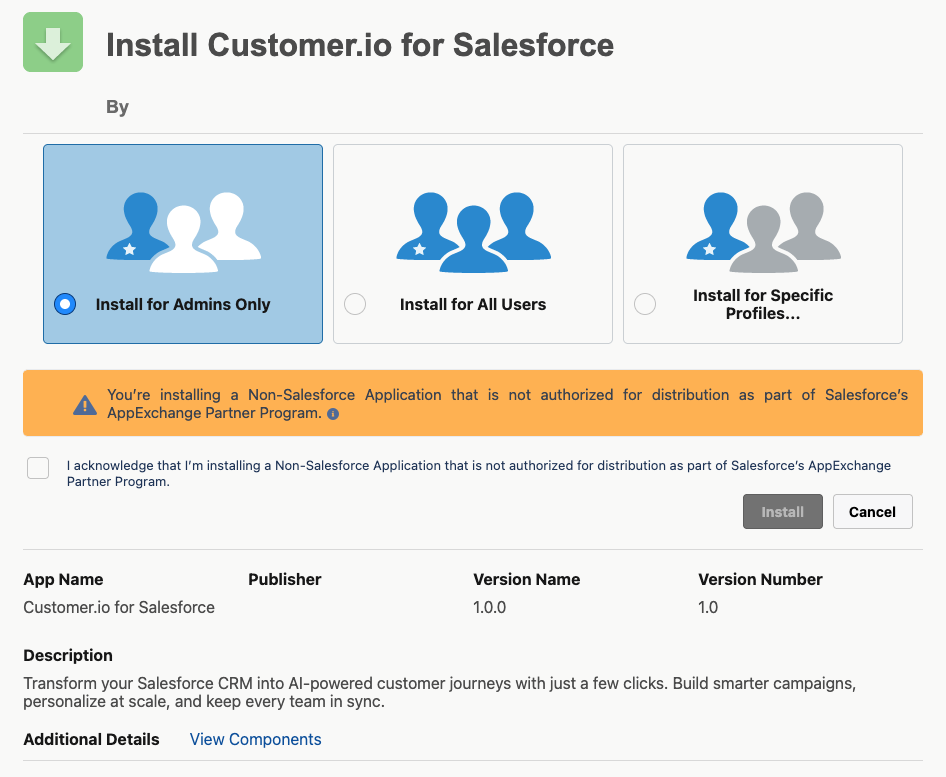
- Open the External Client App installation link for your Salesforce environment—either the link Customer.io provides for your connection or the appropriate static link above.
- Determine who should access the app.
- Acknowledge the warning about the app not being a part of the AppExchange Partner Program and click Upgrade.
- Return to Customer.io to connect to Salesforce.
Connect Customer.io to Salesforce
After a Salesforce admin installs the External Client App, a Customer.io admin can connect Customer.io to Salesforce.
- Go to Integrations. In the Directory tab, pick the Data In Salesforce integration.
- Give the integration a friendly Name so you’ll recognize it in Customer.io.
- If you’re logging in with your Salesforce Sandbox account, enable the Sandbox setting to test your integration.
- Click Connect Salesforce and log in to Salesforce. While you can log in with any Salesforce user, you might want to log in with an integration user—an account made specifically for this integration that helps you manage and limit the data available to Customer.io.
- Set up your first sync We’ll prompt you to do this immediately. See Set up syncs for the rest of the process.
Set session timeout for the External Client App
We recommend that you set the session timeout for the External Client App to 24 hours, to allow large syncs to complete successfully without being interrupted part-way through due to session expiry.
The Salesforce admin can set the session timeout for the External Client App by following these steps:
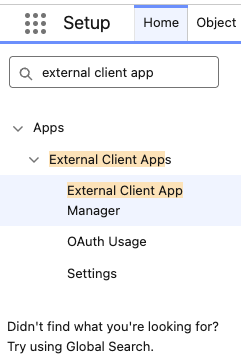
- Find the External Client App Manager in Salesforce Setup:
- Find the Customer.io Connector app in the list of apps in the External Client App Manager, and click it.
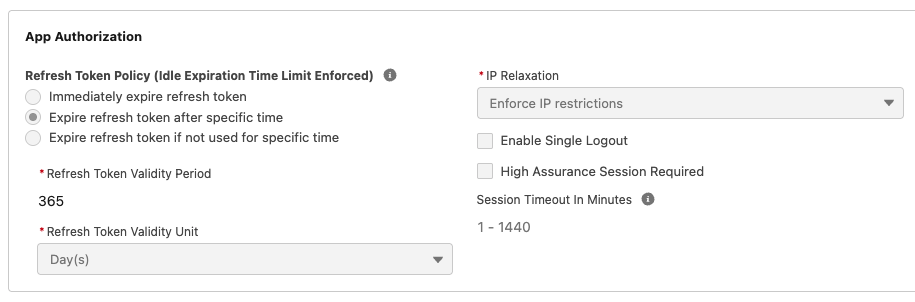
- Expand the OAuth Policies section, and find the App Authorization section. The Session Timeout in Minutes is shown as 1-1440 when it has not been set.
- Click Edit at the top of the page.
- Set Session Timeout in Minutes to 1440 minutes - equivalent to 24 hours.
- Click Save at the top of the page.
Set up syncs
A sync imports one kind of Salesforce record—like contacts or accounts—and maps it to a Customer.io data type. The first time a sync runs, it brings in the complete set of records that match your sync settings. Later syncs bring in records that changed since the previous sync interval. This keeps your Salesforce data up to date in Customer.io without importing the complete data set every time.
You can create syncs by starting from a template for common Salesforce data types, or configure a custom sync for other data types.
Configure a sync with a template
We offer templates for the data most commonly synced with Customer.io: contacts, leads, accounts, and account-contact relationships. Templates come pre-configured with field mappings, identifiers, and filters, so we recommend starting with one to get your first sync running quickly. To bring in other types of Salesforce data, configure a custom sync.
- Go to your Salesforce integration’s Syncs tab and click Add Sync. (If you just connected Salesforce, we take you straight to this step.)
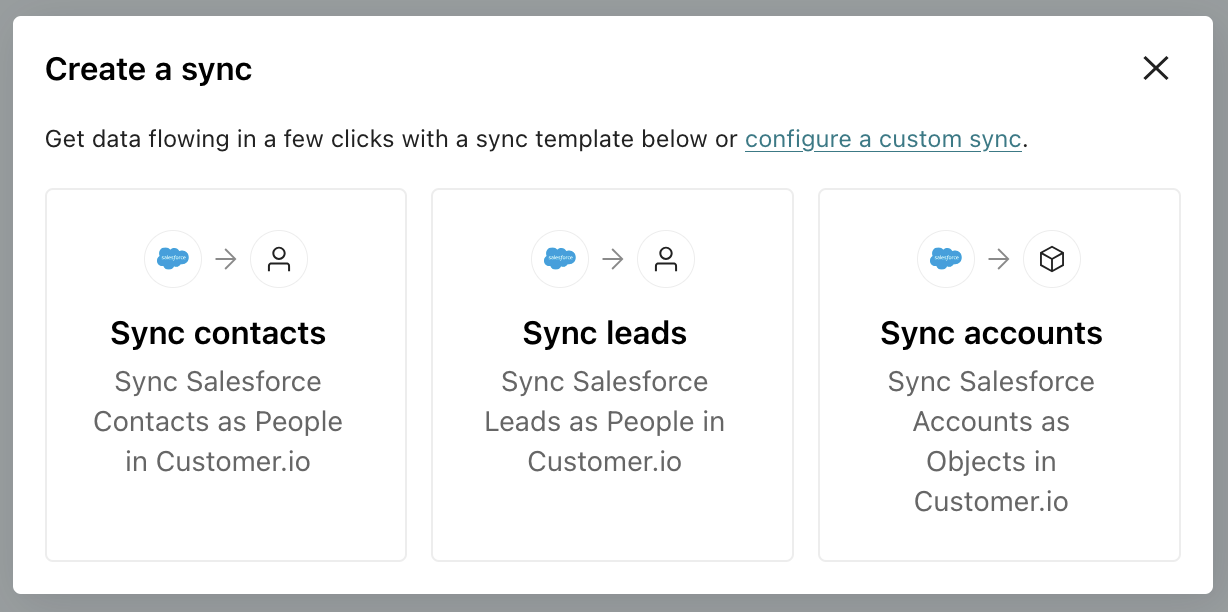
- Select your sync template. In general, we recommend starting with Contacts because they map to people in Customer.io.
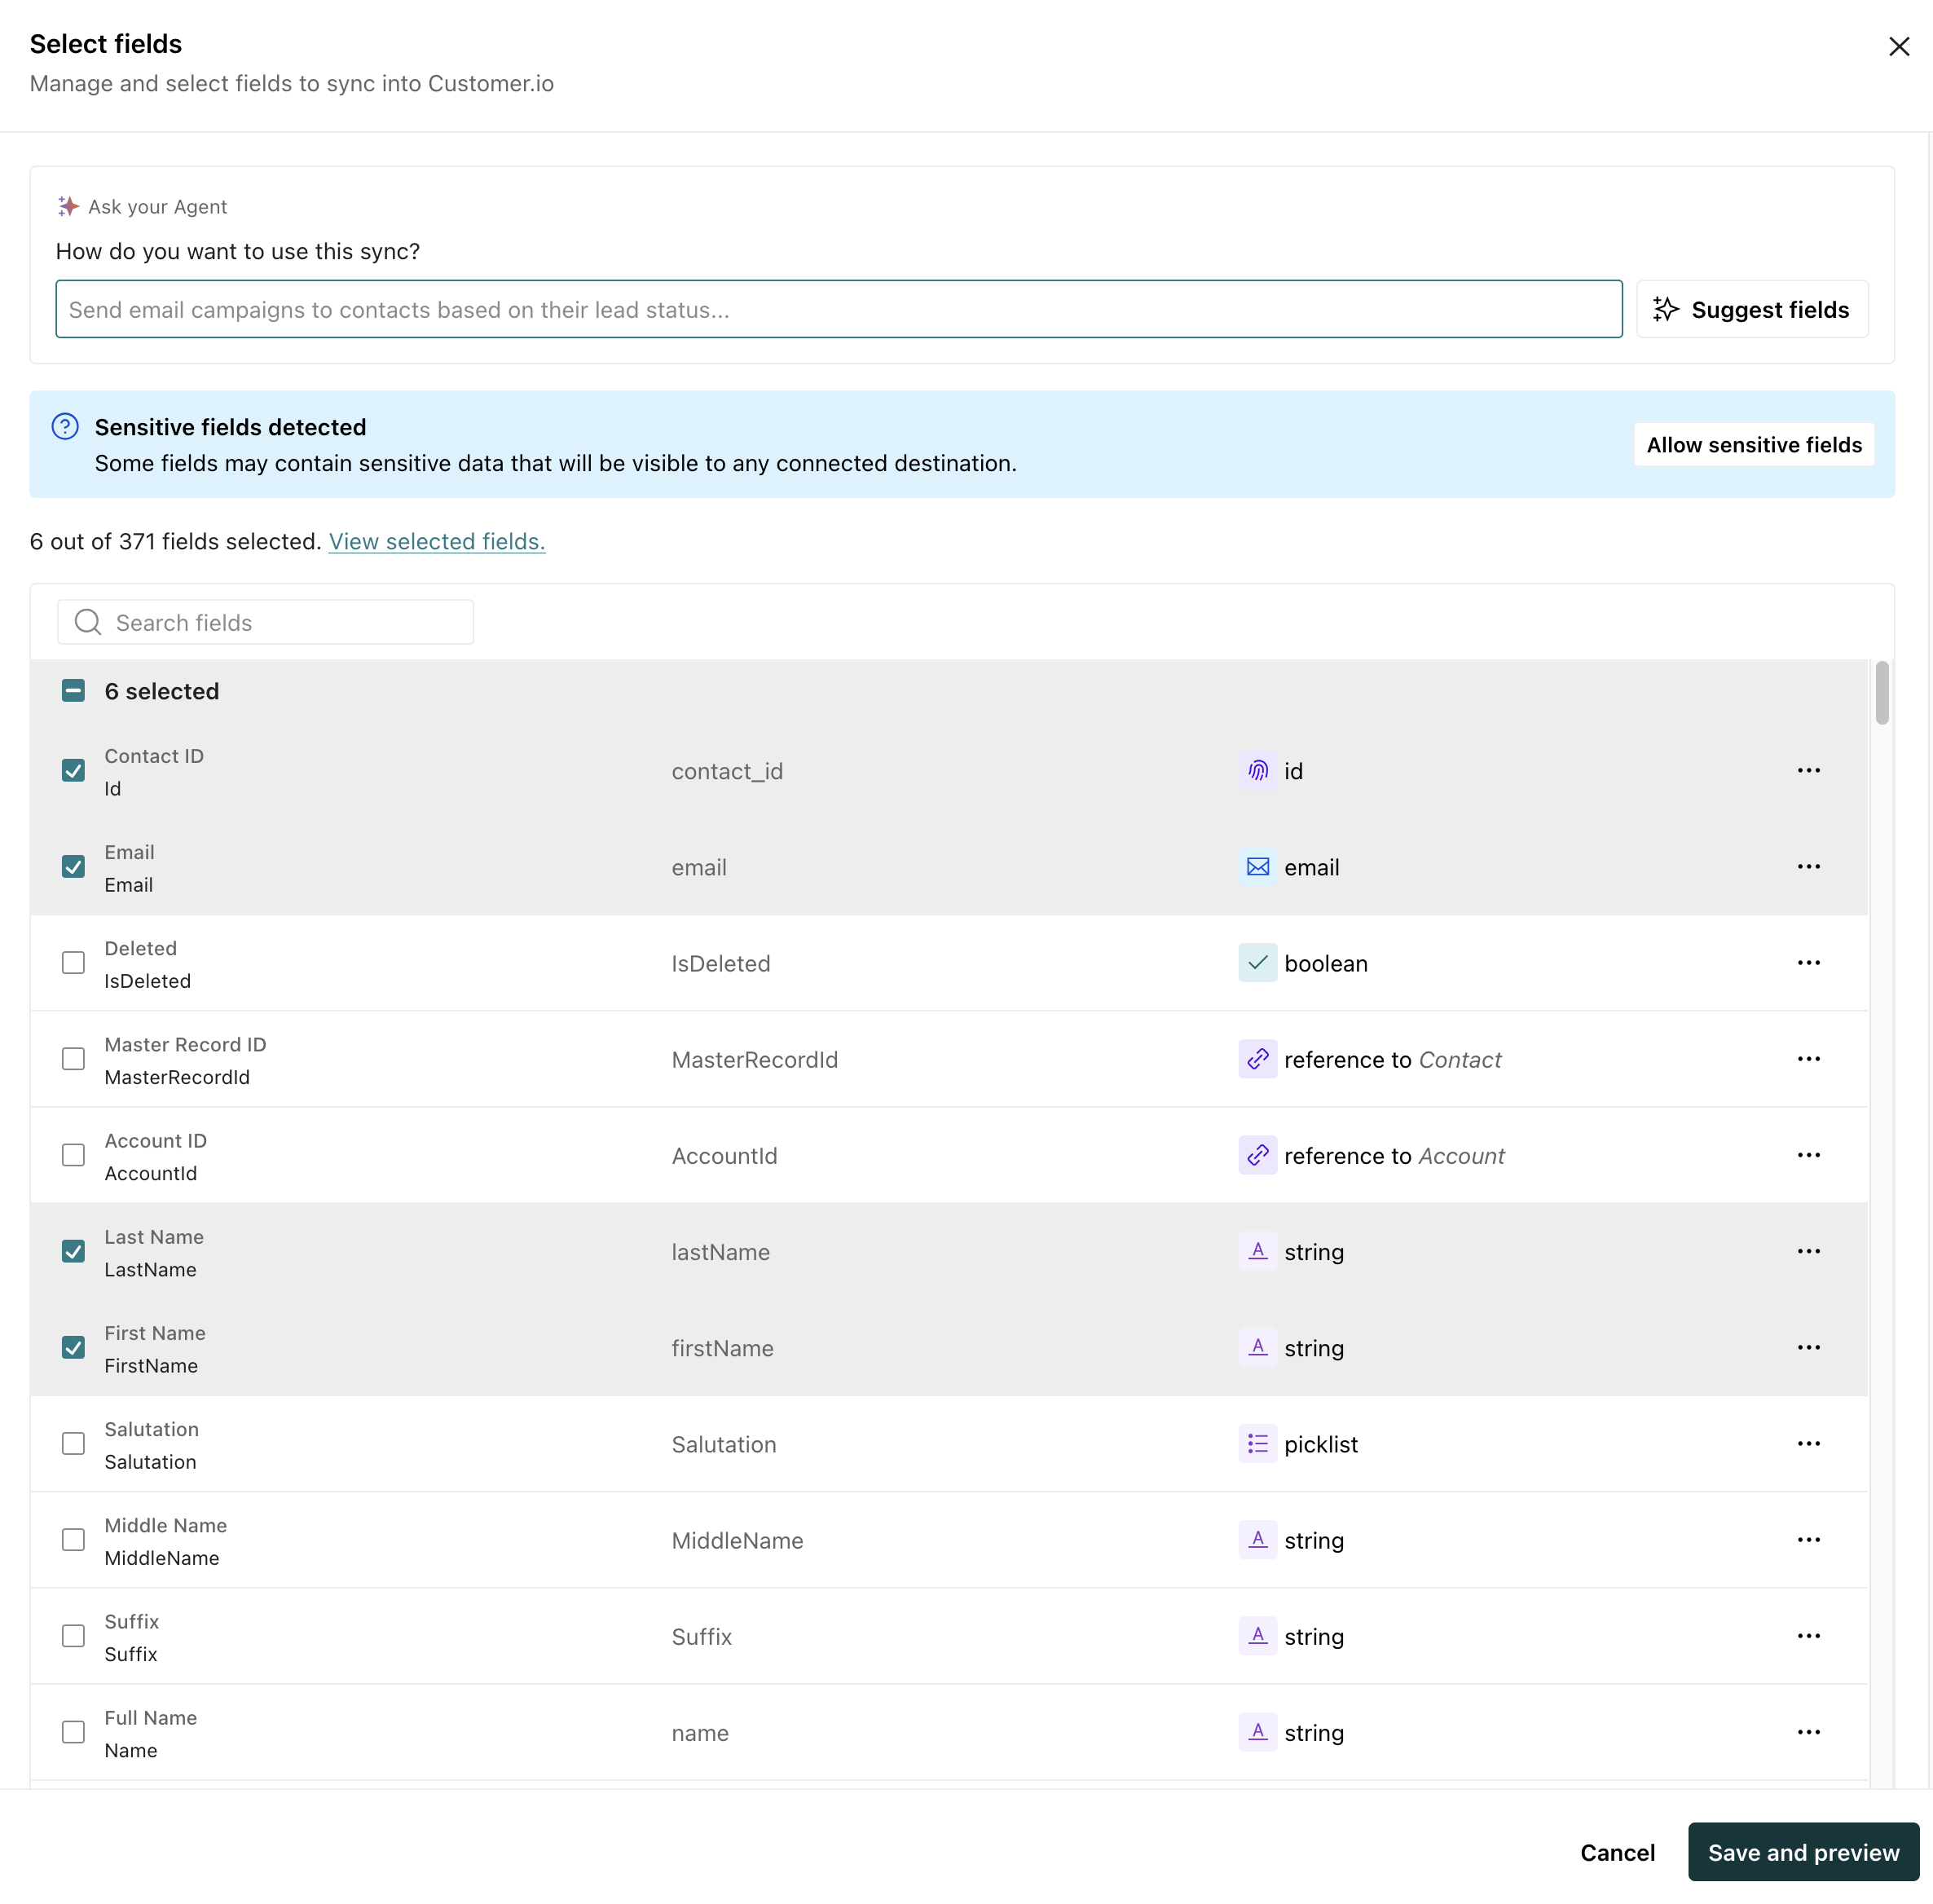
- Click Add fields to determine the data you want to bring in for each Salesforce record. When you’re done, click Save and preview. From here you can:
- Manually select the fields you want to add.
- Add a prompt under How do you want to use this sync? (if AI is enabled) and Customer.io will suggest fields based on your goals. For example, you might want to “send email automations to contacts based on lead status” or “segment accounts by company type.” We try to exclude fields that are usually not useful for segmentation, automation targeting, or personalization. Fields added by AI show a sparkle badge in the field list.
- (Optional) Click Filter data to sync a subset of records. This gives you a way to filter out records you know won’t be useful in Customer.io. If you’re not comfortable with SOQL, you can enter a prompt and click Generate query to help you write a filter. Click Validate query when you’re done to make sure your query works the way you expect. When you’re done, click Save and preview.
- Review your sync. We’ll show you which fields you’re going to sync and the total number of records your sync will add. Make sure you’re syncing the right data and that the total number of records looks right to you.
- Click Enable sync and choose a sync interval: 1 hour, 6 hours, 24 hours, or a custom interval.
The Syncs tab shows the status of your sync. If you go into , you should begin seeing your Salesforce data—though it may take a few minutes to populate all your people, especially if you have millions of records.
Account-contact relationships template
The account-contact relationships template links the people created by your contact sync with the account objects created by your account syncs: it matches people by their email address and accounts by their Salesforce ID, the same identifiers the contact and account syncs use.
When you configure the template, if you haven’t set up your contact or account syncs yet, you can create them without leaving the flow—but you can’t enable the relationship sync until you’ve set up contact and account syncs.
Configure a custom sync (without a template)
In general, you should follow this process if you need to sync a Salesforce data type that isn’t covered by a template.
If you’re not sure whether your Salesforce data should become people, custom objects, events, or relationships in Customer.io, see Mapping Salesforce data to Customer.io.
When you configure a custom sync:
-
Go to your Salesforce integration’s Syncs tab and click Add Sync. (If you just connected Salesforce, we take you straight to this step.)
-
Click Configure a custom sync.
-
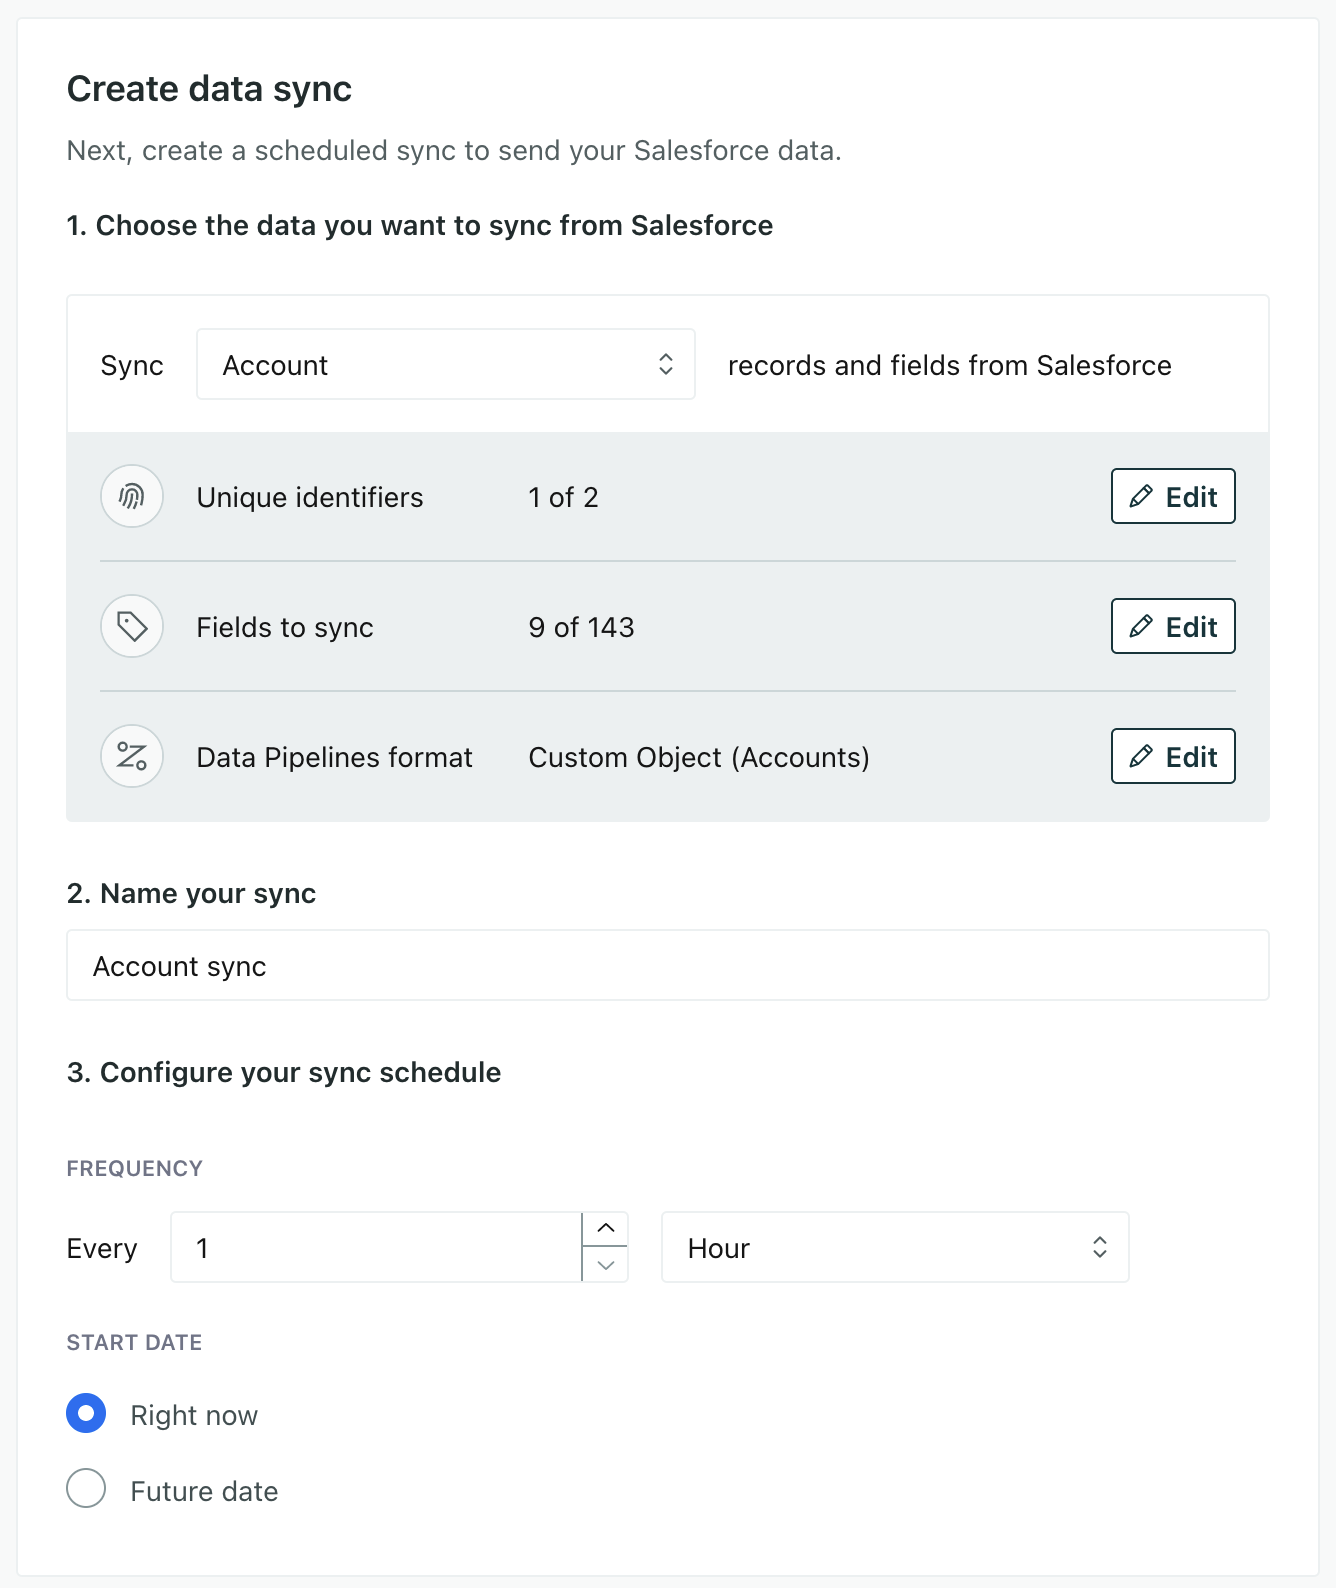
Pick the kind of Salesforce record you want to send to Customer.io in the Sync dropdown.
-
Give your sync a Name—something that describes the data you’re importing and what you’re mapping it to.
-
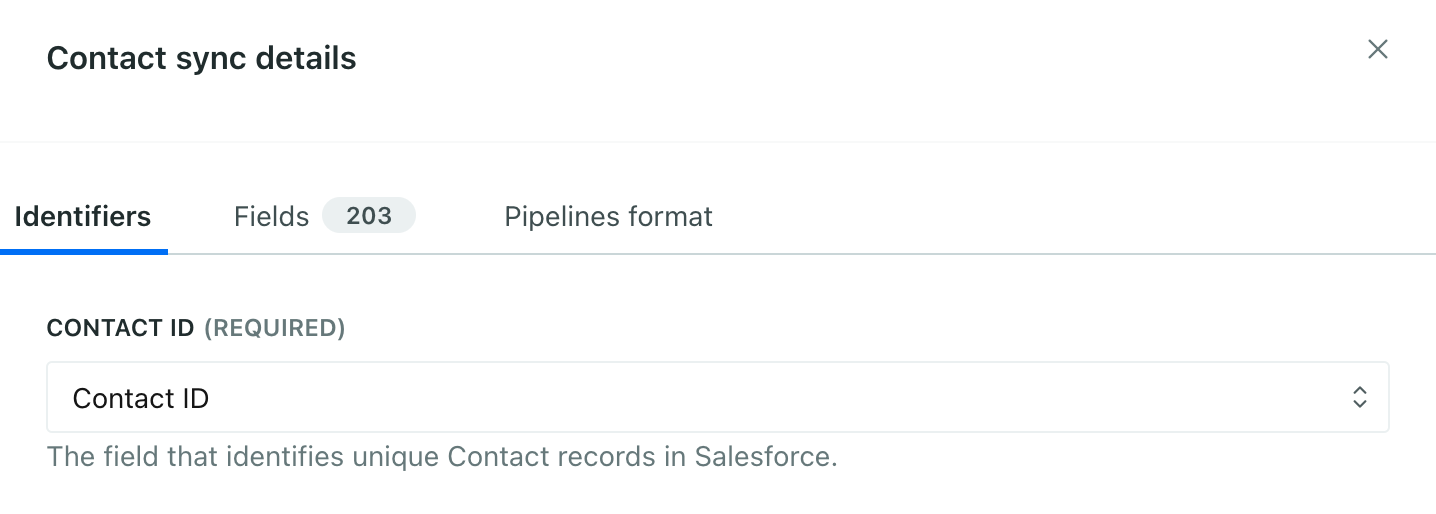
Click Edit next to Unique identifiers to map your identifier—the field that uniquely identifies each person or object. For example, if you sync Opportunities, you might want to use the Opportunity ID as the identifier.
-
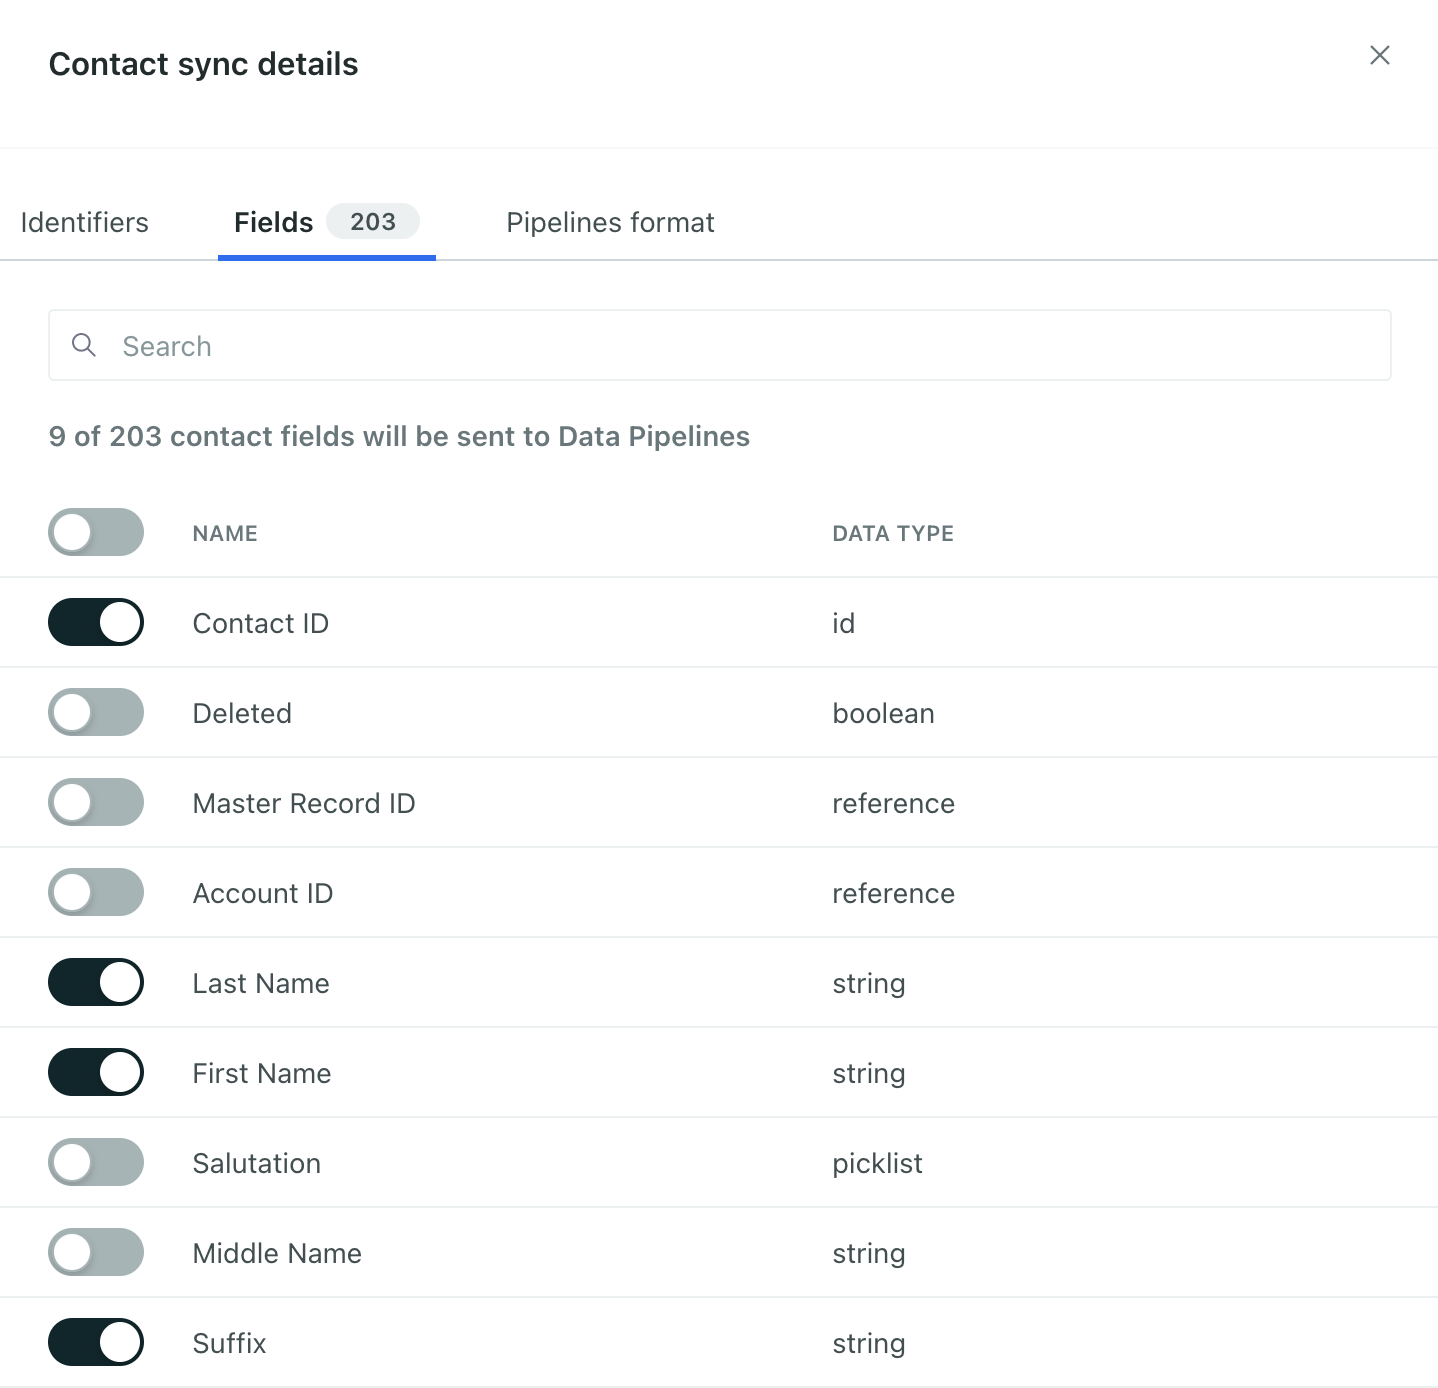
Go to the Fields tab and pick the fields you want to capture in Customer.io. Salesforce contains a lot of data, not all of which is useful in Customer.io.
-
Go to the Pipelines format tab and tell us what kind of data you’re sending. For popular Salesforce data types, we set these fields for you. For example, for Opportunities, we automatically set the Data Pipelines format to Custom Object and the Custom Object Name to Opportunities.
If your Data Pipelines format is set to Custom Object or Relationship, you need to map them to a custom object
An object is a non-person entity that you can associate with one or more people—like a company, account, or online course.
in Customer.io. In most cases, this is the same name as the Salesforce object you want to sync (or relate people to). If the object doesn’t exist yet, click New Object Type and set the singular and plural forms—like Account and Accounts. See Mapping Salesforce data to Customer.io for more information.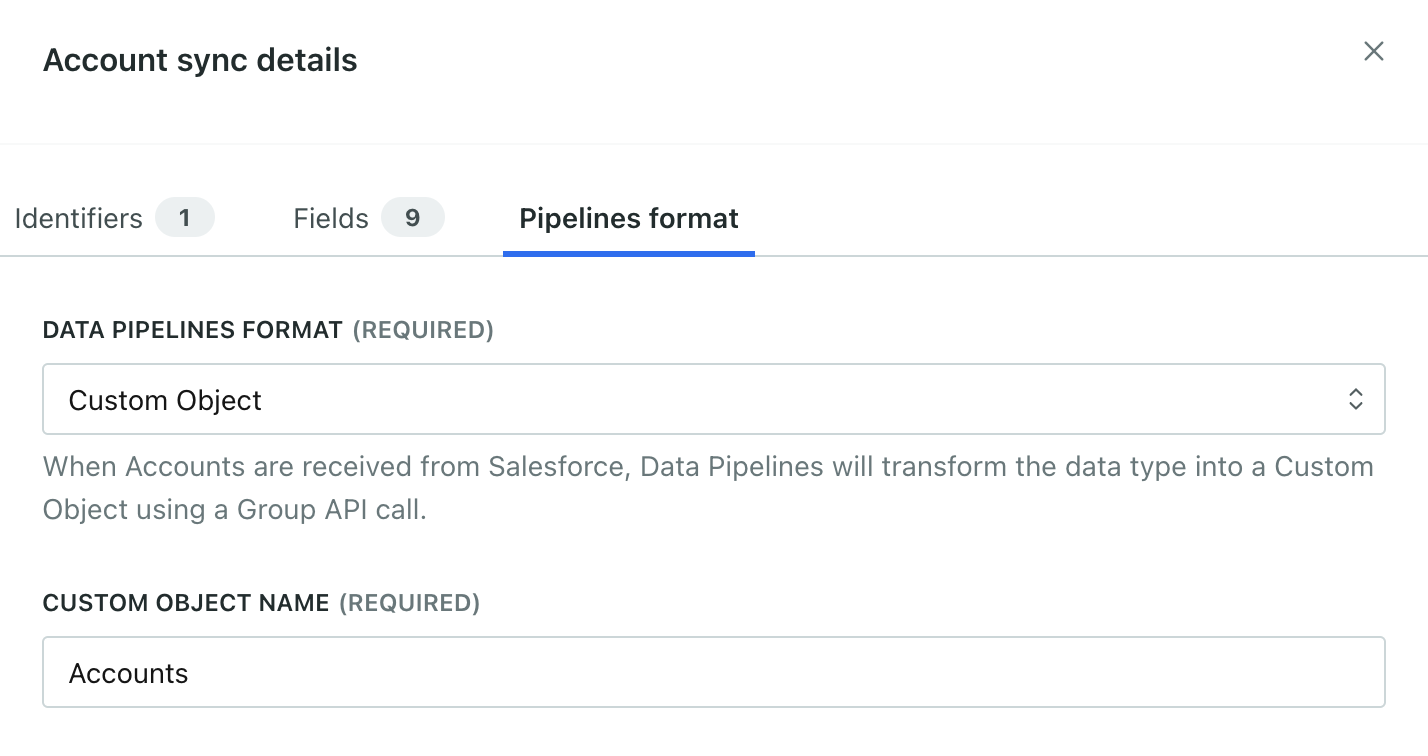
-
(Optional) Go to the Advanced filtering tab and write a query to filter the records you want to bring into Customer.io. You can also enter a prompt and use AI to generate a filter. See Filter incoming data for more information.
-
Go to the Preview tab to see a preview of the data you’ll be syncing. If everything looks good, click Save changes.
-
Configure your sync schedule. This is how often you want to sync data from Salesforce to Customer.io.
-
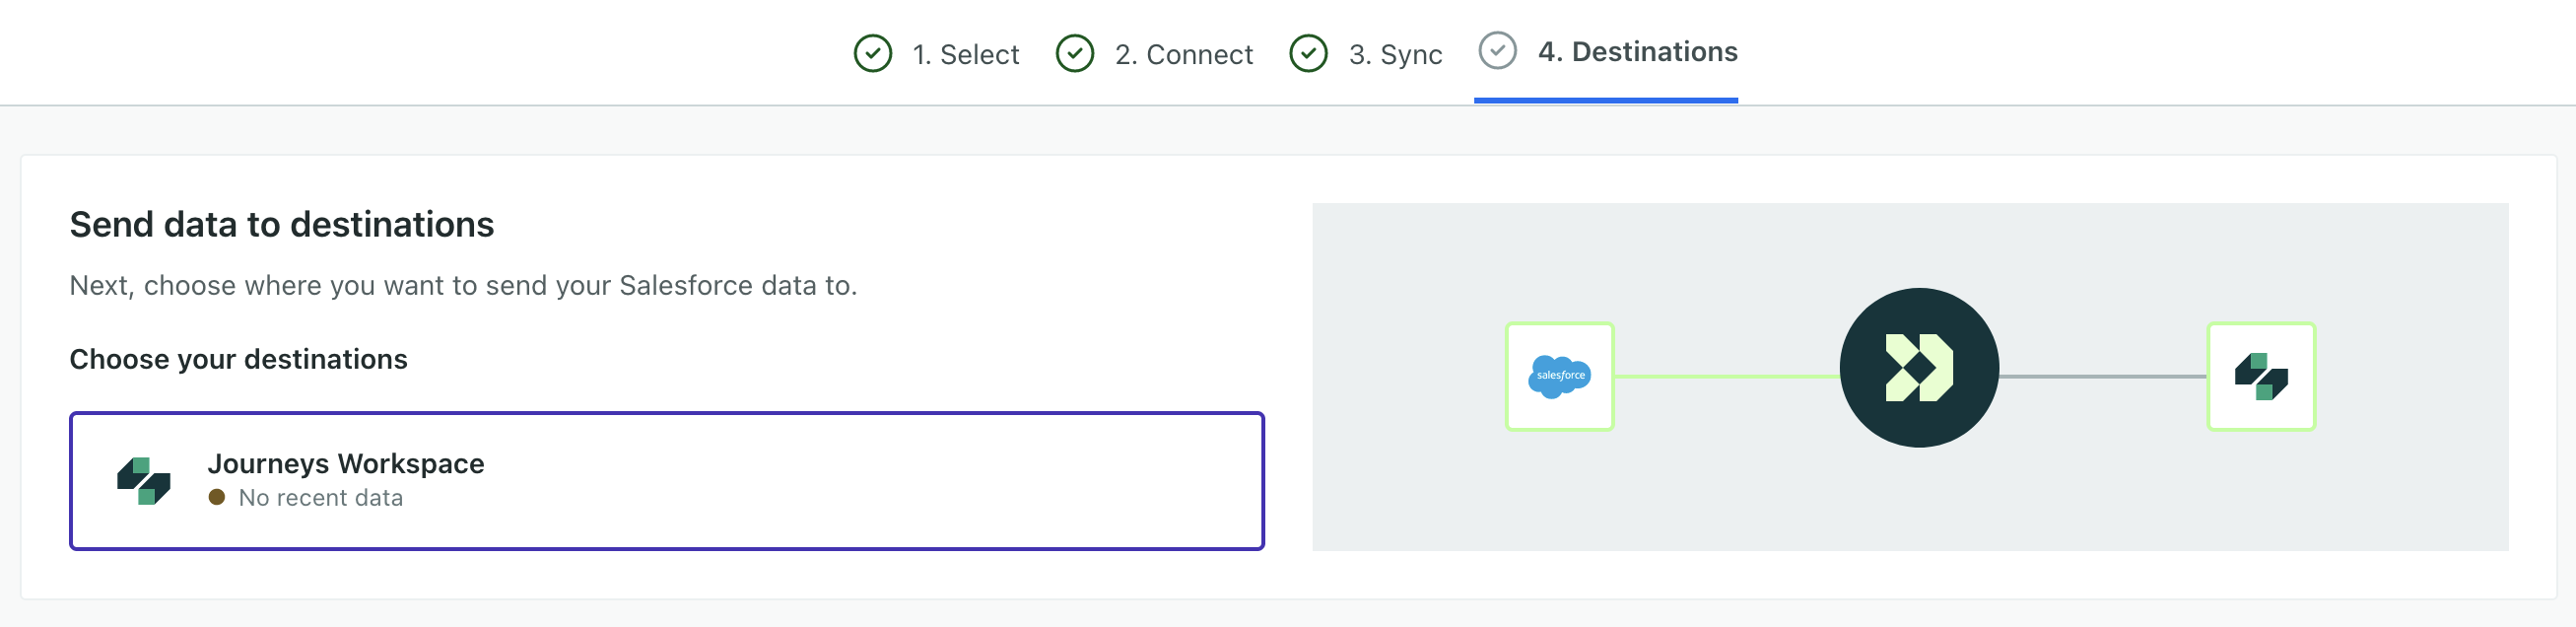
When you’re done, click Configure destinations and select places you want to connect your Salesforce data to. The destinations you connect to might depend on how you model your data. See Mapping data to destinations for more information.
-
Click Enable sync.
The Syncs tab shows the status of your new sync. It may take a few minutes to populate all your data, especially if you have millions of records.
Filter incoming data
When you set up a sync, we bring all data of the selected type from Salesforce by default. For example, if you sync your Salesforce contacts, we’ll bring all your contacts into Customer.io. But you might not want all of your contacts—maybe you qualify your contacts or you only want to bring in contacts who meet certain thresholds.
That’s what the Add optional data filters button does: it lets you provide criteria for data you want to bring into Customer.io.
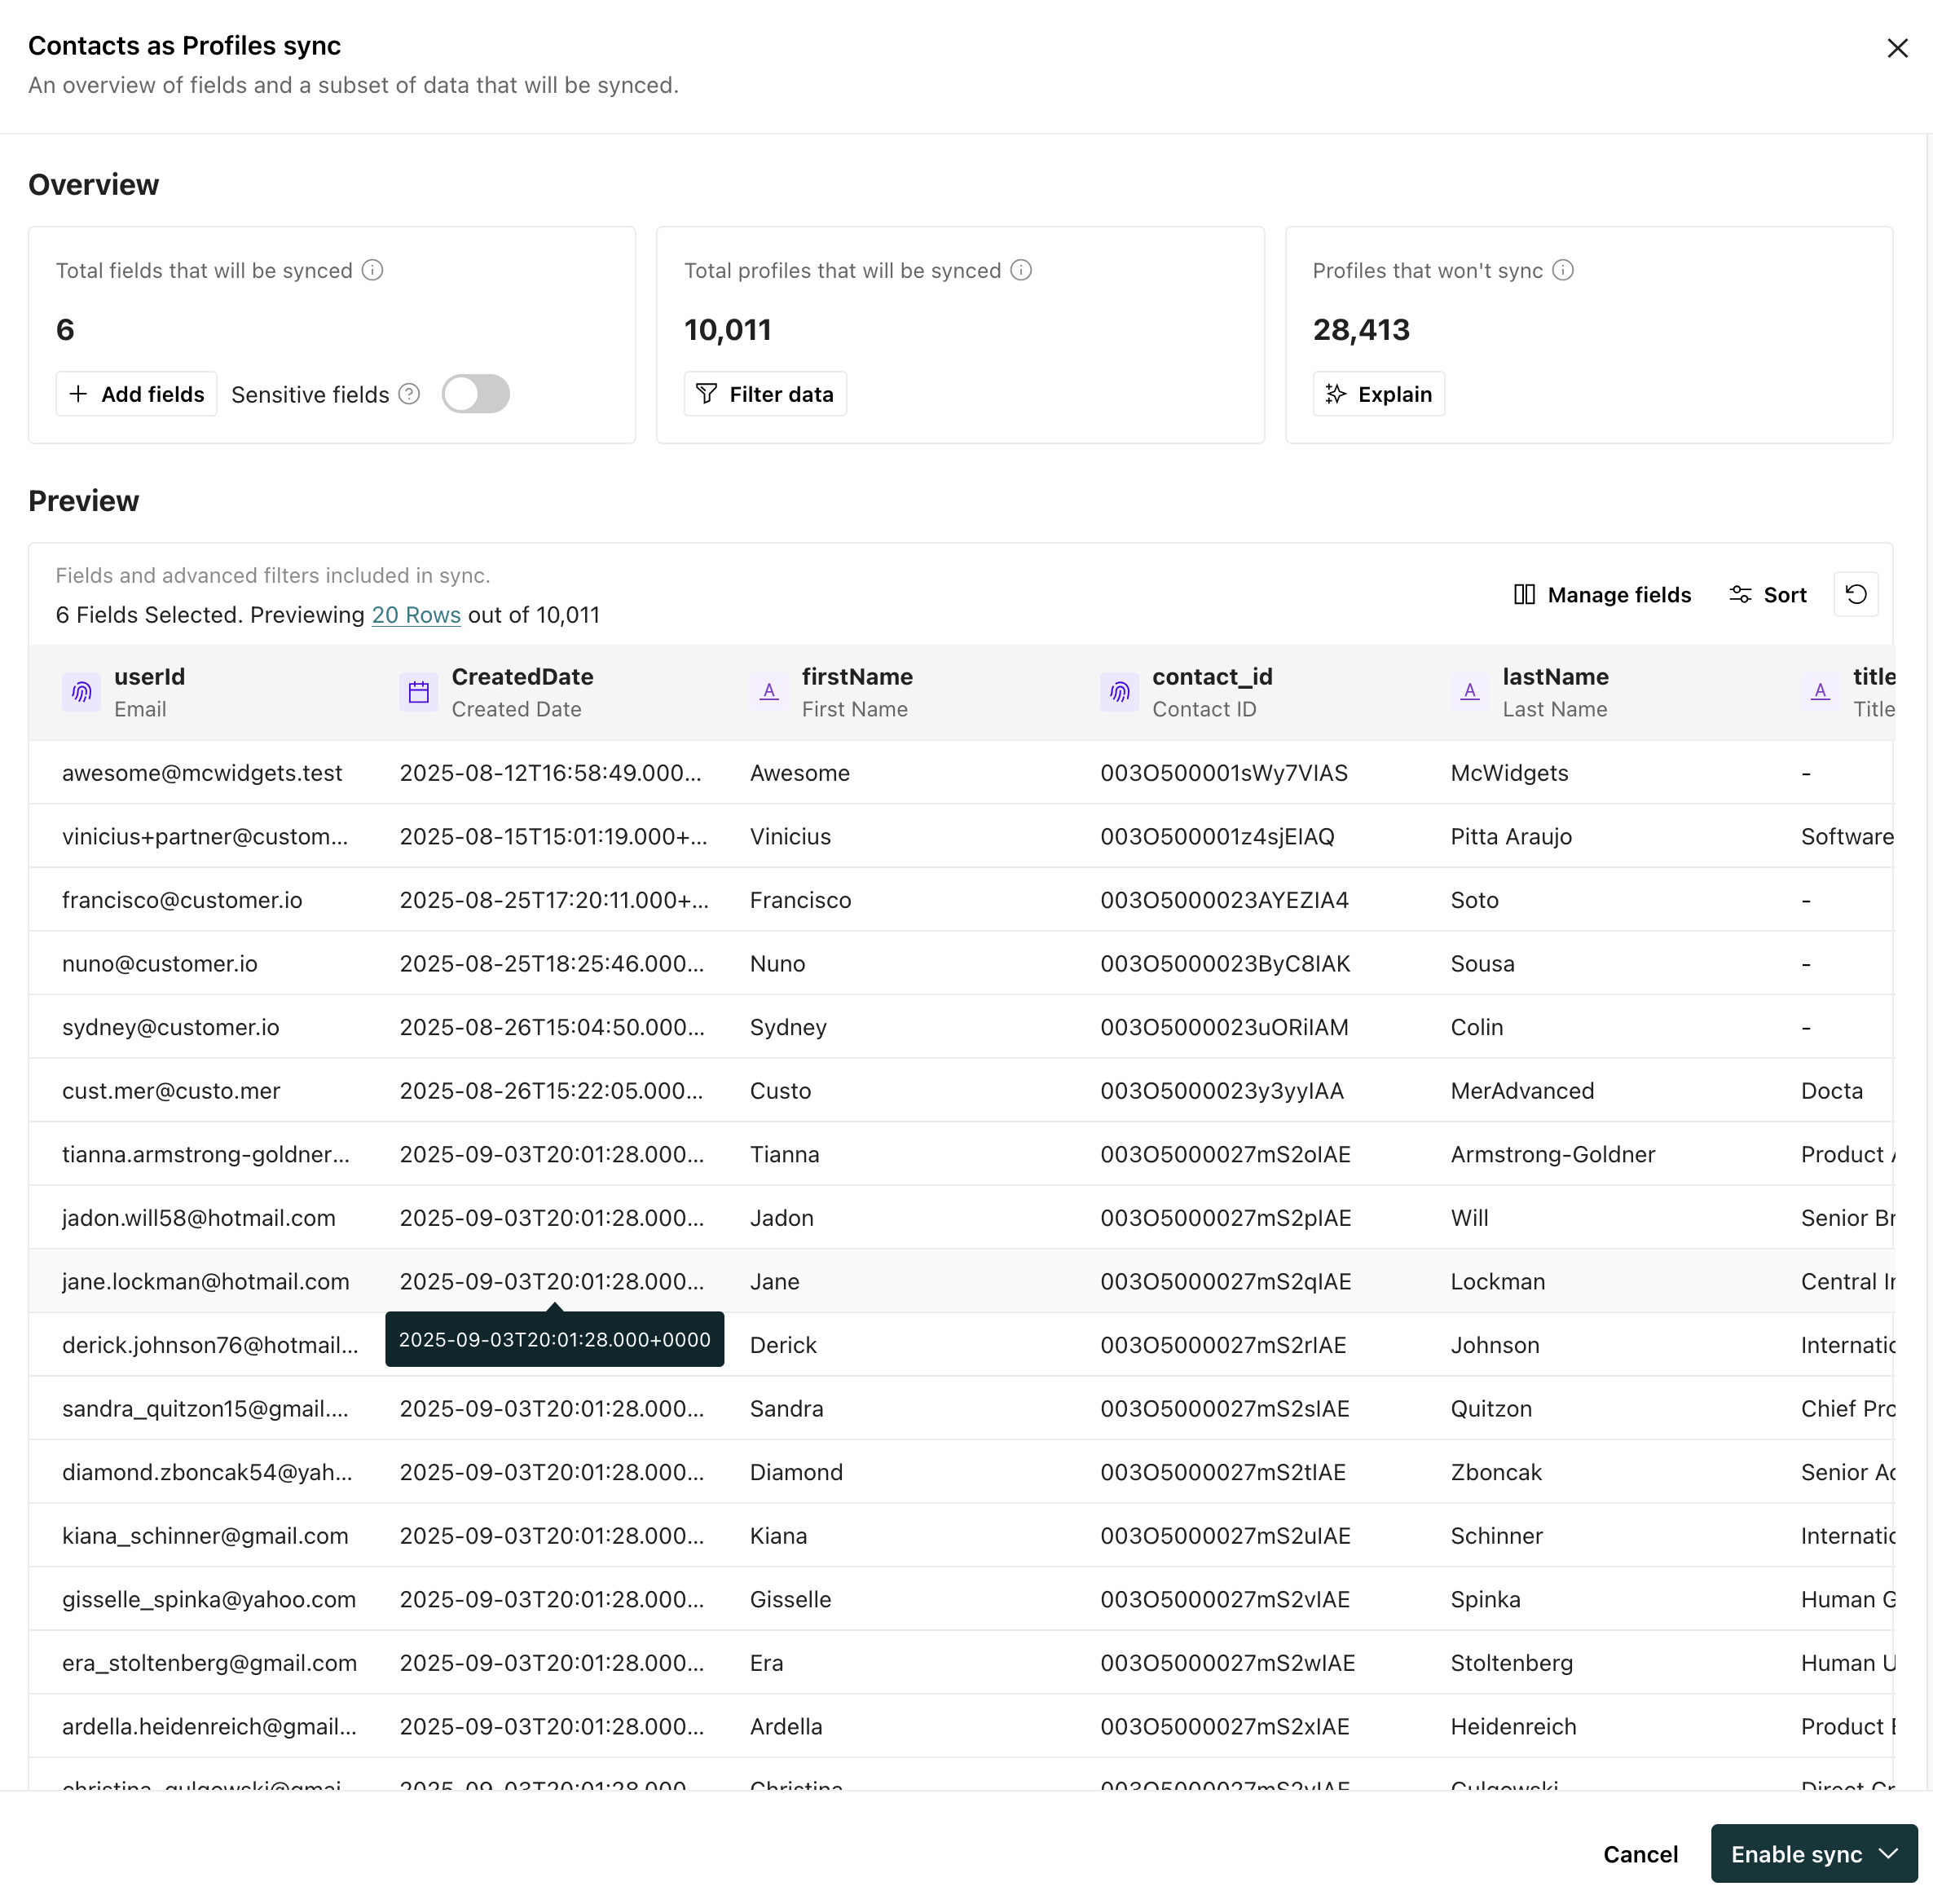
If you’re not comfortable writing your own query, you can use AI to generate a filter for you! Provide a plain-text description of the data you want to capture or exclude, and we’ll try to generate a filter for you.
If you write your own query, note that you don’t have to write the SELECT, FROM, or WHERE clauses. The filter acts as criteria for the WHERE clause of a Salesforce SOQL query, and the other sync settings cover the SELECT and FROM clauses. For example, if you only want to bring contacts into Customer.io if they have an email address, you could write a filter like this:
Email != nullDeleted records
Updating syncs
When you update a sync to add or remove fields, your updates take effect at the next sync interval. This means that your changes don’t affect data that you’ve already sent from Salesforce (or any syncs in progress).
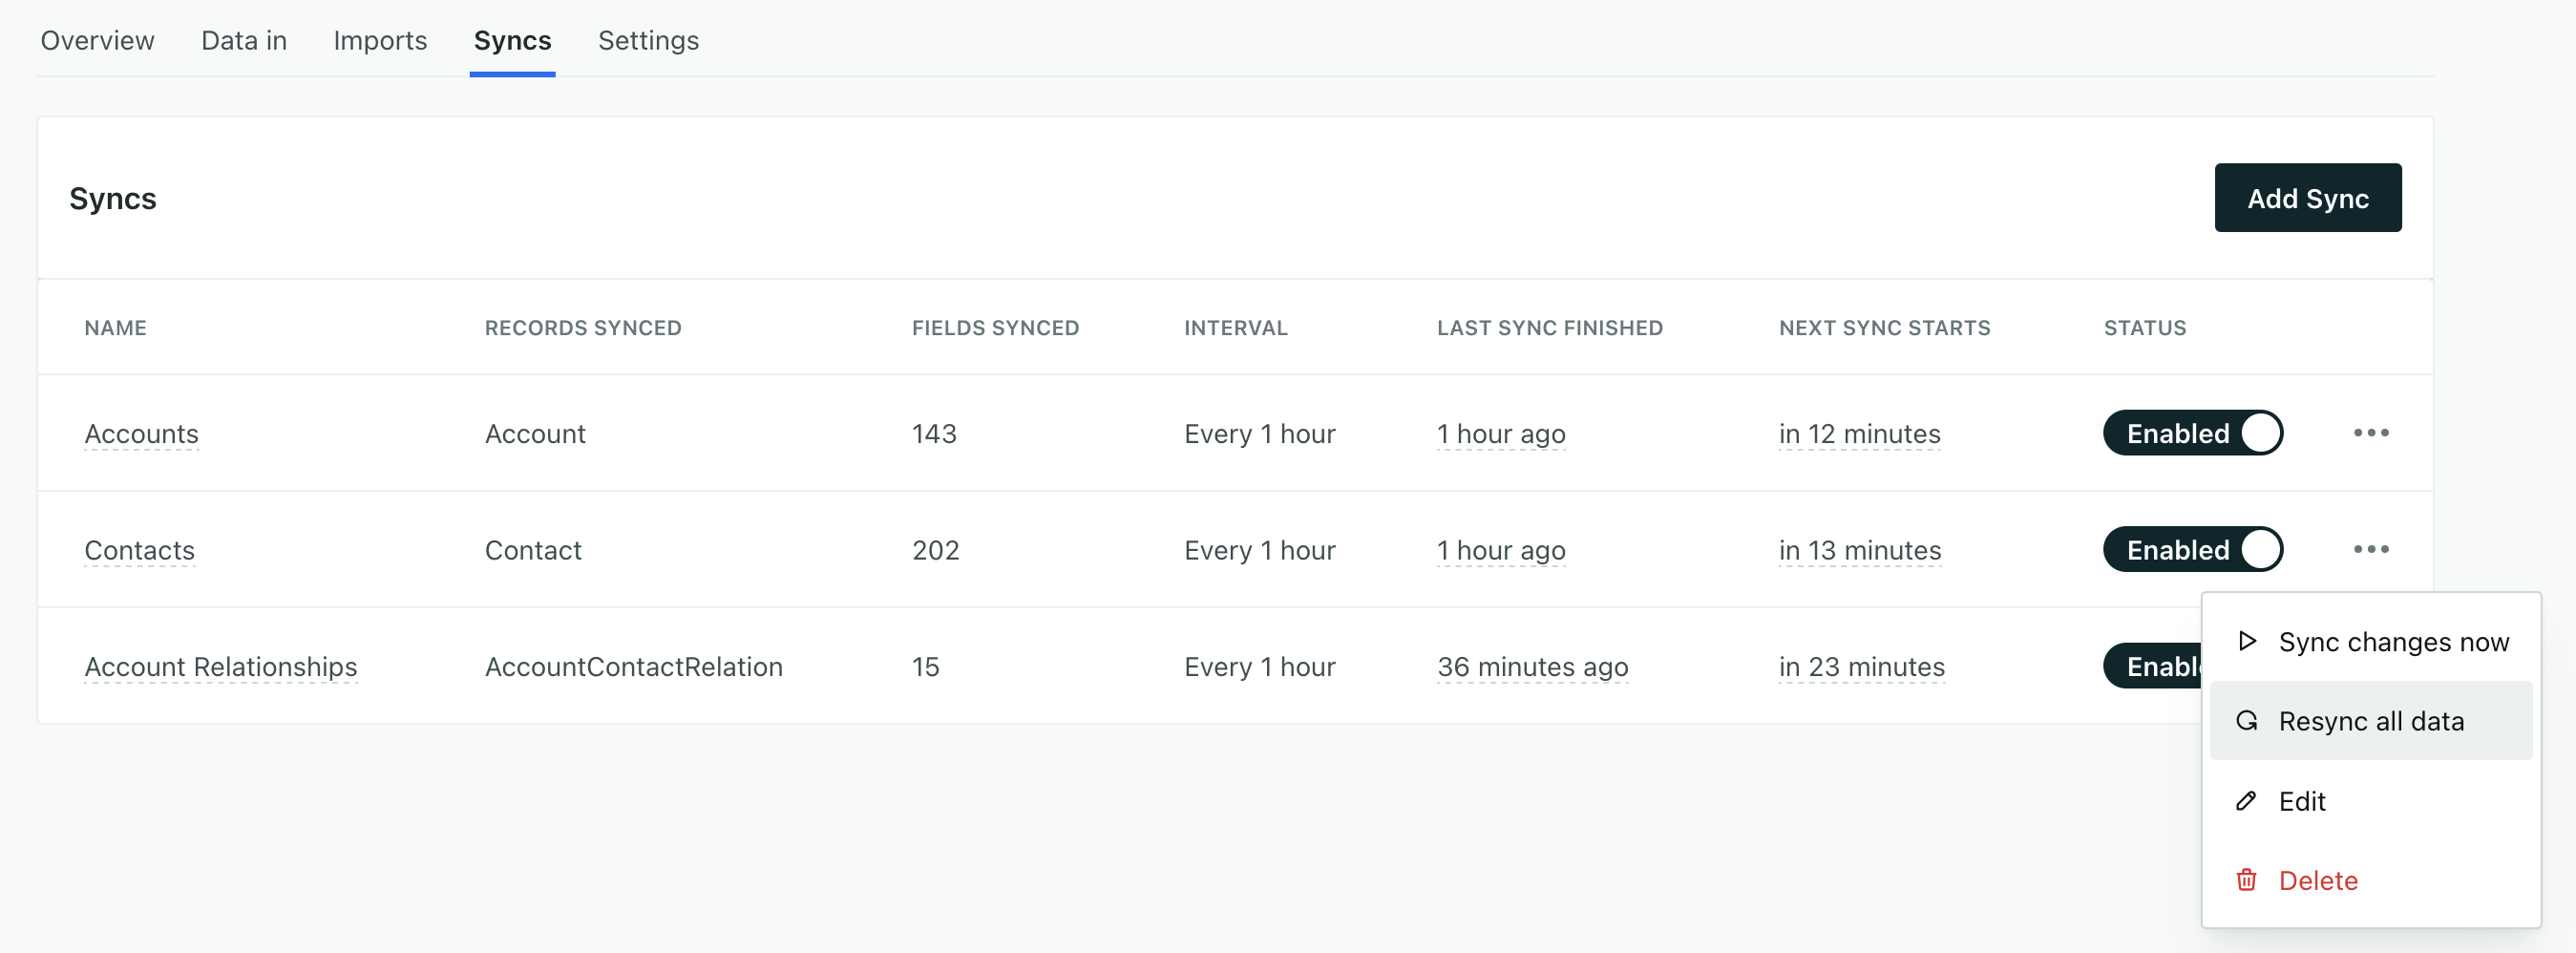
To update all data you’ve passed from Salesforce to Customer.io (and other places you send your Salesforce data to), you can Resync all data. This sends all of your corresponding Salesforce data through Customer.io again, updating all of your records with the changes you made to your sync.
On the Syncs tab, click next to the sync you updated and click Resync all data.
Manage access to Salesforce data with an “Integration User”
When you connect to Salesforce, you don’t need to use your own credentials. You can set up an Integration User in Salesforce with limited access to the data you want to send to Customer.io. This helps you secure and limit the data that you expose to Customer.io—both the types of data you can sync and the fields within each data type that Customer.io can access.
See Salesforce’s documentation for more about Integration Users.
Migrate to the External Client App
Salesforce made changes around how integrations connect to Salesforce. If you set up your Salesforce integration before June 17, 2026, you need to migrate Salesforce source or destination to the new “External Client App” setup before August 17, 2026 or your integration will stop working.
If you haven’t migrated yet, we’ll show a banner in your Salesforce connection. Migrating uses the same External Client App setup as a new connection, so you need to meet the same prerequisites. A Salesforce admin installs the Customer.io External Client App package, then a Customer.io admin upgrades authentication from the connection’s Settings tab or the upgrade banner. This may be easier if the person doing the migration is both a Salesforce admin and a Customer.io admin.
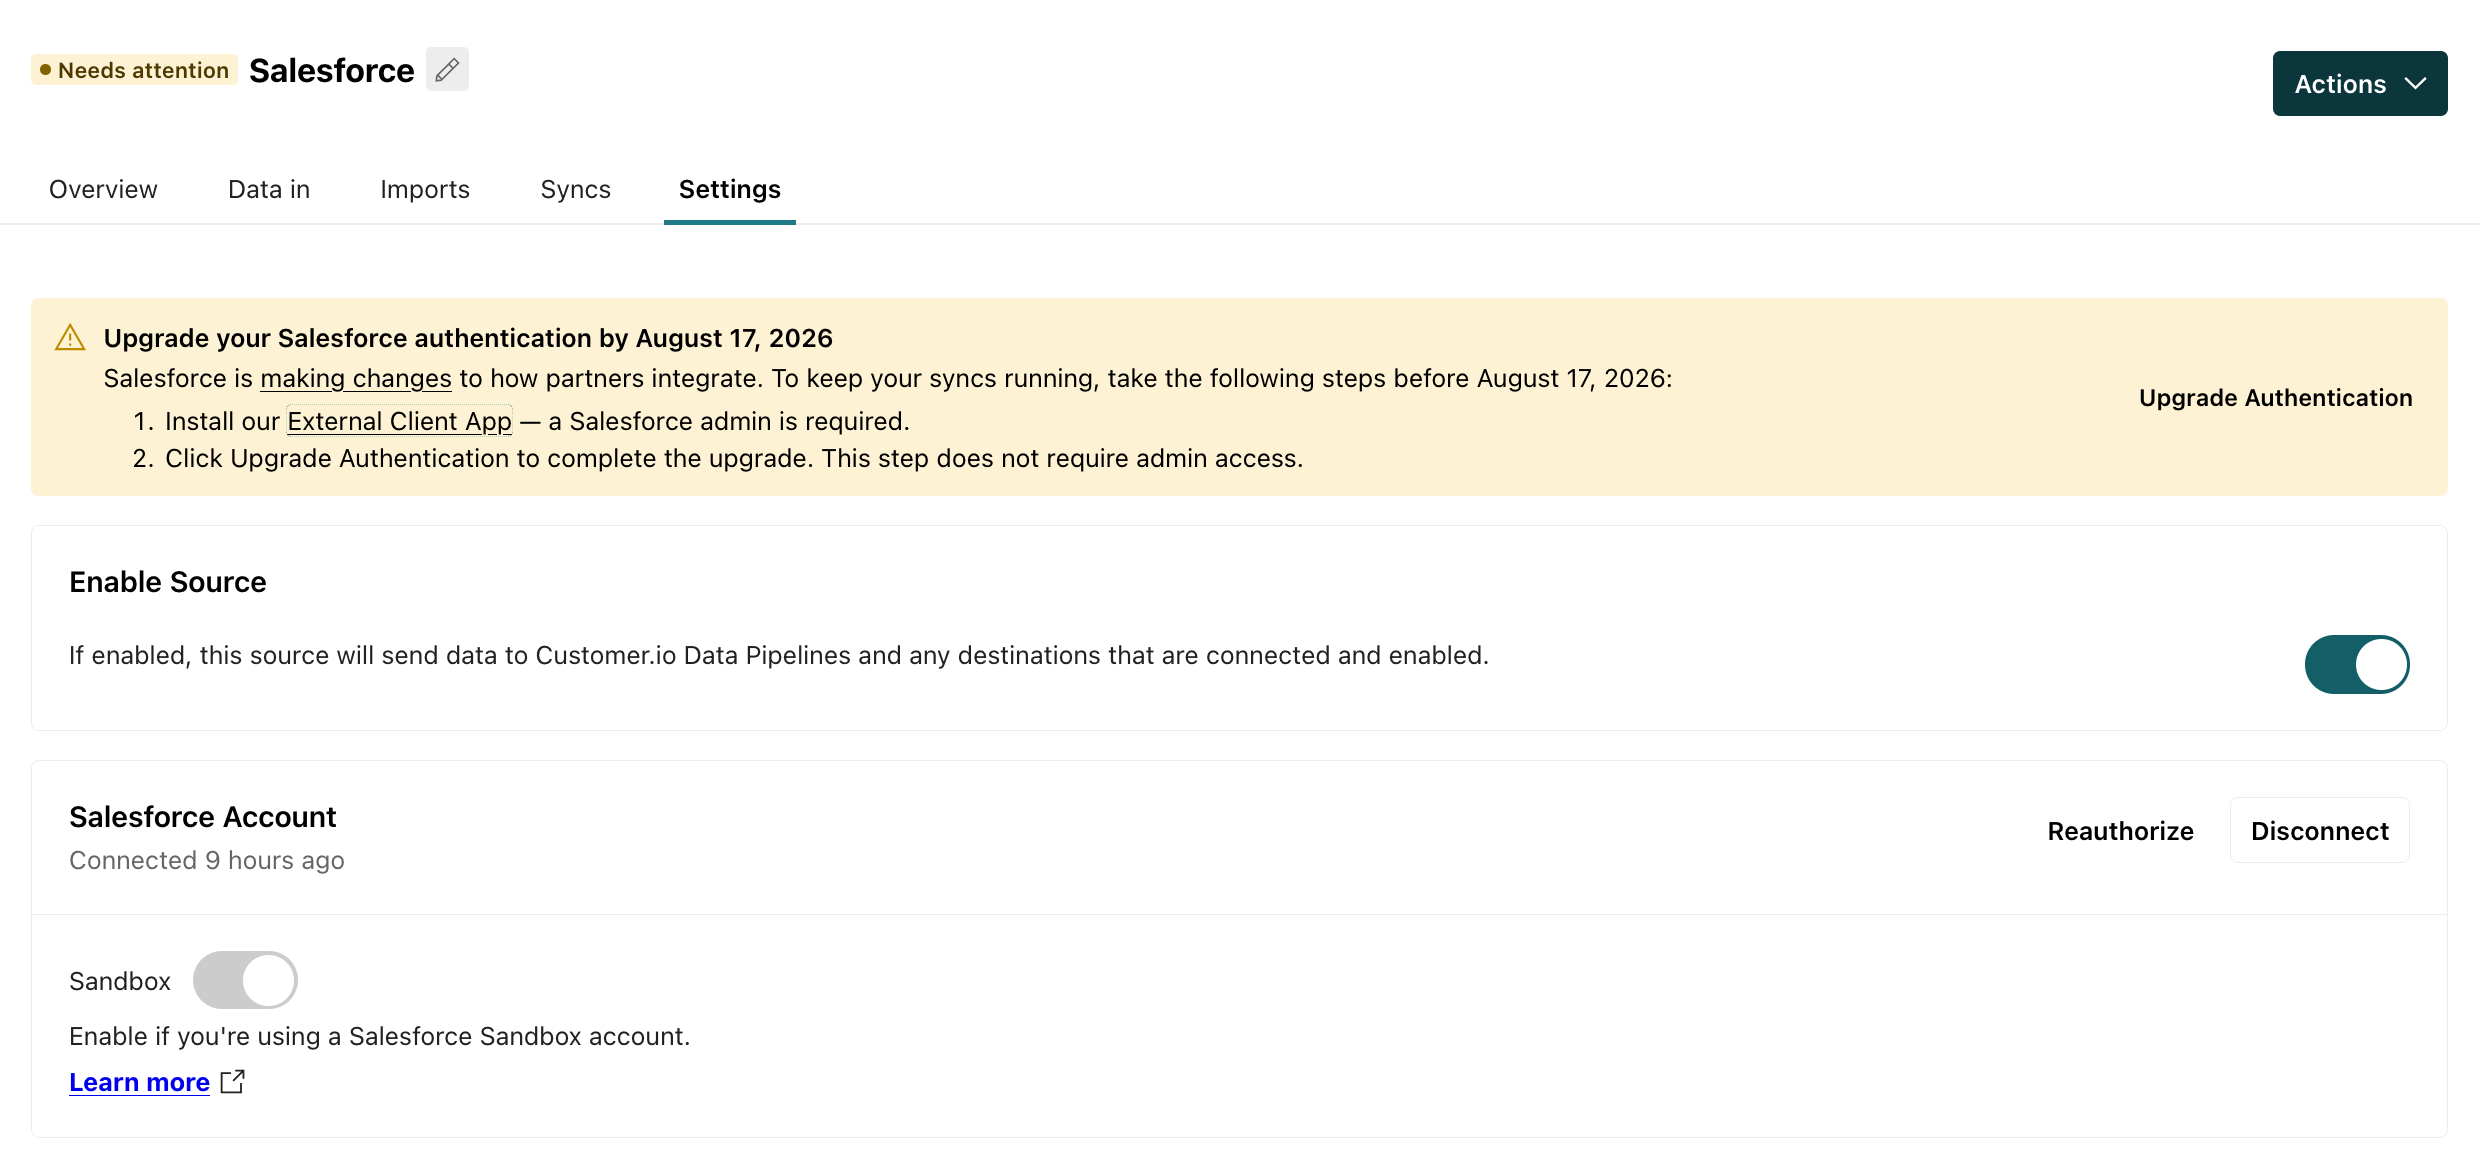
- Open your Salesforce integration in Customer.io.
- In the banner, click the External Client App link.
- Follow the instructions to install the package and give the Salesforce users or profiles that should use Customer.io access to the app.
- Determine who should get access to the app.
- Acknowledge the warning about the app not being a part of the AppExchange Partner Program and click Upgrade.
- Return to Customer.io and click Upgrade authentication.
- Log in to Salesforce with the Salesforce user you want Customer.io to use for this connection. We recommend using an integration user.
- When Salesforce prompts you to grant access to the app, click Allow.