

Snowflake reverse ETL
The Snowflake reverse ETL integration helps you bring data from your Snowflake warehouse into Customer.io. You write a query, and Customer.io runs it on the schedule you set, as often as every minute. Each row your query returns becomes an API call, like identify or track. See About reverse ETL for how syncs work.
Best Practices
Before you add a Reverse ETL source, you should take some measures to ensure the security of your customers’ data and limit performance impacts to your database and Customer.io workspace.
-
Create a new database user/service account. Implement a database user with minimal privileges specifically for Customer.io import/sync operations. This account only requires read permissions with access limited to the tables you want to sync from.
-
Avoid using your main database instance. Consider creating a read-only database instance with replication in place, lightening the load and preventing data loss on your main instance.
-
Sync only the data that you’ll use in Customer.io. Limiting your query can improve performance, and minimizes the potential to expose sensitive data. Select only the columns you care about, and make sure you use the
{{last_sync_time}}to limit your query to data that changed since the previous sync. -
Limit your sync frequency so you don’t sync more than necessary and consume unnecessary resources. If the previous reverse ETL operation is still in progress when the next interval occurs, we’ll skip the operation and catch up your data on the next interval. You should monitor your first few reverse ETL intervals to ensure that your sync doesn’t impact your system’s security and performance—frequently skipped operations may indicate that you’re syncing too often.
Granting us access to your database
As a part of setup, you'll need to provide a private key in PKCS#8 PEM format to authenticate with Snowflake.
If you use a firewall or an allowlist, you must allow the following IP addresses so we can connect to your database. Make sure you use the correct IP addresses for your account region.
| US Region | EU Region |
|---|---|
| 34.29.50.4 | 34.22.168.136 |
| 35.222.130.209 | 34.78.194.61 |
| 34.122.196.49 | 104.155.37.221 |
Set up a Snowflake connector
When you set up a Snowflake integration, you’ll need to set up a Snowflake connector that Customer.io will use to connect to Snowflake. We recommend that you use the ACCOUNTADMIN role to execute all the commands below.
As a part of this process, you’ll also generate the private key that Customer.io will use to authenticate with Snowflake.
-
Log in to your Snowflake account and go to Worksheets.
-
Run this code to create a virtual warehouse. We need to execute queries on your Snowflake account, which requires a Virtual Warehouse to handle the compute. You can also reuse an existing warehouse. You may need tune the warehouse size later, depending on your query size or complexity. Please see the Snowflake documentation for more details.
SQL-- not required if reusing another warehouse CREATE WAREHOUSE customerio_reverse_etl WITH WAREHOUSE_SIZE = 'XSMALL' WAREHOUSE_TYPE = 'STANDARD' AUTO_SUSPEND = 600 -- 10 minutes AUTO_RESUME = TRUE; -
Create a specific role for Customer.io. Snowflake access is specified through roles. You’ll assign a role to the user you’ll create later. The following is an example of how you might set up the role:
SQL-- create role CREATE ROLE customerio_reverse_etl; -- warehouse access -- change the name if reusing another warehouse GRANT USAGE ON WAREHOUSE customerio_reverse_etl TO ROLE customerio_reverse_etl; -- table access -- change the names to match the schema, database and table you want to use GRANT USAGE ON DATABASE my_database TO ROLE customerio_reverse_etl; GRANT USAGE ON SCHEMA my_database.my_schema TO ROLE customerio_reverse_etl; GRANT SELECT ON TABLE my_database.my_schema.my_table TO ROLE customerio_reverse_etl; -
Run this code to create the username and password combination that Customer.io will use to execute queries. Make sure to enter your password where it says
my_strong_password.SQL-- create user CREATE USER customerio_reverse_etl_user MUST_CHANGE_PASSWORD = FALSE DEFAULT_ROLE = customerio_reverse_etl PASSWORD = 'my_strong_password'; -- Do not use this password -- role access GRANT ROLE customerio_reverse_etl TO USER customerio_reverse_etl_user; -
Create a key pair for the user you just created. This is how you’ll authenticate with Snowflake. You’ll either need to generate an unencrypted key or decrypt an encrypted key.
BASH# Generate an unencrypted key openssl genrsa 2048 | openssl pkcs8 -topk8 -inform PEM -out rsa_key.p8 -nocrypt ### Private key requirements We support unencrypted private keys in the [PKCS#8 PEM format](https://en.wikipedia.org/wiki/PKCS_8). If you already have a private key and you're not sure what format it's in, check the last line of the key. The format we support ends with: `-----END PRIVATE KEY-----` * If your key ends with `-----END RSA PRIVATE KEY-----`, you need to [convert it to the format we support](#converting-from-pkcs1-format). * If your key ends with `-----END ENCRYPTED PRIVATE KEY-----`, you need to [decrypt it](#if-your-key-is-encrypted). #### If your key is encrypted If your private key starts with `-----BEGIN ENCRYPTED PRIVATE KEY-----`, you'll need to decrypt it before you can use it in Customer.io: ```bash openssl pkcs8 -in encrypted_key.pem -nocrypt -out decrypted_key.pem
Converting from PKCS#1 format
If you have a key in the older PKCS#1 format (ending with -----END RSA PRIVATE KEY-----), you can convert it to the format we support by running:
# Convert from PKCS#1 to PKCS#8 (unencrypted)
openssl pkcs8 -topk8 -inform PEM -outform PEM -in existing_key.pem -out new_key.p8 -nocrypt
Set up your Snowflake integration
Before you set up your integration, make sure that you’ve set up your Snowflake connector and generated the private key that we’ll use to authenticate with Snowflake first. You’ll use the user, role, and private key you generate in that process when you set up your integration in Customer.io.
-
Go to Integrations. In the Directory tab, pick the Snowflake Data in integration.
-
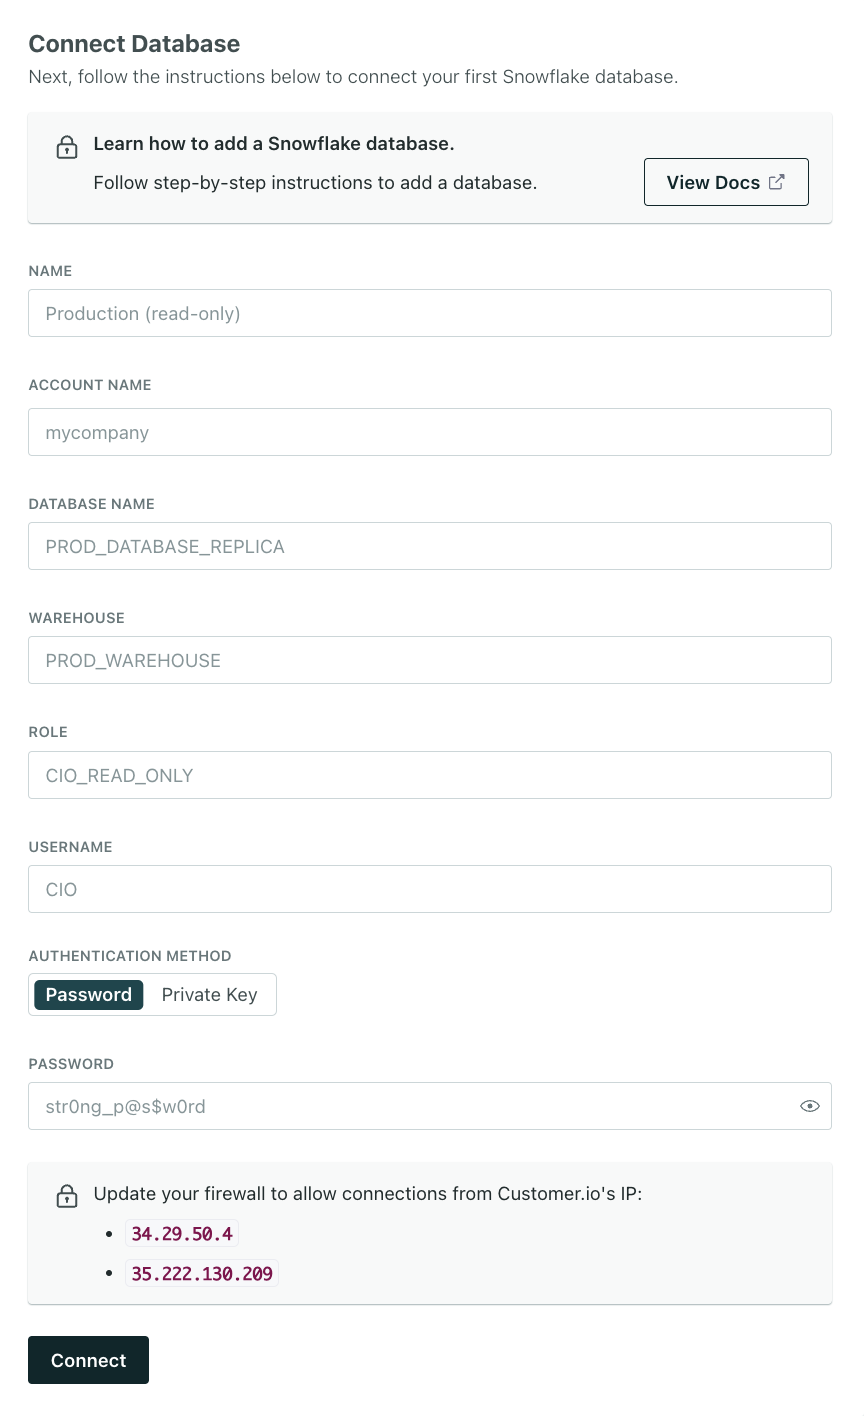
Provide your database information, including credentials to connect to your database, and click Connect.
- The Name is a friendly name you’ll use to recognize your database whenever you reference it in Customer.io.
- Enter the name and role of the user that will be used to authenticate with Snowflake. This must be the person associated with the private key you’ll provide.
- Copy your private key into the Private Key field.
-
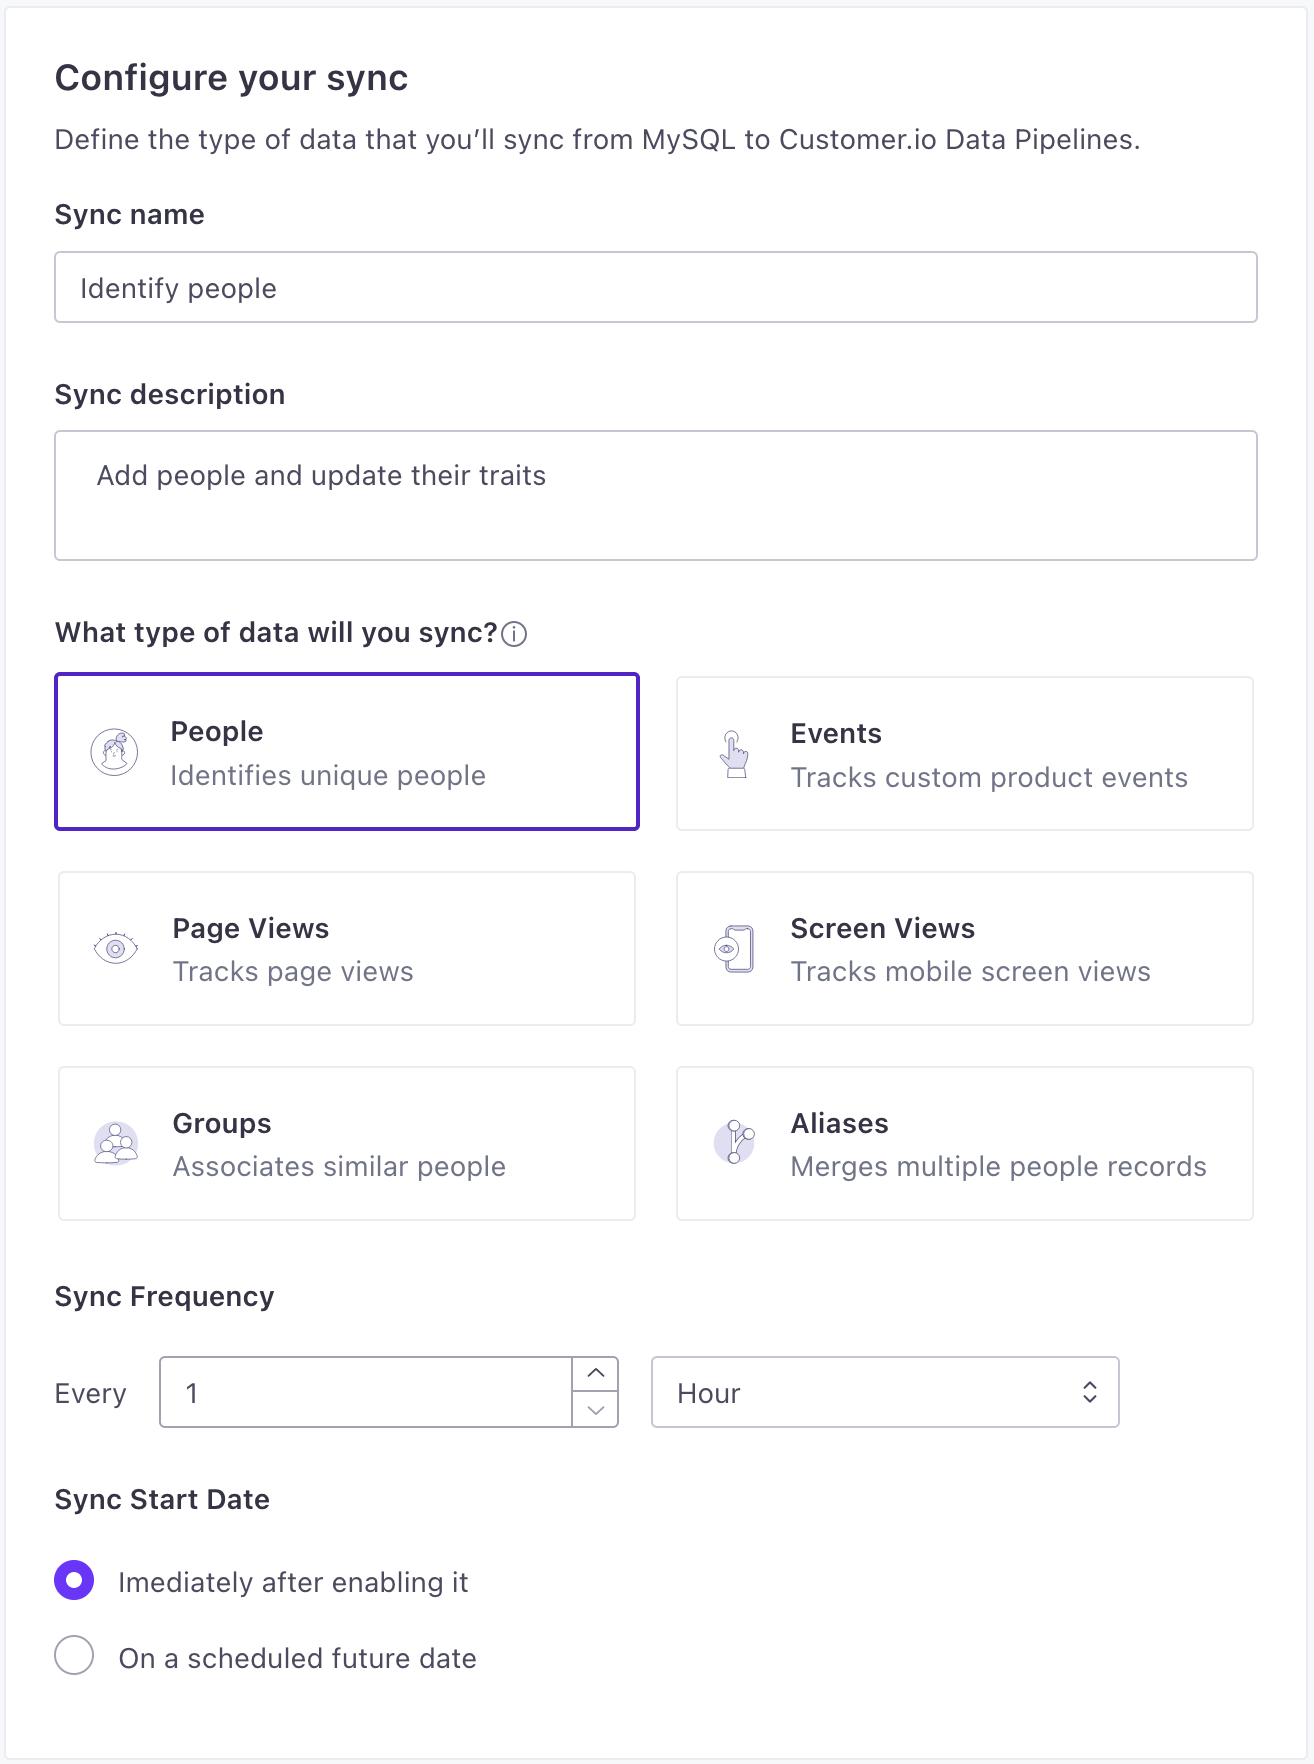
Set up a Sync. A sync is the type of data (
identify,track, etc) you want to import from your database and click Next: Define Query. You can set up syncs for each type of data you want to import.- Provide a Name and Description for the sync. This helps you understand the sync at a glance when you look at your integration’s Overview later.
- Select the type of data you want to import.
- Set the Sync Frequency, indicating how often you want to query your database for new data. You should set the frequency such that sync operations don’t overlap. Learn more about sync frequency.
- Select when you want to start the sync: whether you want to begin importing data immediately, or schedule the sync to start at a later date.
-
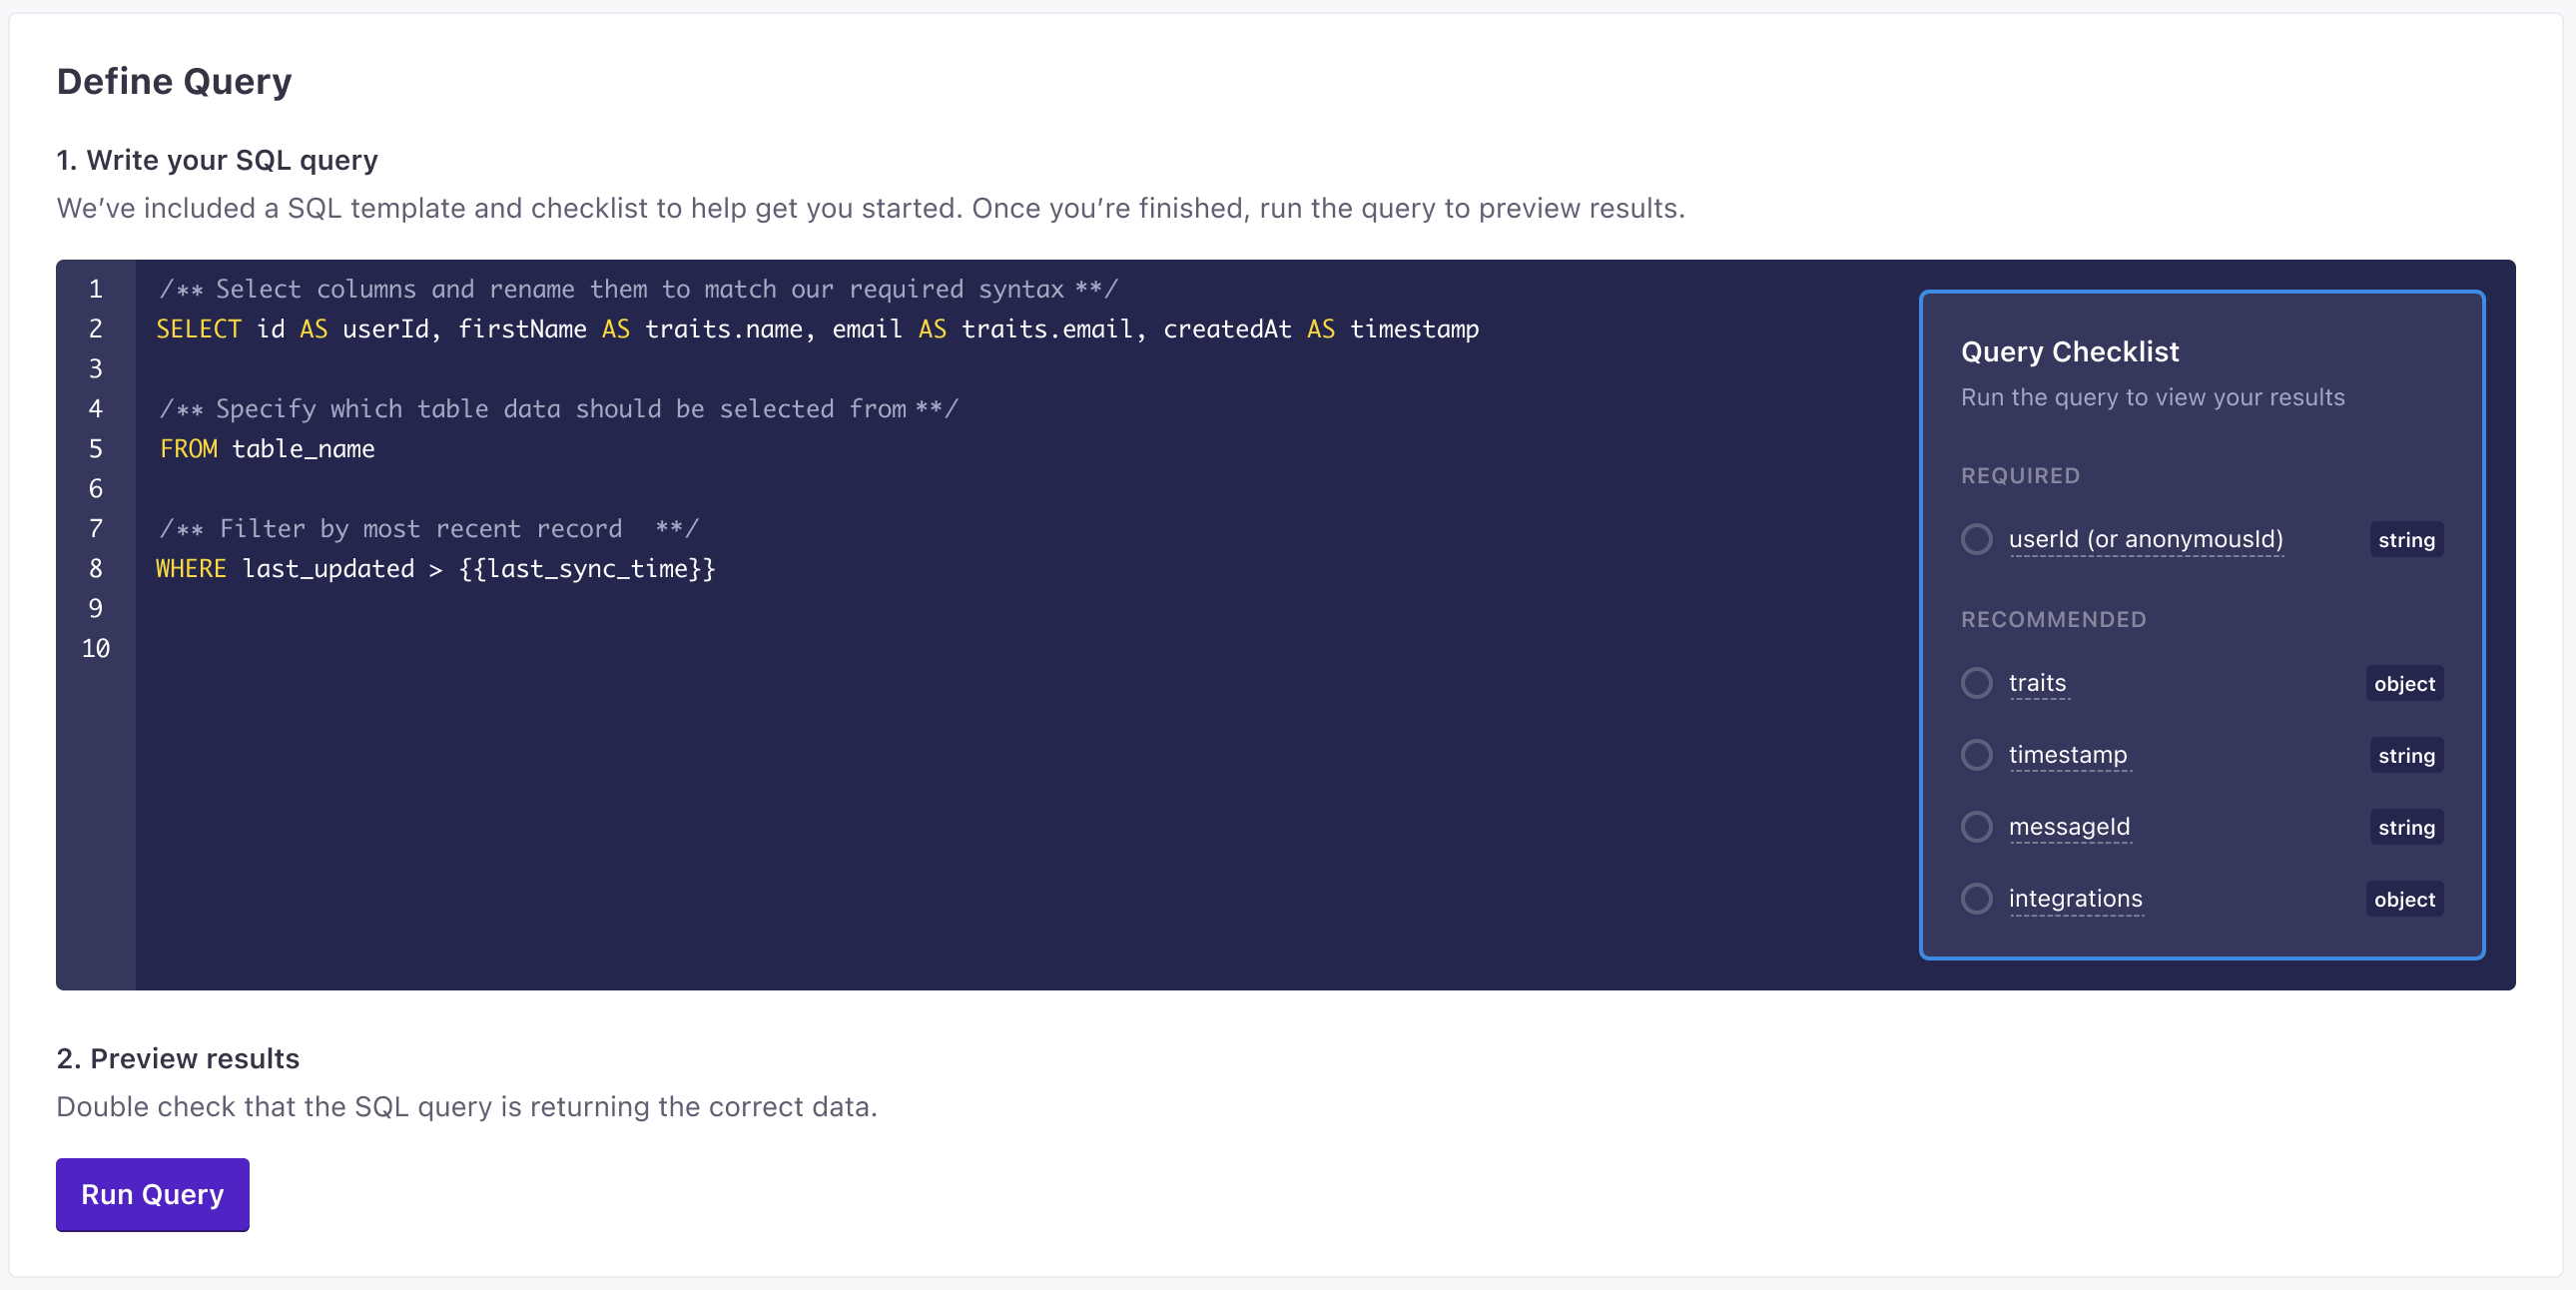
Enter the query that selects the data you want to import. See Queries below for more information about the information you’ll want to select for your sync. Click Run Query to preview results and make sure that your query selects the right information.
-
Click Enable to enable your sync.
Now you can set up additional syncs and connect your integration to one or more destinations.
Adding syncs
After you set up your incoming integration, you can add additional syncs to import different types of data from your database. For example, you might want to import identify data for your users, and track data for their actions. Subsequent syncs can rely on your existing database, or you can add another database within your integration.
- In your integration, go to the Syncs tab and click Add Sync.
- Select your database or add a new one and click Next: Create Sync.
- Set up a sync
A sync is the type of source data (
and click Next: Define Query. You can set up syncs for each type of data you want to import.identify,track, etc) you want to import from your database. A sync is essentially the type of source call you want to make.- Provide a Name and Description for the sync. This helps you understand the sync at a glance when you look at your integration’s Overview later.
- Select the type of data you want to import.
- Set the Sync Frequency, indicating how often you want to query your database for new data. You should set the frequency such that sync operations don’t overlap. Learn more about sync frequency.
- Select when you want to start the sync: whether you want to begin importing data immediately, or schedule the sync to start at a later date.
- Enter the query that selects the data you want to import. See Queries below for more information about the information you’ll want to select for your sync. Click Run Query to preview results and make sure that your query selects the right information.
- Click Enable to enable your sync.
Sync Frequency
You can sync data as often as every minute. However, we recommend that you set your sync frequency such that sync operations don’t overlap. If you schedule syncs such that a sync operation is scheduled to start while the previous operation is still we’ll skip the next sync operation.
Semantic events: Deleting people, groups, and more
You may notice that this integration doesn’t have sync types to delete people, groups, or other objects. To do these kinds of operations, you’ll use what we call semantic events. These are events with specific names that indicate a delete operation. When your Track sync picks up events with an event name we recognize, we’ll perform the associated action—like deleting a person or group.
For example, if you send an event with the name User Deleted, we’ll delete the person from your workspace. See Customer.io Semantic Events for more information.
The semantic events we support are:
| Event Name | Action |
|---|---|
Device Created or Updated | Add or update a mobile device. |
Device Deleted | Delete a mobile device. |
User Deleted | Delete a person. |
Object Deleted | Delete a custom object. |
Relationship Deleted | Delete a relationship. |
User Suppressed | Suppress a person. |
User Unsuppressed | Unsuppress a person. |
Report Delivery Event | Report in-app message events (like delivery, open, click) outside of our JavaScript integration. |
Queries for each sync type
When you create a database sync, you provide a query selecting the people or objects you want to import, and respective properties. You’ll build your queries using the same principles from our Pipelines API.
Each row returned from your query represents an individual operation (like an identify call, a track event, etc). Columns represent the traits or properties that you want to apply to the person, group, or event that your sync imports.
While we support queries that return millions of rows and hundreds of columns, syncing large amounts of data more then once a day can impact your account’s performance—including delaying automations or messages. When you set up your query, consider how much data you want to send and how often; and make sure you limit your results using the last_sync_time.
Convert your column names from all caps
Snowflake column names are in all caps, but Customer.io and other places you might send Snowflake data to don’t expect property names to be formatted that way. When you write your query, you should convert your column names to lower, snake-cased formats (or a format that fits your use case). For example, if you have a column named EMAIL, you must convert it to email to use it as an identifier in Customer.io Journeys.
Queries aren’t case-sensitive, but the results are. For example, Snowflake returns the same results whether you use EMAIL, email, or Email. But the column name—and the trait we record in Customer.io—is called EMAIL unless you change it with AS.
SELECT ID AS "id", EMAIL AS "email", PRIMARY_PHONE AS "phone"
FROM people
WHERE LAST_UPDATED >= {{last_sync_time}}
Troubleshooting uppercase column names
If your Snowflake database returns uppercase attributes despite using an AS clause, you may need to adjust the QUOTED_IDENTIFIERS_IGNORE_CASE setting for your Snowflake user or role. This setting controls whether Snowflake treats quoted identifiers as case-sensitive.
Important: We recommend setting this at the role or user level rather than at the account level to prevent unintended consequences for other places that rely on your Snowflake data.
To apply this setting to the Customer.io user you created for this integration:
ALTER USER customerio_reverse_etl_user
  SET QUOTED_IDENTIFIERS_IGNORE_CASE = FALSE;
Or, to apply it to the Customer.io role:
ALTER ROLE customerio_reverse_etl
  SET QUOTED_IDENTIFIERS_IGNORE_CASE = FALSE;
Convert boolean values from binary to true/false strings
You may want to convert binary to T/F strings to make your data more readable to your teammates. This way, your teammates can set branch or action conditions as true/false rather than 0/1 for instance.
Most databases, including Snowflake, automatically store boolean values as binary (0 and 1) to reduce file size on disk. While your database software’s UI may display these as “True” or “False” for easier readability, the underlying data is stored in binary format. As Snowflake’s documentation mentions: “BINARY input/output can be confusing because what you see is not necessarily what you get.”
You can convert binary boolean values to string representations in your query using Snowflake’s IFF function. The IFF function works similarly to SQL’s IF function but with an extra “F”:
SELECT
  ID AS "userId",
  IFF(IS_ACTIVE, 'true', 'false') AS "is_active"
FROM
  users
WHERE
  LAST_UPDATED >= {{last_sync_time}}
This query converts IS_ACTIVE to the string “true” when the value is 1 and “false” when the value is 0.
last_sync_time and limiting your results
We strongly recommend that you index a column in your database representing the date-time each row was last-updated. When you write your query, you should add a WHERE clause comparing your “last updated” column to the {{last_sync_time}}.
The last sync time is a Unix timestamp representing the date-time when the previous successful sync started. Comparing a “last-updated” column to this timestamp helps you limit your sync operations to the columns that changed since the previous sync.This helps you avoid syncing the same records repeatedly, which can make your syncs take longer and impact your workspace’s performance.
If you use ISO date-times, you can convert them to Unix timestamps in your query.
Identify
The A key-value pair that you associate with a person or an object—like a person's name, the date they were created in your workspace, or a company's billing date etc. Use attributes to target people and personalize messages.identify method tells us who someone is and lets you assign unique traitstimestamp to the last_sync_time to ensure that you only import new data.
You can identify people by anonymousId and/or userId.
anonymousIdonly: This assigns traits to a person before you know who they are.userIdonly: Identifies a user and sets traits.- both
userIdandanonymousId: Associates the data from theanonymousIdwith the person you identify byuserId.
SELECT ID AS userId, EMAIL AS email, MSISDN AS phone, FNAME AS first_name, LNAME AS last_name
FROM users
WHERE TIMESTAMP >= {{last_sync_time}}- userIdstringrequiredThe unique identifier for a person. This value should be unique across systems, so you recognize the same person in your sources _and_ destinations.
- anonymousIdstringA unique substitute for a User ID in cases when you don’t have an absolutely unique identifier. Our libraries generate this value automatically to help you track people before they sign up, log in, provide their email, etc.
- A dictionary of context about a source call/event, like the user’s IP address or locale. Context is automatically collected by our source libraries.
- Contains a list of booleans indicating the integrations that are enabled (true) or disabled (false). By default, all integrations are enabled (returning an empty object). Set
"All": falseto reverse this behavior. - messageIdstringA unique identifier for a Data Pipelines call, ensuring that each individual event is unique. This is set by Customer.io
- originalTimestampstring(date-time)In general, you can use
timestamprather than this field if you want to back-date events. This is the timestamp on the client device you invoke a call or the timestamp value you manually passed in a server-side library call. - sentAtstring(date-time)The ISO-8601 timestamp when a library sends an event to Data Pipelines.
- timestampstring(date-time)The ISO-8601 timestamp when the event originally took place. This is mostly useful when you backfill past events. If you're not backfilling data, you can leave this field empty and we'll use the current time or server time.
- Additional properties that you know about a person. We've listed some common/reserved traits below, but you can add any traits that you might use in another system.
Identify people by email or ID
If you identify people by email and a unique ID, you can use a CASE statement or the COALESCE function to set the userId to prioritize the customer ID when available, falling back to email for people who don’t have a unique ID yet. This kind of setup is common when you support both leads (identified by email) and customers (identified by a unique ID after they make a purchase, or otherwise convert).
Note that you need to use AS with quotes to ensure the column name is lowercase.
COALESCE
The COALESCE function returns the first non-null value from the list of arguments:
SELECT
  COALESCE(CAST(USER_ID AS VARCHAR), EMAIL) AS "userId",
  EMAIL AS "email",
  FIRST_NAME AS "first_name",
  LAST_NAME AS "last_name"
FROM users
WHERE LAST_UPDATED >= {{last_sync_time}}
CASE
The CASE statement checks if USER_ID exists. If it does, it converts the ID to a string; otherwise, it uses the email address:
SELECT
  CASE
    WHEN USER_ID IS NOT NULL THEN CAST(USER_ID AS VARCHAR)
    ELSE EMAIL
  END AS "userId",
  EMAIL AS "email",
  FIRST_NAME AS "first_name",
  LAST_NAME AS "last_name"
FROM users
WHERE LAST_UPDATED >= {{last_sync_time}}
Track
The track method records things people do. Every track call represents an event.
You should track your audience’s activities with events both as performance indicators and so you can respond to your audience’s activities with automations An automated process people enter when they meet your criteria. An automation has a trigger (who enters, and when), a workflow of messages and actions, and exit criteria (when they leave). A person's path through the workflow is their journey.
Track calls require an event name describing what a person did. They must also include an anonymousId or a userId. Calls that you make with an anonymousId are associated with a userId when you identify someone by their userId.
In most cases, your query should compare a timestamp to the last_sync_time to ensure that you only import new events.
SELECT id AS USERID As userId, EVENT_NAME AS event, PRODUCTS AS products, TOTAL_PRICE AS value
FROM events
WHERE TIMESTAMP > {{last_sync_time}}- eventstringrequiredThe name of the event
- userIdstringrequiredThe unique identifier for a person. This value should be unique across systems, so you recognize the same person in your sources _and_ destinations.
- A dictionary of context about a source call/event, like the user’s IP address or locale. Context is automatically collected by our source libraries.A dictionary of context about a source call/event, like the user’s IP address or locale. Context is automatically collected by our source libraries.
- activebooleanWhether a user is active.
This is usually used when you send an .identify() call to update the traits independently of when you've “last seen” a user.
- Contains information about the campaign that resulted in the API call, gathered from, or mapping to, UTM parameters (e.g.
utm_source). - channelstringThe channel the event originated from.Accepted values:
browser,server,mobile - ipstringThe user's IP address. This isn't captured by our libraries, but by our servers when we receive client-side events (like from our JavaScript source).
- localestringThe locale string for the current user, e.g.
en-US. - Contains information about the current page in the browser. This is automatically collected by our JavaScript source.
- userAgentstringThe user agent of the device making the request
- Contains a list of booleans indicating the integrations that are enabled (true) or disabled (false). By default, all integrations are enabled (returning an empty object). Set
"All": falseto reverse this behavior.- Enabled/Disabled integrations *boolean
- messageIdstringA unique identifier for a Data Pipelines call, ensuring that each individual event is unique. This is set by Customer.io
- originalTimestampstring(date-time)In general, you can use
timestamprather than this field if you want to back-date events. This is the timestamp on the client device you invoke a call or the timestamp value you manually passed in a server-side library call. - Additional properties for your event.
- Event Properties *any typeAdditional properties that you want to capture in the event. These can take any JSON shape.
- sentAtstring(date-time)The ISO-8601 timestamp when a library sends an event to Data Pipelines.
- timestampstring(date-time)The ISO-8601 timestamp when the event originally took place. This is mostly useful when you backfill past events. If you're not backfilling data, you can leave this field empty and we'll use the current time or server time.
Backfilling events
In your initial sync, the last_sync_time is 0, and we’ll capture all events that otherwise match your query. After that, we only capture events that occur after the last_sync_time—events that occurred since the previous sync. This prevents you from importing the same events multiple times, but also means that you can’t backfill event history.
If you need to backfill event history after your initial sync, you’ll need to set up a new sync to import the events you want to backfill. In general, you’ll:
- Create a new sync with a new query that captures the events you want to backfill.
- Run the sync to backfill events.
- Disable the backfilling sync so that you don’t capture events that your normal event query would otherwise import.
Group
The Group method associates a person with a group—like a company, organization, project, online class or any other collective noun you come up with for the same concept. In Customer.io Journeys, we call groups objects An object is a non-person entity that you can associate with one or more people—like a company, account, or online course.
Group calls require a groupId to represent the group. In almost every case, a group call should also include a userId to associate the person with the group. You can also include traits to provide additional information about the group (or the relationship between the person and the group). Find more details about the group method in our API specifications.
Your query should compare a timestamp to the last_sync_time to ensure that you only import new data.
SELECT COMPANYID AS groupId, OBJECT_TYPE_ID AS objectTypeId, COMPANYNAME as company_name, EMPLOYEES AS employees, PERSONID AS userId
FROM companies
WHERE LAST_UPDATED >= {{last_sync_time}}- groupIdstringrequiredID of the group
- A dictionary of context about a source call/event, like the user’s IP address or locale. Context is automatically collected by our source libraries.A dictionary of context about a source call/event, like the user’s IP address or locale. Context is automatically collected by our source libraries.
- activebooleanWhether a user is active.
This is usually used when you send an .identify() call to update the traits independently of when you've “last seen” a user.
- Contains information about the campaign that resulted in the API call, gathered from, or mapping to, UTM parameters (e.g.
utm_source). - channelstringThe channel the event originated from.Accepted values:
browser,server,mobile - ipstringThe user's IP address. This isn't captured by our libraries, but by our servers when we receive client-side events (like from our JavaScript source).
- localestringThe locale string for the current user, e.g.
en-US. - Contains information about the current page in the browser. This is automatically collected by our JavaScript source.
- userAgentstringThe user agent of the device making the request
- Contains a list of booleans indicating the integrations that are enabled (true) or disabled (false). By default, all integrations are enabled (returning an empty object). Set
"All": falseto reverse this behavior.- Enabled/Disabled integrations *boolean
- messageIdstringA unique identifier for a Data Pipelines call, ensuring that each individual event is unique. This is set by Customer.io
- originalTimestampstring(date-time)In general, you can use
timestamprather than this field if you want to back-date events. This is the timestamp on the client device you invoke a call or the timestamp value you manually passed in a server-side library call. - sentAtstring(date-time)The ISO-8601 timestamp when a library sends an event to Data Pipelines.
- timestampstring(date-time)The ISO-8601 timestamp when the event originally took place. This is mostly useful when you backfill past events. If you're not backfilling data, you can leave this field empty and we'll use the current time or server time.
- Additional information about the group.
- objectTypeIdstringIf you use Customer.io Journeys as a destination, this value is the type of group/object your group belongs to; object type IDs are stringified integers. If you don't include this value, we assume the object type ID is
1. See objects in Customer.io Journeys for more information. - relationshipAttributesobjectAttributes that you want to set for the relationship between the person and the group.
- Group Traits *any type
- userIdstringThe unique identifier for a person. This value should be unique across systems, so you recognize the same person in your sources _and_ destinations.
Relationship attributes
In Customer.io, you can assign attributes A key-value pair that you associate with a person or an object—like a person's name, the date they were created in your workspace, or a company's billing date etc. Use attributes to target people and personalize messages. An object is a non-person entity that you can associate with one or more people—like a company, account, or online course. The connection between an object and a person in your workspace. For instance, if you have Account objects, people could have relationships to an Account if they're admins.relationshipAttributes JSON object.
SELECT COMPANYID AS "groupId", OBJECTTYPEID AS "objectTypeId",
    COMPANYNAME AS "companyname", EMPLOYEES AS "employees",
    PERSONID AS "userId",
    OBJECT_CONSTRUCT(
        'is_manager', IS_MANAGER,
        'role', ROLE,
        'start_date', START_DATE
    ) AS "relationshipAttributes"
FROM companies
WHERE LAST_UPDATED >= {{last_sync_time}}
Page
The Page method records page views on your website, along with optional extra information about the page a person visited.
Your query should compare a timestamp to the last_sync_time to ensure that you only import new data.
SELECT ID AS userId, METATITLE AS name, URL AS url, TIME_ON_PAGE AS time_on_page
FROM pages
WHERE TIMESTAMP > {{last_sync_time}}- userIdstringrequiredThe unique identifier for a person. This value should be unique across systems, so you recognize the same person in your sources _and_ destinations.
- A dictionary of context about a source call/event, like the user’s IP address or locale. Context is automatically collected by our source libraries.
- activebooleanWhether a user is active.
This is usually used when you send an .identify() call to update the traits independently of when you've “last seen” a user.
- Contains information about the campaign that resulted in the API call, gathered from, or mapping to, UTM parameters (e.g.
utm_source). - channelstringThe channel the event originated from.Accepted values:
browser,server,mobile - ipstringThe user's IP address. This isn't captured by our libraries, but by our servers when we receive client-side events (like from our JavaScript source).
- localestringThe locale string for the current user, e.g.
en-US. - Contains information about the current page in the browser. This is automatically collected by our JavaScript source.
- userAgentstringThe user agent of the device making the request
- Contains a list of booleans indicating the integrations that are enabled (true) or disabled (false). By default, all integrations are enabled (returning an empty object). Set
"All": falseto reverse this behavior.- Enabled/Disabled integrations *boolean
- messageIdstringA unique identifier for a Data Pipelines call, ensuring that each individual event is unique. This is set by Customer.io
- namestringThe name of the page.
- originalTimestampstring(date-time)In general, you can use
timestamprather than this field if you want to back-date events. This is the timestamp on the client device you invoke a call or the timestamp value you manually passed in a server-side library call. - Additional
pageproperties. Analytics.js automatically collectsurl,title,referrer,path, andsearchproperties. But, if you use our other sources or you write your own integration, you should consider sending these properties yourself. Destination actions that takepageevents often rely on theurlandtitleproperties.- categorystringThe category of the page. This might be useful if you have a single page routes or have a flattened URL structure.
- pathstringThe path of the page. This defaults to
location.pathname, but can be overridden. - referrerstringThe referrer of the page, if applicable. This defaults to
document.referrer, but can be overridden. - searchstringThe search query in the URL, if present. This defaults to
location.search, but can be overridden. - titlestringThe title of the page. This defaults to
document.title, but can be overridden. - urlstringThe URL of the page. This defaults to a canonical url if available, and falls back to
document.location.href. - Page Properties *any type
- sentAtstring(date-time)The ISO-8601 timestamp when a library sends an event to Data Pipelines.
- timestampstring(date-time)The ISO-8601 timestamp when the event originally took place. This is mostly useful when you backfill past events. If you're not backfilling data, you can leave this field empty and we'll use the current time or server time.
Screen
The Screen method sends screen view events for mobile devices. These help you understand the screens that people use in your app.
Your query should compare a timestamp to the last_sync_time to ensure that you only import new data.
SELECT ID AS userId, SCREEN_NAME AS name, SESSION_STARTED AS session_started
FROM screens
WHERE TIMESTAMP > {{last_sync_time}}- userIdstringrequiredThe unique identifier for a person. This value should be unique across systems, so you recognize the same person in your sources _and_ destinations.
- A dictionary of context about a source call/event, like the user’s IP address or locale. Context is automatically collected by our source libraries.
- activebooleanWhether a user is active.
This is usually used when you send an .identify() call to update the traits independently of when you've “last seen” a user.
- Contains information about the mobile app the event originated from, automatically collected by our mobile libraries when possible.
- channelstringThe channel the event originated from.Accepted values:
browser,server,mobile - Contains information about the device the event originated from.
- ipstringThe user's IP address. This isn't captured by our libraries, but by our servers when we receive client-side events (like from our JavaScript source).
- localestringThe locale string for the current user, e.g.
en-US. - Information about the current network connection, containing
bluetooth,carrier,cellular, andwifi. If thecontext.network.cellularandcontext.network.wififields are empty, then the user is offline. - Dictionary of information about the operating system, containing
nameandversion. - userAgentstringThe user agent of the device making the request
- Contains a list of booleans indicating the integrations that are enabled (true) or disabled (false). By default, all integrations are enabled (returning an empty object). Set
"All": falseto reverse this behavior.- Enabled/Disabled integrations *boolean
- messageIdstringA unique identifier for a Data Pipelines call, ensuring that each individual event is unique. This is set by Customer.io
- namestringThe name of the screen the person visited.
- originalTimestampstring(date-time)In general, you can use
timestamprather than this field if you want to back-date events. This is the timestamp on the client device you invoke a call or the timestamp value you manually passed in a server-side library call. - Additional properties for your screen.
- Screen Properties *any type
- sentAtstring(date-time)The ISO-8601 timestamp when a library sends an event to Data Pipelines.
- timestampstring(date-time)The ISO-8601 timestamp when the event originally took place. This is mostly useful when you backfill past events. If you're not backfilling data, you can leave this field empty and we'll use the current time or server time.
Alias
The Alias method combines two previously unassociated user identities. Some integrations automatically reconcile people with different identifiers based on whether you send anonymousId, userId, or another trait that the integration expects to be unique. But for integrations that don’t, you may need to send alias requests to do this.
In general, you won’t need to use the alias call; we try to handle user identification gracefully so you don’t need to merge people. But you may need to send alias calls to manage user identities in some data-out integrations.
For example, in Mixpanel it’s used to associate an anonymous user with an identified user once they sign up.
SELECT ID AS userId, OLD_ID AS previousId
FROM user_resolution
WHERE TIMESTAMP >= {{last_sync_time}}- previousIdstringrequiredThe anonymousId or userId value that you want to merge into the canonical profile.
- userIdstringrequiredThe userId that you want to keep. This is required if you haven't already identified someone with one of our web or server-side libraries.