

Rich push notifications
With rich push, you can do more than just send a simple notification; you can send an image, open a deep link when someone taps your message, and more!
This page is part of a setup flow for the SDK. Before you continue, make sure you've implemented previous features—i.e. you can't receive in-app notifications before you identify people!
Before you begin
You should set up APN or FCM push notifications and make sure that you can send yourself a test push notification before you start implementing rich push.
While rich push generally entails a number of features, our SDK only supports deep links and images right now. If you want to include action buttons or other rich push features, you need to add your own custom code.
When writing your own custom code, we recommend that you use our SDK as it is much easier to extend than writing your own code from scratch. Read below for tips on how to extend the functionality of the SDK with features we do not yet support.
Set up rich push
-
You should now see a new file added to your Xcode project. The file is probably named
NotificationServiceand looks similar to this.SWIFTimport UserNotifications class NotificationService: UNNotificationServiceExtension { override func didReceive( _ request: UNNotificationRequest, withContentHandler contentHandler: @escaping (UNNotificationContent) -> Void ) { } override func serviceExtensionTimeWillExpire() { } } -
Modify this file by selecting the push package you want to import and calling the appropriate Customer.io functions. Your code changes if:
- Customer.io is your only push/rich push provider
- Customer.io is not your only provider
- You want to take advantage of push features outside the Customer.io, like action buttons; in this case, you’ll need to set your own completion handler.
Customer.io push only
SWIFT// Keep the import for your push provider—FCM or APN, and // remove the other import statement import CioMessagingPushFCM import CioMessagingPushAPN import UserNotifications import CioTracking class NotificationService: UNNotificationServiceExtension { override func didReceive( _ request: UNNotificationRequest, withContentHandler contentHandler: @escaping (UNNotificationContent) -> Void ) { // Because of the behavior of Notification Service Extensions in iOS, you need to // initialize the Customer.io SDK in your host app and in your Notification Service. CustomerIO.initialize(siteId: "YOUR SITE ID", apiKey: "YOUR API KEY", region: Region.EU) MessagingPush.shared.didReceive(request, withContentHandler: contentHandler) } override func serviceExtensionTimeWillExpire() { MessagingPush.shared.serviceExtensionTimeWillExpire() } }Multiple push services
SWIFT// Keep the import for your push provider—FCM or APN, and // remove the other import statement import CioMessagingPushFCM import CioMessagingPushAPN import UserNotifications import CioTracking class NotificationService: UNNotificationServiceExtension { override func didReceive( _ request: UNNotificationRequest, withContentHandler contentHandler: @escaping (UNNotificationContent) -> Void ) { // Because of the behavior of Notification Service Extensions in iOS, you need to // initialize the Customer.io SDK in your host app and in your Notification Service. CustomerIO.initialize(siteId: "YOUR SITE ID", apiKey: "YOUR API KEY", region: Region.EU) // If you use a service other than Customer.io to send rich push, // you can check if the SDK handled the rich push for you. If it did not, you // know that the push was *not* sent by Customer.io and you can try another way. let handled = MessagingPush.shared.didReceive(request, withContentHandler: contentHandler) if !handled { // Rich push was *not* sent by Customer.io. Handle the rich push in another way. } } override func serviceExtensionTimeWillExpire() { MessagingPush.shared.serviceExtensionTimeWillExpire() } }Custom completion handler
SWIFT// Keep the import for your push provider—FCM or APN, and // remove the other import statement import CioMessagingPushFCM import CioMessagingPushAPN import UserNotifications import CioTracking class NotificationService: UNNotificationServiceExtension { override func didReceive( _ request: UNNotificationRequest, withContentHandler contentHandler: @escaping (UNNotificationContent) -> Void ) { // Because of the behavior of Notification Service Extensions in iOS, you need to // initialize the Customer.io SDK in your host app and in your Notification Service. CustomerIO.initialize(siteId: "YOUR SITE ID", apiKey: "YOUR API KEY", region: Region.EU) // If you need to add features, like showing action buttons in your push, // you can set your own completion handler. MessagingPush.shared.didReceive(request) { notificationContent in if let mutableContent = notificationContent.mutableCopy() as? UNMutableNotificationContent { // Modify the push notification like adding action buttons! } contentHandler(notificationContent) } } override func serviceExtensionTimeWillExpire() { MessagingPush.shared.serviceExtensionTimeWillExpire() } }
Your app can now display rich push notifications in your app, including images, etc. However, if you want to enable deep links, you should continue to the Deep links section below.
Deep links
After you set up rich push notifications you can enable deep links in rich push notifications.
-
Modify your
AppDelegatewith the following information. This enables your app to launch a deep link URL when someone taps a notification.SWIFTimport CioMessagingPushAPN import CioTracking import Foundation import UIKit class AppDelegate: NSObject, UIApplicationDelegate { func application( _ application: UIApplication, didFinishLaunchingWithOptions launchOptions: [UIApplication.LaunchOptionsKey: Any]? = nil ) -> Bool { CustomerIO.initialize(siteId: "YOUR SITE ID", apiKey: "YOUR API KEY", region: Region.US) // Must call this function in order for `UNUserNotificationCenterDelegate` functions // to be called. UNUserNotificationCenter.current().delegate = self // It's good practice to always register for remote push when the app starts. // This asserts that the Customer.io SDK always has a valid APN device token to use. UIApplication.shared.registerForRemoteNotifications() return true } } extension AppDelegate: UNUserNotificationCenterDelegate { func userNotificationCenter( _ center: UNUserNotificationCenter, didReceive response: UNNotificationResponse, withCompletionHandler completionHandler: @escaping () -> Void ) { let handled = MessagingPush.shared.userNotificationCenter(center, didReceive: response, withCompletionHandler: completionHandler) // If the Customer.io SDK does not handle the push, it's up to you to handle it and call the // completion handler. If the SDK did handle it, it called the completion handler for you. if !handled { completionHandler() } } // OPTIONAL: If you want your push UI to show even with the app in the foreground, override this function and call // the completion handler. @available(iOS 10.0, *) func userNotificationCenter( _ center: UNUserNotificationCenter, willPresent notification: UNNotification, withCompletionHandler completionHandler: @escaping (UNNotificationPresentationOptions) -> Void ) { completionHandler([.list, .banner, .badge, .sound]) } } -
Setup deep linking in your app. There are two ways to do this, and you can do both if you choose.
- Universal Links: universal links are great if you want to open your mobile app instead of a web browser when your goes to a page on your website. However, universal links take more time to setup. Follow this guide to set up Universal Links in your app.
- App scheme: app scheme deep links are quick and easy to setup. However, they do not work if the mobile app is not installed, which is where universal links provide an advantage. To enable app scheme deep links. See the section below to enable app scheme deep links.
Setup App Scheme Deep Links
App scheme deep links only work if your audience has your mobile app installed. If you want to support cases where your audience might not already have your app, you can set up universal links.
-
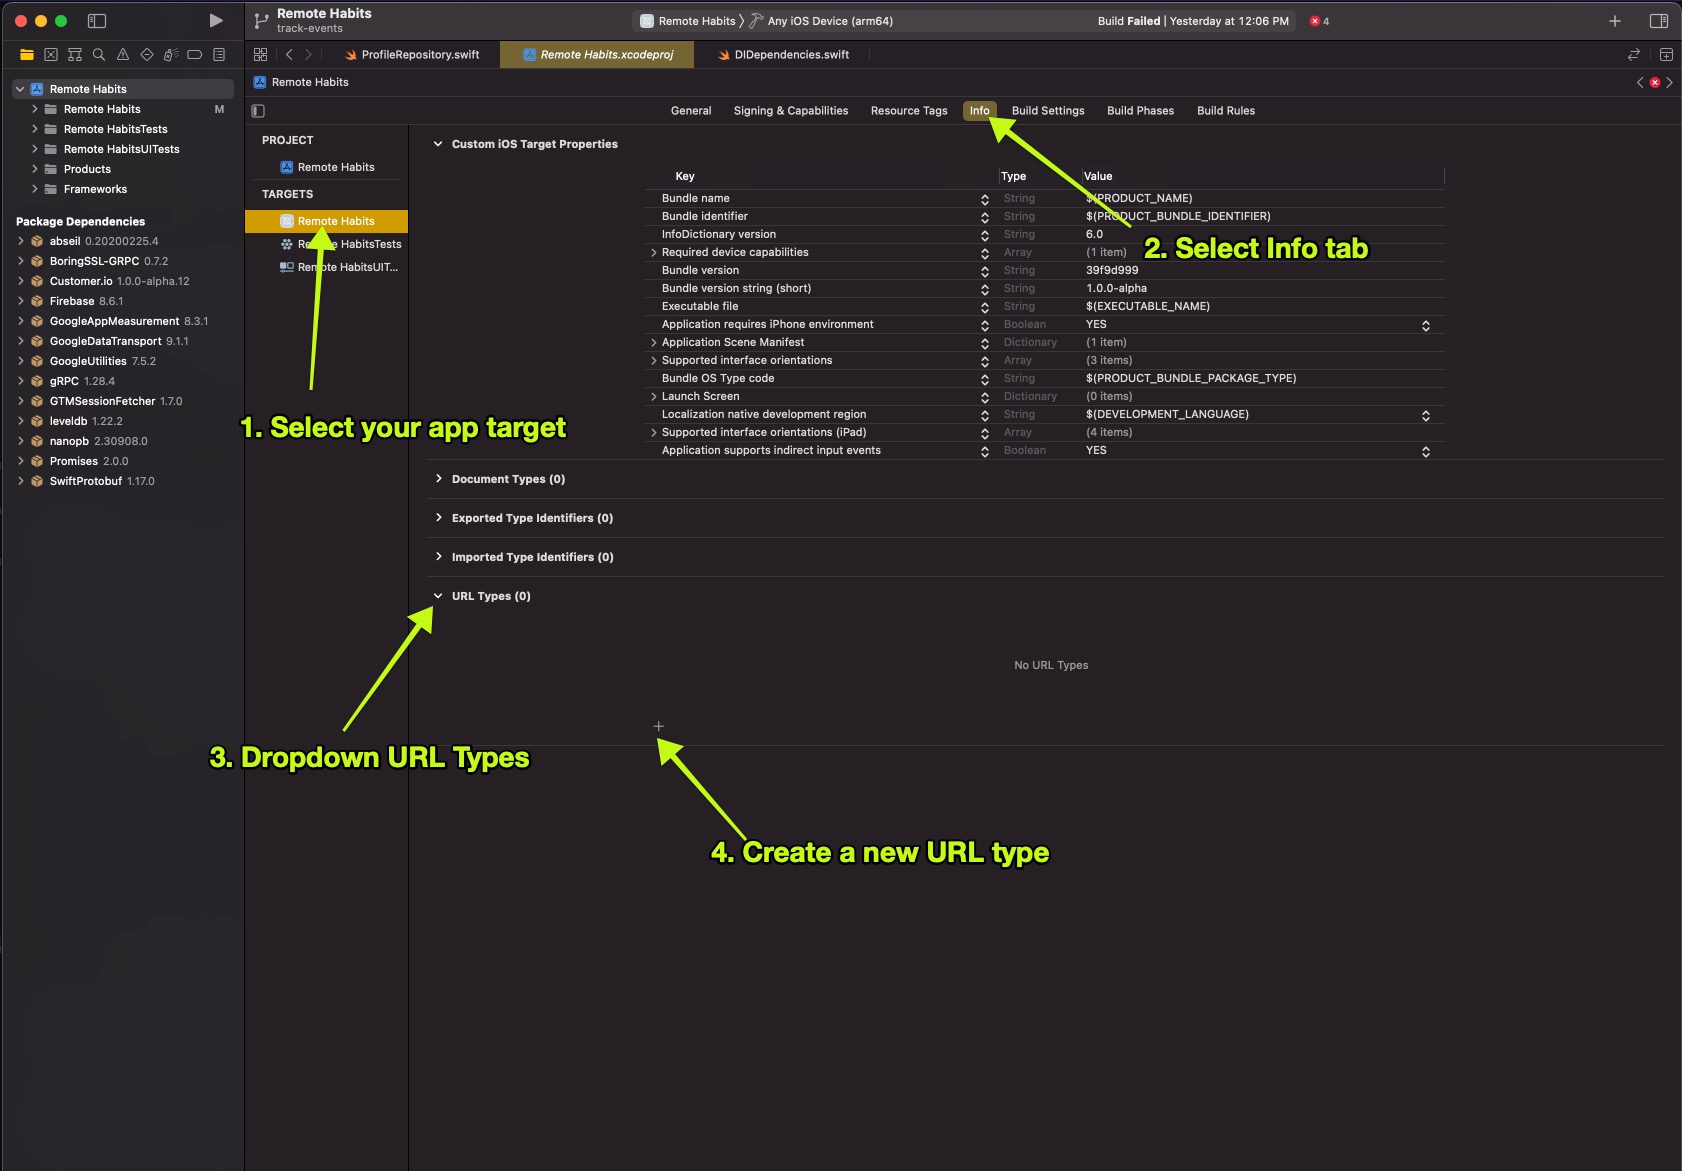
Open your Xcode project and go to your project’s settings. Select your app Target, click the Info tab, and then click URL Types > to create a new URL Type.
-
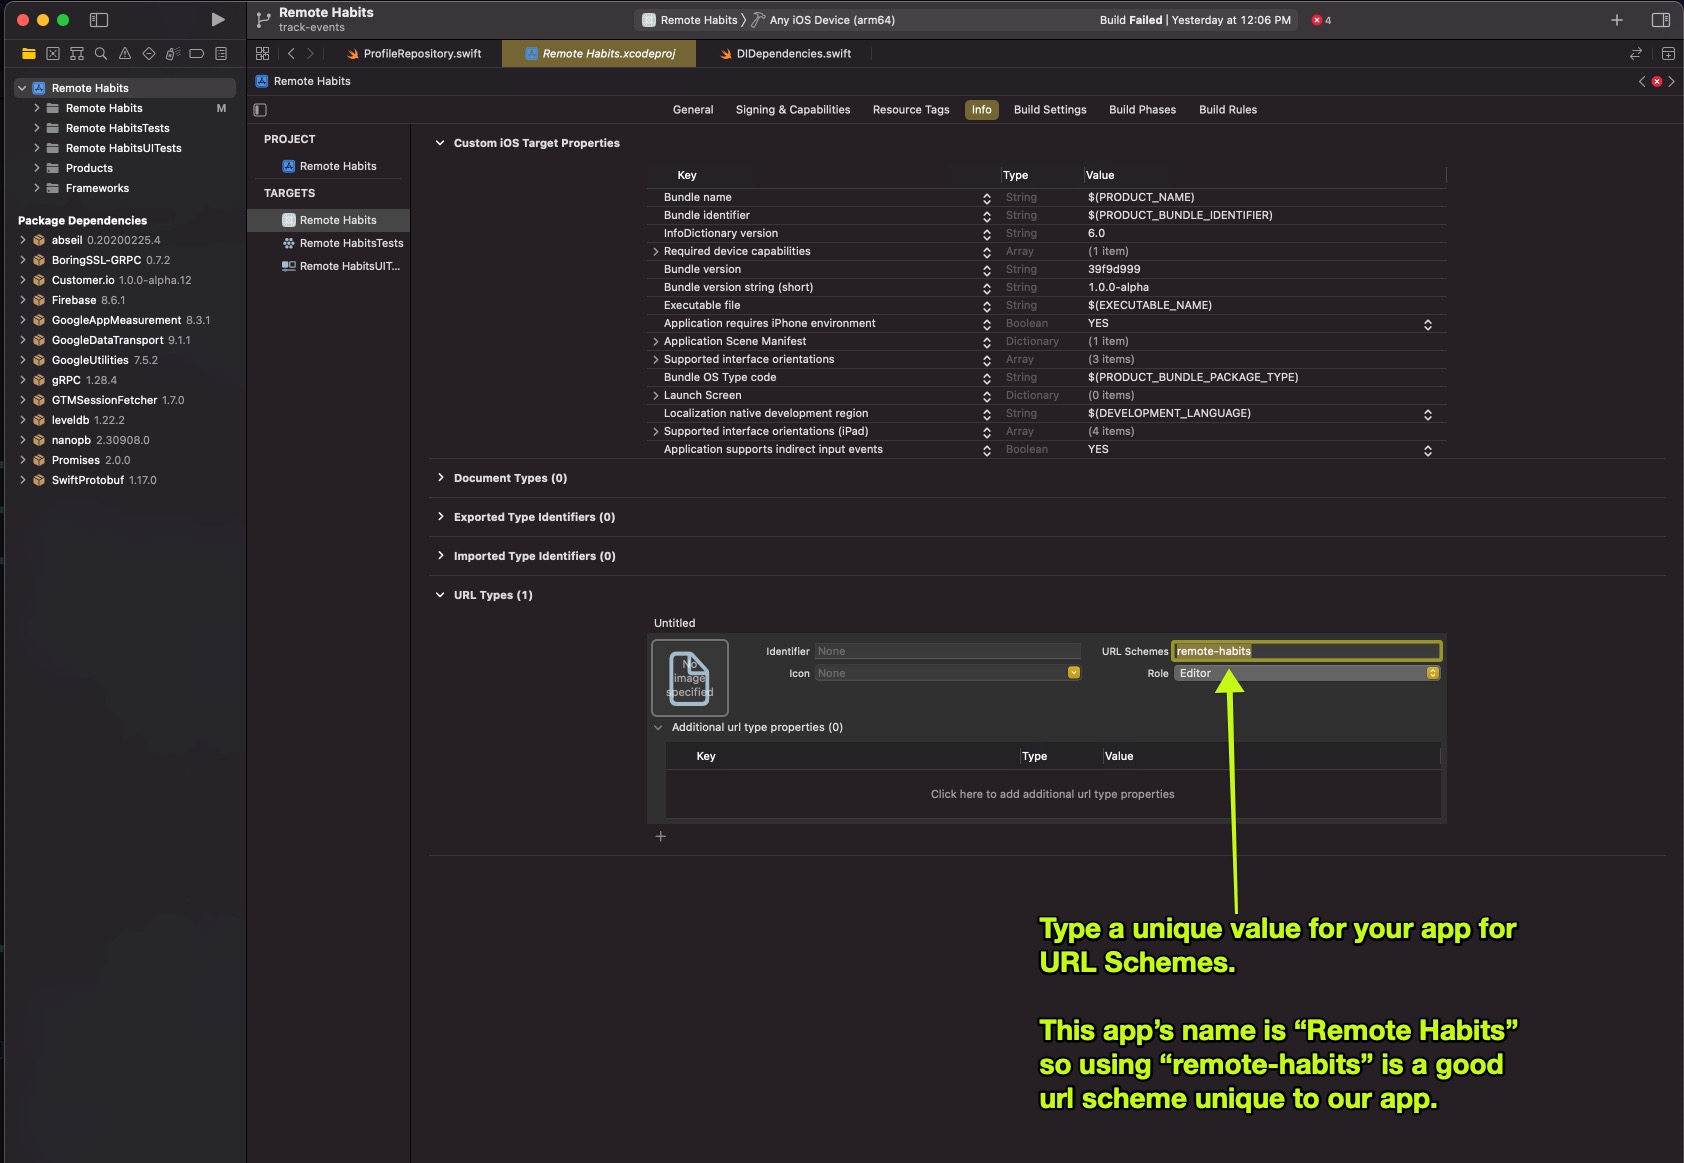
Enter a unique value for your app for URL Schemes.
Test Rich Push
After you set up rich push, you should test your implementation. Use the payloads below to send a push in the Customer.io web app with a Custom Payload.
In both of the test payloads below, you should:
- Set the
linkto the deep link URL that you want to open when your tester taps your notification. - Set the
imageto the URL of an image you want to show in your notification. It’s important that the image URL starts withhttps://and nothttp://or the image might not show up.
APNs test payload
{
    "CIO": {
        "push": {
            "link": "remote-habits://deep?message=hello&message2=world",
            "image": "https://thumbs.dreamstime.com/b/bee-flower-27533578.jpg"
        }
    },
    "aps": {
        "mutable-content": 1,
        "alert": {
            "title": "Title of your push goes here!",
            "body": "Body of your push goes here!"
        }
    }
}
FCM test payload
{
    "message": {
        "apns": {
            "payload": {
                "CIO": {
                    "push": {
                        "link": "remote-habits://deep?message=hello&message2=world",
                        "image": "https://thumbs.dreamstime.com/b/bee-flower-27533578.jpg"
                    }
                },
                "aps": {
                    "mutable-content": 1,
                    "alert": {
                        "title": "Title of your push goes here!",
                        "body": "Body of your push goes here!"
                    }
                }
            }
        }
    }
}
Rich push payloads
To send a rich push in Customer.io, you need to use our Custom Payload editor, which takes a JSON structure. In the editor, you’ll select the type of device you want to send your message to: you can have separate payloads for Android and iOS. In our case, you’ll click iOS.
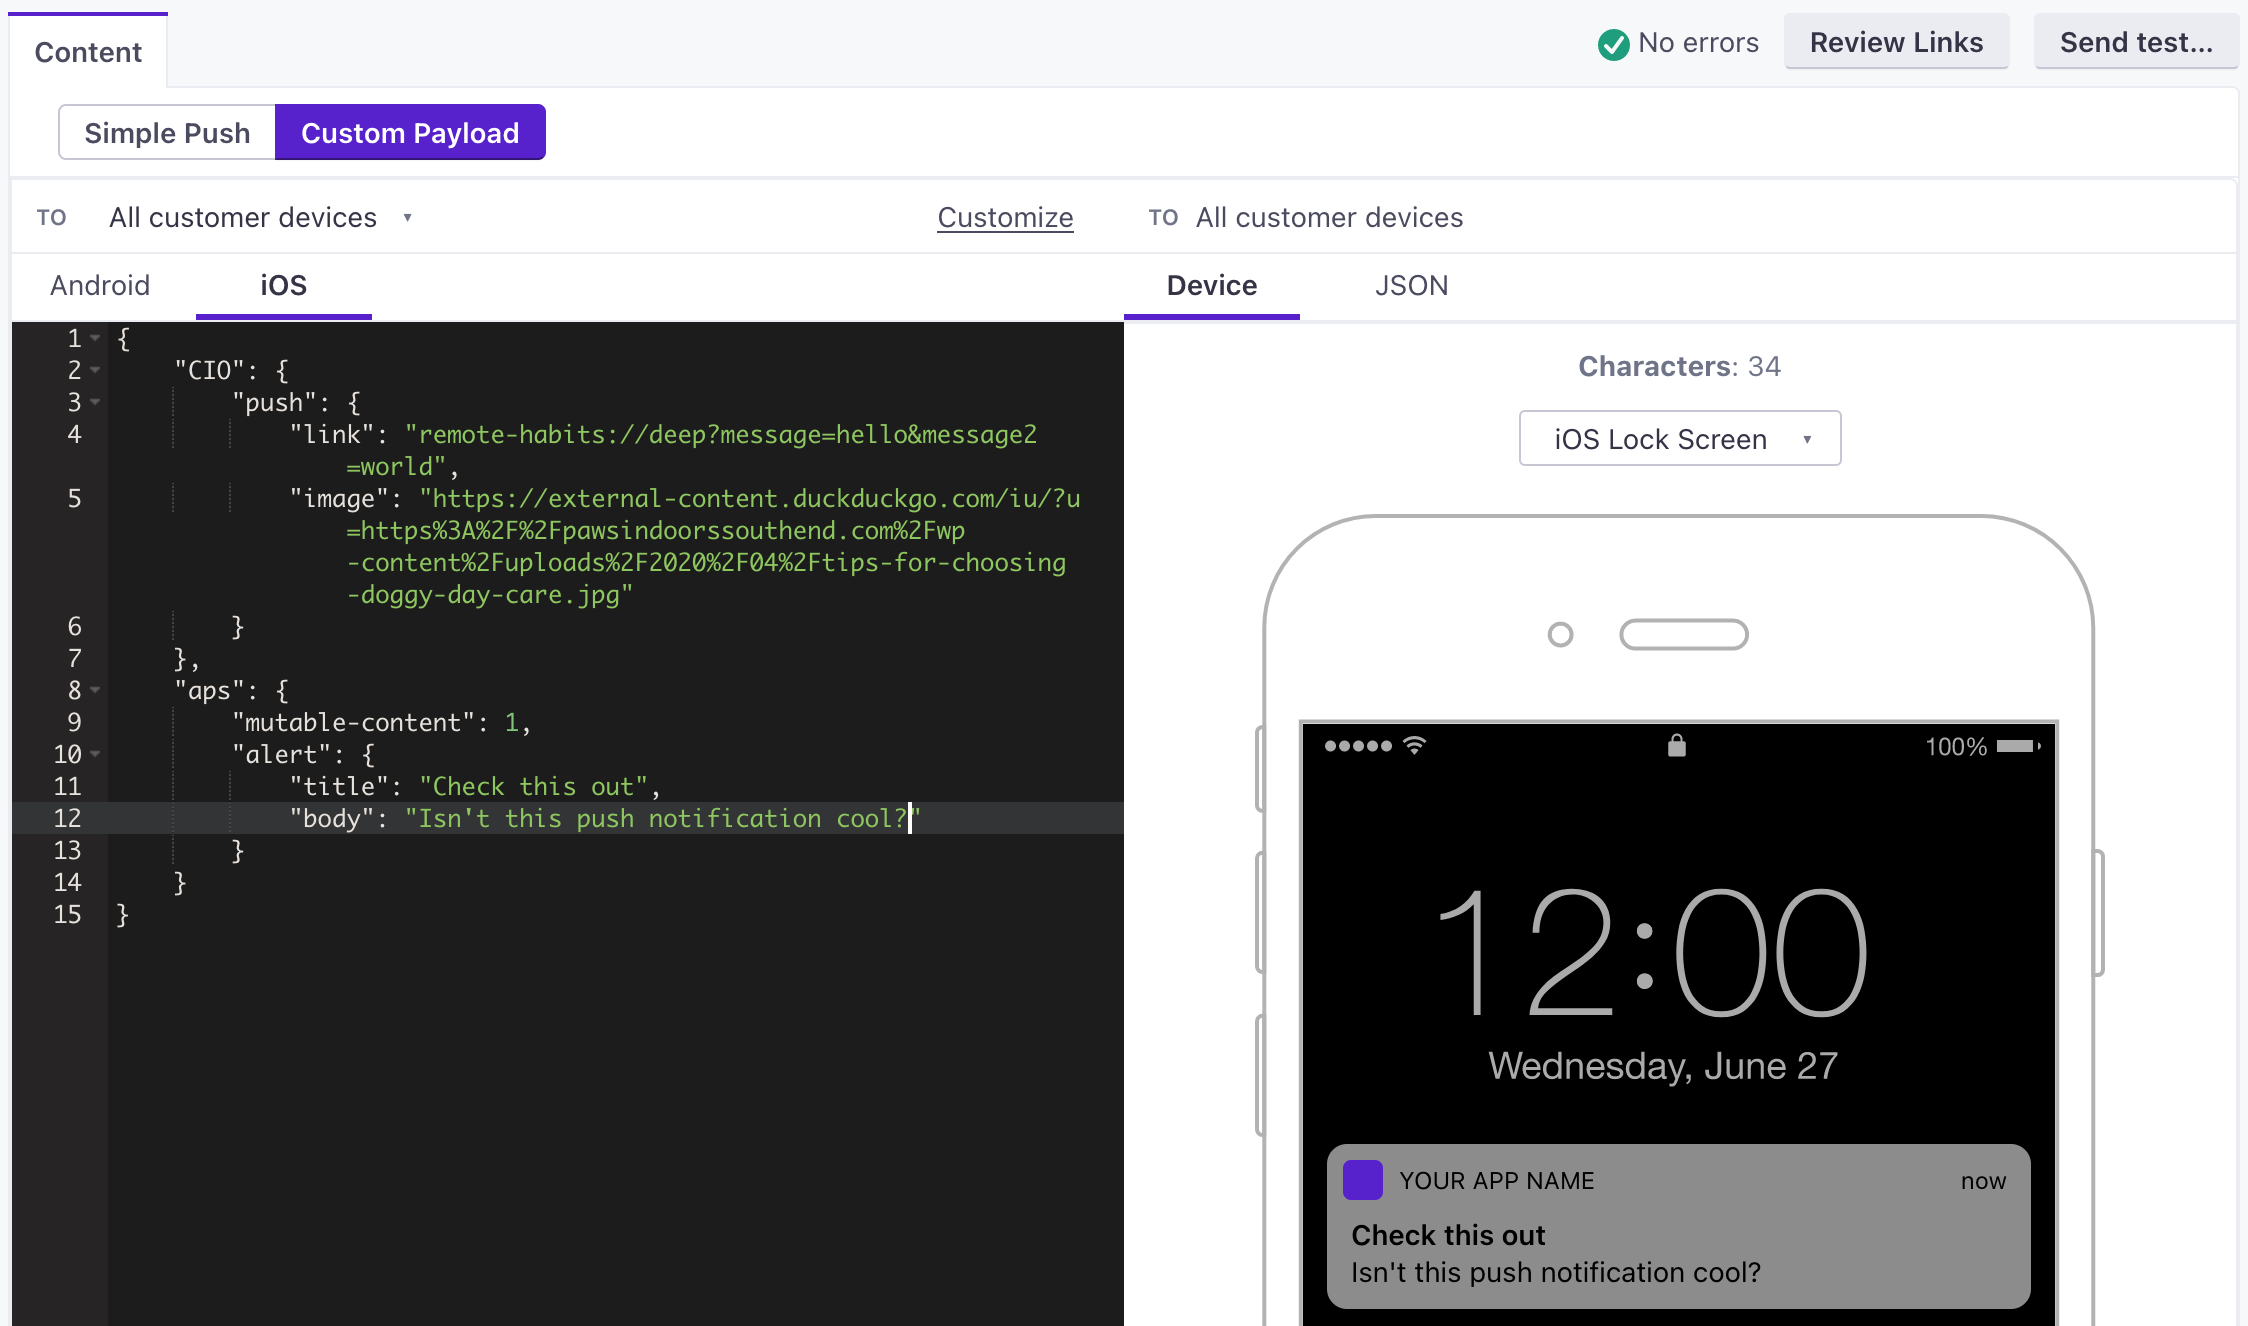
The top level of the payload changes slightly depending on your push provider, APNS or FCM. Otherwise, your JSON is split into two major objects:
- an
apsobject, which contains the standard aspects of a push—thealert.titleandalert.bodyof your message—and Apple’s push options. - a
CIOobject containing the rich aspects of your message that the SDK will interpret. At present, it containslinkandimagestrings.
APNs payload
{
    "aps": {
        // basic iOS message and options go here
        "mutable-content": 1,
        "alert": {
            "title": "string", //(optional) The title of the notification.
            "body": "string" //(optional) The message you want to send.
        }
    },
    "CIO": {
        "push": {
            "link": "string", //generally a deep link, i.e. my-app:://...
            "image": "string" //HTTPS URL of your image, including file extension
        }
    }
}- A push payload intended for an iOS device.
- Contains options supported by the Customer.io SDK.
FCM payload
{
  "message": {
    "apns": {
      "payload": {
        "aps": {
          // basic iOS message and options go here
          "mutable-content": 1,
          "alert": {
            "title": "string", //(optional) The title of the notification.
            "body": "string" //(optional) The message you want to send.
           }
        },
        "CIO": {
          "push": {
            "link": "string", //generally a deep link, i.e. my-app://... or https://yourwebsite.com/...
            "image": "string" //HTTPS URL of your image, including file extension
          }
        }
      },
      "headers": {
        // (optional) headers to send to the Apple Push Notification Service.
        "apns-priority": 10
      }
    }
  }
}- The base object for all FCM payloads.
- Defines a payload for iOS devices sent through Firebase Cloud Messaging (FCM).
- Contains a push payload.
- headersobjectHeaders defined by Apple's payload reference that you want to pass through FCM.