

Get started
Before you can take advantage of our SDK, you need to install and initialize the SDK. This page also explains how the SDK prioritizes operations.
This page is part of an introductory series to help you get started with the essential features of our SDK. The highlighted step(s) below are covered on this page. Before you continue, make sure you've implemented previous features—i.e. you can't identify people before you initialize the SDK!
How it works
Our SDKs provide a ready-made integration to identify people who use mobile devices and send them notifications. Before you start using the SDK, you should understand a bit about how the SDK works with Customer.io.
You must identify a person before you can take advantage of most SDK features. You can send anonymous in-app messages in our latest updates, but you can’t send push notifications or capture event activity for anonymous devices/users. That means that you can’t track or respond to anything your audience does in your app until you identify them.
In Customer.io, you identify people by id or email, which typically means that you need someone to log in to your app or service before you can identify them.
While someone is “identified”, you can send events representing their activity in your app to Customer.io. You can also send the identified person messages from Customer.io.
You send messages to a person through the Customer.io automation builder, broadcasts, etc. These messages are not stored on the device side. If you want to send an event-triggered automation to a mobile device, the mobile device user must be identified and have a connection such that it can send an event back to Customer.io and receive a message payload.
Prerequisites
Before you get started with our React Native SDKs, you’ll need your Customer.io workspace Site ID and API Key. You’ll provide these credentials when you initialize the SDK.
Because our React Native package relies on our native iOS and Android modules, you’ll need to set up both your React Native development environment and make sure that you’re set up to support both iOS and Android in your environment.
React Native
- Set up your React Native environment
- Add React navigation to your project to support deep links and screen tracking
iOS
- Setup XCode and set your deployment target to 13.0 or later
- Make sure that you’ve got XCode command line tools installed—
xcode-select --install - Get your Apple Push Certificate and enable push notifications for iOS in your Customer.io account
- You should have an iOS 13+ device to test your implementation. You cannot test push notifications in a simulator.
Android
- Download and install Android Studio
- Add your Google Firebase Cloud Messaging (FCM) key to Customer.io and enable push notifications for Android
- Android Gradle plugin version 7.4 or later
- An Android device or emulator with Google Play Services enabled and a minimum OS version between Android 5.0 (API level 21) and Android 13.0 (API level 33)
Install the React Native SDK
This process involves setup for both iOS and Android. For Android, we’ll guide you through the process to set up Firebase Cloud Messaging (FCM) in your app.
-
Open your terminal and go to your project folder—
cd <Root/path/to/your/app>. -
Install the
customerio-reactnativepackage using NPM or Yarn:npm install customerio-reactnativeyarn add customerio-reactnative
-
If you’re using a React Native version earlier than 0.60, link the library manually with
npx react-native link customerio-reactnative. Otherwise, go to the next step. -
In your terminal, run
pod install --repo-update --project-directory=ios. This adds the required iOS dependencies to your project. When the process is complete, you’ll see a message like this:Pod installation complete! There are X dependencies from the Podfile and Y total pods installed. -
Make sure that your minimum deployment target is set to
13.0. You’ll have to do this in two places:-
Go to the
iossubfolder and open yourPodfile. Find theplatform:iosline, and make sure that the version is set to13.0or later if it isn’t already. -
Open your project’s iOS directory in XCode, select the project under Targets, and set the Minimum Deployments target to 13.0 or later.
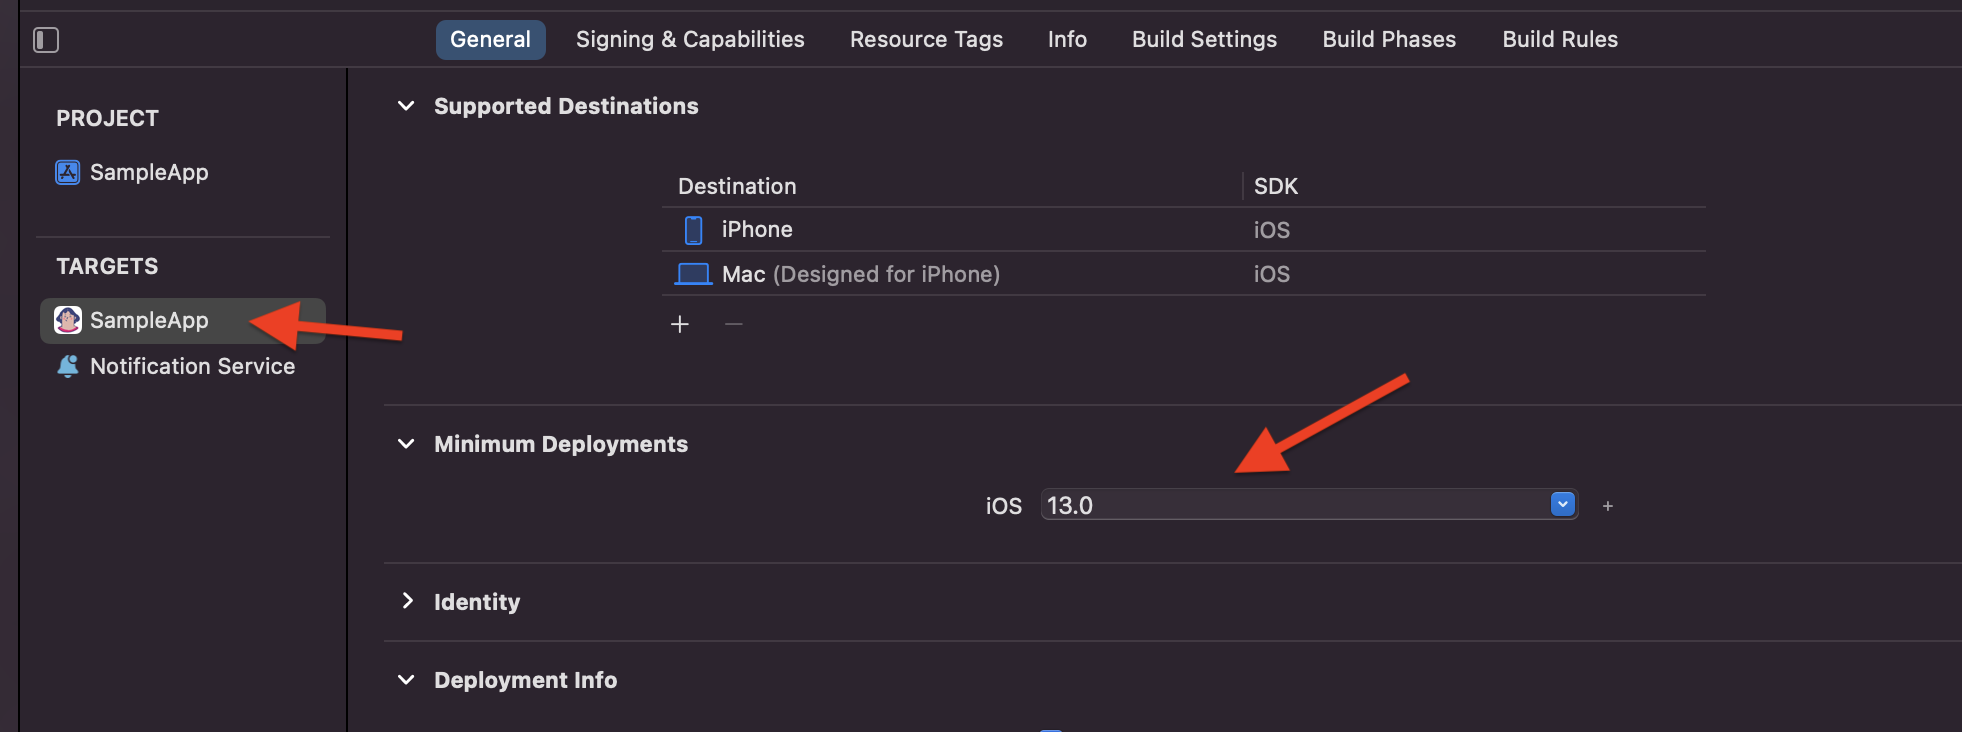
-
-
Go to the Android subfolder and include google-services-plugin by adding the following lines to the project-level
android/build.gradlefile:GROOVYbuildscript { repositories { // Add this line if it isn't already in your build file: google() // Google's Maven repository } dependencies { // Add this line: classpath 'com.google.gms:google-services:<version-here>' // Google Services plugin } } allprojects { repositories { // Add this line if it isn't already in your build file: google() // Google's Maven repository } } -
Add the following line to
android/app/build.gradle:GROOVYapply plugin: 'com.google.gms.google-services' // Google Services plugin -
Download
google-services.jsonfrom your Firebase project and copy the file toandroid/app/google-services.json.
Now you’re ready to initialize the SDK and use it in your app.
Initialize the SDK
After you install the SDK, you’ll need to initialize it in your app. To do this, you’ll add initialization code in your Equivalent to the user name you'll use to interface with the Journeys Track API; also used with our JavaScript snippets. You can find your Site ID under Workspace Settings > API Credentials Equivalent to the password you'll use with a Site ID to interface with the Journeys Track API. You can generate new keys under Workspace Settings > API CredentialsApp.js file—or wherever you want to initialize the customerio-reactnative package. You’ll need Track API credentials to initialize the SDK—your Site ID
This makes the SDK available to use in your app. Note that you’ll still need to identify your app’s users before you can send them messages.
import React, {useEffect} from 'react';
import { CustomerIO, CustomerIOEnv, Region } from 'customerio-reactnative';

const App = () => {

useEffect(() => {
   const env = new CustomerIOEnv()
   env.siteId = "YourSiteId"
   env.apiKey = "YourAPIKey"

   // Region is optional, defaults to Region.US.
   // Use Region.EU for EU-based workspaces.
   env.region = Region.US

   CustomerIO.initialize(env)
}, [])
When you’re done, you may want to return to your main folder and run your application to make sure that everything’s set up correctly:
- iOS:
npx react-native run-ios - Android:
npx react-native run-android
Configure the SDK
You can determine global behaviors for the SDK in the CustomerIO.config object. You must provide configuration options before you initialize the SDK; you cannot declare configuration changes after you initialize the SDK.
Import CustomerioConfig and then set configuration options to configure things like your logging level and whether or not you want to automatically track device attributes, etc.
import { CustomerIO, CustomerioConfig } from 'customerio-reactnative';

const data = new CustomerioConfig()
data.logLevel = CioLogLevel.debug
data.autoTrackDeviceAttributes = true

// In-app messages are optional and disabled by default
// To enable in-app messages, set enableInApp to true
data.enableInApp = true

// `env` is the environment constant you used
// to initialize the SDK in the previous section
CustomerIO.initialize(env, data)
When you initialize the SDK, you can pass configuration options. In most cases, you'll want to stick with the defaults, but you might do things like change the logLevel when testing updates to your app.
| Option | Type | Default | Description |
|---|---|---|---|
autoTrackDeviceAttributes | boolean | true | Automatically gathers information about devices, like operating system, device locale, model, app version, etc |
autoTrackPushEvents | boolean | true | The SDK automatically generates delivered and opened metrics for push notifications sent from Customer.io |
backgroundQueueMinNumberOfTasks | integer | 10 | See the processing queue for more information. This sets the number of tasks that enter the processing queue before sending requests to Customer.io. In general, we recommend that you don't change this setting, because it can impact your audience's battery life. |
backgroundQueueSecondsDelay | integer | 30 | See the processing queue for more information. The number of seconds after a task is added to the processing queue before the queue executes. In general, we recommend that you don't change this setting, because it can impact your audience's battery life. |
enableInApp | boolean | false | Enables in-app messaging. See in-app messaging for more details. |
logLevel | string | error | Sets the level of logs you can view from the SDK. Set to debug to see more logging output. |
trackApiUrl | string | Do not change this setting. This points to our Track API. |
The Processing Queue
The SDK automatically adds all calls to a queue system, and waits to perform these calls until certain criteria is met. This queue makes things easier, both for you and your users: it handles errors and retries for you (even when users lose connectivity), and it can save users’ battery life by batching requests.
The queue holds requests until any one of the following criteria is met:
- There are 20 or more tasks in the queue.
- 30 seconds have passed since the SDK performed its last task.
- The app is closed and re-opened.
For example, when you identify a new person in your app using the SDK, you won’t see the created/updated person immediately. You’ll have to wait for the SDK to meet any of the criteria above before the SDK sends a request to the Customer.io API. Then, if the request is successful, you’ll see your created/updated person in your workspace.
How the queue organizes tasks
The SDK typically runs tasks in the order that they were called—unless one of the tasks in the queue fails.
Tasks in the queue are grouped by “type” because some tasks need to run sequentially. For example, you can’t invoke a track call if an identify call hasn’t succeeded first. So, if a task fails, the SDK chooses the next task in the queue depending on whether or not the failed task is the first task in a group.
- If the failed task is the first in a group: the SDK skips the remaining tasks in the group, and moves to the next task outside the group.
- If the failed task is 1+n task in a group: the SDK skips the failed task and moves on to the next task in the group.**
The following chart shows how the SDK would process a queue where tasks A, B, and C belong to the same group.