

Set up push notifications
Our React Native SDK supports push notifications over APN or FCM—including rich push messages with links and images. Use this page to add support for your push provider and set your app up to receive push notifications.
This page is part of a setup flow for the SDK. Before you continue, make sure you've implemented previous features—i.e. you can't receive push notifications before you identify people!
How it works
Under the hood, our React Native SDK takes advantage of our native Android and iOS SDKs. This helps us keep the React Native SDK up to date. But, for now, it also means you’ll need to add a bit of code to support your iOS users. For Android, you’re ready to go if you followed our getting started instructions.
Before a device can receive a push notification, you must:
- (iOS) Add push notification capabilities in XCode.
- (iOS) Integrate push notifications: code samples on this page help you do that.
- Identify a person. This associates a token with the person; you can’t send push notifications to a device until you identify the recipient.
- Request, or check for, push notification permissions. If your app’s user doesn’t grant permission, notifications will not appear in the system tray.
While push providers support a number of features in their payloads, our React Native package only supports deep links and images right now. If you want to include action buttons or other rich push features, you need to add your own custom code. When writing your own custom code, we recommend that you use our SDK as it is much easier to extend than writing your own code from scratch.
Set up push on Android
If you followed our Getting Started instructions, you’re already set up to send standard push notifications to Android devices.
Set up push on iOS
You’ll need to add some additional code to support push notifications for iOS. You’ll need to add push capabilities in XCode and integrate push capabilities in your app.
Add push capabilities in Xcode
Before you can work with push notifications, you need to add Push Notification capabilities to your project in XCode.
-
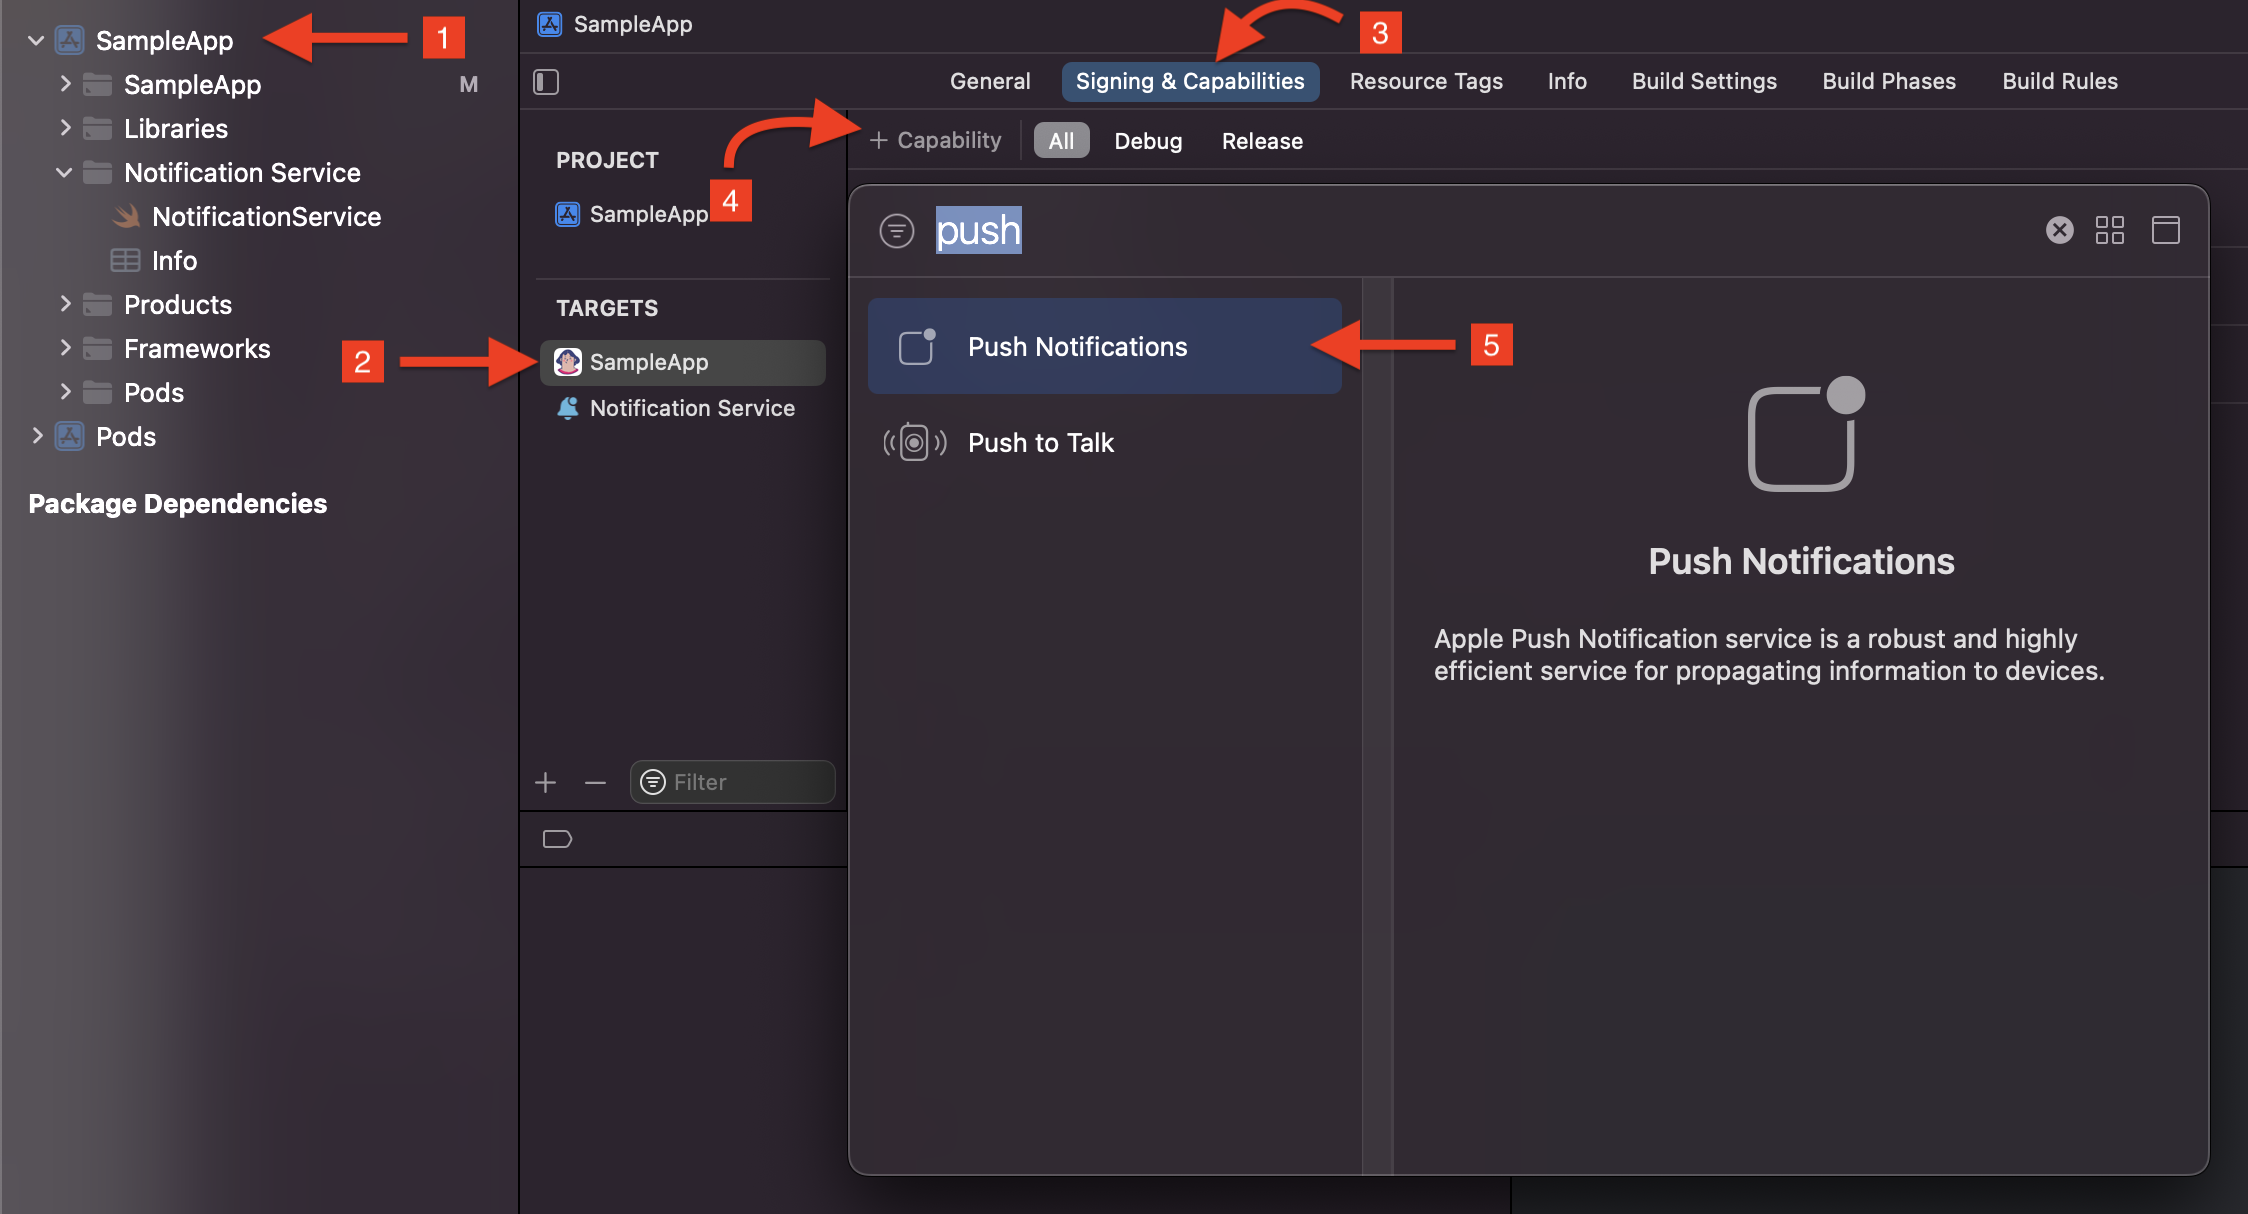
In your React Native project, go to the
iossubfolder and open<yourAppName>.xcworkspace. -
Select your project, and then under Targets, select your main app.
-
Click the Signing & Capabilities tab
-
Click Capability.
-
Add Push Notifications to your app. When you’re done, you’ll see Push Notifications added to your app’s capabilities, but there are still a few more steps to finish setting things up.
-
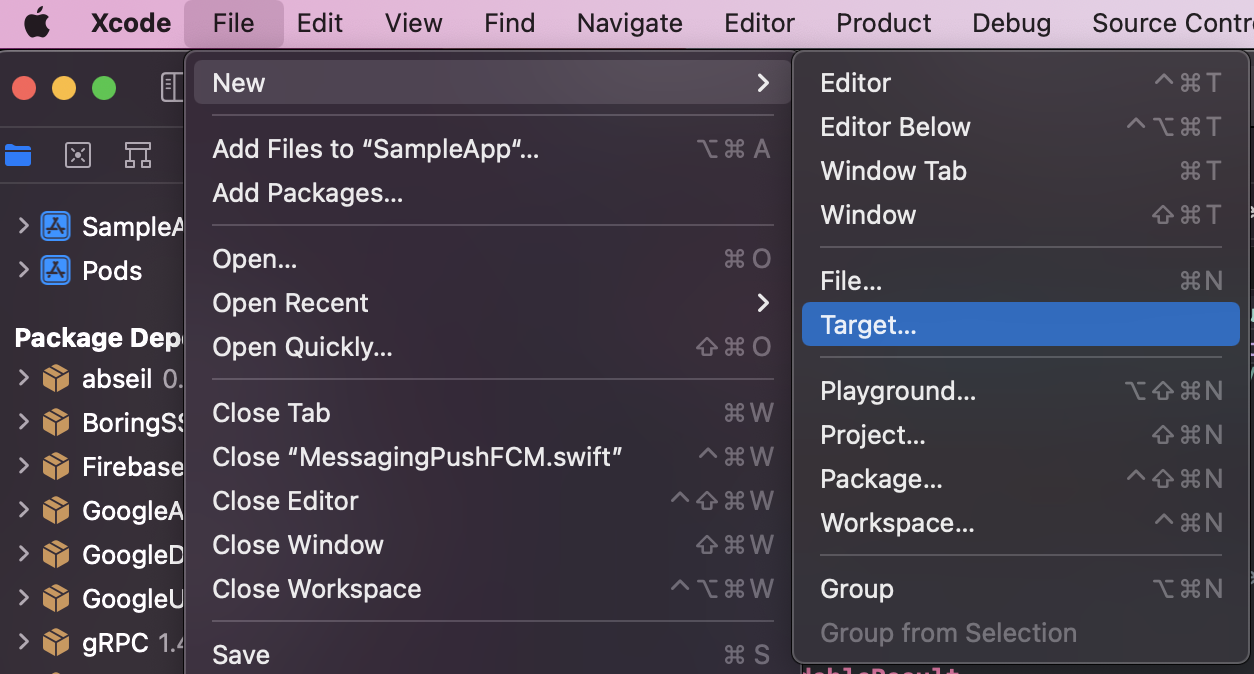
Go to File > New > Target.
-
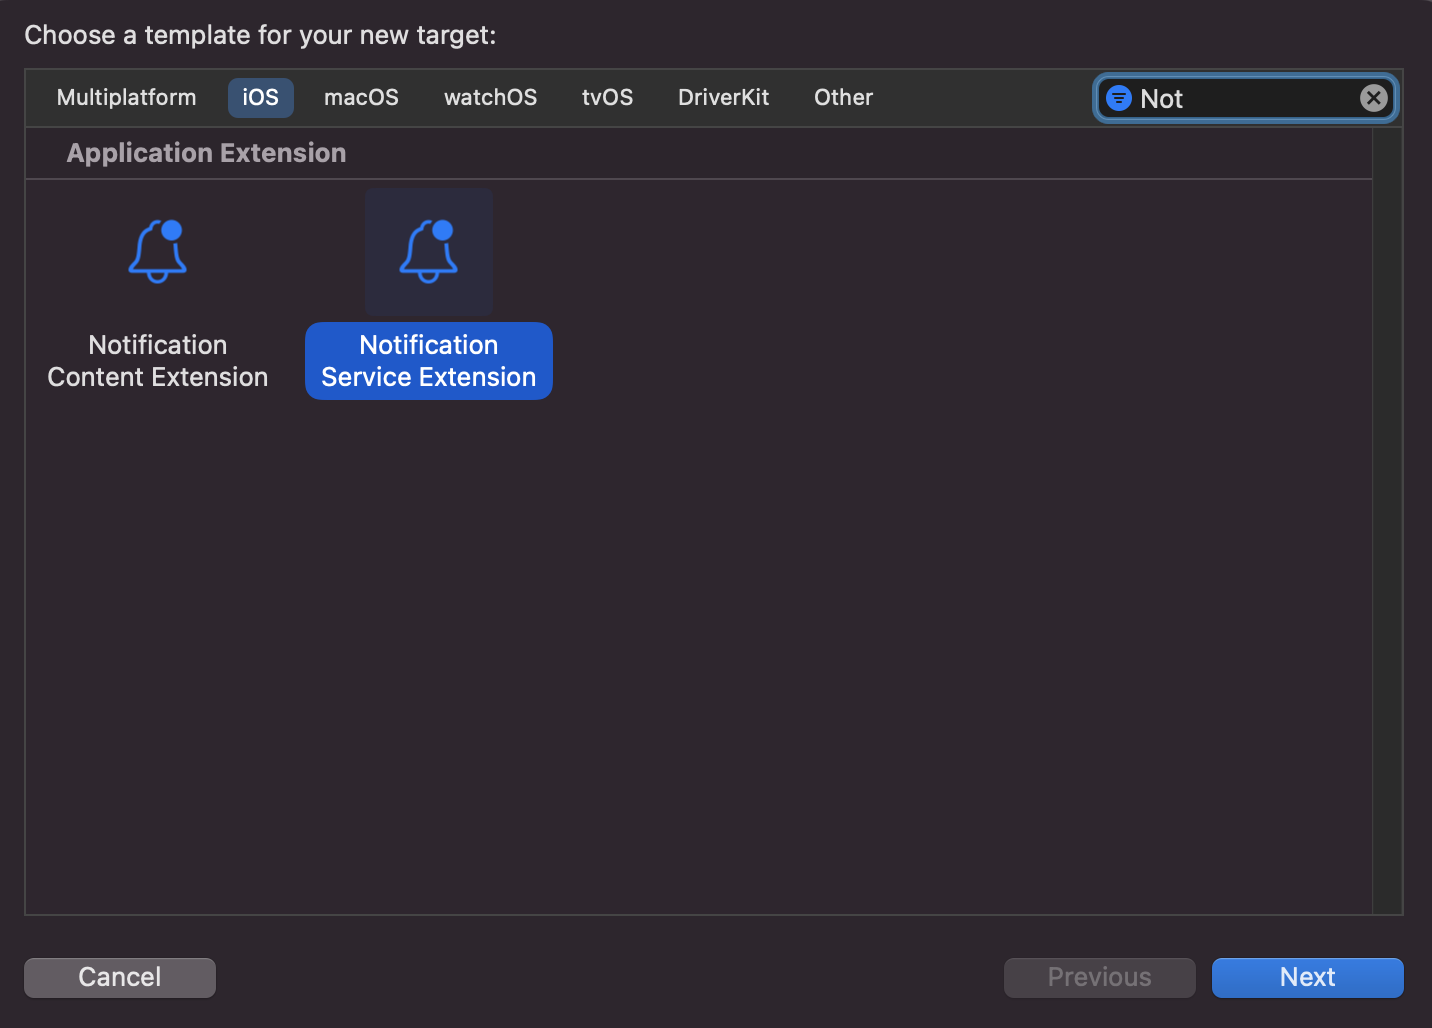
Select Notification Service Extension and click Next.
-
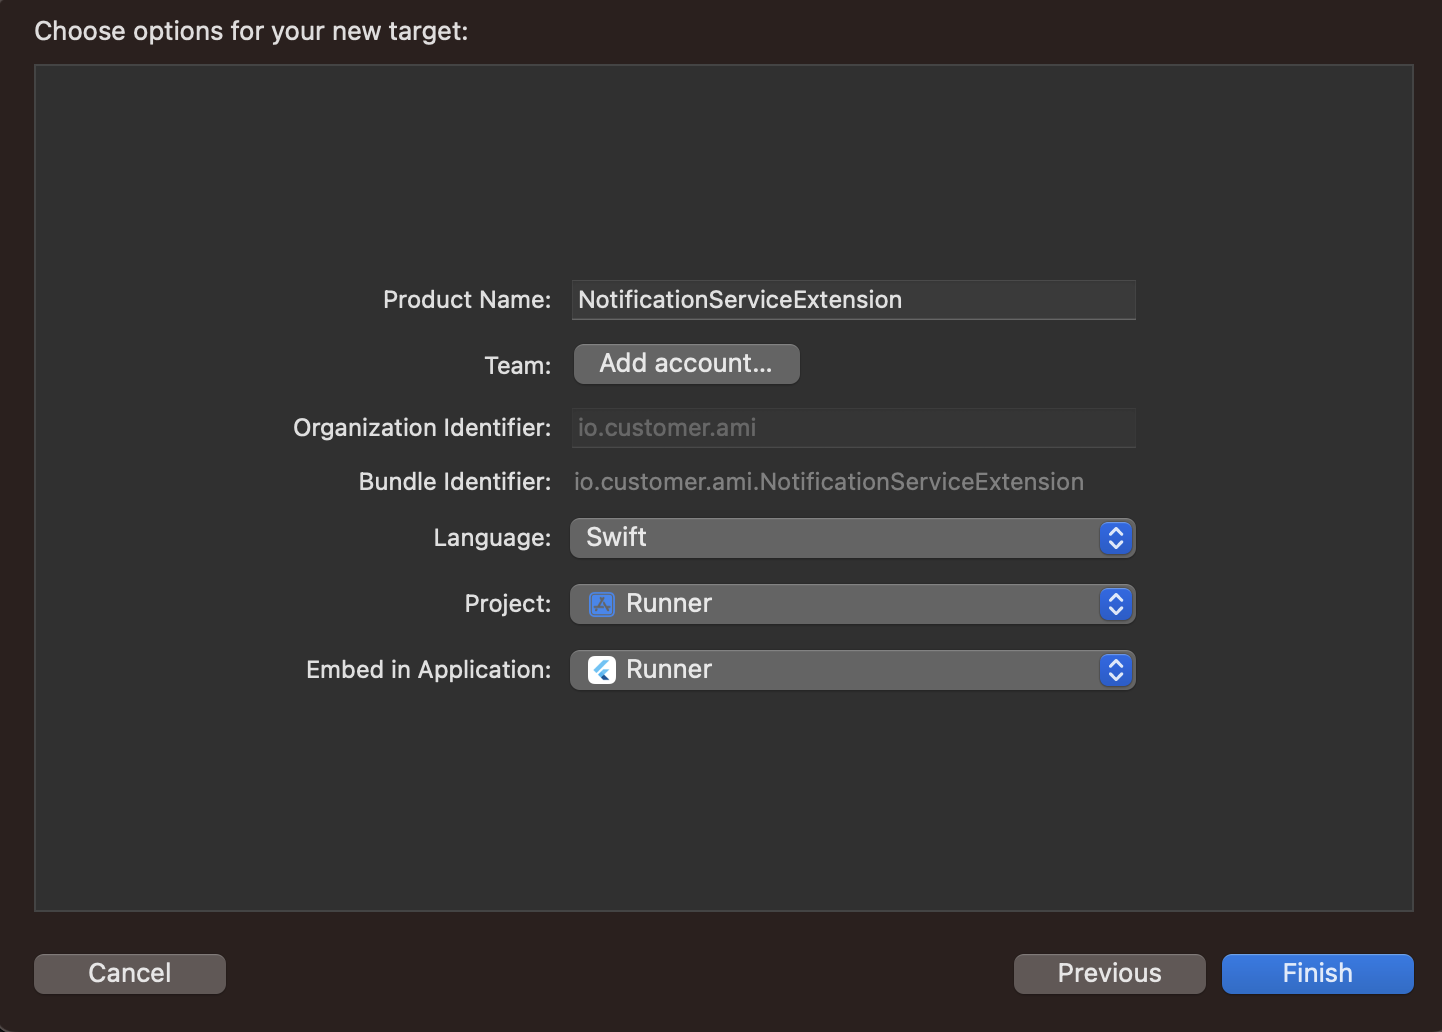
Enter a product name, like NotificationServiceExtension (which we use in our examples on this page), and click Finish.
-
When presented with the dialog below, click Cancel. This will help Xcode continue debugging your app and not just the extension you just added.
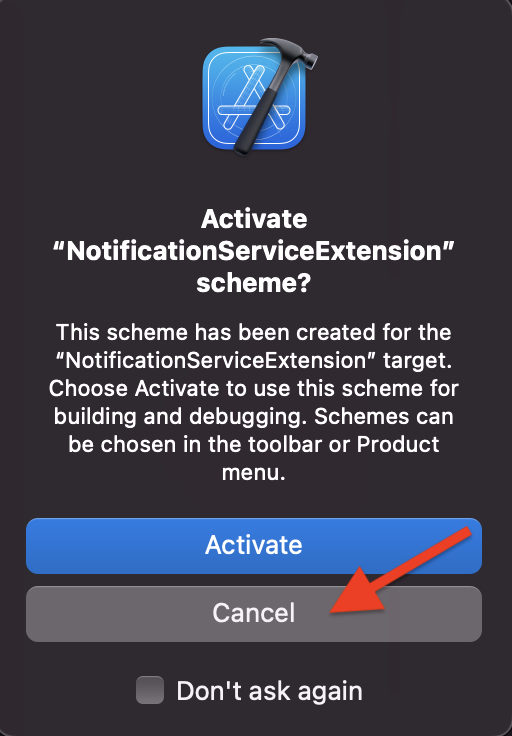
Now you have another target in your project navigator named NotificationServiceExtension. We’ll configure this extension when we Integrate Push Notifications in the following section.
Integrate push capabilities in your app
Pick your push provider (APN or FCM) and the language your native files are written in to get started (Objective C or Swift).
APN/Objective-C
-
Open the file
ios/Podfileand make the following modifications:RUBYpod 'CustomerIO/MessagingPushAPN', '~> 2.14.2' -
Outside your main target, add the following line to the Podfile.
RUBYpod 'CustomerIO/MessagingPushAPN', '~> 2.14.2' -
Open your terminal, go to your project path and run
pod install --project-directory=ios. When dependencies finish installing, you should see a message like this:Pod installation complete! There are X dependencies from the Podfile and Y total pods installed. -
Open
ios/<YourAppName>.xcworkspacein Xcode, and add a new Swift file to your project. In our examples, we’ve named this fileMyAppPushNotificationsHandler.swiftbut you should use a name that makes sense to you. -
Replace the file contents with the code below. We’re calling our class
MyAppPushNotificationsHandler, but you might want to rename it to fit your app.
import Foundation
import CioMessagingPushAPN
import UserNotifications
import CioTracking

@objc
public class MyAppPushNotificationsHandler : NSObject {

  public override init() {}

  @objc(setupCustomerIOClickHandling:)
  public func setupCustomerIOClickHandling(withNotificationDelegate notificationDelegate: UNUserNotificationCenterDelegate) {
    // This line of code is required in order for the Customer.io SDK to handle push notification click events.
    // We are working on removing this requirement in a future release.
    // Remember to modify the siteId and apiKey with your own values.
    // let siteId = "YOUR SITE ID HERE"
    // let apiKey = "YOUR API KEY HERE"
    CustomerIO.initialize(siteId: siteId, apiKey: apiKey, region: Region.US) { config in
      config.autoTrackDeviceAttributes = true
    }

    let center  = UNUserNotificationCenter.current()
    center.delegate = notificationDelegate
  }

  @objc(application:deviceToken:)
  public func application(_ application: UIApplication, didRegisterForRemoteNotificationsWithDeviceToken deviceToken: Data) {
    MessagingPush.shared.application(application, didRegisterForRemoteNotificationsWithDeviceToken: deviceToken)
  }

  @objc(application:error:)
  public func application(_ application: UIApplication, didFailToRegisterForRemoteNotificationsWithError error: Error) {
    MessagingPush.shared.application(application, didFailToRegisterForRemoteNotificationsWithError: error)
  }

  @objc(userNotificationCenter:didReceiveNotificationResponse:withCompletionHandler:)
  public func userNotificationCenter(_ center: UNUserNotificationCenter, didReceive response: UNNotificationResponse, withCompletionHandler completionHandler: @escaping () -> Void) {
    let handled = MessagingPush.shared.userNotificationCenter(center, didReceive: response,
  withCompletionHandler: completionHandler)

    // If the Customer.io SDK does not handle the push, it's up to you to handle it and call the
    // completion handler. If the SDK did handle it, it called the completion handler for you.
    if !handled {
      completionHandler()
    }
  }
}- Open
AppDelegate.hand add the following import statements and theUNUserNotificationCenterDelegatedelegate.
#import <RCTAppDelegate.h>
#import <UIKit/UIKit.h>
#import <UserNotifications/UserNotifications.h>
@interface AppDelegate: RCTAppDelegate<UNUserNotificationCenterDelegate>

@end
-
Open
AppDelegate.mand import your project’s Objective-C header file.OBJECTIVE-C#import <MyAppProject-Swift.h> -
Inside AppDelegate’s implementation, create an object of
MyAppPushNotificationsHandler(remember to substitute the name of your handler).
@implementation AppDelegate
  // Create Object of class MyAppPushNotificationsHandler
  MyAppPushNotificationsHandler* pnHandlerObj = [[MyAppPushNotificationsHandler alloc] init];
...-
Update
AppDelegate.mto register a device to the current app user and handle push notifications. See comments in the sample below to understand what the code does!OBJECTIVE-C- (BOOL)application:(UIApplication *)application didFinishLaunchingWithOptions:(NSDictionary *)launchOptions { ... [pnHandlerObj setupCustomerIOClickHandling:self]; return YES; } - (void)application:(UIApplication *)application didRegisterForRemoteNotificationsWithDeviceToken:(NSData *)deviceToken { // Register device to receive push notifications with device token [pnHandlerObj application:application deviceToken:deviceToken]; } - (void)application:(UIApplication *)application didFailToRegisterForRemoteNotificationsWithError:(NSError *)error { [pnHandlerObj application:application error:error]; } // Send push notification click events to the Customer.IO SDK for processing - (void)userNotificationCenter:(UNUserNotificationCenter *)center didReceiveNotificationResponse:(UNNotificationResponse *)response withCompletionHandler:(void(^)(void))completionHandler { [pnHandlerObj userNotificationCenter:center didReceiveNotificationResponse:response withCompletionHandler:completionHandler]; } // (Optional) Add the following code to show your push notifications even when your app is in the foreground. - (void)userNotificationCenter:(UNUserNotificationCenter* )center willPresentNotification:(UNNotification* )notification withCompletionHandler:(void (^)(UNNotificationPresentationOptions options))completionHandler { completionHandler(UNNotificationPresentationOptionAlert + UNNotificationPresentationOptionSound); }
-
In XCode, select your
NotificationServiceExtension. Go to File > New > File > Swift File and click Next. -
Enter a file name, like
MyAppNotificationServicePushHandler, and click Create. This adds a new swift file in your extension target. -
Copy the content from the snippet below and replace the code in your
MyAppNotificationServicePushHandler.swiftfile. You might change the name of the class to fit your project. Refer the comments in the snippet below for more information.SWIFTimport Foundation import UserNotifications import CioMessagingPushAPN import CioTracking @objc public class MyAppNotificationServicePushHandler : NSObject { public override init() {} @objc(didReceive:withContentHandler:) public func didReceive(_ request: UNNotificationRequest, withContentHandler contentHandler: @escaping (UNNotificationContent) -> Void) { // You can configure the SDK here // Update region to .EU for your EU-based workspace CustomerIO.initialize(siteId: "YourSiteID", apiKey: "YourAPIKey", region: .US) { config in config.autoTrackDeviceAttributes = true config.logLevel = .info } MessagingPush.shared.didReceive(request, withContentHandler: contentHandler) } @objc(serviceExtensionTimeWillExpire) public func serviceExtensionTimeWillExpire() { MessagingPush.shared.serviceExtensionTimeWillExpire() } } -
In your
NotificationService.mfile, import the auto-generated header file—e.g.YourTargetName-Swift.h.SWIFT#import <NotificationServiceExtension-Swift.h> -
Create an object of class
MyAppNotificationServicePushHandlerin yourNotificationServiceExtensionimplementation and call the functions below.SWIFT#import "NotificationService.h" #import <NotificationServiceExtension-Swift.h> @interface NotificationService () @property (nonatomic, strong) void (^contentHandler)(UNNotificationContent *contentToDeliver); @property (nonatomic, strong) UNMutableNotificationContent *bestAttemptContent; @end @implementation NotificationServiceExtension // Create object of class MyAppNotificationServicePushHandler MyAppNotificationServicePushHandler* nsHandlerObj = nil; // Initialize the object + (void)initialize{ nsHandlerObj = [[MyAppNotificationServicePushHandler alloc] init]; } - (void)didReceiveNotificationRequest:(UNNotificationRequest *)request withContentHandler:(void (^)(UNNotificationContent * _Nonnull))contentHandler { [nsHandlerObj didReceive:request withContentHandler:contentHandler]; } - (void)serviceExtensionTimeWillExpire { [nsHandlerObj serviceExtensionTimeWillExpire]; } @end
Now you can run your app on a physical device and send yourself a push notification with images and deep links to test your implementation. You’ll have to use a physical device because simulators can’t receive push notifications.
APN/Swift
-
Open the file
ios/Podfileand make the following modifications:RUBYpod 'CustomerIO/MessagingPushAPN', '~> 2.14.2' -
Add the following line to your Podfile.
RUBYtarget 'NotificationServiceExtension' do pod 'CustomerIO/MessagingPushAPN', '~> 2.14.2' end -
Open your terminal, go to your project path and run
pod install --project-directory=ios. When dependencies finish installing, you should see a message like this:Pod installation complete! There are X dependencies from the Podfile and Y total pods installed. -
In your iOS subfolder, open
AppDelegate.swiftand add a line inside theapplicationfunction. We have an example in our sample app. This is a workaround for an issue preventing iOS devices from being added to the Podfile after being identified.SWIFTfunc application(_ application: UIApplication, didFinishLaunchingWithOptions launchOptions: [UIApplication.LaunchOptionsKey: Any]?) -> Bool { // Important to call this code *before* you call registerForPushNotifications. CustomerIO.initialize(siteId: "YOUR SITE ID", apiKey: "YOUR API KEY", region: Region.US, configure: nil) -
Add the following code to your app.
SWIFTimport CioTracking import CioMessagingPushAPN class AppDelegate: NSObject, UIApplicationDelegate { func application( _ application: UIApplication, didFinishLaunchingWithOptions launchOptions: [UIApplication.LaunchOptionsKey: Any]? = nil ) -> Bool { // This fixes an issue in which the React Native SDK identifies // a profile, but an iOS device isn't added to the profile. // Important to call this code before calling `registerForRemoteNotifications`. CustomerIO.initialize(siteId: "YOUR SITE ID", apiKey: "YOUR API KEY", region: Region.US, configure: nil) // It's a good practice to register for remote push when the app starts. // This asserts that the Customer.io SDK always has a valid device token. UIApplication.shared.registerForRemoteNotifications() return true } } // PUSH NOTIFICATIONS func application(_ application: UIApplication, didRegisterForRemoteNotificationsWithDeviceToken deviceToken: Data) { MessagingPush.shared.application(application, didRegisterForRemoteNotificationsWithDeviceToken: deviceToken) } func application(_ application: UIApplication, didFailToRegisterForRemoteNotificationsWithError error: Error) { MessagingPush.shared.application(application, didFailToRegisterForRemoteNotificationsWithError: error) } -
Add a notification service extension to call the appropriate Customer.io functions. This lets your app display rich push notifications, including images, etc. However, if you want to enable deep links, you should continue to the Deep links section below.
SWIFTimport UserNotifications import CioMessagingPushAPN import CioTracking class NotificationService: UNNotificationServiceExtension { override func didReceive(_ request: UNNotificationRequest, withContentHandler contentHandler: @escaping (UNNotificationContent) -> Void) { // You can configure the SDK here // Update region to .EU for your EU-based workspace CustomerIO.initialize(siteId: "YourSiteID", apiKey: "YourAPIKey", region: .US) { config in config.autoTrackDeviceAttributes = true config.logLevel = .info } MessagingPush.shared.didReceive(request, withContentHandler: contentHandler) } override func serviceExtensionTimeWillExpire() { MessagingPush.shared.serviceExtensionTimeWillExpire() } }
FCM/Objective-C
-
Open the file
ios/Podfileand make the following modifications:RUBYpod 'CustomerIO/MessagingPushFCM', '~> 2.14.2' pod 'Firebase' pod 'FirebaseMessaging' -
Add the following line outside your main target.
RUBY# You may need to add this line, as required by FCM, to your Podfile if you encounter errors during 'pod install' use_frameworks! :linkage => :static target 'NotificationServiceExtension' do pod 'CustomerIO/MessagingPushFCM', '~> 2.14.2' end -
Open your terminal, go to your project path and run
pod install --project-directory=ios. When dependencies finish installing, you should see a message like this:Pod installation complete! There are X dependencies from the Podfile and Y total pods installed. -
Open
ios/<YourAppName>.xcworkspacein Xcode, and add a new Swift file to your project. In our examples, we’ve named this fileMyAppPushNotificationsHandler.swiftbut you should use a name that makes sense to you. -
Replace the file contents with the code below. We’re calling our class
MyAppPushNotificationsHandler, but you might want to rename it to fit your app.
import Foundation
import CioMessagingPushFCM
import UserNotifications
import FirebaseMessaging
import CioTracking

@objc
public class MyAppPushNotificationsHandler : NSObject {

  public override init() {}

  @objc(setupCustomerIOClickHandling:)
  public func setupCustomerIOClickHandling(withNotificationDelegate notificationDelegate: UNUserNotificationCenterDelegate) {
    // This line of code is required in order for the Customer.io SDK to handle push notification click events.
    // We are working on removing this requirement in a future release.
    // Remember to modify the siteId and apiKey with your own values.
    // let siteId = "YOUR SITE ID HERE"
    // let apiKey = "YOUR API KEY HERE"
    CustomerIO.initialize(siteId: siteId, apiKey: apiKey, region: Region.US) { config in
      config.autoTrackDeviceAttributes = true
    }

    let center  = UNUserNotificationCenter.current()
    center.delegate = notificationDelegate
  }

  // Register device on receiving a device token (FCM)
  @objc(didReceiveRegistrationToken:fcmToken:)
  public func didReceiveRegistrationToken(_ messaging: Messaging, didReceiveRegistrationToken fcmToken: String?) {
    MessagingPush.shared.messaging(messaging, didReceiveRegistrationToken: fcmToken)
  }

  @objc(userNotificationCenter:didReceiveNotificationResponse:withCompletionHandler:)
  public func userNotificationCenter(_ center: UNUserNotificationCenter, didReceive response: UNNotificationResponse, withCompletionHandler completionHandler: @escaping () -> Void) {
    let handled = MessagingPush.shared.userNotificationCenter(center, didReceive: response,
  withCompletionHandler: completionHandler)

    // If the Customer.io SDK does not handle the push, it's up to you to handle it and call the
    // completion handler. If the SDK did handle it, it called the completion handler for you.
    if !handled {
      completionHandler()
    }
  }
}- Open
AppDelegate.hand add the following import statements, theUNUserNotificationCenterDelegatedelegate, and theFIRMessagingDelegatedelegate.
#import <RCTAppDelegate.h>
#import <UIKit/UIKit.h>
#import <UserNotifications/UserNotifications.h>
#import <FirebaseMessaging/FIRMessaging.h>
@interface AppDelegate: RCTAppDelegate<UNUserNotificationCenterDelegate, FIRMessagingDelegate>

@end
-
In
AppDelegate.m, import your project’s Objective-C Generated header file andFirebaseCore.OBJECTIVE-C#import <MyAppProject-Swift.h> #import <FirebaseCore.h> -
Inside AppDelegate’s implementation, create an object of
MyAppPushNotificationsHandler(remember to substitute the name of your handler).
@implementation AppDelegate
  // Create Object of class MyAppPushNotificationsHandler
  MyAppPushNotificationsHandler* pnHandlerObj = [[MyAppPushNotificationsHandler alloc] init];
...-
Make the following updates to your
AppDelegate.mfile. See comments in the sample below to understand what the code does!OBJECTIVE-C- (BOOL)application:(UIApplication *)application didFinishLaunchingWithOptions:(NSDictionary *)launchOptions { // Configure Firebase [FIRApp configure]; // Set FCM messaging delegate [FIRMessaging messaging].delegate = self; ... [pnHandlerObj setupCustomerIOClickHandling:self]; return YES; } - (void)messaging:(FIRMessaging *)messaging didReceiveRegistrationToken:(NSString *)fcmToken { [pnHandlerObj didReceiveRegistrationToken:messaging fcmToken: fcmToken]; } // Send push notification click events to the Customer.IO SDK for processing - (void)userNotificationCenter:(UNUserNotificationCenter *)center didReceiveNotificationResponse:(UNNotificationResponse *)response withCompletionHandler:(void(^)(void))completionHandler { [pnHandlerObj userNotificationCenter:center didReceiveNotificationResponse:response withCompletionHandler:completionHandler]; } // (Optional) Add the following code to show your push notifications even when your app is in the foreground. - (void)userNotificationCenter:(UNUserNotificationCenter* )center willPresentNotification:(UNNotification* )notification withCompletionHandler:(void (^)(UNNotificationPresentationOptions options))completionHandler { completionHandler(UNNotificationPresentationOptionAlert + UNNotificationPresentationOptionSound); }
-
In XCode, select your
NotificationServiceExtension. -
Select File > New > File > Swift File and click Next.
-
Enter a file name, like
MyAppNotificationServicePushHandler, and click Create. This adds a new swift file in your extension target. -
Copy the content from the snippet below and replace the code in your
MyAppNotificationServicePushHandler.swiftfile. You might change the name of the class to fit your project. Refer the comments in the snippet below for more information.SWIFTimport Foundation import UserNotifications import CioMessagingPushFCM import CioTracking @objc public class MyAppNotificationServicePushHandler : NSObject { public override init() {} @objc(didReceive:withContentHandler:) public func didReceive(_ request: UNNotificationRequest, withContentHandler contentHandler: @escaping (UNNotificationContent) -> Void) { // You may choose to configure the SDK here // Update region to .EU for your EU-based workspace CustomerIO.initialize(siteId: "YourSiteID", apiKey: "YourAPIKey", region: .US) { config in config.autoTrackDeviceAttributes = true config.logLevel = .info } MessagingPush.shared.didReceive(request, withContentHandler: contentHandler) } @objc(serviceExtensionTimeWillExpire) public func serviceExtensionTimeWillExpire() { MessagingPush.shared.serviceExtensionTimeWillExpire() } } -
In your
NotificationService.mfile, import the auto-generated header file—e.g.YourTargetName-Swift.h.SWIFT#import <NotificationServiceExtension-Swift.h> -
Create an object of class
MyAppNotificationServicePushHandlerin yourNotificationServiceExtensionimplementation and call the functions below.SWIFT#import "NotificationService.h" #import <NotificationServiceExtension-Swift.h> @interface NotificationService () @property (nonatomic, strong) void (^contentHandler)(UNNotificationContent *contentToDeliver); @property (nonatomic, strong) UNMutableNotificationContent *bestAttemptContent; @end @implementation NotificationServiceExtension // Create object of class MyAppNotificationServicePushHandler MyAppNotificationServicePushHandler* nsHandlerObj = nil; // Initialize the object + (void)initialize{ nsHandlerObj = [[MyAppNotificationServicePushHandler alloc] init]; } - (void)didReceiveNotificationRequest:(UNNotificationRequest *)request withContentHandler:(void (^)(UNNotificationContent * _Nonnull))contentHandler { [nsHandlerObj didReceive:request withContentHandler:contentHandler]; } - (void)serviceExtensionTimeWillExpire { [nsHandlerObj serviceExtensionTimeWillExpire]; } @end
Now you can run your app on a physical device and send yourself a push notification with images and deep links to test your implementation. You’ll have to use a physical device because simulators can’t receive push notifications.
FCM/Swift
-
Open the file
ios/Podfileand make the following modifications:RUBYpod 'CustomerIO/MessagingPushFCM', '~> 2.14.2' pod 'Firebase' pod 'FirebaseMessaging' -
Add the following line to your Podfile.
RUBYtarget 'NotificationServiceExtension' do pod 'CustomerIO/MessagingPushFCM', '~> 2.14.2' end -
Open your terminal, go to your project path, and run
pod install --project-directory=ios. When dependencies finish installing, you should see a message like this:Pod installation complete! There are X dependencies from the Podfile and Y total pods installed. -
Update your
AppDelegate.swiftfile to handle push notifications.SWIFTimport CioMessagingPushFCM import CioTracking import Firebase import FirebaseMessaging class AppDelegate: NSObject, UIApplicationDelegate { func application( _ application: UIApplication, didFinishLaunchingWithOptions launchOptions: [UIApplication.LaunchOptionsKey: Any]? = nil ) -> Bool { // This fixes an issue in which the React Native SDK identifies // a profile, but an iOS device isn't added to the profile. // Important to call this code before calling `registerForRemoteNotifications`. CustomerIO.initialize(siteId: "YOUR SITE ID", apiKey: "YOUR API KEY", region: Region.US, configure: nil) // Configure Firebase FirebaseApp.configure() // Set FCM messaging delegate Messaging.messaging().delegate = self // You should register for remote push when the app starts. UIApplication.shared.registerForRemoteNotifications() return true } } extension AppDelegate: MessagingDelegate { func messaging(_ messaging: Messaging, didReceiveRegistrationToken fcmToken: String?) { MessagingPush.shared.messaging(messaging, didReceiveRegistrationToken: fcmToken) } } -
(Optional) Add this function to
AppDelegate.swiftif you want to show your push notifications even when the app is in the foreground.SWIFTfunc userNotificationCenter( _ center: UNUserNotificationCenter, willPresent notification: UNNotification, withCompletionHandler completionHandler: @escaping (UNNotificationPresentationOptions) -> Void ) { completionHandler([.list, .banner, .badge, .sound]) } -
Add a notification service extension to call the appropriate Customer.io functions. This lets your app display rich push notifications, including images, etc. However, if you want to enable deep links, you should continue to the Deep links section below.
SWIFTimport UserNotifications import CioMessagingPushFCM import CioTracking class NotificationService: UNNotificationServiceExtension { override func didReceive(_ request: UNNotificationRequest, withContentHandler contentHandler: @escaping (UNNotificationContent) -> Void) { // You may choose to configure the SDK here // Update region to .EU for your EU-based workspace CustomerIO.initialize(siteId: "YourSiteID", apiKey: "YourAPIKey", region: .US) { config in config.autoTrackPushEvents = true config.logLevel = .info } MessagingPush.shared.didReceive(request, withContentHandler: contentHandler) } override func serviceExtensionTimeWillExpire() { MessagingPush.shared.serviceExtensionTimeWillExpire() } }
Now you can run your app on a physical device and send yourself a push notification with images and deep links to test your implementation. You’ll have to use a physical device because simulators can’t receive push notifications.
Sound in push notifications (iOS Only)
When you send a push notification to iOS devices that uses our SDK, you can opt to send the Default system sound or no sound at all. If your audience’s phone is set to vibrate, or they’ve disabled sound permissions for your app, the Default setting will cause the device to vibrate rather than playing a sound.
In most cases, you should use the Default sound setting to make sure your audience hears (or feels) your message. But, before you send sound, you should understand:
- Your app needs permission from your users to play sounds. This is done by your app, not our SDKs. Here’s an example from our iOS sample app showing how to request sound permissions.
- iOS users can go into System Settings and disable sound permissions for your app. Enabling the Default setting doesn’t guarantee that your audience hears a sound when your message is delivered!
Prompt users to opt-into push notifications
Your audience has to opt into push notifications. To display the native iOS and Android push notification permission prompt, you’ll use the CustomerIO.showPromptForPushNotifications method.
You can configure push notifications to request authorization for sounds and badges as well (only on iOS). If a user opts into push notifications, the CustomerIO.showPromptForPushNotifications method will return Granted, otherwise it returns Denied as a string. If the user has not yet been asked to opt into notifications, the method will return NotDetermined (only for iOS).
var options = {"ios" : {"sound" : true, "badge" : true}}
CustomerIO.showPromptForPushNotifications(options).then(status => {
  switch(status) {
    case "Granted":
      // Push permission is granted, your app can now send push notifications to the user
      break;
    case "Denied":
      // App is not allowed to send push notifications to the user
      // You might need to explain users why your app needs permission to send notifications
      break;
    case "NotDetermined": // Only for iOS
      // Push permission status is not determined
      break;
  }
}).catch(error => {
  // Failed to show push permission prompt
  console.log(error)
})
Get a user’s permission status
To get a user’s current permission status, call CustomerIO.getPushPermissionStatus() method. This returns a promise with the current status as a string.
CustomerIO.getPushPermissionStatus().then(status => {
  console.log("Push permission status is - " + status)
})
Optional: Remove POST_NOTIFICATIONS permission from Android apps
By default, the SDK includes the POST_NOTIFICATIONS permission which is required by Android 13 to show notifications on Android device. However, if you do not want to include the permission because don’t use notifications, or for any other reason, you can remove the permission by adding the following line to your android/app/src/main/AndroidManifest.xml file:
<uses-permission android:name="android.permission.POST_NOTIFICATIONS" tools:node="remove"/>Test your implementation
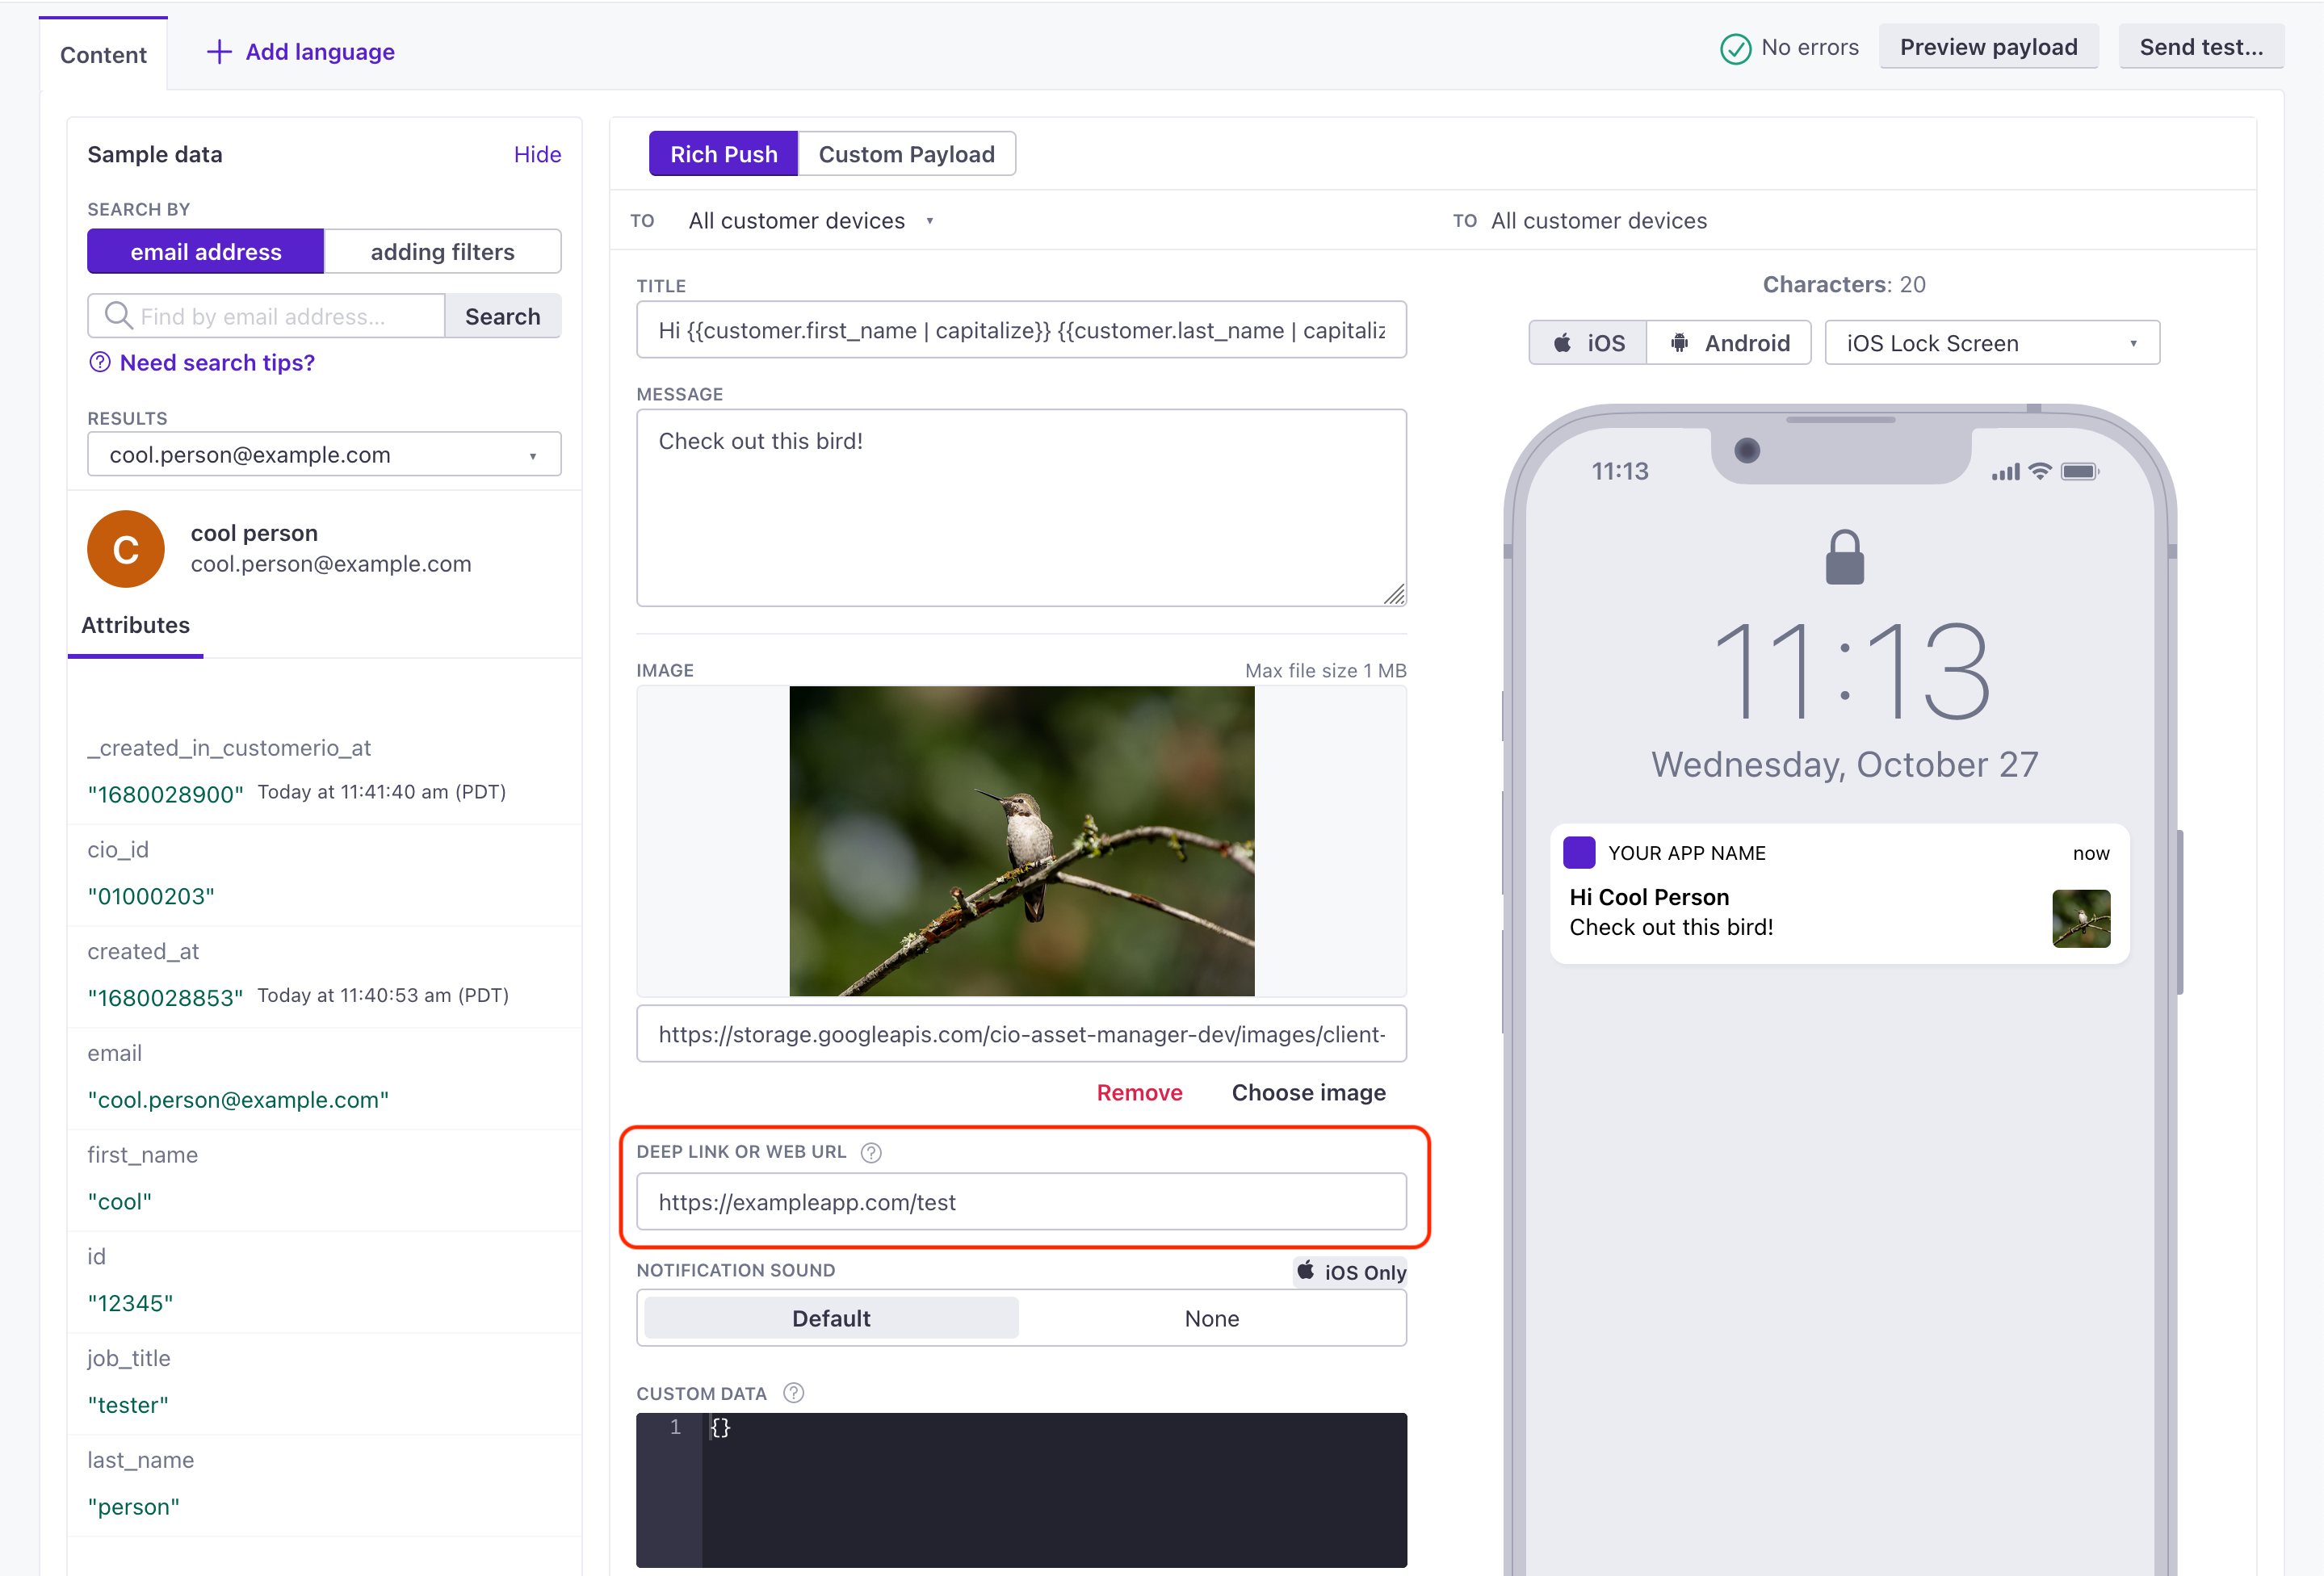
After you set up rich push, you should test your implementation. Below, we show the payload structure we use for iOS and Android. In general, you can use our regular rich push editor; it’s set up to send messages using the JSON structure we outline below.
If you want to fashion your own payload, you can use our custom payload.
iOS APNs payload
{
    "aps": {
        // basic iOS message and options go here
        "mutable-content": 1,
        "alert": {
            "title": "string", //(optional) The title of the notification.
            "body": "string" //(optional) The message you want to send.
        }
    },
    "CIO": {
        "push": {
            "link": "string", //generally a deep link, i.e. my-app:://...
            "image": "string" //HTTPS URL of your image, including file extension
        }
    }
}- A push payload intended for an iOS device.
- Contains options supported by the Customer.io SDK.
iOS FCM payload
{
  "message": {
    "apns": {
      "payload": {
        "aps": {
          // basic iOS message and options go here
          "mutable-content": 1,
          "alert": {
            "title": "string", //(optional) The title of the notification.
            "body": "string" //(optional) The message you want to send.
           }
        },
        "CIO": {
          "push": {
            "link": "string", //generally a deep link, i.e. my-app://... or https://yourwebsite.com/...
            "image": "string" //HTTPS URL of your image, including file extension
          }
        }
      },
      "headers": {
        // (optional) headers to send to the Apple Push Notification Service.
        "apns-priority": 10
      }
    }
  }
}- The base object for all FCM payloads.
- Defines a payload for iOS devices sent through Firebase Cloud Messaging (FCM).
- Contains a push payload.
- headersobjectHeaders defined by Apple's payload reference that you want to pass through FCM.
Android payload
{
  "message": {
    "data": {
      "title": "string", //(optional) The title of the notification.
      "body": "string", //The message you want to send.
      "image": "string", //https URL to an image you want to include in the notification
      "link": "string" //Deep link in the format remote-habits://deep?message=hello&message2=world
    }
  }
}- The parent object for all push payloads.