

Automation concepts & settings
Automations are automated workflows you set up to send people messages and perform other actions when they meet your criteria. They're the most flexible, robust automation offered by Customer.io. This page introduces the concepts behind automations to help you get started.
If you’re new to Customer.io, checkout automations, broadcasts, and transactional messages to make sure you’re creating the right kind of automation.
How it works
An automation is a workflow to send messages and manipulate data in Customer.io. It consists of four major components:
- Trigger: this determines who enters your automation (trigger and filter conditions) and when (frequency setting). Filters are optional.
- Goals: the outcome you want your customers to achieve through the automation. You don’t need to define a goal, but it can be helpful to gauge the success and health of your automations.
- Exit criteria: these determine if people should leave your automation early or not.
- Workflows: the messages you want to send and other actions you want to perform for people who enter your automation.
Your automation starts when someone (or some data) matches your trigger condition. Then your customers move through the workflow—we call this a journey A profile's path through an automation workflow. If the automation is triggered by a webhook, then a journey captures the webhook's path, not a profile's.
Automation setup
Automation triggers
Your automation trigger determines who enters your automation and when. Most triggers are based around people, like when they match certain criteria. Typically, these people are the subject of your automation—you’ll send them messages, set their attributes, and so on.
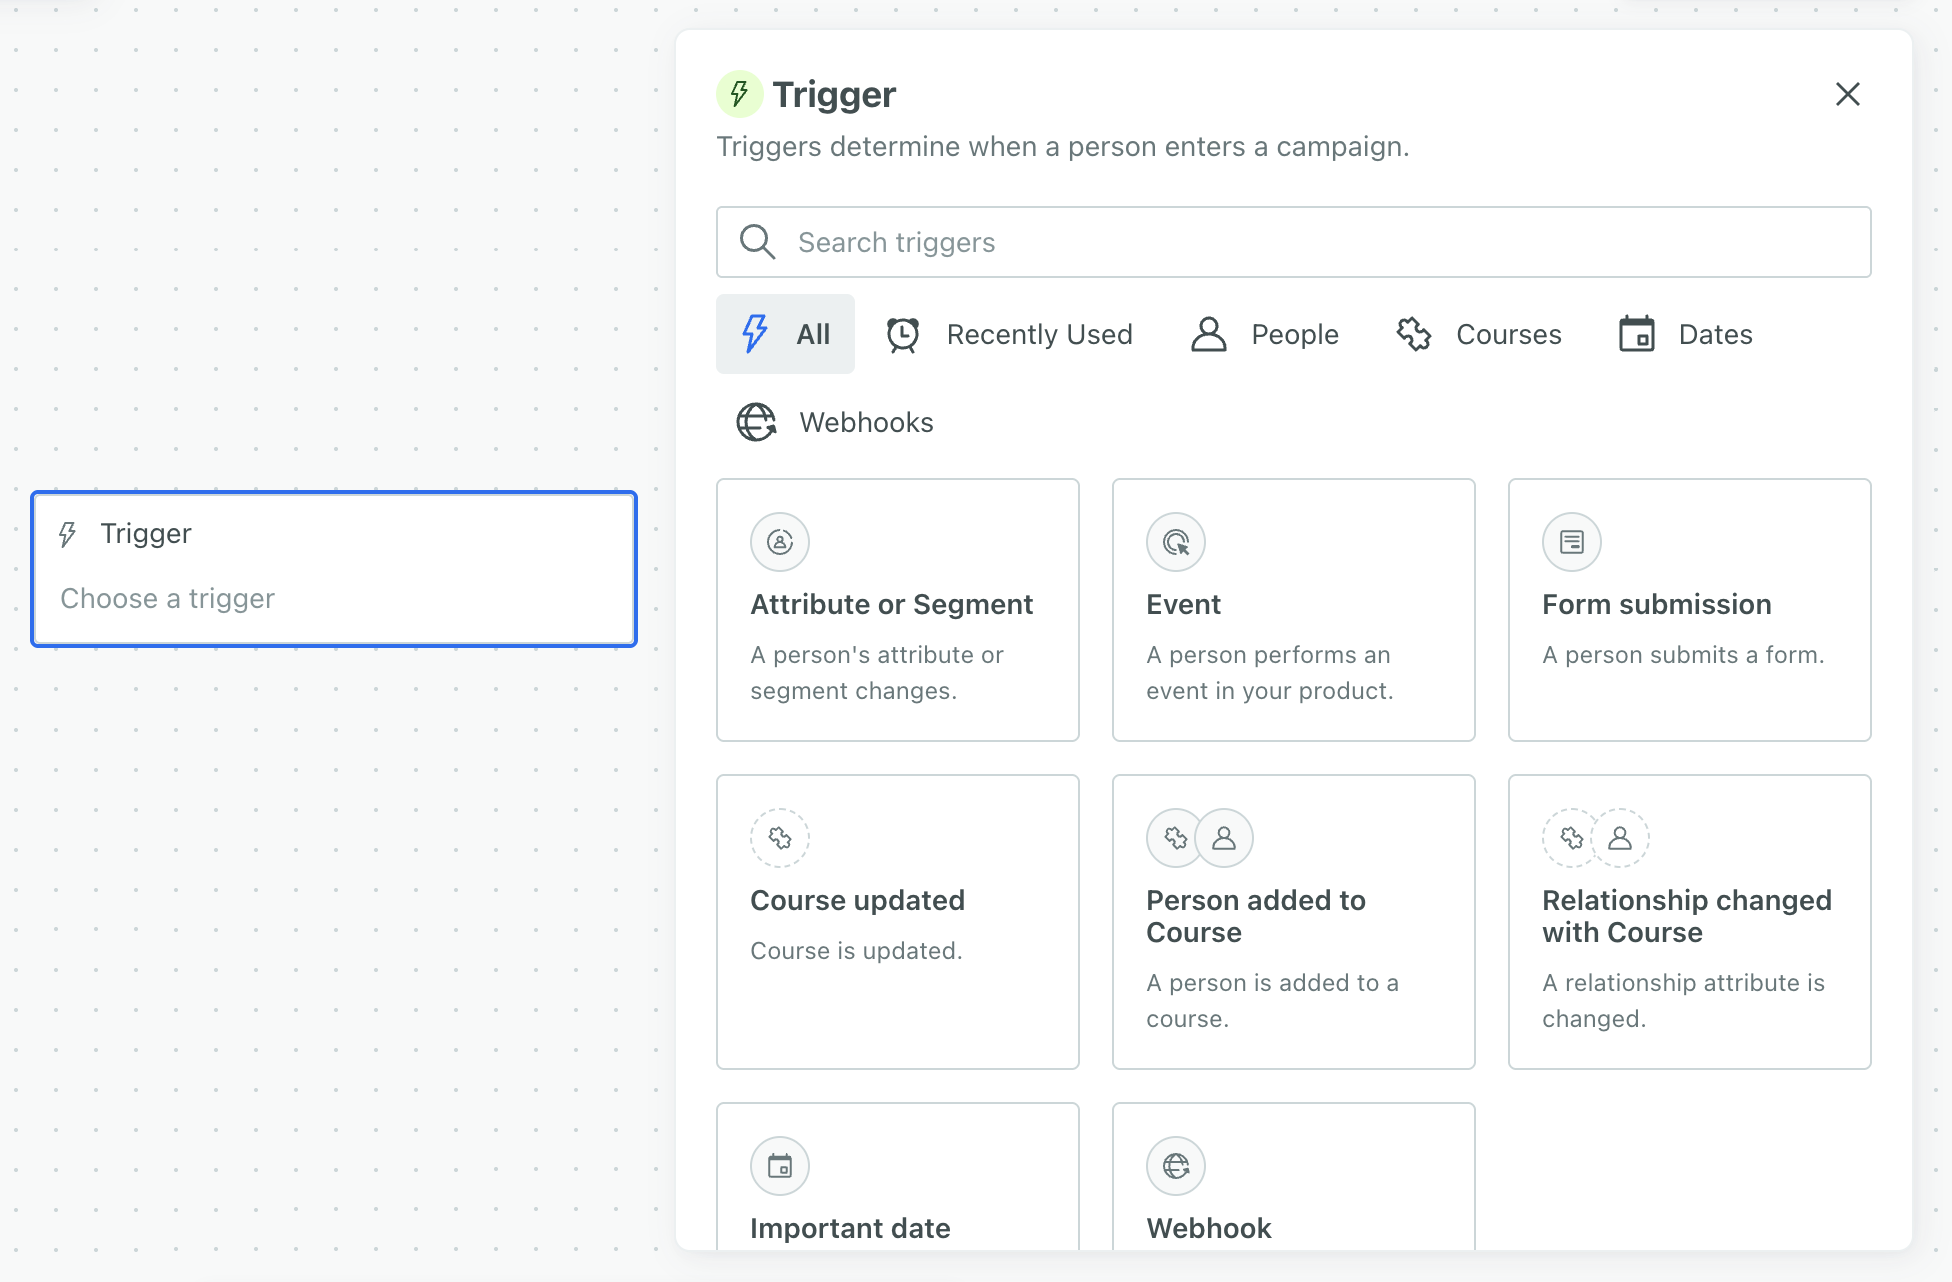
Trigger options
Attribute or Segment
The record that represents a person or object in Customer.io. A person is the human; their profile is everything you know about them in your workspace, like their attributes, activity, and message history. People and objects both have profiles, and we bill based on the total number of profiles in your account.
attributes, segmentsA segment is a group of people in your workspace. Use segments to trigger automations, track membership over time, or fine-tune your audience. There are three types of segments: data-driven, snapshot, and manual. Data-driven segments automatically update when people start or stop matching criteria. Snapshot segments capture everyone who matches at a point in time and only change when you refresh them. Manual segments are static groups of people.
, or both. Use segments if you want to track people who match this criteria over time or reuse the criteria as a trigger for other automations. You can set segment criteria based on your audience’s attributes, events, etc. Use attributes alongside segments or to quickly target specific profile attributes without creating or finding a segment. This trigger is best for automations like recurring NPS surveys, onboarding drip automations, and inactivity reminders.Event
Something that a person in your workspace did. Events can trigger automations, add people to segments, etc, and you can use properties from events to personalize messages.
-triggered automation helps you respond to a person’s activity in your app or website. For instance, you could trigger an automation based on a user abandoning their cart, viewing a specific page on your app, or completing an order.Form submission
Connected Forms in Customer.io allow you to automatically trigger automations, send data to other services, and add or update people when they submit forms on your website or in your app.
responses to trigger automations. You can connect a form to your workspace or integrate with Facebook Lead Ads. Use this type of automation to send messages to nurture new leads or respond to support requests.Important date
A key-value pair that you associate with a person or an object—like a person's name, the date they were created in your workspace, or a company's billing date etc. Use attributes to target people and personalize messages.
that people or custom objectsAn object is a non-person entity that you can associate with one or more people—like a company, account, or online course.
have. You can trigger based on any attributes that are properly formatted dates. This is useful for recurring automations like birthdays, anniversaries, subscription renewals, and payment reminders.Geofence set
A named group of geofences that you act on together—for example, trigger a campaign when a person enters any geofence in the set. When a person crosses a geofence, our mobile SDKs send a Geofence Transition event for each geofence set the geofence belongs to.
Object updated
Use Object updated when you want people to enter the automation every time an object An object is a non-person entity that you can associate with one or more people—like a company, account, or online course.
You’ll see this as “Object_type_name updated” in your trigger list. In the image above, “Course updated” is an example.
When you use objects to trigger automations, you can choose who enters into the automation. The audience could be:
- every person in the object
- certain people related to the object
Relationship added or changed
A relationship is the association between an object An object is a non-person entity that you can associate with one or more people—like a company, account, or online course.
You’ll see this as “Person added” or “Relationship changed” in your trigger list. In the image above, “Person added to Course” and “Relationship changes with Course” are examples.
When you use relationships to trigger automations, you can choose who enters into the automation. That is, the recipient of the message in this kind of automation doesn’t have to be the person in the relationship that triggered it. The audience could be:
- the person whose relationship to the object is updated (default)
- every person in the object
- certain people related to the object
Webhook
A webhook triggers a automation based on data from an external service. The purpose of your automation is to manipulate this data and associate it with people, much like you can with Zapier or Segment, but entirely within an automation. Because data, not people, is the subject of your automation, webhook-triggered automations don’t typically send messages directly; rather, they let you associate data with people, which can trigger subsequent automations.
Webhook automations help you perform one-to-many interactions with your audience, like notifying a group of people when you post a job or a product becomes available that a cohort of your audience is interested in.
Goals
A goal helps you track the success of an automation based on whether a person performs an event, enters a segment, or exits a segment.
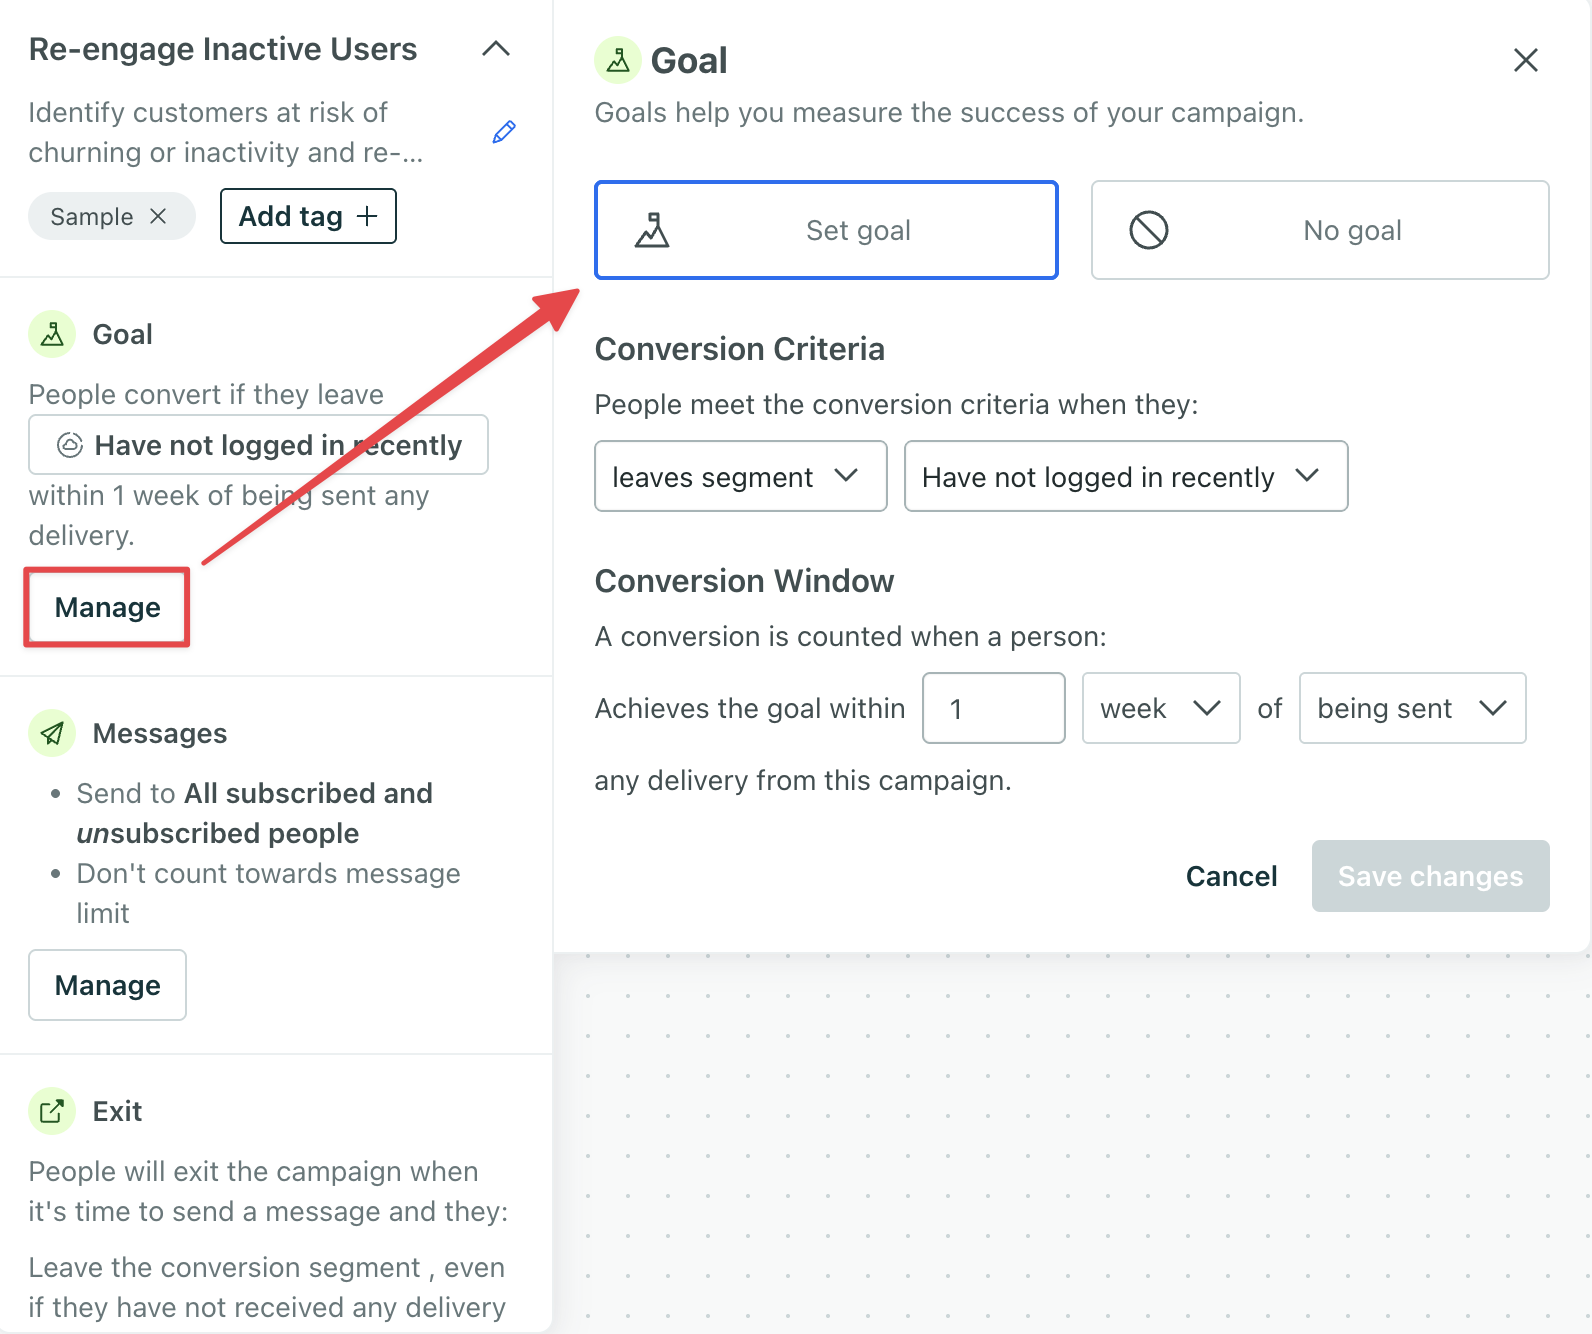
If a person achieves your goal, we mark the message The instance of a message sent to a person. When you set up a message, you determine an audience for your message. Each individual "send"—the version of a message sent to a single member of your audience—is a delivery. A profile's path through an automation workflow. If the automation is triggered by a webhook, then a journey captures the webhook's path, not a profile's.
We track conversions for the following message/delivery types:
| Conversions attributed | Conversions not attributed |
|---|---|
| Slack Message | |
| SMS | Create or update person action |
| Customer.io Push Notifications | |
| Customer.io In-app Messages | |
| Webhooks1 |
Slack and Create or update person actions are often internal or used for analytics purposes; they don’t always send messages to end-users. For that reason, we don’t attach conversions to them. You can enable webhook conversions on individual webhook actions.
Exit conditions
Exit conditions determine if or when a person should exit your automation. For example, imagine that you have an automation to re-engage users if they haven’t logged into your platform for a week; your goal is for people to log back into your service. When people do log in, you probably want them to exit the automation so you stop sending them messages after they achieve your goal.
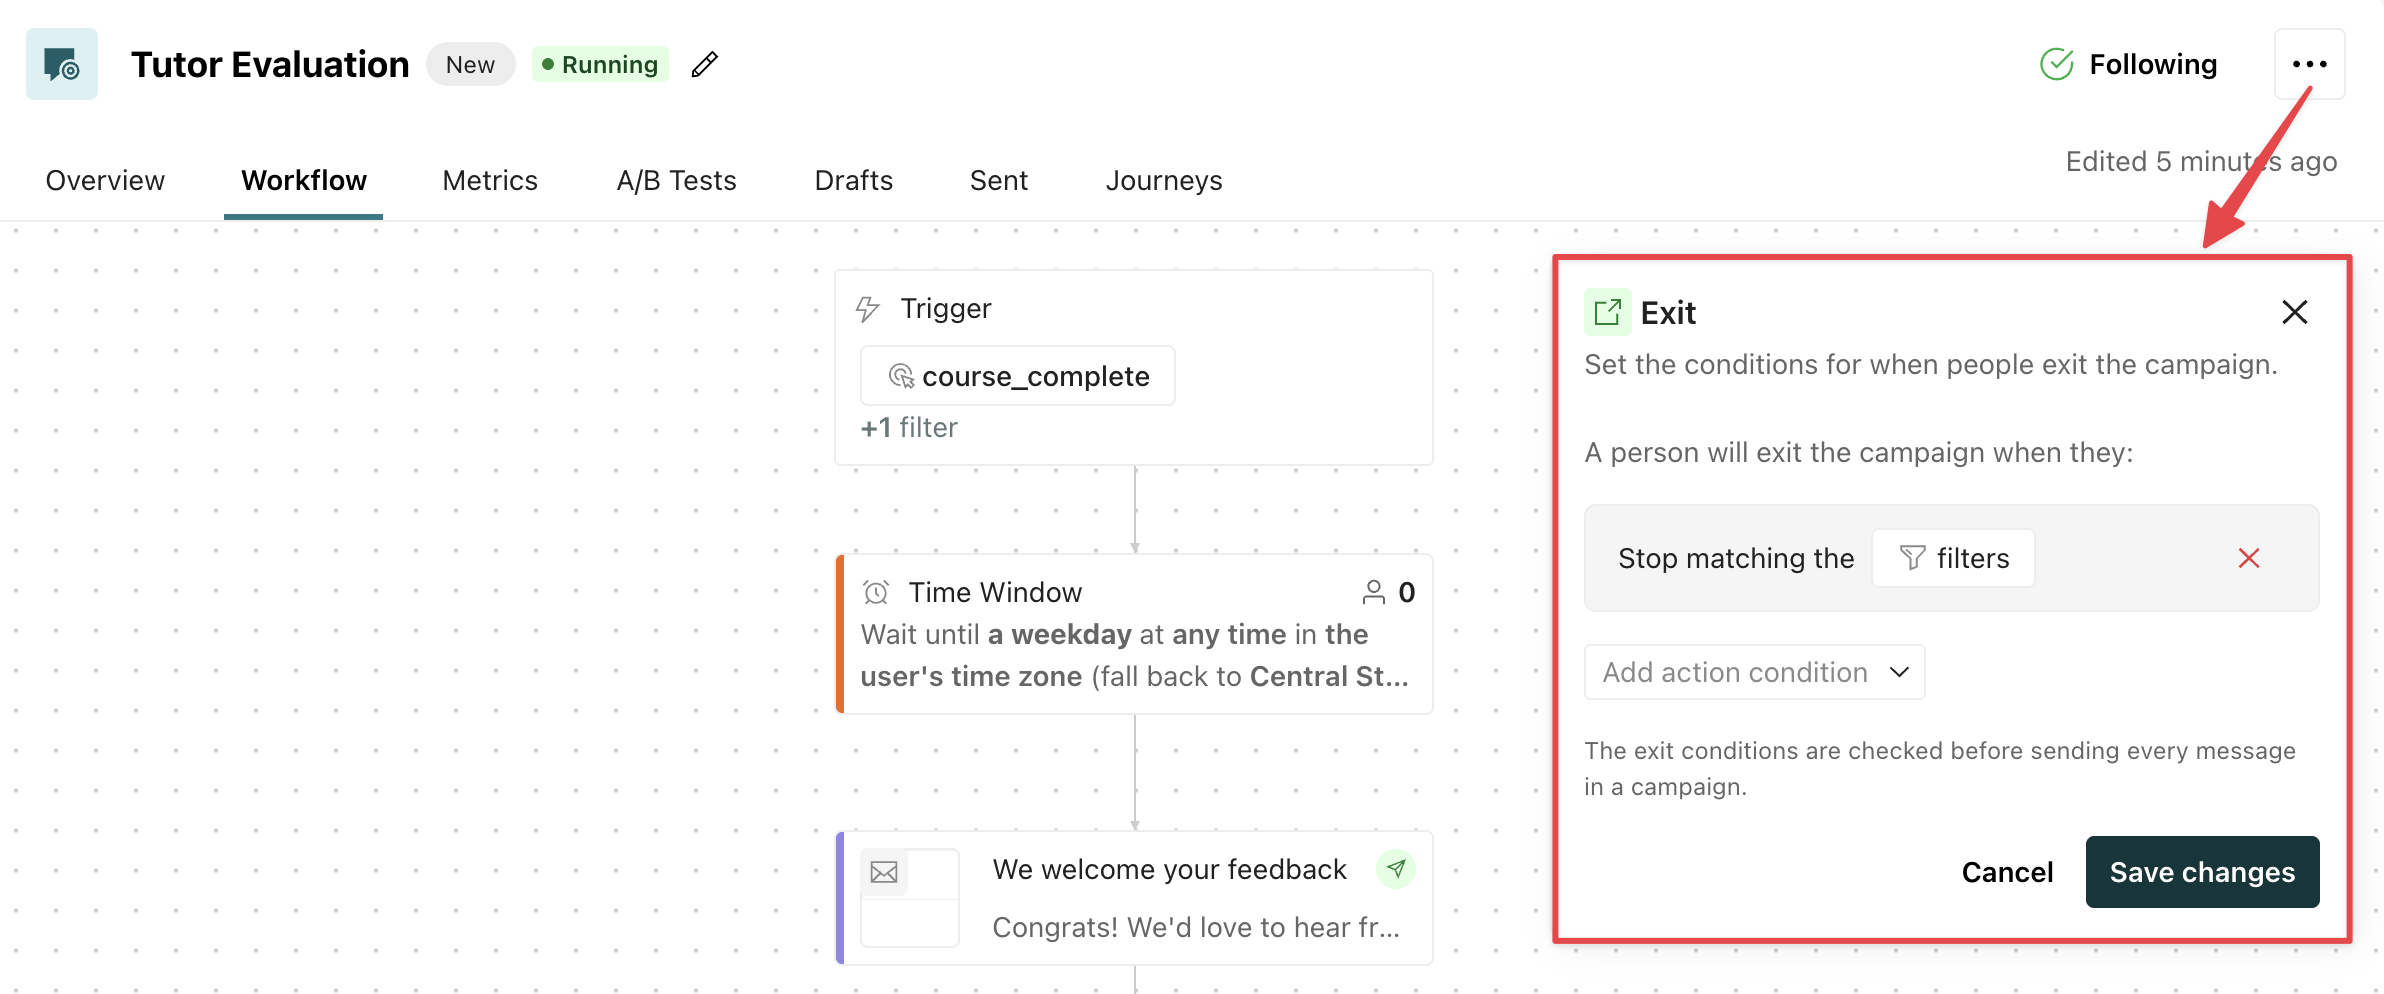
Message settings
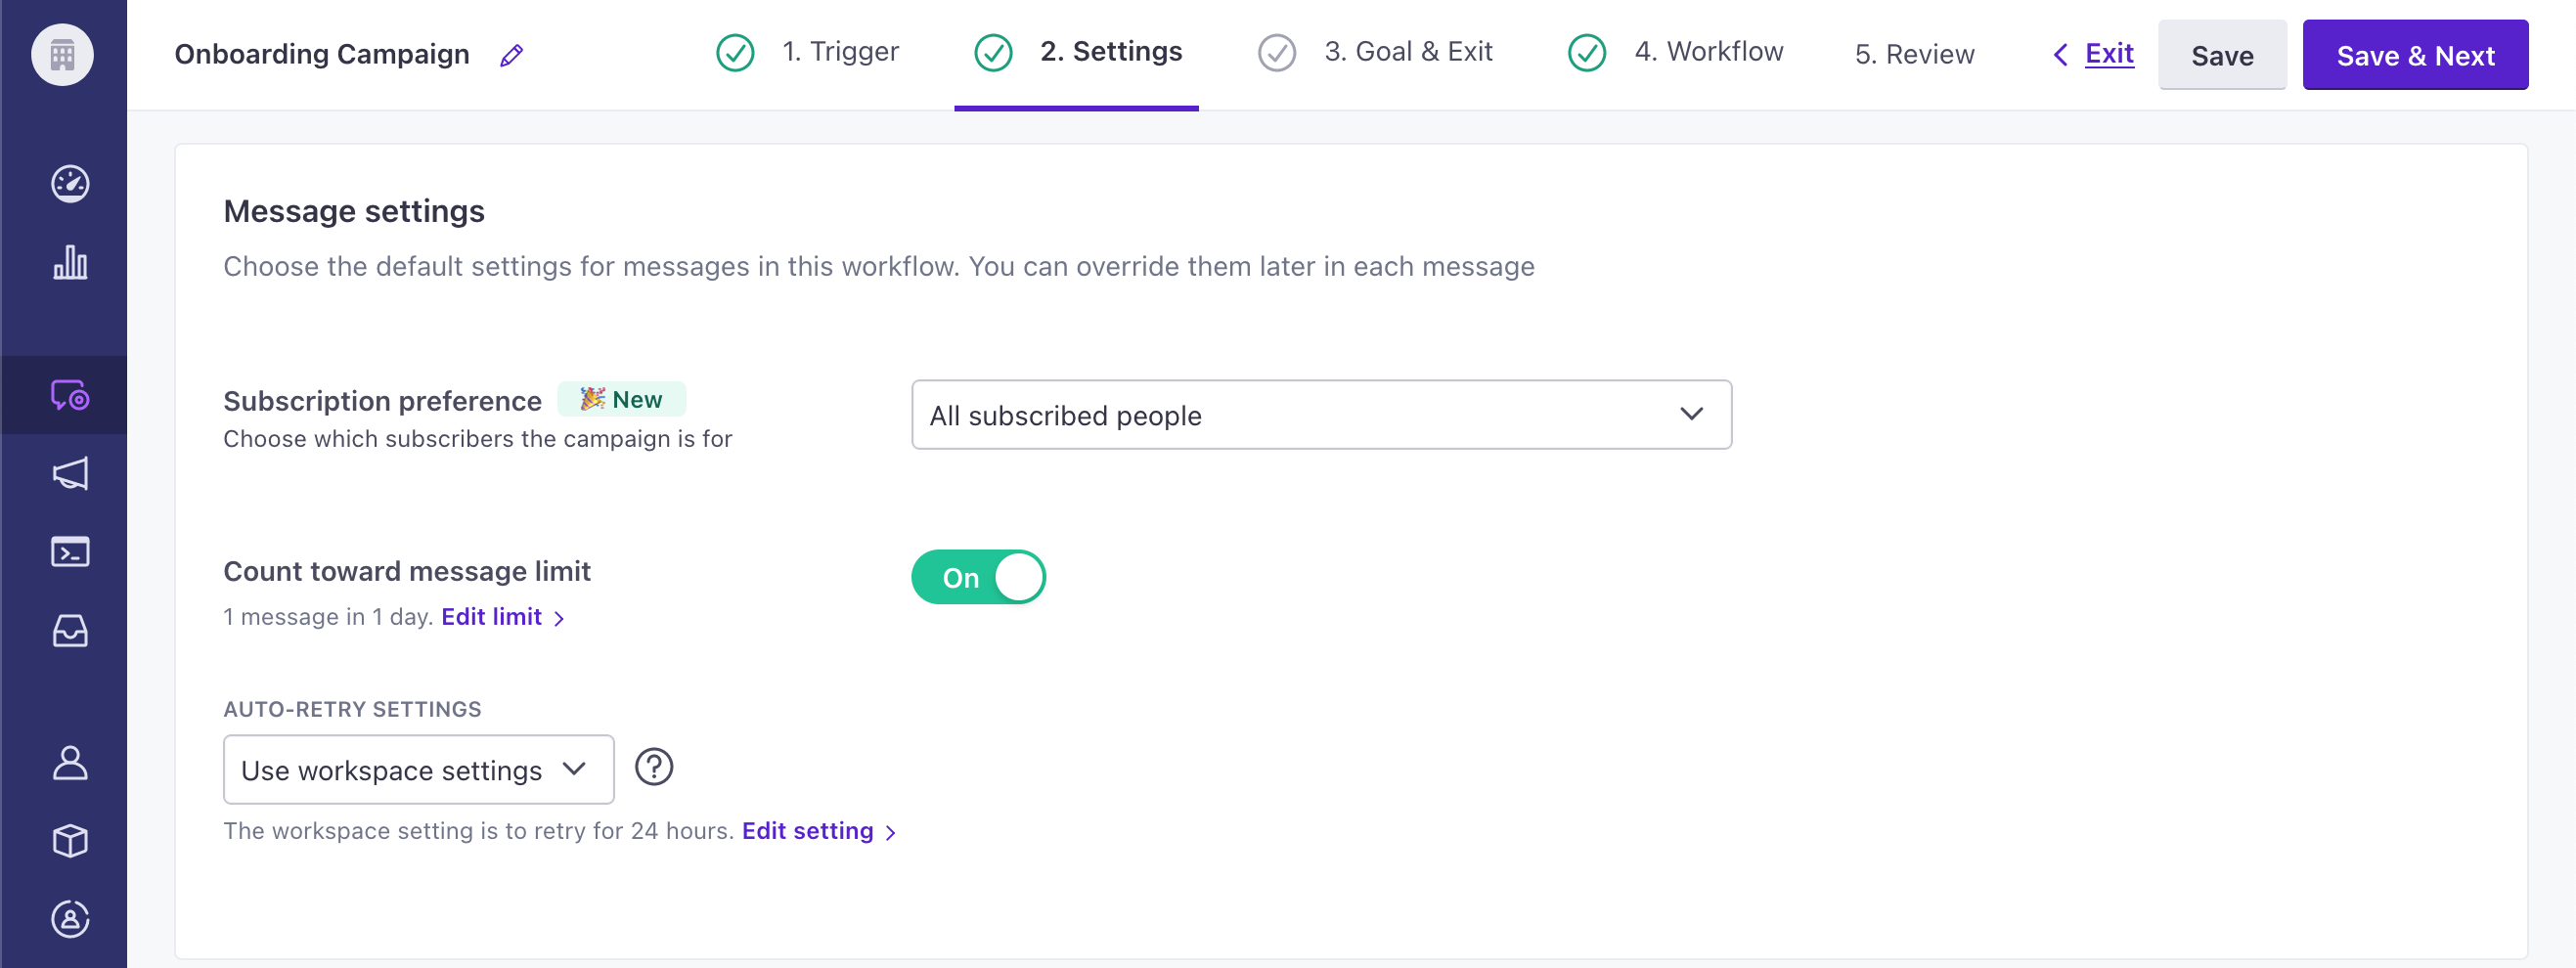
Subscription preferences
If you use our subscription center feature, you’ll set your automation’s topic A category of message, set within your workspace's subscription center, that people can subscribe to or unsubscribe from. Topics let your audience determine the kinds of messages they want to get from you.
- If people are unsubscribed from the topic, they won’t get messages from the automation. They would, however, continue to receive in-app messages; subscription preferences apply to email, SMS, and push.
- If your automation includes non-message actions (like Create or Update Person), those actions will still apply to people who aren’t subscribed to the topic.
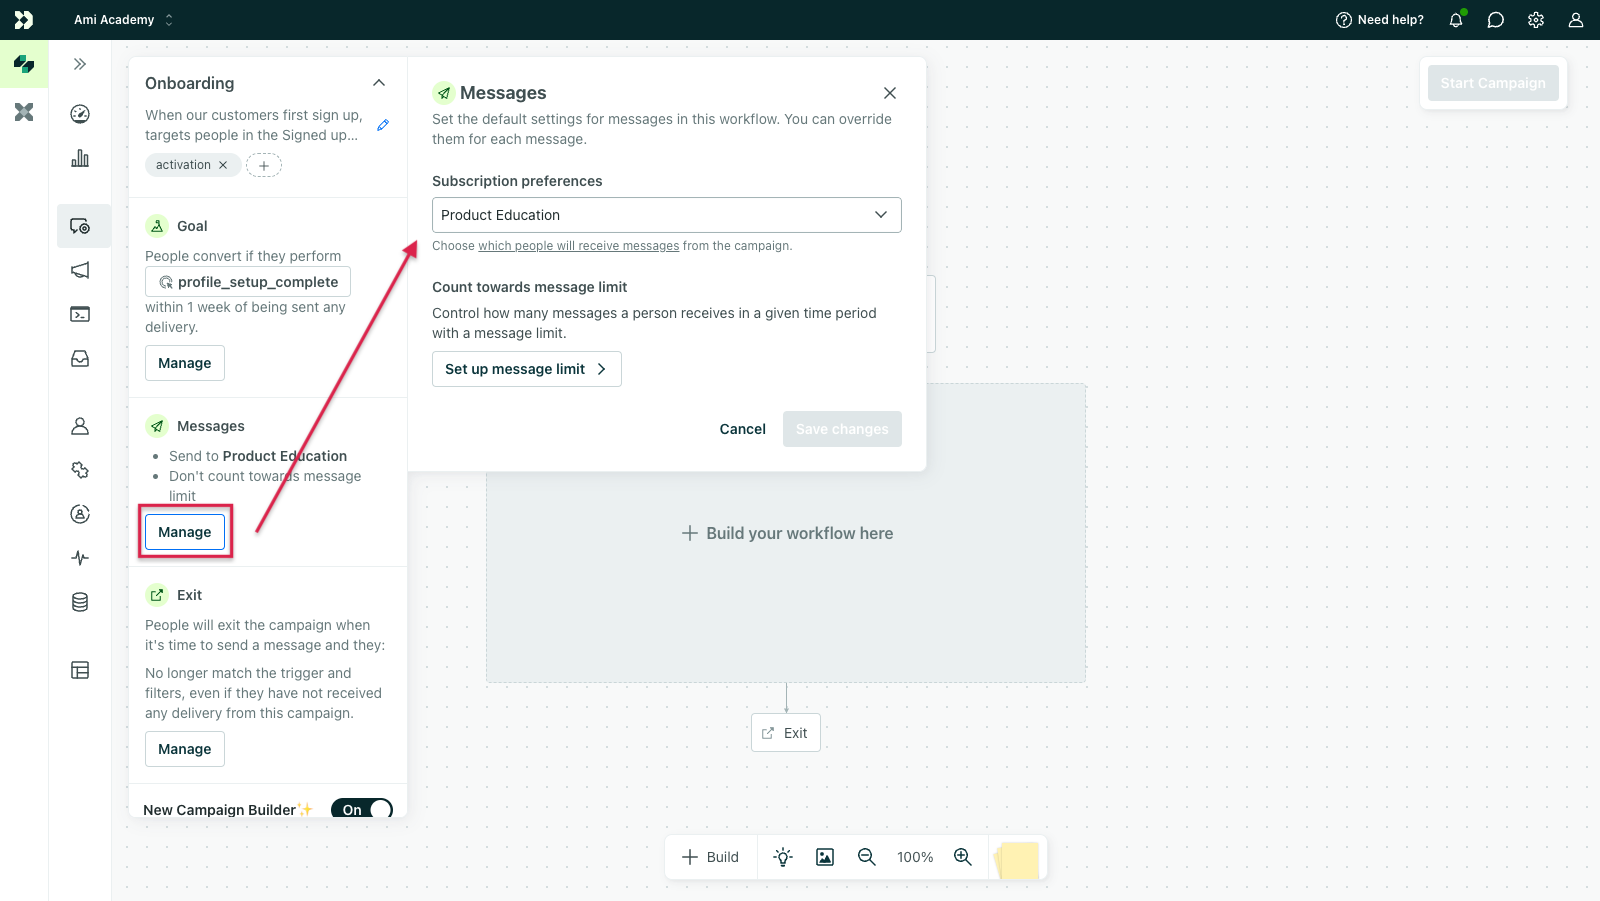
If you don’t want to set a topic, you can use the All subscribed and unsubscribed preference. You should use this setting sparingly—for things like transactional-style automations and important notices. Sending messages to unsubscribed people can violate their trust—or even violate local laws and regulations (GDPR, CAN-SPAM, etc)!
If you don’t use our subscription center, your automation will send to all subscribed by default.
Message frequency limit
If you’ve set a message limit in your workspace settings, you can determine whether your automation, or individual messages in your automation, count towards your message limit. A message limit determines the maximum number of messages you can send to a person within a time period.
Rate limit
Rate limiting lets you control how fast a single automation sends email, SMS, push, and/or webhooks. This is a per-automation setting, not a workspace cap. You might add a rate limit to protect your email sender reputation or to prevent overwhelming your downstream systems.
A rate limit is different from a message frequency limit. While a rate limit determines how fast a single automation can send messages, a message frequency limit determines how often your workspace can send messages to a single person.
Within an automation’s workflow, click > Message settings to manage the rate limit for each channel. You can set a range of 1 to 60,000 messages per minute for each channel.
Rate limits are optional. If you don’t set one, your automation sends messages as fast as Customer.io can deliver them, which can be much faster than the highest rate limit you can set. Use a rate limit when you want to protect your own systems, like landing pages or webhook endpoints, from a sudden burst of traffic.
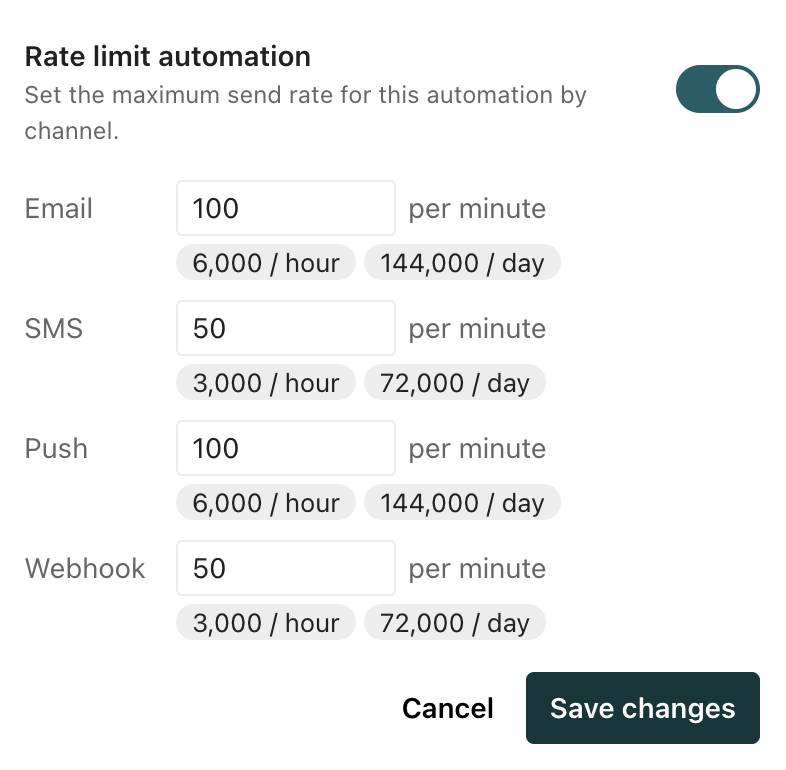
If a message isn’t sent due to a rate limit, people still continue forward in your workflow. If you want to make sure people receive your messages before moving forward in your automation, learn more about pausing journeys with the Wait before continuing journey setting.
Note you can’t set a rate limit for WhatsApp, in-app, LINE, or Slack messages. However, if you send both SMS and WhatsApp through Twilio, then the rate limit for SMS applies to both message channels.
Workflow builder
You’ll craft your workflow—the messages and actions people move through during their journey—using our Add menu.
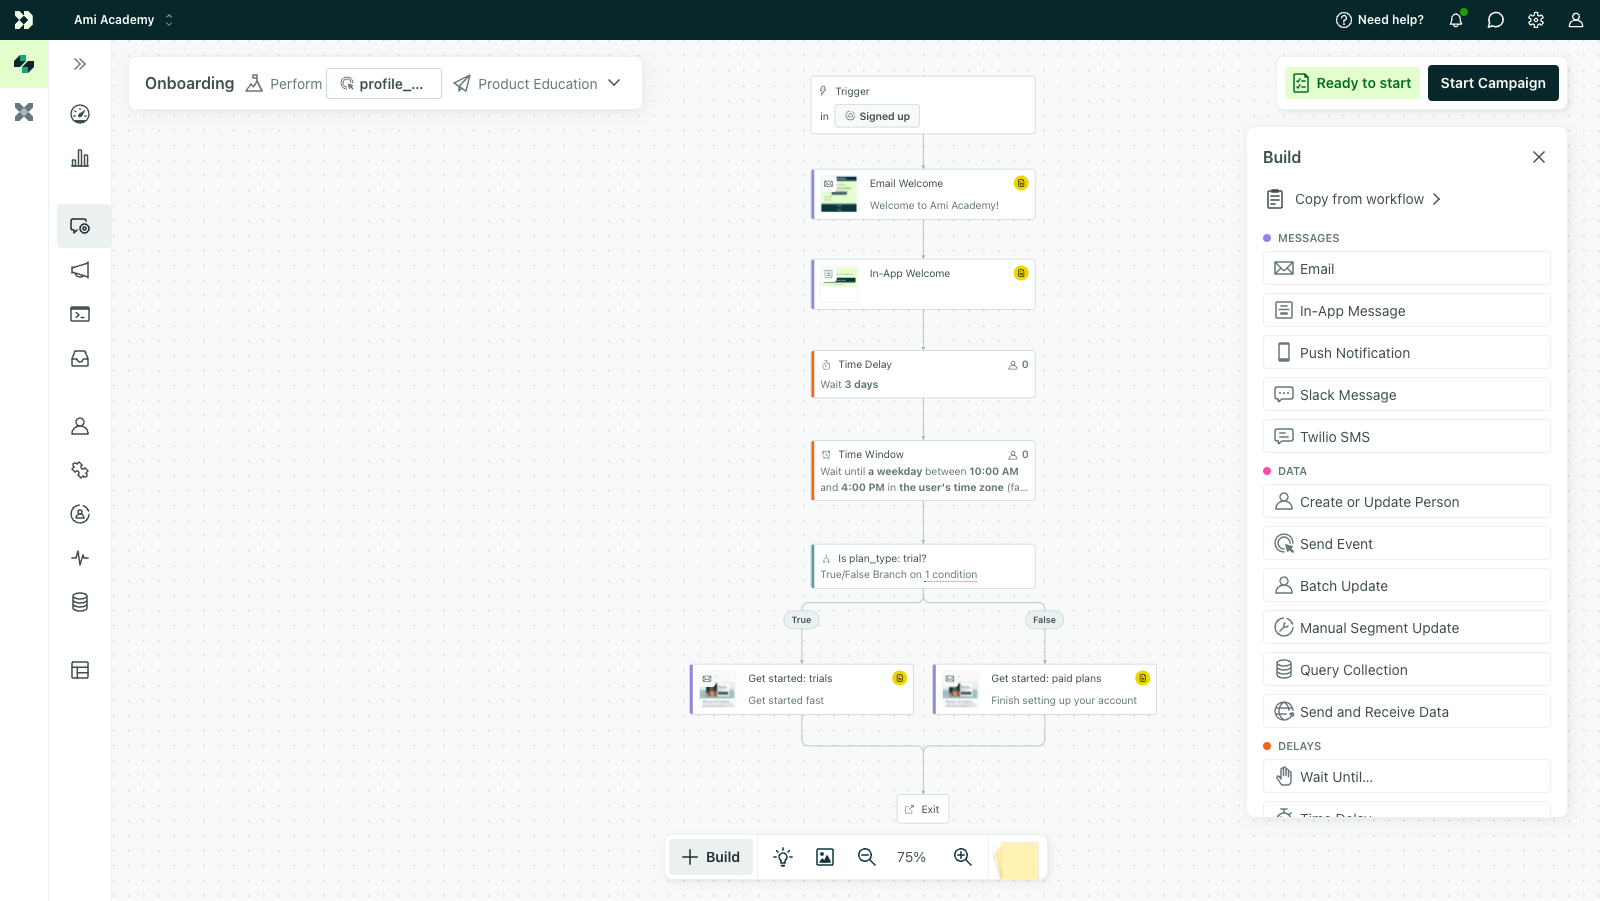
You can add a variety of items—messages, webhooks, attribute updates, time delays, and more-to set up your automation.
Individual message settings
Select a message in your workflow, and the settings will appear in the right-hand panel:
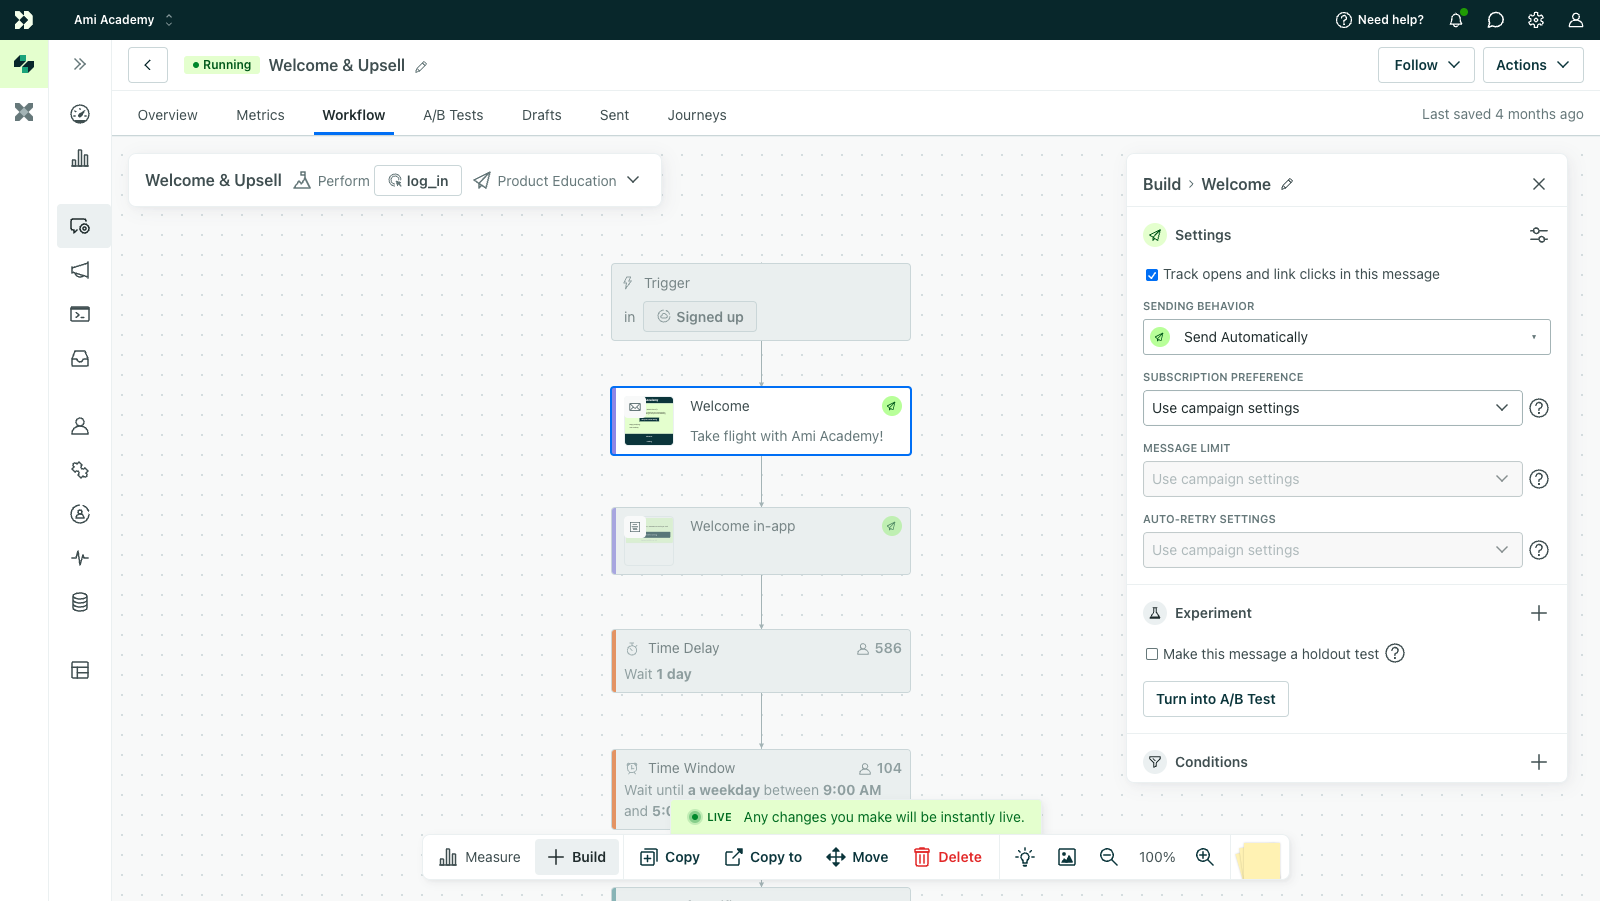
Settings change based on the kind of message or action you select, but common settings include:
- Tracking opens and clicks: whether or not to track opens and clicks for a message; this is on by default
- Sending behavior: whether or not the message sends automatically, queues a draft, or doesn’t send at all; we queue drafts by default
- Subscription preference setting: whether or not to use automation settings or override them; this respects automation settings by default
- Holdout test: a type of A/B test. Check out how to Create a conclusive A/B test result and how to Understand A/B test results for help.
Subscription preference
By default, your messages inherit your automation settings. But you can change this within a message’s settings:
- If you enabled the subscription center for your workspace, you can change this message to send to people subscribed to a different topic or all people in the automation regardless of their subscription status.
- If you have not enabled the subscription center, you can change this to send to all subscribed or all people regardless of their subscription status.
Liquid and customer data in automations
You can personalize data in messages using liquid A syntax that supports variables, letting you personalize messages for your audience. For example, if you want to reference a person's first name, you might use the variable {{customer.first_name}}.
{{customer.<attribute_name>}}For example, if you’re sending us a customer’s name using the attribute full_name, you can utilize it like this:
Hi, {{customer.full_name}}!You can also perform more complex operations using the data you send; we have more comprehensive information here.
Event attributes
A few things to remember when using event attributes:
- They can be used in message content
You can use all of the data you send with an event in your messages. For example, if you send us a purchase event with the following data:
{"name":"purchase","data":{"price": "9.99", "product": "socks", "color":"blue"}}then you can send a receipt email (or push notification, or SMS, or any other action) with the product’s name, price, and color in it. Whatever you send in the event attributes is available to you; you can learn more about using event data here. - They can override certain email headers
If you send any of these attributes as part of your event, they will override your automation settings:
from_address,recipient,reply_toFor example: If a purchase event triggers an email to send, but that purchase event contains recipient = wile.e.coyote@example.com as an attribute, then all emails triggered by that automation will go to wile.e.coyote@example.com, no matter the settings in the automation itself.
Activate your automation
Check out this tutorial on activating an automation:
After you’ve set up your automation, you’ll click Review items if you have setup left to do then Start automation when you’re ready to review the entirety of your setup.
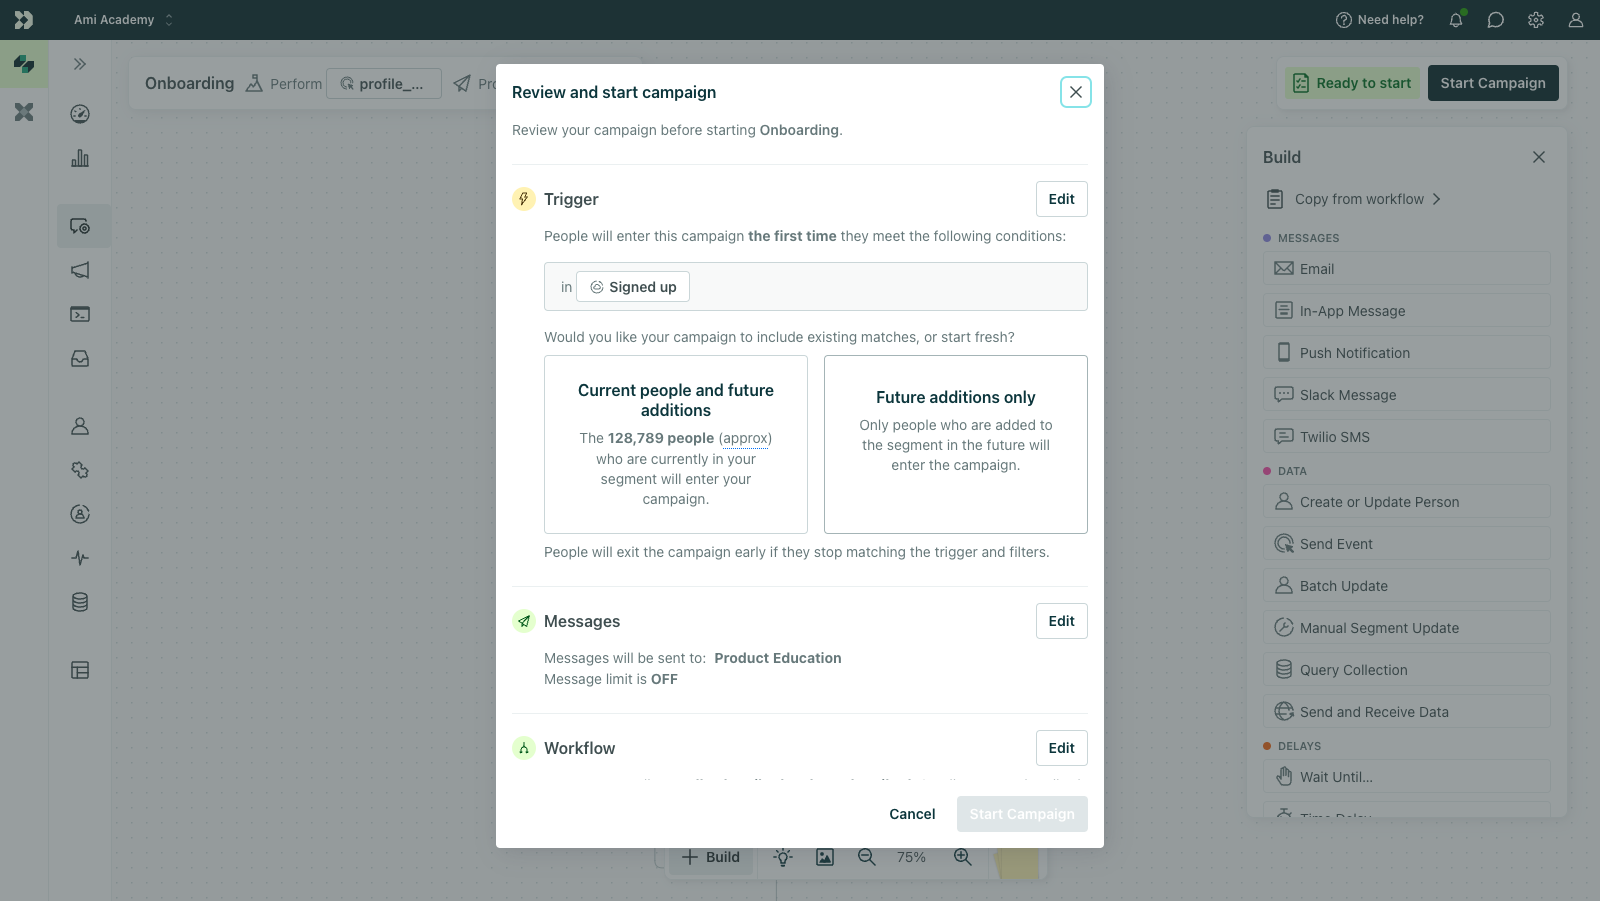
Current vs future additions
You can decide whether current people and future additions or only future additions should trigger your automation. This applies to automations triggered by segments, attributes, objects, or relationships:
- Current people and future additions: People who match your automation criteria after you start it will enter the automation. And people who already match your trigger criteria will immediately enter your automation.
- Future additions only: This only includes people who match your trigger criteria after you start the automation. Learn about when backfilled person data can trigger automations.
Date-triggered automations always trigger for both current matches and future additions.
For event-triggered automations, people enter the automation when they perform the event after you start the automation. Learn about when backfilled event data can trigger automations.
You can create an automation triggered by a segment based on a specific event so you can include current matches, but keep in mind, you won’t be able to include any event attributes in the content of the workflow.
Schedule your automation
You can schedule your automation to start or stop at a specific date and time. This gives your team the flexibility to plan and execute time-bound marketing initiatives with fewer manual steps. For instance, you might have a seasonal automation or limited-time offers that you want to make sure are only available during the relevant time period.
Automation metrics & reporting
Once an automation is running, you can view reports and export them to CSV from the Metrics tab.
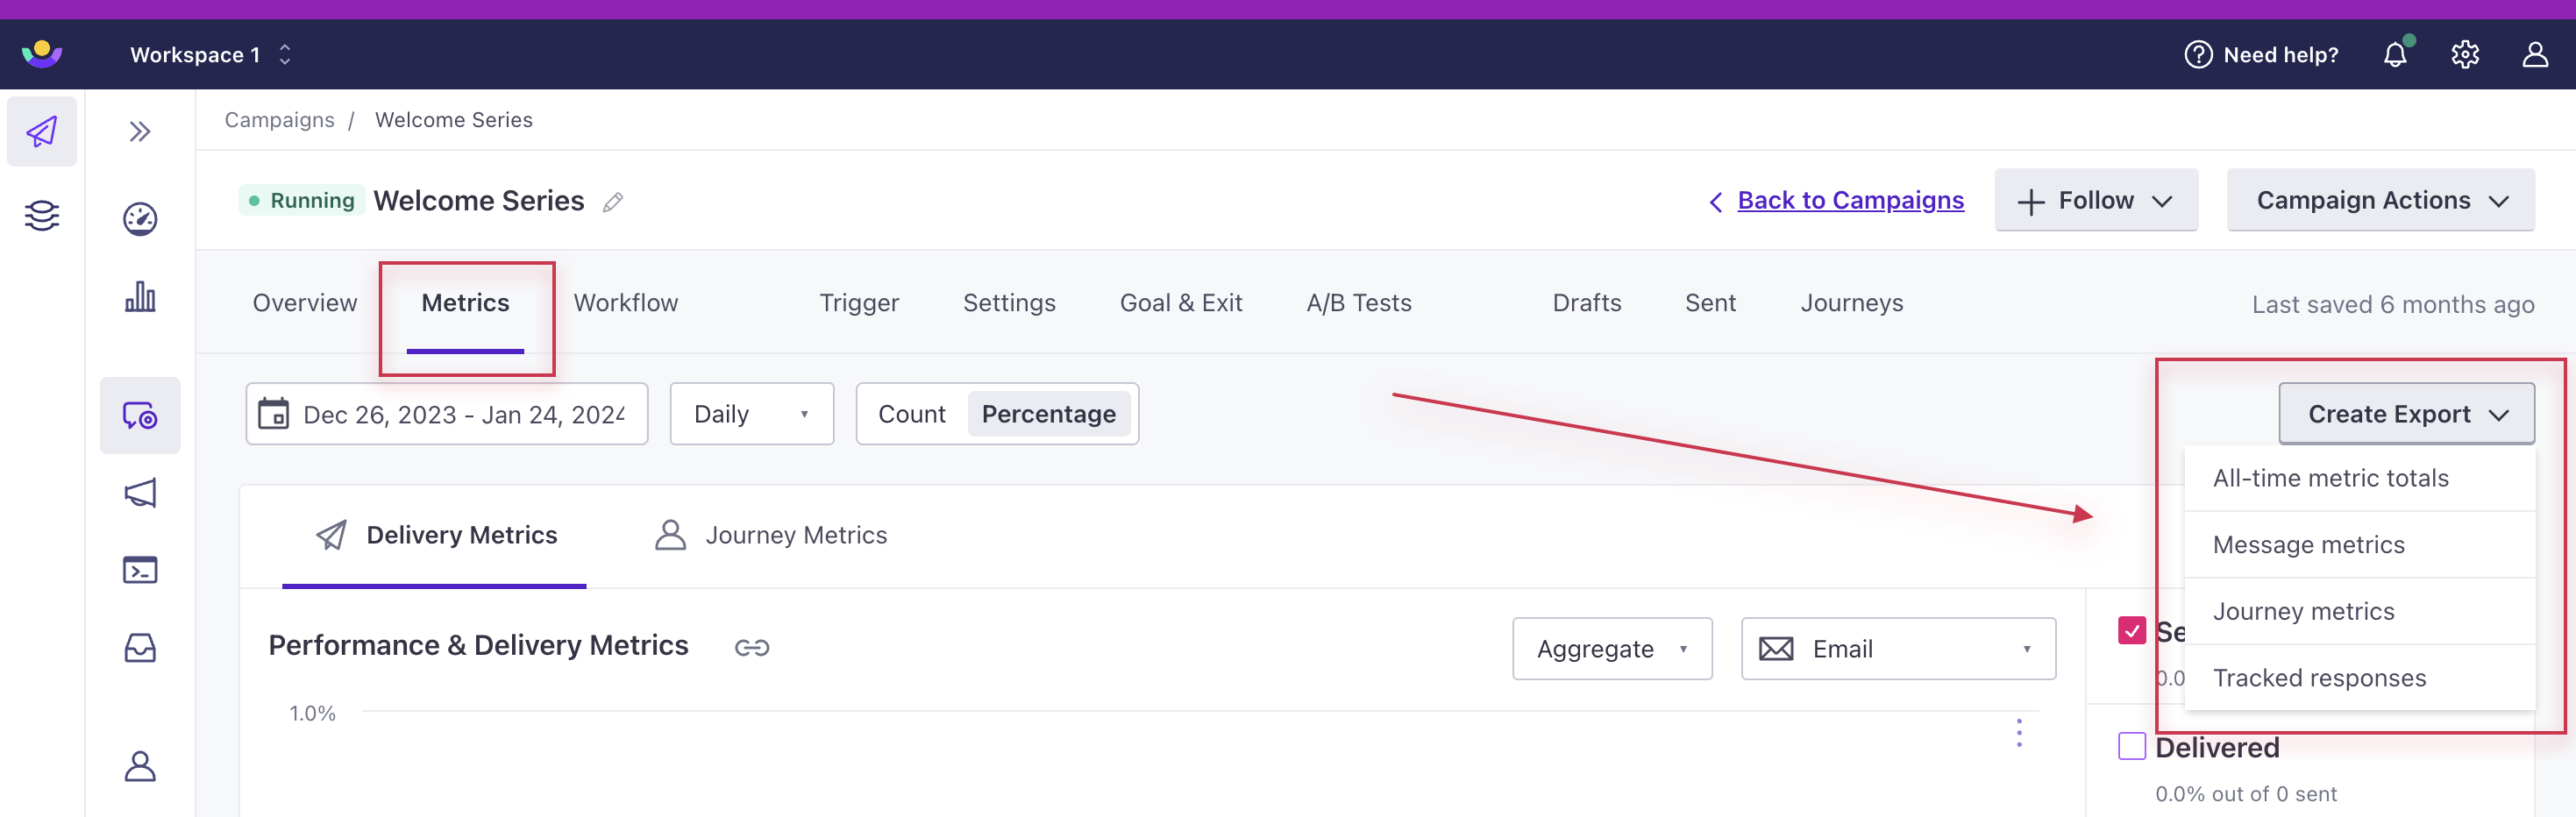
The export will reflect the dropdown selection:
- All-time metric totals
- Message metrics
- Journey metrics or
- Tracked responses for in-app messages
It will also include any filters you selected. For instance, if you select “Email” for the “Last 30 days” under Delivery Metrics, your export will only include the filtered data. You can learn more about how we define each metric in Automation and Broadcast Metrics.
We can also send reporting webhooks with performance data to a URL you specify so you can receive information about events as they occur in real-time. Customer.io sends the information as JSON in an HTTP POST. Read more about setup here.
Check out our Data-out integrations overview for more options.