

Set up geofences
When someone enters, stays in, or exits a physical location with your app, geofences let you trigger an automation journey, update a segment, or send a message.
Geofences help you meet your customers where they are—literally. Send retail and Quick Service Restaurant (QSR) promotions, travel information, parking reminders, venue welcome messages, or delivery notifications based on people’s locations.
How it works
A geofence is a virtual boundary you draw around a real-world place—like a store, gym, airport, or parking lot. When someone with your app on their phone crosses that boundary or stays within the boundary for a significant amount of time (called dwell time), the SDK sends a Geofence Transition event. Customer.io records it as a Geofence activity that you can use to trigger an automation, create a segment, or control the flow of people’s journeys.
You group geofences into geofence sets. A geofence set lets you treat many geofences as one target, so an automation or segment can act on all of them at once. For example, you might group all of your stores into a geofence set, and trigger an automation when a person enters any of the geofences in the set.
You create geofences in your workspace. Then our mobile SDKs detect when someone crosses one and they send the event back to Customer.io.
Geofence boundary detection happens on the device. When the SDK refreshes nearby geofences, it sends the device’s current coordinates without identifying the person. The transition event for the person does not include precise coordinates.
Geofence transitions are not instantaneous. Detection and delivery time varies with the operating system, device movement, location accuracy, background restrictions, and network availability. Many events arrive within tens of seconds, but delivery can take several minutes. Polygon transitions can take longer when the SDK needs to recover from a missed operating-system callback.
Choose a circle or polygon
Use a circle when a center point and radius describe the location well. Mobile operating systems monitor circular geofences directly, making them more reliable and less battery-intensive than polygons.
Use a polygon when you need the boundary to follow the shape of a campus, venue, parking area, or other property. Polygons must be convex and meet the other polygon requirements. Mobile operating systems only monitor circles, so the SDK uses the polygon’s enclosing circle as a wake-up boundary and takes additional location readings to check movement into or out of the polygon boundary. Depending on the platform and device state, these checks can happen after an operating-system wake, when the app returns to the foreground, or as part of a recovery check. They may use more battery. Background restrictions and location accuracy can also delay polygon detection or cause missed enter and exit events.
The SDK setup and Geofence Transition event are the same for both shapes. Polygon monitoring does not continuously track a person’s location, and transition events never include their precise coordinates.
Polygon support starts with Android SDK 4.22.0, iOS SDK 4.9.0, React Native 6.13.0, Flutter 4.7.0, and Expo plugin 3.11.0 with React Native 6.13.0. Older SDK versions continue to monitor circles, but they don’t receive polygons.
Refer to the mobile SDK documentation for version requirements, location permissions, and more.
Location permissions
Geofences depend on a permission your customers grant in your app: background location—Always on iOS, Allow all the time on Android. Without it, the device detects crossings only while your app is open in the foreground, so you miss most of them. People rarely have your app open at the moment they walk into a store.
Your app asks for that permission; our SDKs never prompt on their own. Neither platform grants background location in a single tap, so this is worth planning with your mobile team before you build automations around geofences—your reach depends on how many people grant it. Each mobile SDK guide covers the permissions to declare and how to stage the request.
Geofencing uses background location for background detection, not just for polygons. Polygon monitoring can use additional location readings while your app is in the background because mobile operating systems don’t report polygon transitions directly. iOS and Android may show people a system reminder that your app has used, or can access, their location in the background. The operating system controls the wording and timing of these reminders, so make sure your permission messaging clearly explains why your app needs background location.
Create a geofence set
In your workflows, you can add conditions for geofence sets, not individual geofences. So when you create geofences, first consider if you want to take action on them collectively. If not, that’s a signal to create multiple geofence sets to separate your geofences into.
Every geofence belongs to a geofence set. You either add a geofence to an existing set or create a geofence set followed by a geofence.
Under Configure data in the lefthand menu, go to Geofences, and then click Create a new geofence set. You only need to give it a name, but make sure it’s easy to understand so you can find it when creating automations, segments, and conditions.
After you create a geofence set, you can either import multiple geofences—names, boundaries, and any custom metadata—or add them manually.
Import multiple geofences
To import multiple geofences, first create a geofence set. Then create either a GeoJSON file or CSV file with the required fields. You can import up to 10,000 geofences per geofence set, and the file must be less than 32 MB. GeoJSON files, including GeoJSONL files, can contain circles, polygons, or both. CSV files only support circles.
You can also import a file with the import endpoint in the App API by setting type to geoset. The file uses the same formats and fields as an import in the UI, and your set’s geoset_id is the number after geosets/ in the set’s URL.
- Select a geofence set.
- Click Import.
- Upload a GeoJSON or CSV file.
- Decide how to run the import:
- Choose Add and update if you want to add new geofences and update existing geofences. If the geofence shares an ID with other geofences, every geofence with that ID updates to match the new settings, even if the geofence is in a different geofence set.
- Choose Replace all if you want to replace all geofences in the set with only what’s in the import file. This only removes geofences from this set; if a deleted geofence shares an ID with a geofence in another set, the other geofence set keeps the geofence.
- Click Import files.
You can preview the geofences after importing.
GeoJSON
GeoJSON is a geospatial data interchange format based on JavaScript Object Notation (JSON). You can learn about the spec through the IETF and validate your spec before import at geojson.io.
This example contains a circular geofence and a polygon geofence:
{
  "type": "FeatureCollection",
  "features": [
    {
      "type": "Feature",
      "id": "hq-sf",
      "geometry": {
        "type": "Point",
        "coordinates": [
          -122.4194,
          37.7749
        ]
      },
      "properties": {
        "name": "HQ",
        "radius": 250,
        "promo_code": "HQ10"
      }
    },
    {
      "type": "Feature",
      "id": "campus-sf",
      "geometry": {
        "type": "Polygon",
        "coordinates": [
          [
            [-122.394, 37.794],
            [-122.39, 37.794],
            [-122.39, 37.798],
            [-122.394, 37.798],
            [-122.394, 37.794]
          ]
        ]
      },
      "properties": {
        "name": "Campus",
        "promo_code": "CAMPUS10"
      }
    }
  ]
}
The following fields are required unless noted otherwise:
| Field | Description |
|---|---|
type | Must be “FeatureCollection” |
features | An array of objects, where each object is a geofence |
features. | Must be “Feature” |
features. | A unique identifier for the feature; if you leave this blank, Customer.io generates a UUID |
features. | An object with a type and coordinates |
features. | Use Point for a circle or Polygon for a polygon. You can’t use other geometry types, including MultiPolygon. |
features. | For a circle, use [<longitude>, <latitude>]. For a polygon, use one array of coordinate pairs that meets the polygon requirements. |
features. | An object with a name and any additional custom properties you want to store with the geofence. Circles also require a radius. |
features. | The name of your geofence |
features. | Required for circles. Integer representing the radius in meters, from 100–10,000. Remove this property from polygons; otherwise, validation rejects the feature. Customer.io calculates the enclosing circle from the polygon boundary. |
features. | (Optional) The time, in seconds, that a person needs to stay inside the geofence before the SDK sends a dwell event. Use 0 or null to turn dwell events off. Omit this property to keep the current dwell time. |
features. | (Optional) Any additional properties—like a location ID, category, or deeplink slug—are stored as the geofence’s attributes. Values keep their JSON types, so numbers and true/false stay numbers and booleans. |
You can also upload a GeoJSONL file (.geojsonl), which puts one Feature object on each line instead of wrapping features in a FeatureCollection. Each line uses the same features.* fields as the preceding table. When you export a geofence set, Customer.io writes the export in this format, so you can edit an export and import it again without converting it.
CSV
To import multiple geofences from a CSV file, create a CSV file with these fields. All fields are required except where noted:
| Field | Description |
|---|---|
name | The name of your geofence |
radius | Integer. Represents radius in meters. Must be within 100–10,000. |
longitude | The longitude of your geofence |
latitude | The latitude of your geofence |
external_id | (Optional) A unique identifier for the feature; if you leave this blank, Customer.io generates a UUID |
dwell_threshold_seconds | (Optional) The time, in seconds, that a person needs to stay inside the geofence before the SDK sends a dwell event. Use 0 to turn dwell events off. Leave empty to keep the current dwell time. |
Any other column becomes a custom attribute on each geofence, named after the column header. Customer.io stores these values as text, so use GeoJSON if you need an attribute to be a number or true/false. Use the column names in the table exactly as written, in lowercase. A column that only differs from one of them by capitalization, like Name, makes the import fail.
From the import UI, you can download a CSV template to help you create your file.
Polygon requirements
Whether you draw a polygon in Customer.io or import it with GeoJSON, it must meet these requirements:
- Use one boundary with 3–500 points.
- Use a convex shape. The boundary can’t turn inward or include a cut-out, such as an L or T shape. To exclude a building at the corner of a larger area, use two rectangular geofences to cover the remaining space. Customer.io tracks each rectangle as a separate geofence.
- Don’t use holes, crossing edges, or duplicate adjacent points.
- The enclosing radius of the polygon must be no smaller than 100 meters and no larger than 10 kilometers.
- Keep every point between -85° and 85° latitude, and don’t draw a polygon across the 180° longitude line.
For GeoJSON imports, you must also:
- Close the boundary by repeating its first point at the end. The repeated closing point does not count toward the 500-point limit.
- Start each coordinate with longitude followed by latitude. Customer.io ignores additional numeric values such as altitude, but rejects non-numeric values.
- Remove
latitude,longitude, andradiusfrom the feature’sproperties. Customer.io calculates the center and enclosing circle from the polygon boundary.
If a GeoJSON file contains at least one polygon, every feature in the file must be valid before you can import it.
Polygons must be convex
Mobile operating systems don’t report polygon crossings, so the SDK works out for itself which side of the boundary a person is on. Each location reading comes with an accuracy radius: how far off the real position might be. A reading that lands within that distance of the boundary could belong on either side, so it’s less reliable than one that lands well inside or well outside.
Concave shapes have pockets of outside space that reach into the boundary. The U below is an extreme example, but any inward turn creates a smaller pocket. A reading in a narrow pocket can land near both walls, and it can be tough to determine whether someone is in or out of the boundary. Because these pockets make detection less reliable, Customer.io only supports convex polygons for now.
Convex boundary
Uncertainty stays in a thin strip along the edge, and a straight walk across the inside never crosses the boundary.
Concave boundary
A gap that reaches into the shape puts a reading near two walls at once, and the same walk leaves the boundary and comes back.
Create a geofence manually
To create a geofence through the UI, first create a geofence set.
- Select your geofence set.
- Click Create geofence.
- Choose Circle or Polygon for the shape.
- Define the boundary:
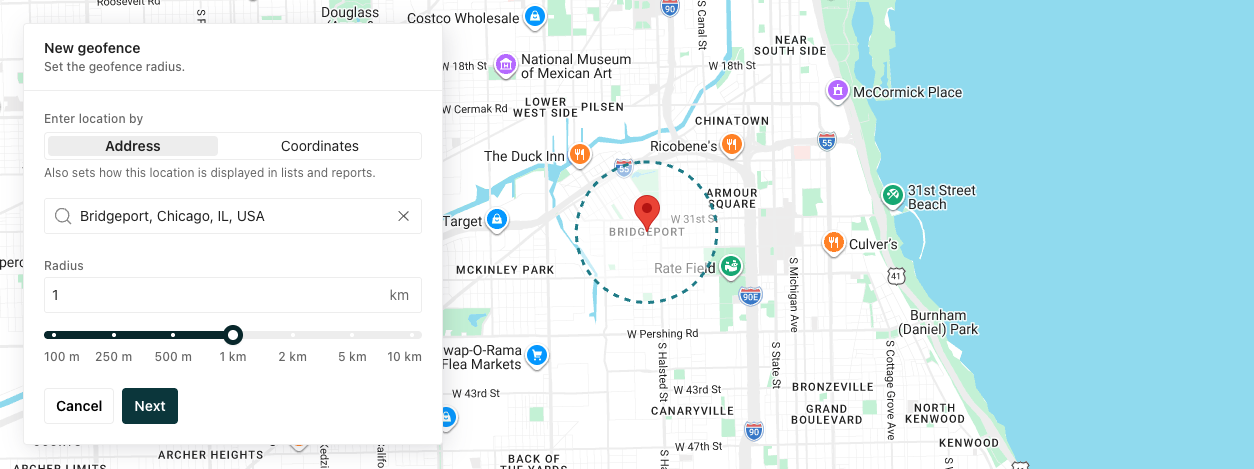
- For a circle, search for the place, business, or address, or select Coordinates to specify a longitude and latitude. Then set the Radius in meters.
- For a polygon, find the area on the map and draw its boundary. The boundary must meet the polygon requirements.
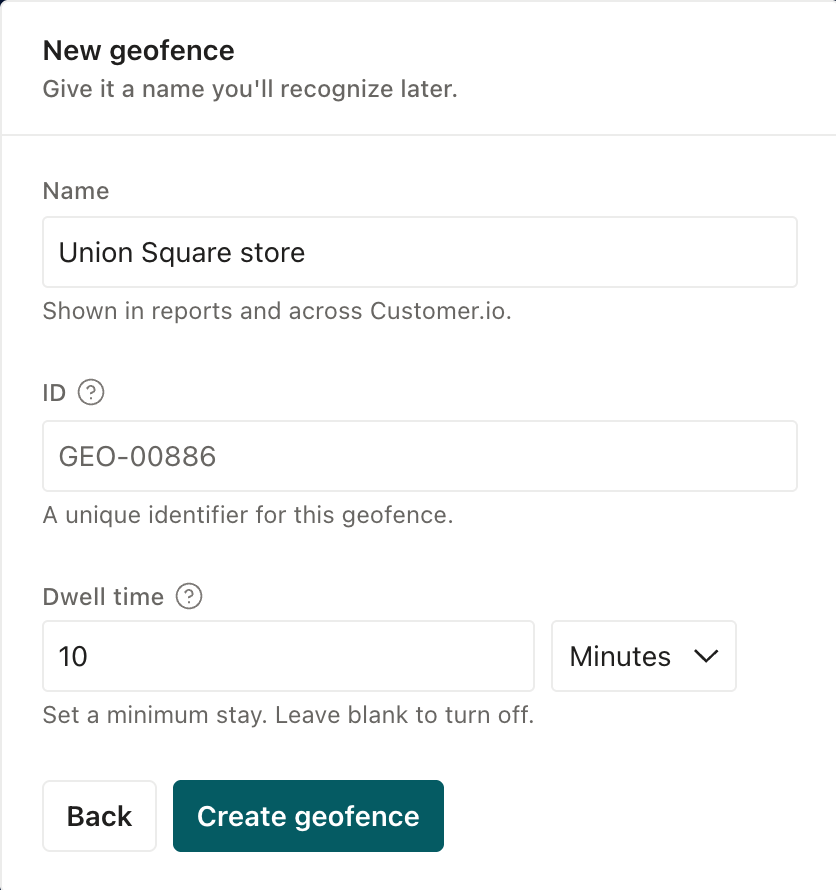
- Add a Name to easily identify your geofence and use it across your workflows.
- (Optional) Add an identifier; otherwise, your workspace generates one for you.
- (Optional) Set a Dwell time: how long a person needs to stay inside the geofence, in minutes or hours, before the SDK sends a dwell event. Leave this field empty if you don’t require users to stay inside the geofence for a minimum amount of time. Learn more about time spent in a geofence.
Dwell time: capture duration inside a geofence
Enter and exit events tell you that a person crossed a boundary. Dwell events tell you when a person stayed inside a geofence for a minimum amount of time—they “dwelled” in the geofence. Customer.io sends dwell events if you set a dwell time for a geofence.
For example, you might send a coupon or a daily special to people who spend at least 10 minutes in your store. This ensures you don’t message people who are just passing by.
The diagram below follows one visit to a geofence with a 10-minute dwell time. The SDK sends one event when the person enters the geofence, one when they’ve stayed for the dwell time, and a final event when they leave the geofence. You can trigger automations based on any of these events.
Set dwell time
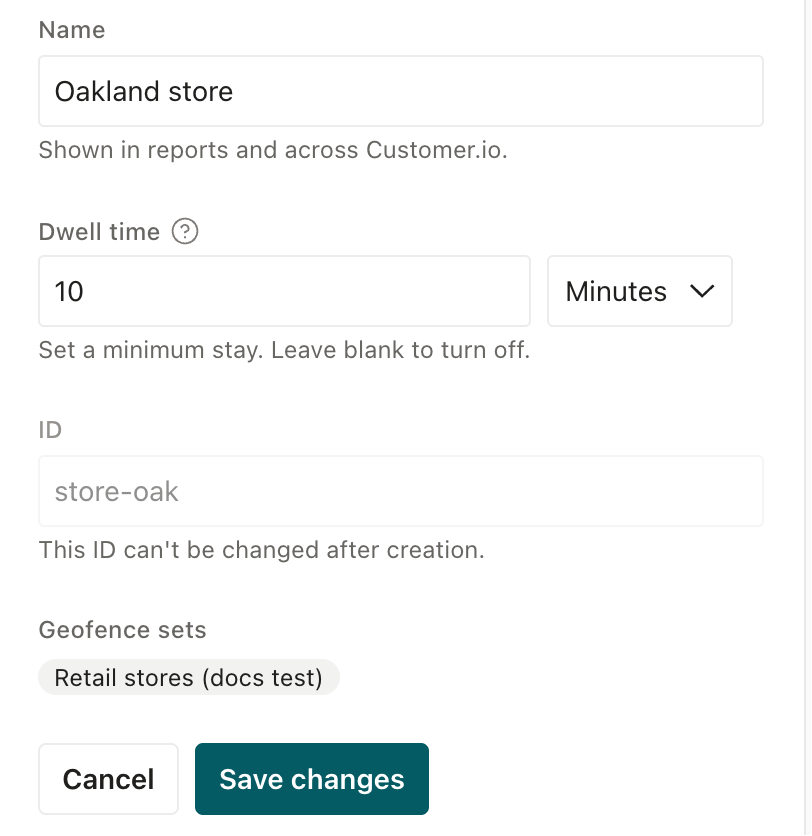
Each geofence can have a dwell time. This is the minimum time that a person needs to stay inside the geofence before the SDK sends a dwell event.
- When you create or edit a geofence in the Customer.io UI, you’ll set this time in minutes or hours.
- When you import geofences using GeoJSON or CSV files, you set dwell times in seconds with the
dwell_threshold_secondsfield.
Set dwell time for geofences in a set
You can set a dwell time for multiple geofences in a set. This saves you the trouble of setting dwell time for each geofence individually.
While you can set a dwell time for a set of geofences, the dwell time setting belongs to each geofence. If a geofence is in multiple sets, it will have the same dwell time in each set.
- Open your geofence set and click Set dwell time….
- Choose Set a time and enter a Minimum stay.
- Pick which geofences you want to apply it to:
- Geofences with dwell time off sets the dwell time for geofences that don’t have one yet. Geofences that already have a dwell time keep their current setting.
- All N geofences replaces the dwell time on every geofence in the set. The option shows how many geofences your set has, like All 3 geofences.
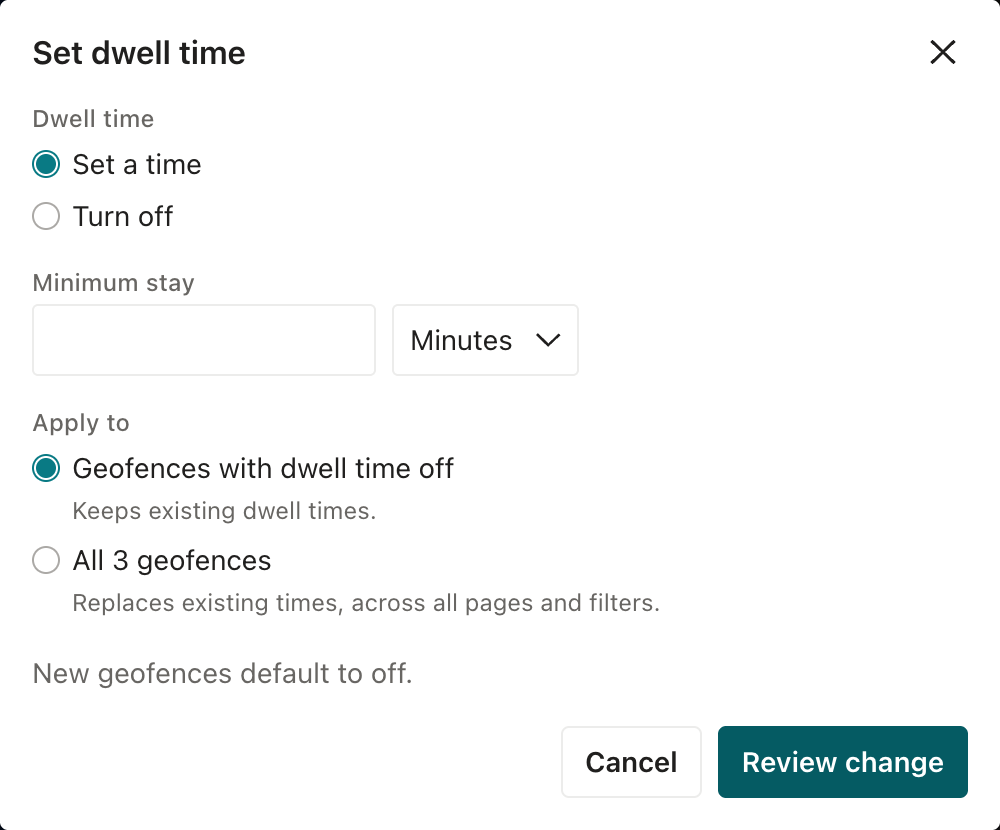
- Click Review change to check the change before you apply it. If any of these geofences are also in other geofence sets, the review lists those sets, and you need to agree to change them too. Then click Update to apply the change. The button shows how many geofences change.
Use Turn off to remove the dwell time from all geofences in the set.
How the SDK tracks dwell time
The SDK keeps track of how long a person stays inside a geofence on the device. When the dwell time passes, the SDK checks that the person is still inside the geofence before it sends the Geofence Transition event with transition set to dwell. The SDK sends at most one dwell event per visit, no matter how long the person stays inside the geofence.
Background restrictions can delay this check, especially on iOS and for polygons. Location accuracy can also prevent confirmation, especially near a geofence’s edge or inside a small polygon. The SDK makes a limited number of confirmation attempts per visit, so even a long visit may not produce a dwell event.
Dwell events might not arrive in Customer.io immediately. Tracking location and geofence transitions can still happen on the device, even if the device is offline or disconnected from the internet.
To make sure that automations triggered by dwell events are relevant to your audience, Customer.io only triggers automations from dwell events that happened within the last hour. This prevents you from sending dwell-based messages like “enjoy your visit” to a customer whose device was offline and delivered the dwell event more than an hour after the fact.
Visit duration on exit
When the SDK can time a visit reliably, exit events include the seconds from entry until it detects departure. Detection can happen after the person leaves, especially for polygons or when the device has been still, so this may exceed the actual stay. The SDK can also detect the entry after the person arrives, so the actual stay can begin before the recorded entry. The SDK rounds durations up to whole seconds. You don’t need to set a dwell time for this; the SDK tracks visit duration for every geofence.
You can use visit duration to filter geofence exits in automation triggers and conditions. For example, you can trigger an automation when a person exits your store after more than 20 minutes inside. Some exits don’t include a duration because the SDK didn’t observe the whole visit, such as when the person was already inside the geofence when your app started monitoring it. A duration filter never matches those exits.
Dwell and visit duration require a minimum Customer.io SDK:
- Android SDK 4.26.0
- iOS SDK 4.13.0
- React Native 6.16.0
- Flutter 4.10.0
- Expo plugin 3.14.0
Older SDK versions that support geofences still send enter and exit events, but they don’t send dwell events or visit durations.
Sync shared geofences across geofence sets
You can share a geofence across geofence sets so the same physical location stays in sync across your sets.
For example, imagine you have two geofence sets, one is for grocery stores and another is for convenience stores. Sometimes a grocery store is also a convenience store so you create a geofence around the same store in both sets. You tie them together by giving them the same ID. If later you update the radius of the geofence, every geofence that shares that ID updates to match the new settings.
To share a geofence with another set, import it into that set using the same external_id. Customer.io keeps one fence record, so later edits apply everywhere it’s used. For example, if you update the geofence, like its radius, in the UI, that updates the radius across geofence sets.
Use geofences in your workflows
You can use geofences in a variety of ways:
- Message customers who cross a geofence boundary
- Personalize messages with liquid based on geofence trigger data
- Group customers who transition through a geofence into segments
Track geofence events
When people move in or out of your geofences, Customer.io logs Geofence Enter and Geofence Exit in your activity logs. If a geofence has a dwell time, Customer.io also logs Geofence Dwell when a person stays inside for that long. Filter for the behavioral event type Geofence to see all geofence transitions in your workspace.
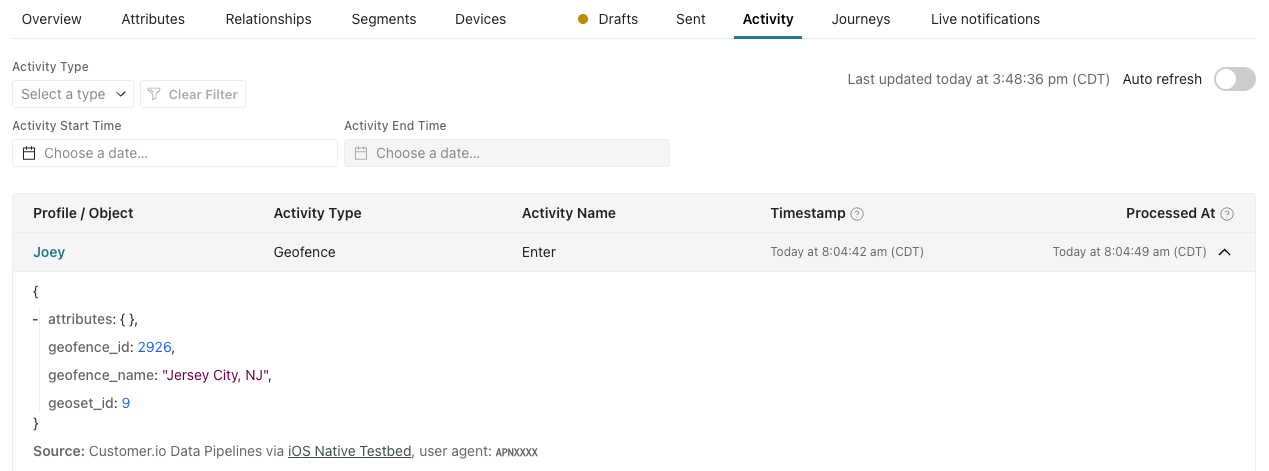
Each event carries the geofence_id of the geofence and the geoset_id that the geofence belongs to. The activities do not send back exact coordinates of your customers, only data for the geofence they crossed.
- Exit events include
visit_duration_secondswhen the SDK can time the visit reliably. - Dwell events include the geofence’s
dwell_threshold_secondsand, when the SDK can time the visit reliably,dwell_duration_seconds.
A missing duration means the SDK couldn’t measure it, not that the visit lasted zero seconds.
A geofence enter or exit event fires when a person enters or exits a geofence. However, keep the following in mind:
- Geofence transitions are not instantaneous. Detection and delivery time varies with the operating system, device movement, location accuracy, background restrictions, and network availability. Many events arrive within tens of seconds, but delivery can take several minutes.
- Enter and exit events have a 1-hour cooldown. The SDK tracks it separately for each person, geofence, and transition type. If a person enters, exits, then re-enters within an hour, the SDK sends the first enter and the exit, and drops the second enter. Dwell events have no cooldown, so the SDK can still send a dwell event for that second visit. If the person leaves again within an hour of the first exit, the SDK drops that exit too, so the dwell event arrives without a matching enter or exit.
- Dwell events happen at most once per visit. A person who stays inside a geofence for hours still produces one dwell event. Editing the geofence or an interruption in monitoring, like a device restart, resets the visit. The SDK may then send no dwell event for the rest of that stay, or send a new one after the person stays for the dwell time again.
Report on geofence events
You can export geofence events through data warehouse syncs. They come with the Events schema in your export files with type = geofence.
Geofence events don’t currently come with destination actions in other data out integrations.
Export a list of geofences
You can export geofence metadata by going to a geofence set and clicking Export.
Edit a geofence in use
When you edit geofences in use in your workspace—as an automation trigger, segment condition, or wait until condition—changes reach devices on their next SDK refresh. Depending on the platform and the device’s current location, a geometry change may produce a transition after it is applied.
For example, if you expand the radius of a geofence that’s part of an automation trigger, the automation could suddenly trigger for more people in the area. Similarly, if you shrink the radius, people could suddenly exit the automation.
You can filter for automations triggered by geofences from the Automations page.
Delete a geofence in use
You can’t delete a geofence set in use; you first have to remove it from any automation or segment that uses it.
However, you can delete individual geofences from a geofence set that’s in use. Deleting a geofence does not trigger a geofence transition event, which is what causes people to enter or exit automations. Deleting a geofence does not log a Geofence Exited event for the person.
So if you have an automation triggered by entering a geofence set and then deleted one of its geofences, people who entered the geofence initially would not exit the automation, even if the exit condition was “Exited Geofence Set”.
Current limitations
The following are not part of the initial release. Reach out to product@customer.io with your use case if you want to request a feature.
- Duplicating polygon geofences in the workspace
- Import of address-to-coordinate geocoding (This is available when creating geofences in the UI, just not through bulk import.)
- Scheduling based on time of day
- A/B testing for geofence triggers
- Anonymous profiles
Troubleshooting
To troubleshoot issues with geofences, like entrances and exits not triggering as you’d expect, start with the SDK docs. Missing background location permission is the most common reason transitions don’t arrive: