

Email: getting started
Choose how you deliver email, set up your sending domain, warm it up, and build your first email in Design Studio.
How it works
Sending your first email through Customer.io takes four steps. You choose who delivers your email, set up the domain you send from, create and test your first email, and then send gradually to build up your domain’s reputation with inbox providers.
Choose how to send email
When you create a workspace, you choose who delivers your email:
- Customer.io delivers it for you. This is the default.
- Your own SMTP provider delivers it, and Customer.io hands each message to your provider.
If you already have an email provider, you can keep using it. If you don’t, Customer.io is the easier path, because you don’t have to set up or maintain a separate account.
Send through Customer.io
Customer.io delivers your email from a pool of shared IP addresses. We authenticate every message we send and keep our network off denylists by monitoring for problematic senders.
When you send through Customer.io, you must verify your sending domain before we can deliver any email from it.
Send through your own SMTP provider
If you have your own provider, Customer.io builds and personalizes your messages and passes them to your provider for delivery.
We fully support the following providers. For each of these, we receive and report delivery statuses after the message leaves our servers, like delivered, opened, and clicked.
You can also use any other provider that supports SMTP, like Amazon SES. If you want us to support your provider, get in touch and let us know.
Set up your sending domain
Your sending domain is the domain in your From addresses, like yourcompany.com in hello@yourcompany.com. Whichever delivery option you chose, you add your domain and From addresses in Customer.io before you send your first email.
- Go to Settings > Workspace Settings > Email and add your domain.
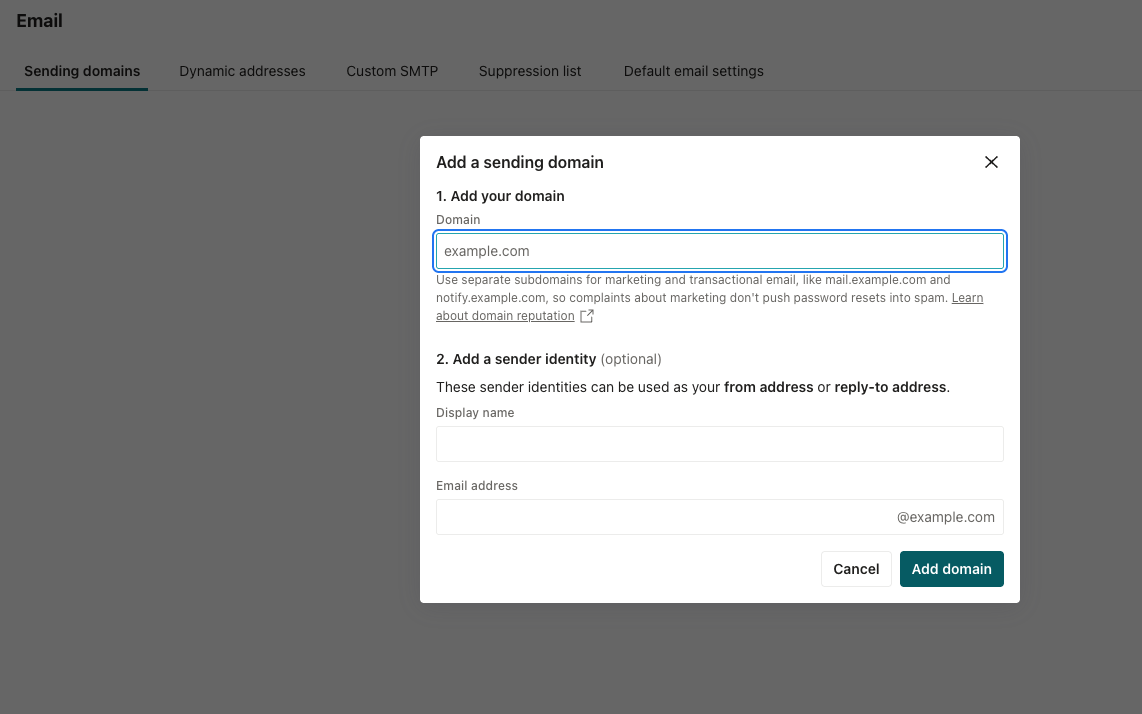
- Enter the From address(es) you want to send from.
- Verify the domain by adding DNS records to your domain host. Whether this step is required depends on how you send email. See Verify your domain below.
By default, Customer.io tracks clicks on links in your emails. To do this, Customer.io wraps your links in a Customer.io subdomain. See Track links with your domain to learn more.
Verify your domain
Verifying your domain proves to inbox providers that Customer.io is allowed to send on your behalf. You add SPF, DKIM, and verification records to an account-specific subdomain, like cio#####.yourdomain.com, so we never take over your root domain. You can let Customer.io add the records for you through Entri, or add them yourself.
What verification means for you depends on your delivery option:
- Sending through Customer.io: You must verify your domain before Customer.io can send email from it. DNS changes can take hours to propagate, so start this step as early as you can.
- Sending through your own SMTP provider: You don’t have to verify your domain in Customer.io to send. Your provider delivers the mail, so check its documentation for the SPF and DKIM records it needs.
Create your first email in Design Studio
Design Studio is our latest message creation experience. Create your email from visual blocks or code, and set global styles to create a consistent brand.
Design Studio gives you two editors for every email:
- The visual editor lets you drag components like headings, paragraphs, images, and buttons onto a canvas. Click a component to style it, and open the Personalization panel to add liquid
A syntax that supports variables, letting you personalize messages for your audience. For example, if you want to reference a person's first name, you might use the variable
.{{customer.first_name}}. - The code editor gives you the HTML and CSS behind the same email. Use it to import an email you already have or paste in your own HTML.
Before you build, set your Styles: your brand’s colors, fonts, spacing, and more. The components, or building blocks, of your email inherit these styles, so every email you make in Design Studio matches your brand without styling each one by hand. Your agent takes these standards into account when building emails for you.
If you’re just getting started and warming your domain, you might build a one-time send. Use the visual editor to build your message or tell the agent to create a certain kind of email for you.
When your content is ready, fill out the envelope with your subject line, preheader, and the From address you set up earlier.
Test and send
Before you activate your workflow, send yourself a test message. Pick a person from the sample data so you can confirm that liquid renders their data as you expect. You can also preview your email on desktop and mobile, in dark mode, and with images blocked.
If you’re on a trial, test emails come from test@customer.io instead of your own From address, even if you’ve verified your sending domain. When you move to a paid plan, tests use your own From address. Test your emails explains the trial limits and what to check if a test doesn’t arrive.
When your test looks right, check your workspace settings and make sure you’re sending messages to your audience, instead of sending emails to a test address. Then you’re ready to activate your automation, schedule your one-time send, or trigger your transactional message.
Make sure you slowly start to send messages for optimal deliverability. Check out Warm your domain below for more.
Warm your domain as you send
Inbox providers like Gmail, Yahoo, and Microsoft judge your mail by the reputation of the domain it comes from. When you send through Customer.io, your mail comes from a Customer.io-managed subdomain of your domain. That subdomain is new to inbox providers even if your root domain has years of sending history, so every new sending setup needs a warm-up. The same applies if you send through your own provider from a domain or IP that hasn’t sent at volume before.
You warm a domain by sending real messages to real recipients, starting with a small volume and increasing it over a few weeks. This introduces you to inbox providers gradually, so they can see consistent sending and real engagement before you send at full volume. The core rules are:
- Start small. Send your first messages to a short list of people who recently engaged with your email.
- Hold each volume for 2 to 3 days. Inbox providers’ reputation signals lag a day or two behind your sending.
- Increase volume by no more than 1.5x at a time. If bounces, spam complaints, or throttling appear, hold or reduce volume instead of continuing.
If you warm up with one-time sends, set a daily ramp on your send rate and Customer.io increases the volume for you. For the full schedule and what to monitor, read Safely warm up your sending domain. If you’re moving to Customer.io from another provider, Transitioning to Customer.io as a sender explains what changes about your sender identity and how to ease the move.
Warming is one part of deliverability. List health, bounce rates, complaint rates, and content all affect whether your mail reaches the inbox. Email deliverability best practices covers each factor.