

Set or edit people's attributes
Profile attributes are the data you store on a person, like their name or plan. Learn how to create a new attribute, set or edit a value, and remove a value from a person's profile in the UI.
Typically, you set and edit attributes through one or more integrations. This way your systems stay in sync with Customer.io, and your automated messages go to the right people. But when you want to make one-off modifications or backfill data, you can do so through your workspace’s UI. Just know that if an integration also updates the person and attribute you’re modifying, that can overwrite your work.
If you’re not sure whether a future sync will overwrite your edit, go to your data index and search by the name of the attribute. If there are no sources, an integration is not currently set up to overwrite the attribute. If there are sources, check to see if any of them resync changes to the field.
Overview
You can store data points about people in your audience as attributes, like their first_name, email, or product_interests, or any other information that’s important for your marketing campaigns.
Every attribute has a name and a value. The name is how you reference the attribute whenever you want to find or set the value. For example, you can pull your audience’s first name into a message using liquid A syntax that supports variables, letting you personalize messages for your audience. For example, if you want to reference a person's first name, you might use the variable {{customer.first_name}}.{{customer.first_name}}. And you can create conditions for segments, messages, and automation triggers based on attributes.
You can store simple strings or more complex, nested data as attributes. Learn more about storing and formatting attribute values.
There are some attributes that serve specific purposes in Customer.io:
- Identifiers are unique values that represent a person, like an
idoremail. Every person needs at least one identifier. Learn more in Add or edit people. - Subscription preferences: By default, people can subscribe to, or unsubscribe from, messages all together. If you set up a subscription center, people can subscribe or unsubscribe to different message topics or channels, so they don’t have to make an all-or-nothing choice. Learn more in our subscriptions overview.
- Reserved attributes have specific meanings in Customer.io. For example, Customer.io uses
timezoneto send messages in the timeframes you specify in your automations. Learn more about reserved attributes.
If you send push messages or live notifications, you can also view Devices—data stored on people when your app registers with your push service.
What can you do with people’s attributes?
People’s attributes are core to your messaging and automations. They help you determine who to send to and the type of messaging and content that would engage them.
You can use attributes in a variety of ways:
- To personalize messages and webhooks using liquid
A syntax that supports variables, letting you personalize messages for your audience. For example, if you want to reference a person's first name, you might use the variable
.{{customer.first_name}}. - To group people together according to shared characteristics through data-driven segments
A group of people who match a series of conditions. People enter and exit the segment automatically when they match or stop matching conditions.
. - To start automations using the Attribute or Segment trigger.
- To send people down different pathways, called branches, in automations.
- To limit who receives specific messages or enters delays through action conditions in automations.
Review our info on case sensitivity across the platform, so you know how to efficiently search for attributes and include them in conditions in automations and liquid logic.
Add an attribute to your workspace
When you add a new attribute to any person, you effectively create it in your workspace. You don’t have to take any preliminary steps to add a new profile attribute to your workspace. Once one person has it, you’ll see it listed as an available attribute to set for others. And it appears in your data index where you can audit all of your profile attributes moving forward.
Typically, you set and edit attributes through one or more integrations. This way your systems stay in sync with Customer.io, and your automated messages go to the right people. Whether you’re adding an attribute in the UI or through an integration, make sure you use the same taxonomy and casing so you can build conditions and group people more easily; first_name and FIRST-NAME are two separate attributes in Customer.io.
Delete an attribute from your workspace
To delete an unwanted attribute from your workspace, you first need to remove it from all segments and workflows that use it.
- Go to your Data index.
- Click to open your attribute.
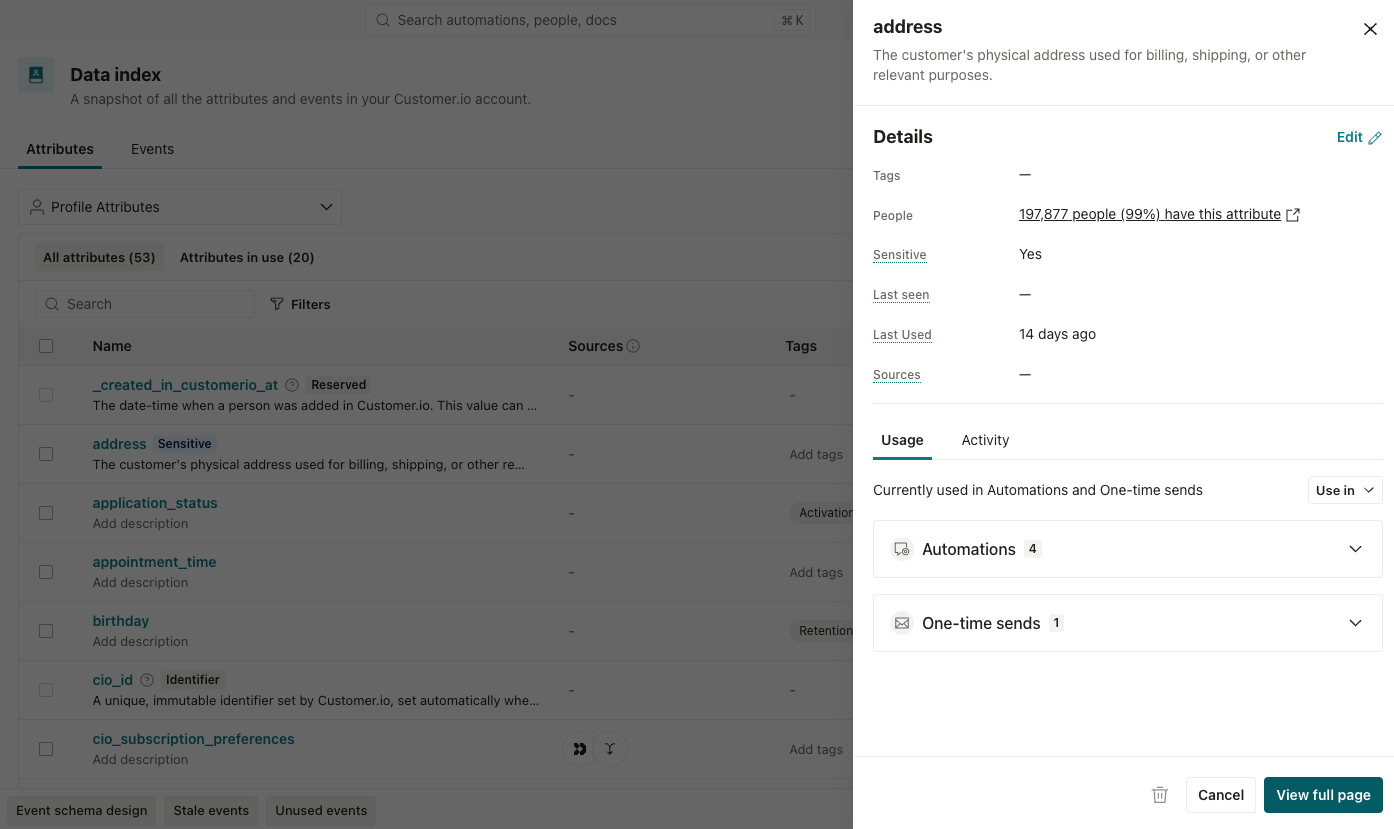
- Under Usage, go to where it’s used and remove it or archive the automation. You can also pair with the Agent on this so you have the usage data available while you review the workflows you want to remove it from.
- Click at the bottom of the attribute’s page in your index. This deletes the attribute from all people who have it.
If the attribute is stored on people in your workspace, it may take over 24 hours for us to fully purge the attribute from your workspace.
Set or edit attributes on a person
You can modify attributes in the UI, but keep in mind that changes you make on a profile don’t take precedence over your integrations or API. If another source later sends a different value for the same attribute, Customer.io overwrites your edit. You can check whether integrations update your attribute in your data index.
- Go to People and click the person’s profile.
- Under Attributes, click Manage.
- Modify the attributes.
- To set an attribute, fill in a name and value in the blank row, or click Create new attribute for a new row. If the attribute name doesn’t exist in your workspace yet, Customer.io adds it to your data index. You can also search for existing attributes under Available attributes.
- To edit an attribute already saved on the profile, change the name or value. You can’t rename reserved attributes. And identifiers such as
emailandidfollow extra rules, which you can find in Update a person’s identifiers.
- Click Save changes. Keep in mind that changing a person’s attributes can make them join or leave segments and trigger automations.
Remove attributes from a person
You might remove an attribute’s value so a person leaves certain segments, doesn’t trigger automations, or to clean up unnecessary or inaccurate data. For example, if you want to get ahead of your integration’s sync cycle, which would remove it later than you want, you could first remove it in the UI. Or if your database syncs ignore empty or null values, you can remove those attributes manually.
- Go to People and open the person’s profile.
- Under Attributes, click Manage.
- Click next to the attribute you want to remove.
- Click Save changes.
To delete an attribute from everybody in your workspace, see Delete an attribute from your workspace.
Change attributes for many people at once
You may want to manually change attributes in bulk if you don’t have the resources to fix integrations that are sending the attributes or want to add information not available through your integrations, like coupon codes or historical data.
If your integrations don’t add or change these fields, a CSV import is a quick and effective way to modify people’s attributes. For example, if you want to get ahead of a sync cycle or if your integration ignores empty or null values, you can manually remove attributes by updating existing people through a CSV import. Include the people you want to update and the attribute name with an empty value. Then when you import, choose “Delete existing attribute values” under What should we do with empty values?
Otherwise, if your integrations do add or update these fields, you should update your integrations to ensure the attributes stay up-to-date. If you don’t have the resources to update your source integrations, you can create an automation with a Create and update person action that programmatically adjusts attributes, like ensuring attribute names or timestamps are formatted properly.
Best practices
Formatting attribute names
In general, these are best practices for developing naming conventions of attributes:
- Don’t use spaces, periods or special characters in attribute names. These things make it harder to personalize messages with liquid
A syntax that supports variables, letting you personalize messages for your audience. For example, if you want to reference a person's first name, you might use the variable
.{{customer.first_name}}. - Don’t start an attribute name with an underscore. This indicates that an attribute is internal and won’t be discoverable or useable throughout your workspace.
_first_nameshould befirst_nameto use it in segments, trigger conditions, search results, etc. - Use one casing convention for attribute names, like
camelCaseorsnake_case.
Attribute names are case sensitive. You may need to audit your data to ensure you only add or update information on a single attribute. If you send an attribute for some people as A syntax that supports variables, letting you personalize messages for your audience. For example, if you want to reference a person's first name, you might use the variable A group of people who match a series of conditions. People enter and exit the segment automatically when they match or stop matching conditions.first_name and set it as First_name for others, you’ll have two different attributes for names in your workspace. This makes it hard to personalize messages with liquid{{customer.first_name}}.