

Test different pathways to convert more people
Overview
Experiments are the next generation of testing in Customer.io. They’re how you run controlled tests on messages and other workflow actions to improve the performance of your automations. They’re currently available only with automations, not broadcasts.
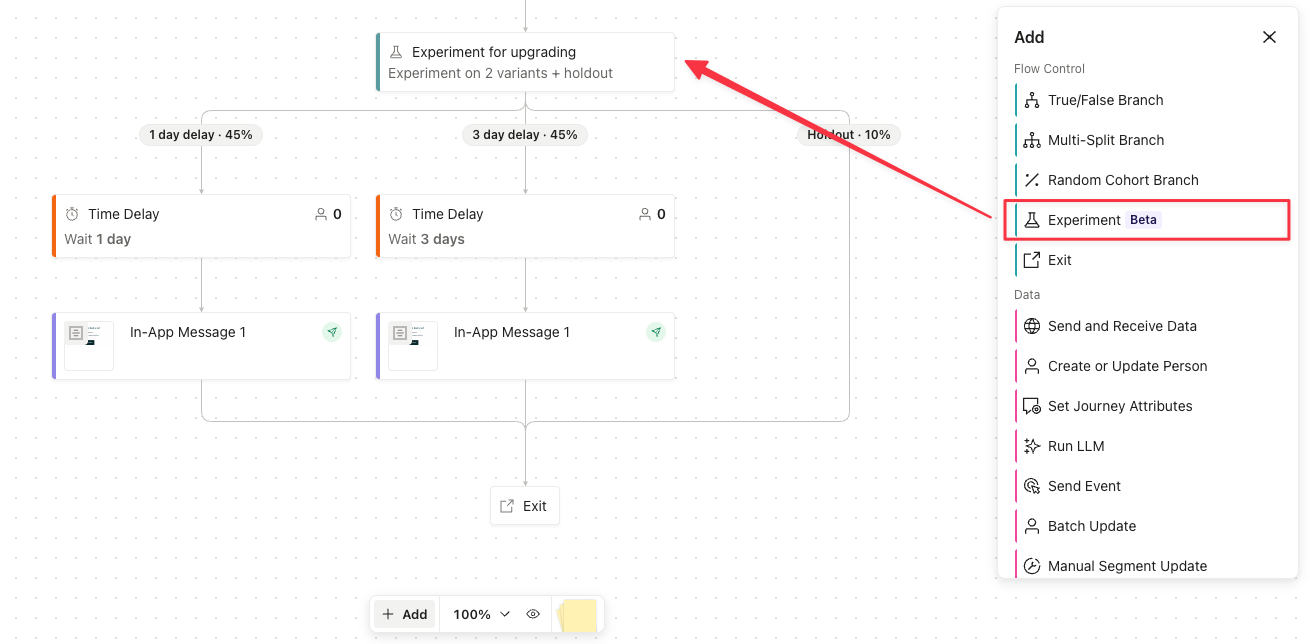
Experiments build upon classic A/B testing, flow control, and holdout groups to create a more coherent way to measure performance and increase conversions. You can create simple experiments to test which subject line in an email is more engaging or create more complex experiments where each path sends a person down a different sequence of messages and actions to convert people, for example, from free to paid plans.
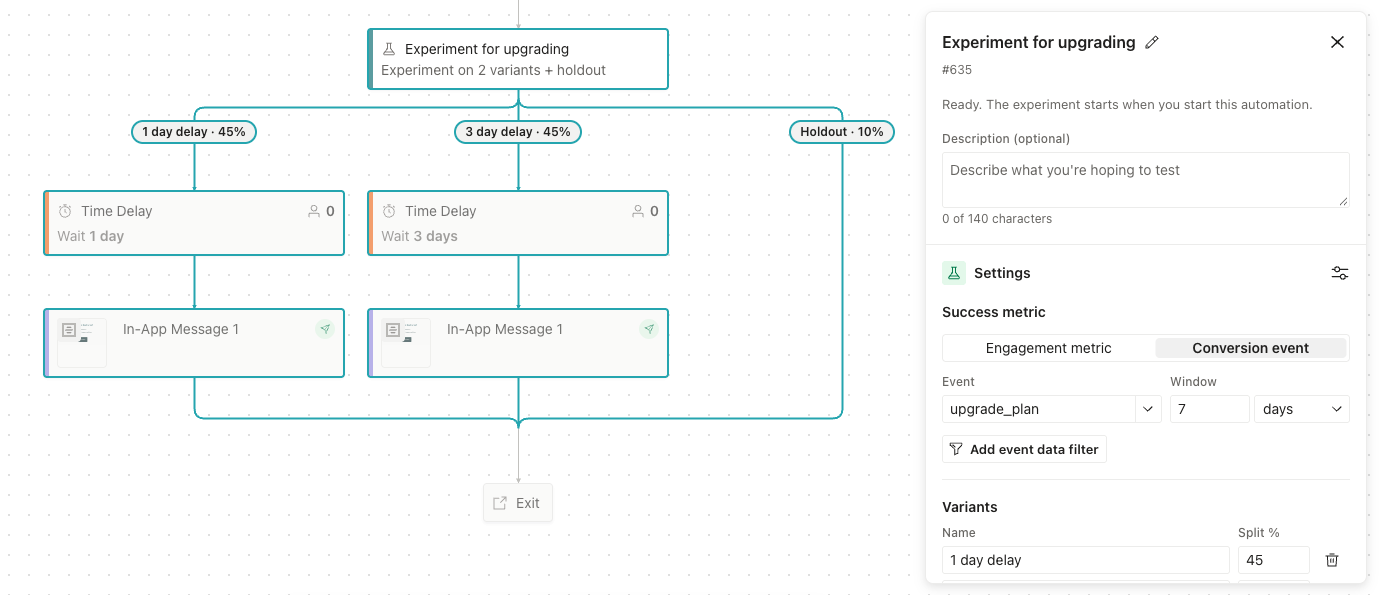
Experiments solve limitations of Customer.io’s other testing options:
- Where the classic A/B test experience is best for measuring message performance, experiments can measure both that and whether multi-step pathways are more effective at converting customers. And unlike A/B tests, you always have visibility into variant performance even after you select a winner.
- Random cohort tests can functionally get you close to what experiments can do, but you can’t fully track and report on the outcomes of random cohort testing in your workspace. With experiments, you see that reporting in your automation. Unlike random cohorts, you can also automatically send people down a winning pathway in an experiment. Or while the experiment runs, you can send a person down the same pathway over the course of multiple journeys, which wasn’t possible with random cohorts.
Check out our blog on journey-level testing for a real-world use case.
Set up an experiment
Before you set up an experiment, define the purpose of your experiment. What outcome are you trying to measure? How are you hoping to change your customers’ behaviors?
Then define the variable that changes across your variants so you can identify what influences path performance. Do you want to focus on when messages are sent, type of message channel, number of emails, or something else?
Then from your automation’s workflow, you have two ways to create an experiment:
- If you simply want to compare message performance, click your message block and select Experiments to get started.
- If you want to create multi-step variants, go to Flow control on your Build menu and click to drag and drop an Experiments block onto your workflow.
Define your success metric
Your success metric is the outcome you want each customer to achieve, like upgrading their plan or clicking a call to action. You can define a conversion event or engagement metric to track each variant against and define the time window for meeting the criteria.
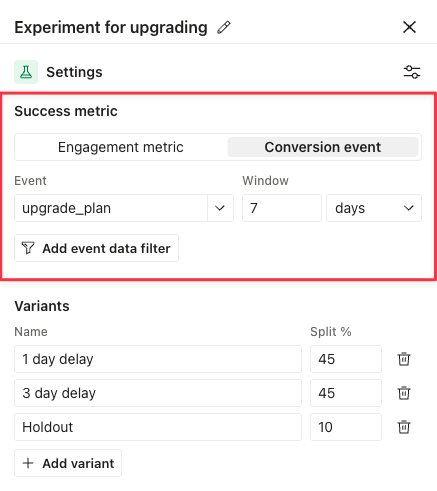
The time window is a max of 30 days, and it starts when a person enters the experiment.
Conversion events
A conversion event is an event you send to Customer.io, like upgraded_plan or completed_onboarding. A person converts when Customer.io receives the event within the time window of your conversion criteria. You can add filters on the event’s data, like plan = "pro", to narrow down your criteria.
Engagement metrics
An engagement metric tracks message engagement. A person converts when a message sent from their variant path records that metric within the time window. If a variant path has more than one message, a person converts the first time any message on the path records the metric.
| Metric | What counts | Channels |
|---|---|---|
| Delivered | The provider confirmed that the message reached the recipient. | Email, push, SMS, WhatsApp |
| Opened | A person opened the message. For email, this counts human opens only, so opens from Apple Mail Privacy Protection and similar automatic image loading don’t count. | Email, push, in-app, inbox |
| Clicked | A person clicked a tracked link in the message. For email, this counts human clicks only, so clicks from link scanners don’t count. | Email, push, WhatsApp, SMS, in-app, inbox |
| Replied | The recipient replied to the message. | SMS, WhatsApp |
Only activity after a person enters the experiment counts toward your success metric.
Check if you’re recording opens and clicks
If your success metric relies on opens or clicks and you’re not seeing engagement data come through as expected, make sure you’ve enabled tracking:
| Channel | Opened | Clicked |
|---|---|---|
| On by default. Make sure open tracking is on for your workspace, that your email tracking consent mode allows tracking for the people in your experiment, and that you left Track opens and link clicks in this message checked in each email’s settings. | On by default. The same workspace, consent, and message settings control link tracking. | |
| SMS | Not available. SMS doesn’t support open tracking. | On by default. Keep Shorten links on in Workspace settings > SMS so tracked links fit in your messages, and don’t set track: false on the links you want to measure. |
| Comes from the recipient’s read receipts. There’s no setting in Customer.io, and recipients can turn read receipts off. | On by default. The same link shortening and track settings as SMS apply. | |
| Push | Your app reports opens through our SDK or your own metric events. If your app doesn’t report them, push messages never record Opened. | Not tracked separately. For push, Opened records the tap, so pick Opened instead. |
| In-app | Automatic. No settings to check. | Automatic. No settings to check. |
Create your variants
Variants are the pathways people take through your automation. You can create up to four variants including a holdout group.
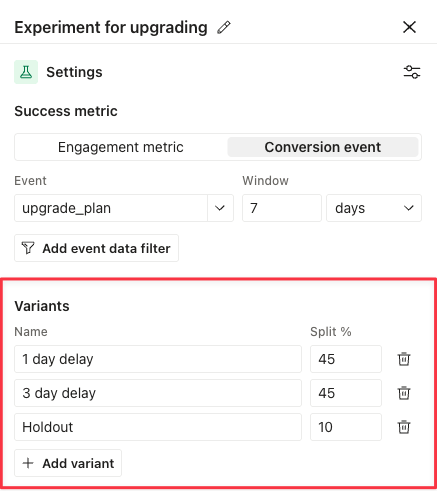
You add or remove variants in the Experiments panel. And you build each path by dragging and dropping blocks from your Build menu onto each path.
Adjust the percent of people who enter each path under Split %. If you update one, the others automatically adjust to always add up to 100%.
To remove a variant, click .
Define the winner
The winner is the variant that performs best on your success metric. Under Winner selection in the Experiments panel, you choose whether you pick the winner yourself or Customer.io picks it for you.
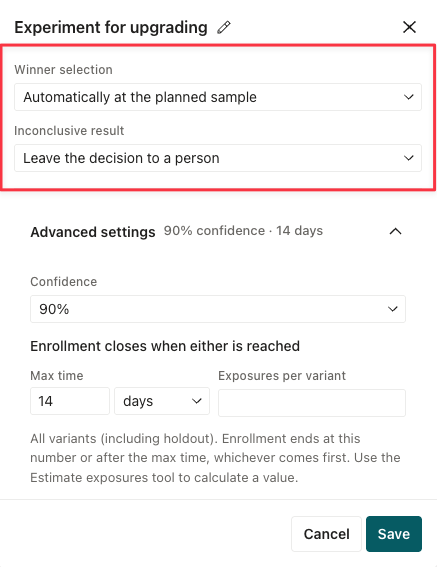
| Option | What it means |
|---|---|
| Manually | Customer.io waits until enrollment closes and the time window passes, then recommends a winner. Enrollment closes when every variant reaches your Exposures per variant target, or when Max time runs out, whichever comes first. |
| Automatically at the planned sample | Customer.io waits until enrollment closes and the time window passes, then declares the winner. Enrollment closes when every variant reaches your Exposures per variant target, or when Max time runs out, whichever comes first. |
| Automatically as soon as a variant is significant | Customer.io checks results as people convert and declares a winner as soon as one variant is statistically ahead at your confidence level. If no variant pulls ahead, the experiment ends at the planned sample, the same as the preceding option. |
Then you define when enrollment ends for the experiment and how confident Customer.io should be in the winner under Advanced settings.
Whichever option you choose, people who enter the automation after a winner is declared go down the winning path.
Learn more about applying a winner to clean up your workflow and move people on losing paths out of your experiment.
Advanced settings: define when enrollment ends
Advanced settings in the Experiments panel control when enrollment closes—when people stop entering your experiment:
- With manual winner selection, these settings shape the recommendation you see in the panel but never end the experiment for you.
- With the automatic options, these settings decide when Customer.io declares the winner.
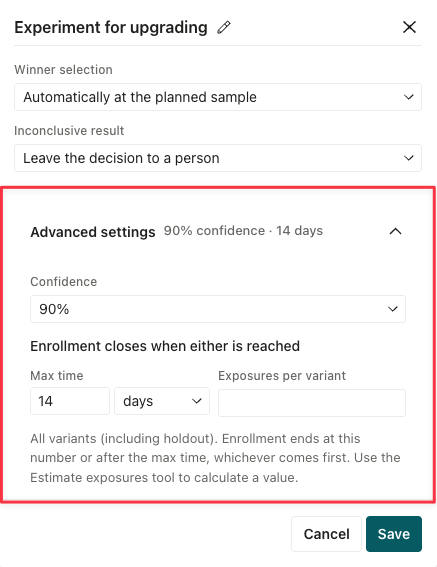
You can’t change these settings after the experiment starts.
| Setting | What it does |
|---|---|
| Confidence | How sure Customer.io has to be before it reports a variant as statistically ahead: 90%, 95%, or 99%. A higher confidence level means fewer false positives, but you need more people to reach it. |
| Max time | The longest enrollment runs, up to 90 days. When this time passes, Customer.io stops adding people to the experiment, even if you haven’t reached your exposures target. |
| Exposures per variant | The number of people each variant needs before enrollment closes. The target applies to every variant, including a holdout. If you leave it blank, enrollment runs until Max time. |
| Estimate exposures | A calculator that suggests a value for Exposures per variant. See Estimate exposures per variant below. |
Estimate exposures per variant
In addition to Max time, you can define the number of people that should enter each path before enrollment closes. If you don’t know what number to use, click to expand Estimate exposures for a recommendation from Customer.io. Choose one of two methods, and when you’re happy with the result click Use suggestion to fill in Exposures per variant.
| Method | Use it when | What it’s based on |
|---|---|---|
| Use baseline rate | You know roughly how well the current approach converts and you want enough people to detect a specific improvement. | Your baseline, minimum effect and power, combined with your Confidence setting. |
| Use audience estimate | You don’t have a baseline rate, or the size of your audience is the real limit on how long you can run the experiment. | Your audience size and your split percentages only. |
Use baseline rate
This method sizes the experiment around the result you’re trying to detect. You enter three things:
- Current baseline: your best estimate of the conversion rate you’d get without the change you’re testing, as a percentage. If the automation is new, borrow a rate from something comparable, like the click rate of a similar email you’ve sent, or the share of people who performed your conversion event after a similar automation. A rough number is better than none. If you have nothing comparable, choose Use audience estimate instead.
- Minimum effect: the smallest improvement over the baseline that you care about, as a percentage of the baseline. A 10% minimum effect on a 3% baseline means you want to catch a variant that lifts conversions to 3.3% or higher.
- Power: how likely the experiment is to detect the minimum effect when a variant really does perform that much better. You can pick 80% or 90%. At 80% power, an experiment misses a real improvement of your minimum effect size about one in five times. At 90% power, it misses about one in ten times. Higher power means fewer missed winners, but you need more people to get there.
Customer.io combines these three inputs with your Confidence setting to suggest a number per variant. Confidence protects you from declaring a winner that isn’t one. Power protects you from missing a winner that is.
For example, with a 3% baseline, a 10% minimum effect, 90% confidence, and 80% power, Customer.io suggests about 40,000 people per variant. Raising power to 90% raises the suggestion to about 55,000, because you need more people to be more certain of catching a real 3% to 3.3% lift. Raising the minimum effect to 20% cuts the suggestion to about 10,000, because a bigger difference is easier to see.
If you set Winner selection to Automatically as soon as a variant is significant, the baseline suggestion includes extra people to account for early decisions. With this option, Customer.io checks the results many times while the experiment runs instead of once at the end. Each check is another chance for a random streak to look like a real winner, so Customer.io requires a stronger result at each check to keep your confidence level accurate. Reaching that stronger result takes more people.
Use audience estimate
This method works backward from the people you have. Pick the approximate size of the audience that enters the automation, from 1,000 up to 10 million, and Customer.io suggests the largest target your smallest split percentage can reach. For example, a 10,000-person audience split 50/50 suggests 5,000 per variant, and the same audience split 80/20 suggests 2,000.
Confidence, power, and minimum effect don’t factor into this estimate, so it tells you what your audience can support, not whether that’s enough to detect the difference you care about. If your smallest split comes out under 100 people, Customer.io asks you to pick a larger audience.
Whichever method you use, results only show once each variant reaches 100 people. If you choose a winner before then, you’re making a decision without data.
Set the criteria for automatic winner selection
If you choose either automatic option, Customer.io declares the winner for you. You define the criteria with the settings under Advanced settings:
- Set your Confidence level. Customer.io only names a winner when one variant beats the reference variant at this level.
- Set Max time and Exposures per variant. For Automatically at the planned sample, these two settings decide when Customer.io makes the decision. For Automatically as soon as a variant is significant, they’re the latest point the decision happens if no variant pulls ahead earlier.
- Choose what happens under Inconclusive result if no variant is statistically ahead when the experiment ends:
- Leave the decision to a person: Customer.io waits for you to choose a winner manually.
- Pick the reference variant: Customer.io picks your first variant—the leftmost variant in your workflow.
- Pick the variant with the best rate: Customer.io picks the variant with the highest conversion rate, even if the difference isn’t significant.
Next, learn how to Apply the winner when you’re ready to remove the other paths from your workflow.
Choose a winner manually
If you set Winner selection to Manually, you decide when the experiment ends. We recommend you never end the experiment before your pre-determined max enrollment period or before the experiment reaches its minimum number of enrollments per variation.
- Click the experiment block in your workflow. While the experiment runs, the panel shows each variant’s conversion rate and tells you whether a variant is statistically ahead.
- Choose a variant.
- When Customer.io has a recommendation, click Choose [variant name] to accept it.
- If you want a different variant, or you want to end the experiment before results are final, click and then select Choose winner early. Pick the variant people get moving forward.
- Add a summary of your findings for future reference, then click Choose winner. Choosing a winner ends the test but doesn’t move anyone who’s already on a path.
Next, learn how to Apply the winner to remove the losing paths and clean up your workflow.
Choosing a winner before enrollment closes ends the test early. An early pick may not hold up once more people convert, so wait until the panel shows a recommendation when you can.
Apply the winner
After a winner is declared, anyone who enters the experiment takes the winning path. Anyone in the losing paths continues down the losing paths, but new people won’t start your losing paths.
To push people in the losing paths out of the experiment and onto the next step in your workflow, you need to apply the winner. Applying the winner also cleans up your workflow—only the winning path remains, though you can track the history of your experiment at any time in your automation’s Experiments tab.
- From your workflow, select your experiment.
- Click Apply winner and confirm the action. Remember, you have to declare a winner before you can apply the winner to your workflow.
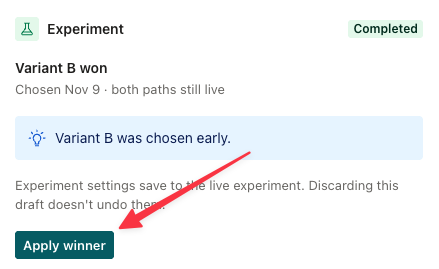
Anyone in the winning path finishes the steps of the winning path and continues forward. People who are actively in a losing path don’t finish the path. They skip forward to the first action after the experiment.
Monitor a running experiment
You can monitor a running test from your automation’s Workflow tab or Experiments tab. The workflow gives you a quick read and the controls to act. The Experiments tab gives you the full results and the history of every test in the automation.
From the workflow
Click the experiment block to open its panel. The block itself shows a status tag on the canvas, like Enrolling, Observing, or Paused, so you can see where each experiment stands without opening it.
The panel has three sections:
- Overview tells you what stage the experiment is in and what, if anything, you need to do. While people enter, it shows an Enrollment progress bar toward your Exposures per variant target or Max time. After enrollment closes, it shows an Observation progress bar while people finish their conversion window. The headline reads like a status update: when results are expected, whether a variant is ahead, whether results are ready, or which variant won. This is also where you Pause, End enrollment early, Extend enrollment, Stop, or Choose a winner early.
- Results shows each variant’s conversion rate against your success metric, with the number of people exposed so far and a preliminary rate in brackets that can still change. Each variant carries a badge: Reference for the variant others are compared against, Leading when a variant is ahead but not yet significant, Significant when the difference holds up at your confidence level, Not significant when it doesn’t, and Winner once you’ve chosen one. Click Full results to open the experiment in the Experiments tab.
- Paths shows the variants and their split percentages, and marks the winning path once there is one.
Results stay empty until each variant reaches 100 people.
After you apply a winner, you see on the actions that came from a winning path in an experiment. Hover over one to view test results.
From the Experiments tab
Your automation’s Experiments tab lists every test in the automation, both experiments and classic A/B tests. For each one, you see its type, status, result, and the number of people in it.
Click an experiment to open its full results. You see the phase of the experiment and whether a winner has been selected.
Following that, you can compare variant performance and phases of your test:
- Results compares conversions and message metrics across each variant.
- People lets you compare daily volume of people in your experiment and who is in your test.
- History records snapshots of your experiment has the state changes, like when it starts or a winner is selected.
- Settings records what the experiment was set up with, like the success metric and enrollment duration.
You can choose a winner, extend enrollment, or stop the experiment from here as well as from the workflow.
Classic A/B tests
A/B testing lets you test different versions of a message in your automation so you can measure which version performs better. For email, this means you can test subject lines against each other, different versions of your call to action, or try out new designs. For mobile messages like SMS and push notifications, you can test for content, imagery, or even deep links.
You can test multiple messages in every triggered automation, though we do recommend sticking to making just one change in your variation. This allows you to get an accurate picture of how that change measures up against the original without being confused by other data points.
Set up a classic A/B test
To get started, open your automation and add a message block you want to turn into a test. On the message panel, click to expand Experiment and choose Use classic A/B test.
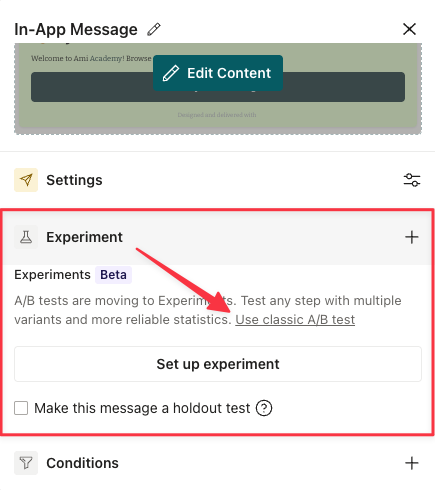
Update the traffic so each variant goes to a percent of people in your automation.
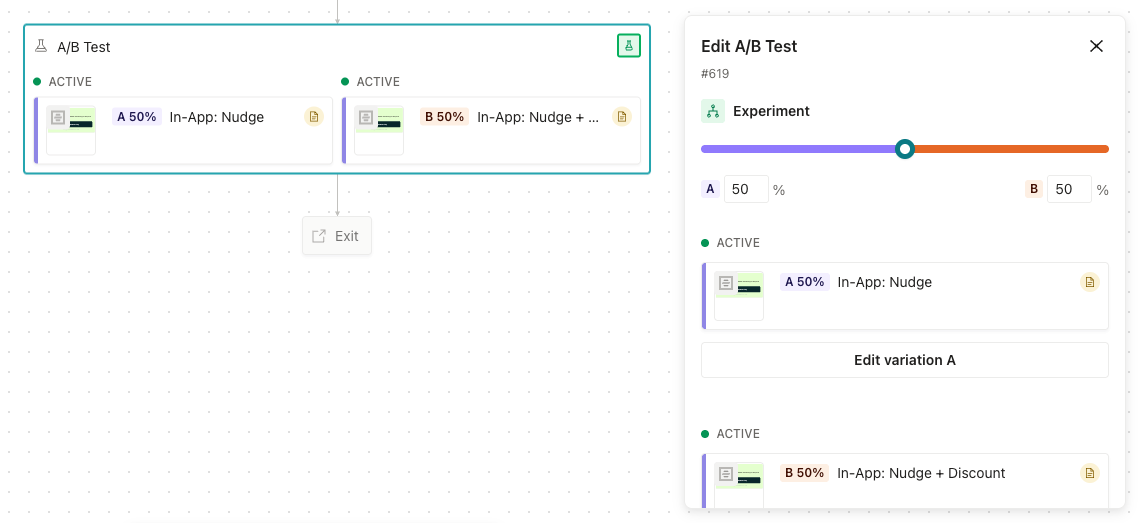
Make your changes to each message variant. You can change most anything about the message. In the case of email, this could be your from address, subject, body, even the sending mode (“Queue Draft” vs. “Send Automatically”). For push, feel free to test your push title, body content, or get creative with custom payloads. Any delays and time windows are shared across both versions, though.
If you have a low volume of messages being sent or are just starting with A/B testing, try testing a small subject line or content change, and measuring opens.
Monitor your test results
When your automation contains an A/B test, you see an tab for Experiments where you can track metrics and determine a winner.
Select a winner
From the Experiments tab, you can select a winning variant. When you have statistically significant results, or if you want to end the test before that, you pick one of the variants as the winner by clicking Select winner.
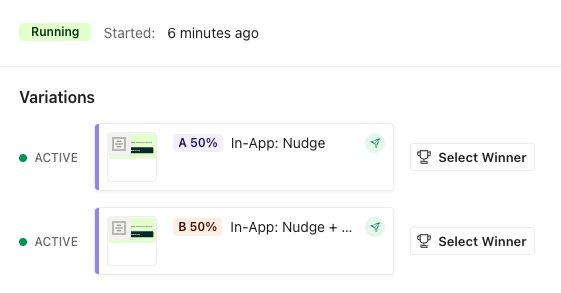
When you select a winner, Customer.io deletes the other variants and their results. You won’t see historical metrics for the classic A/B test, and your workflow only shows the winning variant.
Want more information about what statistical significance means or how classic A/B tests are calculated? Learn more at Understanding classic A/B test results.