

Automation triggers, filters, and frequencies
Automation triggers determine who enters your automations and when. This page describes different kinds of triggers and why you might use them.
If you’re just getting started, we’ve created a quick video to help you understand what each automation trigger does. To learn about object and relationship triggers, read on.
How it works
An automation trigger determines who enters your automation and when. You can set up filters to narrow your trigger criteria. People need to meet your trigger and filter criteria to enter your automation. You can also set your exit conditions to make people exit your automation when they quit matching your trigger and filter criteria, ensuring that your automation is relevant to your audience.
If you want to let people experience an automation multiple times, you can set frequency settings, determining how often a person can trigger an automation.
What kinds of actions trigger an automation?
Your automation trigger determines who enters your automation and when. Most triggers are based around people, like when they match certain criteria. Typically, these people are the subject of your automation—you’ll send them messages, set their attributes, and so on.
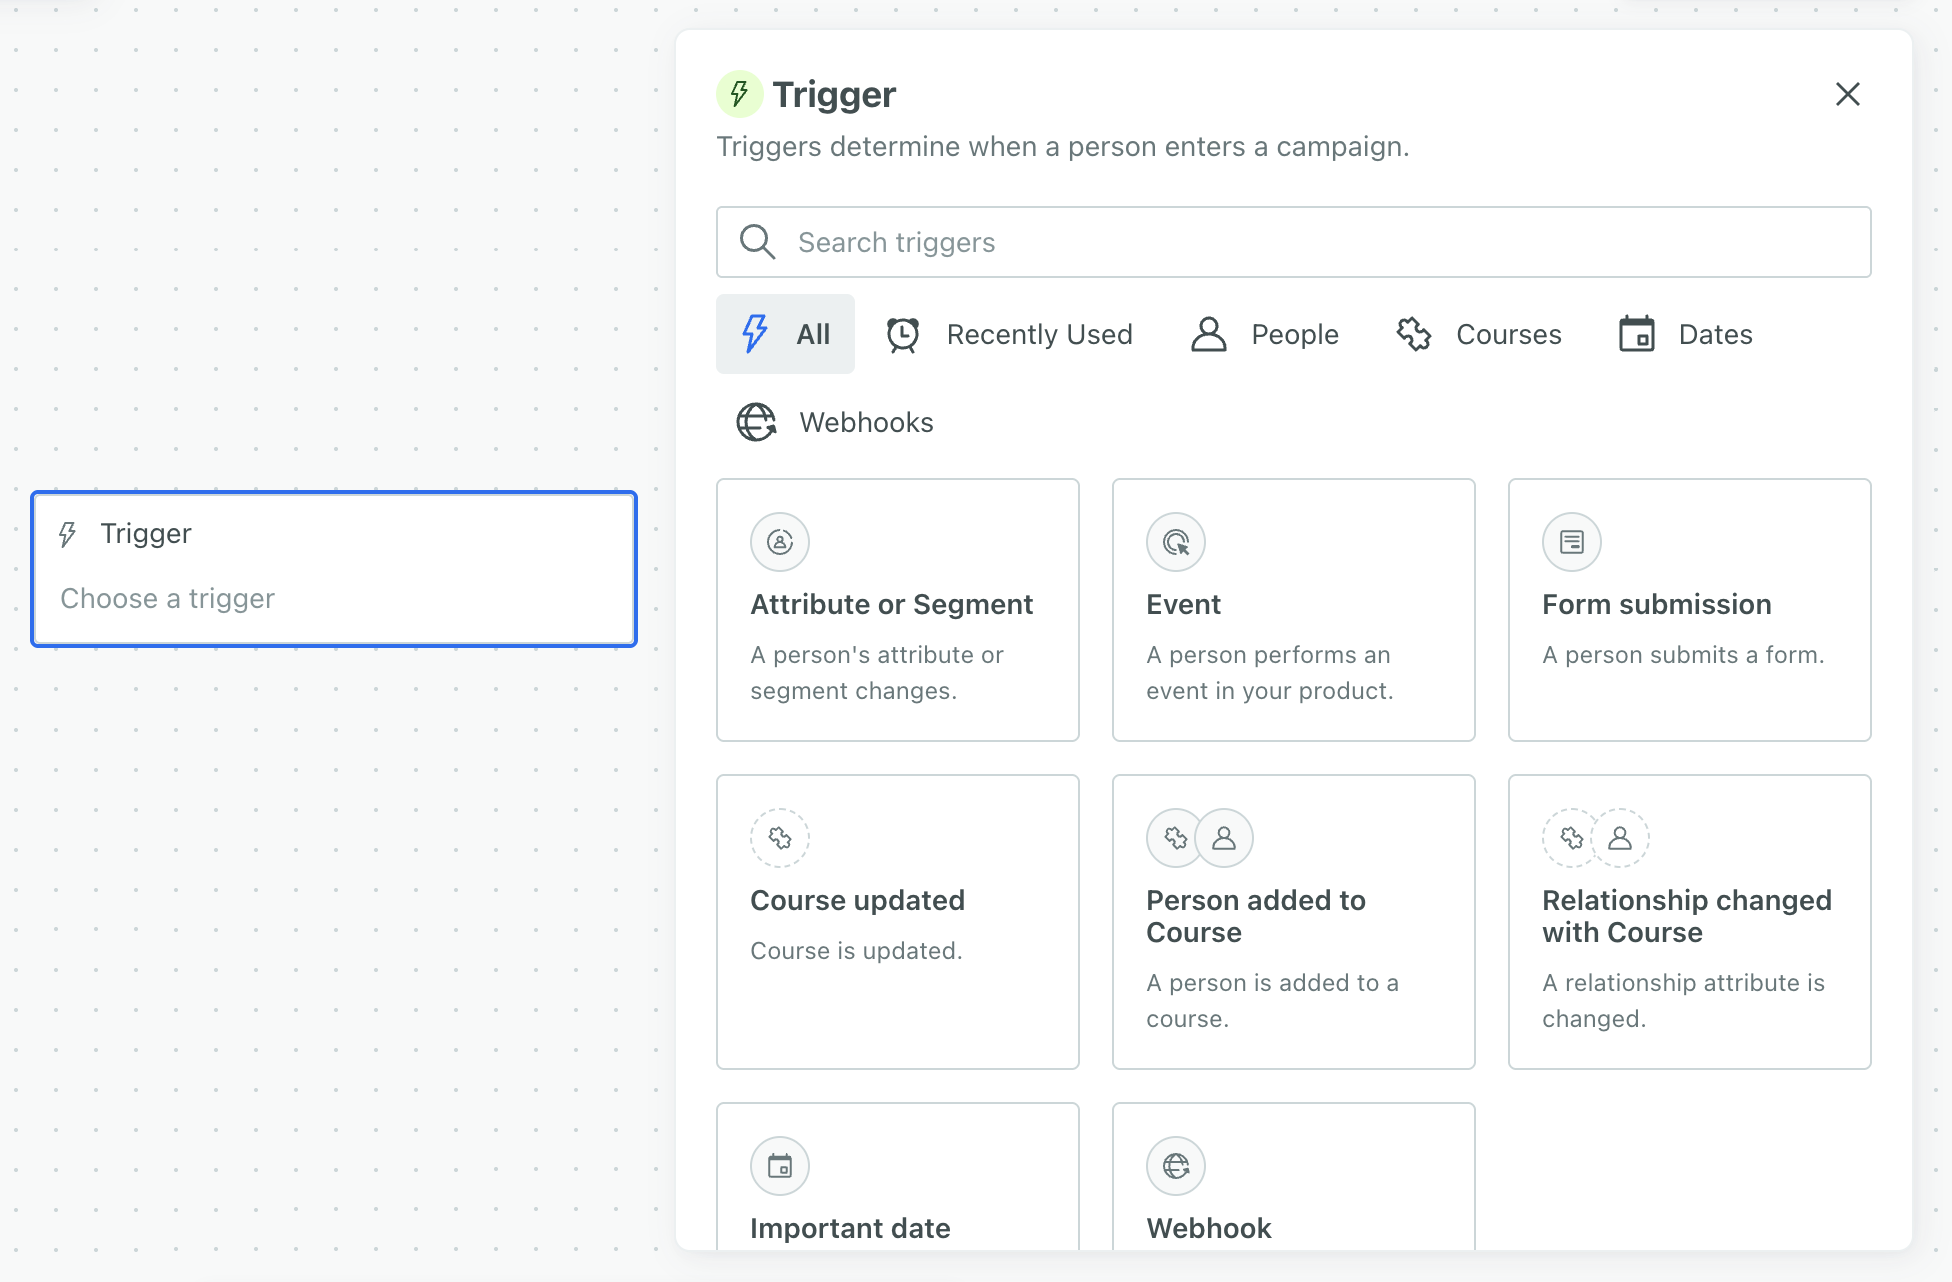
Trigger options
Attribute or Segment
The record that represents a person or object in Customer.io. A person is the human; their profile is everything you know about them in your workspace, like their attributes, activity, and message history. People and objects both have profiles, and we bill based on the total number of profiles in your account.
attributes, segmentsA segment is a group of people in your workspace. Use segments to trigger automations, track membership over time, or fine-tune your audience. There are three types of segments: data-driven, snapshot, and manual. Data-driven segments automatically update when people start or stop matching criteria. Snapshot segments capture everyone who matches at a point in time and only change when you refresh them. Manual segments are static groups of people.
, or both. Use segments if you want to track people who match this criteria over time or reuse the criteria as a trigger for other automations. You can set segment criteria based on your audience’s attributes, events, etc. Use attributes alongside segments or to quickly target specific profile attributes without creating or finding a segment. This trigger is best for automations like recurring NPS surveys, onboarding drip automations, and inactivity reminders.Event
Something that a person in your workspace did. Events can trigger automations, add people to segments, etc, and you can use properties from events to personalize messages.
-triggered automation helps you respond to a person’s activity in your app or website. For instance, you could trigger an automation based on a user abandoning their cart, viewing a specific page on your app, or completing an order.Form submission
Connected Forms in Customer.io allow you to automatically trigger automations, send data to other services, and add or update people when they submit forms on your website or in your app.
responses to trigger automations. You can connect a form to your workspace or integrate with Facebook Lead Ads. Use this type of automation to send messages to nurture new leads or respond to support requests.Important date
A key-value pair that you associate with a person or an object—like a person's name, the date they were created in your workspace, or a company's billing date etc. Use attributes to target people and personalize messages.
that people or custom objectsAn object is a non-person entity that you can associate with one or more people—like a company, account, or online course.
have. You can trigger based on any attributes that are properly formatted dates. This is useful for recurring automations like birthdays, anniversaries, subscription renewals, and payment reminders.Geofence set
A named group of geofences that you act on together—for example, trigger a campaign when a person enters any geofence in the set. When a person crosses a geofence, our mobile SDKs send a Geofence Transition event for each geofence set the geofence belongs to.
Object updated
Use Object updated when you want people to enter the automation every time an object An object is a non-person entity that you can associate with one or more people—like a company, account, or online course.
You’ll see this as “Object_type_name updated” in your trigger list. In the image above, “Course updated” is an example.
When you use objects to trigger automations, you can choose who enters into the automation. The audience could be:
- every person in the object
- certain people related to the object
Relationship added or changed
A relationship is the association between an object An object is a non-person entity that you can associate with one or more people—like a company, account, or online course.
You’ll see this as “Person added” or “Relationship changed” in your trigger list. In the image above, “Person added to Course” and “Relationship changes with Course” are examples.
When you use relationships to trigger automations, you can choose who enters into the automation. That is, the recipient of the message in this kind of automation doesn’t have to be the person in the relationship that triggered it. The audience could be:
- the person whose relationship to the object is updated (default)
- every person in the object
- certain people related to the object
Webhook
A webhook triggers a automation based on data from an external service. The purpose of your automation is to manipulate this data and associate it with people, much like you can with Zapier or Segment, but entirely within an automation. Because data, not people, is the subject of your automation, webhook-triggered automations don’t typically send messages directly; rather, they let you associate data with people, which can trigger subsequent automations.
Webhook automations help you perform one-to-many interactions with your audience, like notifying a group of people when you post a job or a product becomes available that a cohort of your audience is interested in.
Triggers with segments
Our attribute or segment trigger lets you launch automations based on people’s attributes—like plan type, region, or signup date—without needing to build a segment first. And when you need more control, you can still use segments alongside attributes.
This new trigger launched in April 2025. Any automations made with our legacy segment trigger will continue to run as expected. You can still edit their triggers and duplicate legacy segment-triggered automations too.
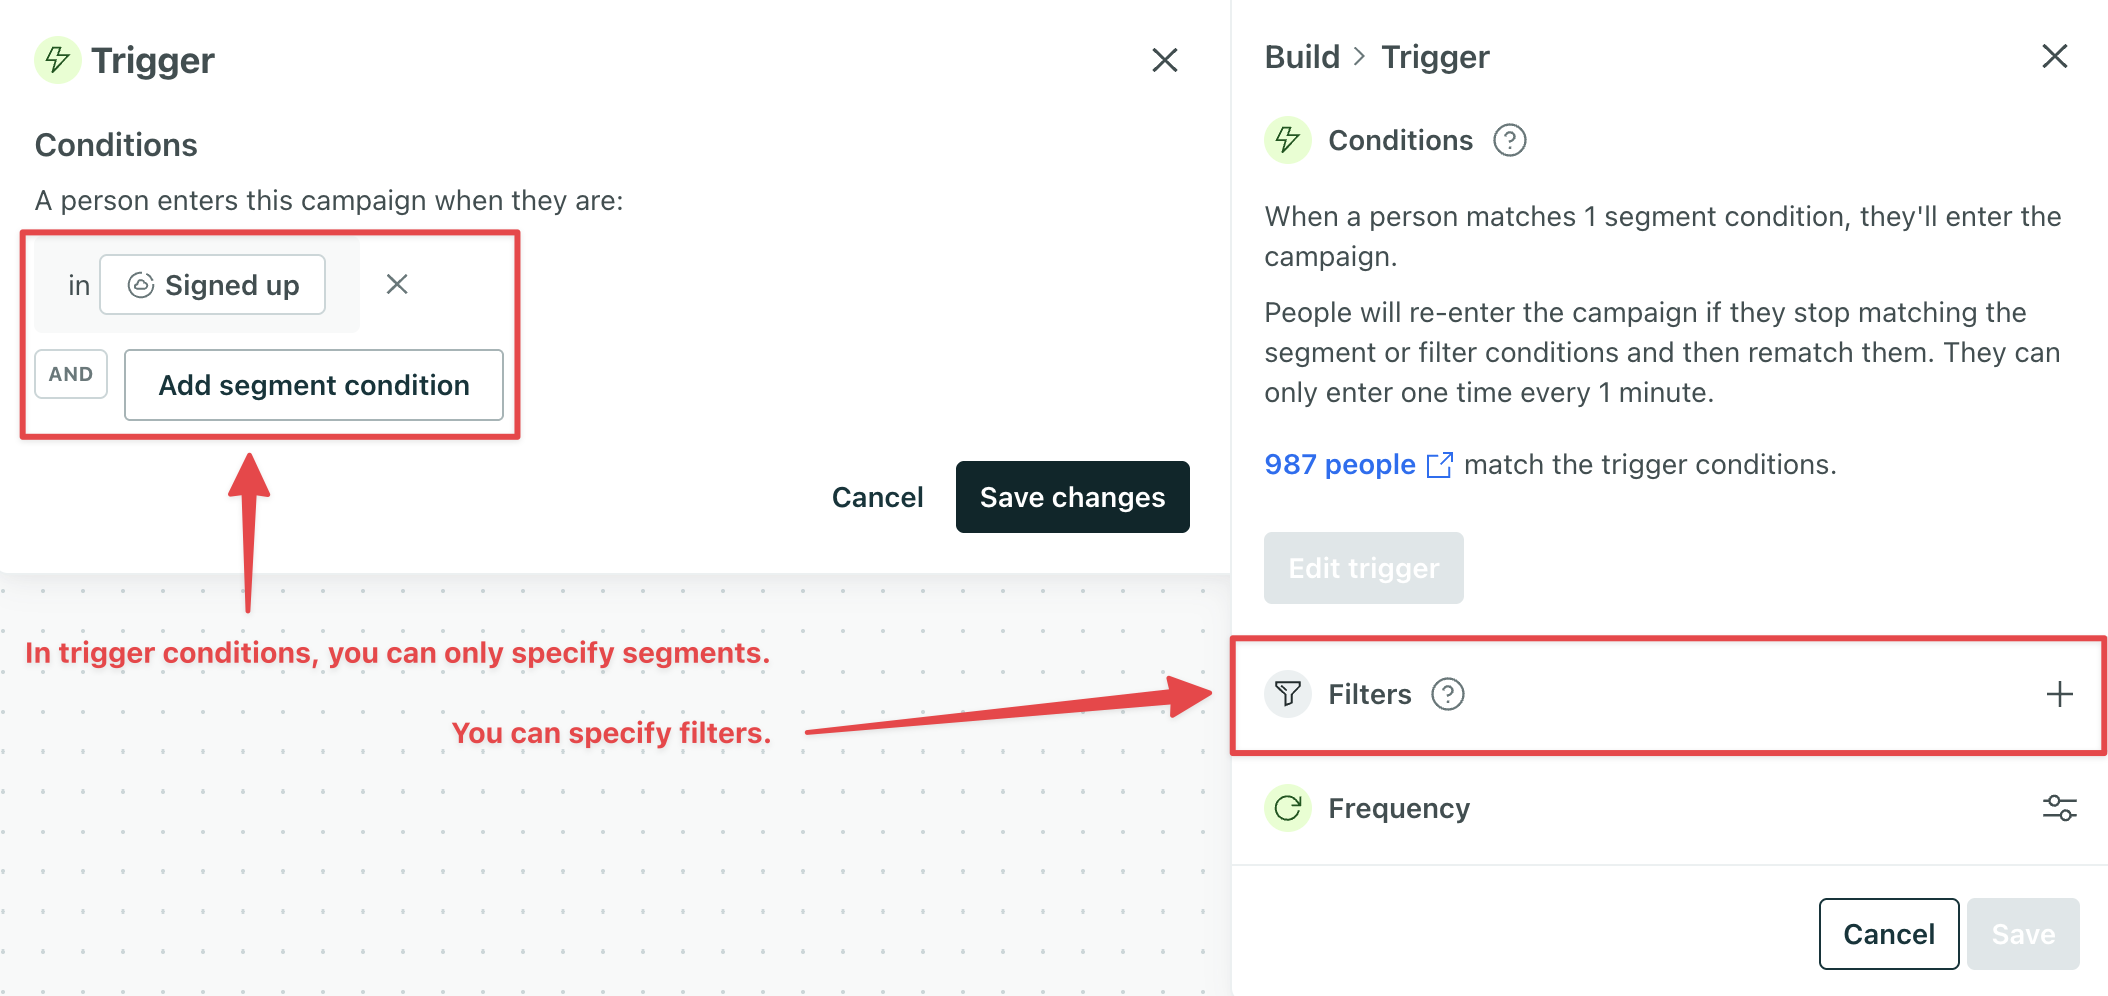
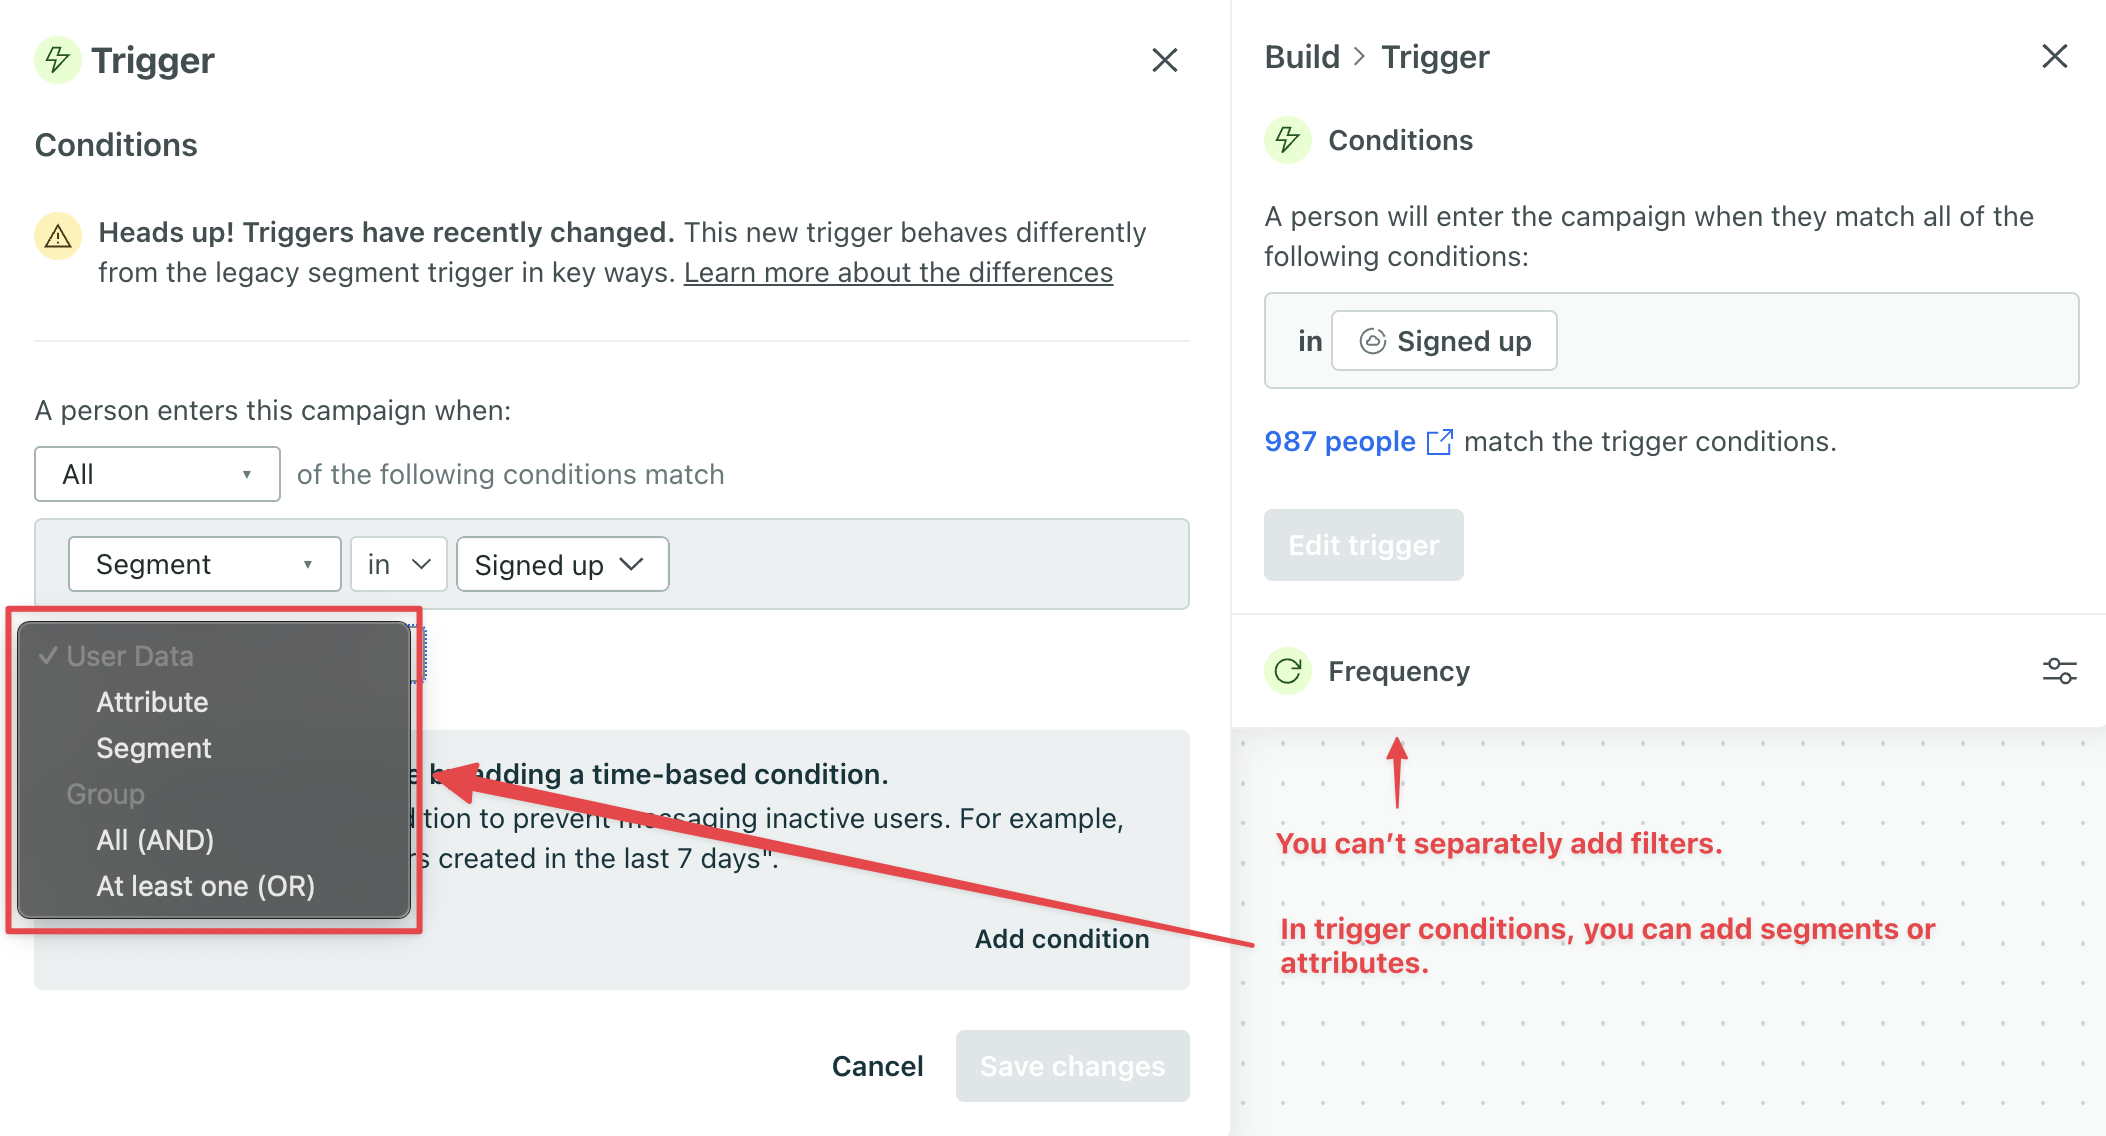
| Legacy segment trigger | Latest segment trigger |
|---|---|
 |  |
Differences between triggers: attribute or segment vs segment change
The new attribute or segment trigger gives you more flexibility and control over when people enter your automation. While it works differently from our legacy segment trigger, it’s designed to simplify setup and avoid unnecessary journeys. Here’s what’s different:
- Filter conditions are now part of the trigger conditions.
- You may need to add time-based conditions to ensure the right group of people trigger your automations.
Filter conditions are now part of the trigger conditions
In the legacy segment trigger, you could add filters to your trigger conditions to narrow your audience further. People would enter the automation when they matched the trigger segment—but they wouldn’t move through the workflow unless they also matched the filters.
This often led to unnecessary journeys: people would log as having entered the automation, but never move forward because they didn’t meet your filters. Eventually, they’d exit the journey without receiving any messages.
With the new attribute or segment trigger, you define previous filter conditions in the trigger itself. That means:
- People only enter the automation when they meet all your criteria.
- You avoid incomplete journeys and keep your reporting clean.
Add time-based logic to target the right users
You may need to add time-based conditions to ensure the right group of people trigger your automations.
The legacy segment trigger included automatic “matchtime” logic — it looked at the following to decide when people should enter an automation:
- When relevant attributes were last updated
- When relevant events were last sent
- The timestamp itself of relevant date/time attributes
The new trigger doesn’t do this automatically. Instead, you define when people should enter using time-based conditions in your trigger or delays in your workflow. This gives you more control and predictability.
Here’s how this works in practice:
Migrate users and backfill data
Imagine you have a running automation that uses a legacy segment trigger. People enter when they join the segment “Signed Up.” The segment is defined by a person’s attribute created_at is a timestamp. Then you migrate some users from another platform to Customer.io and backfill their data. If their created_at timestamps are more than 24 hours before now, those people would not trigger the automation.
With the new attribute or segment trigger, people will enter the automation as long as they meet the trigger conditions—regardless of how old their data is. That means backfilled users could start the automation right away.
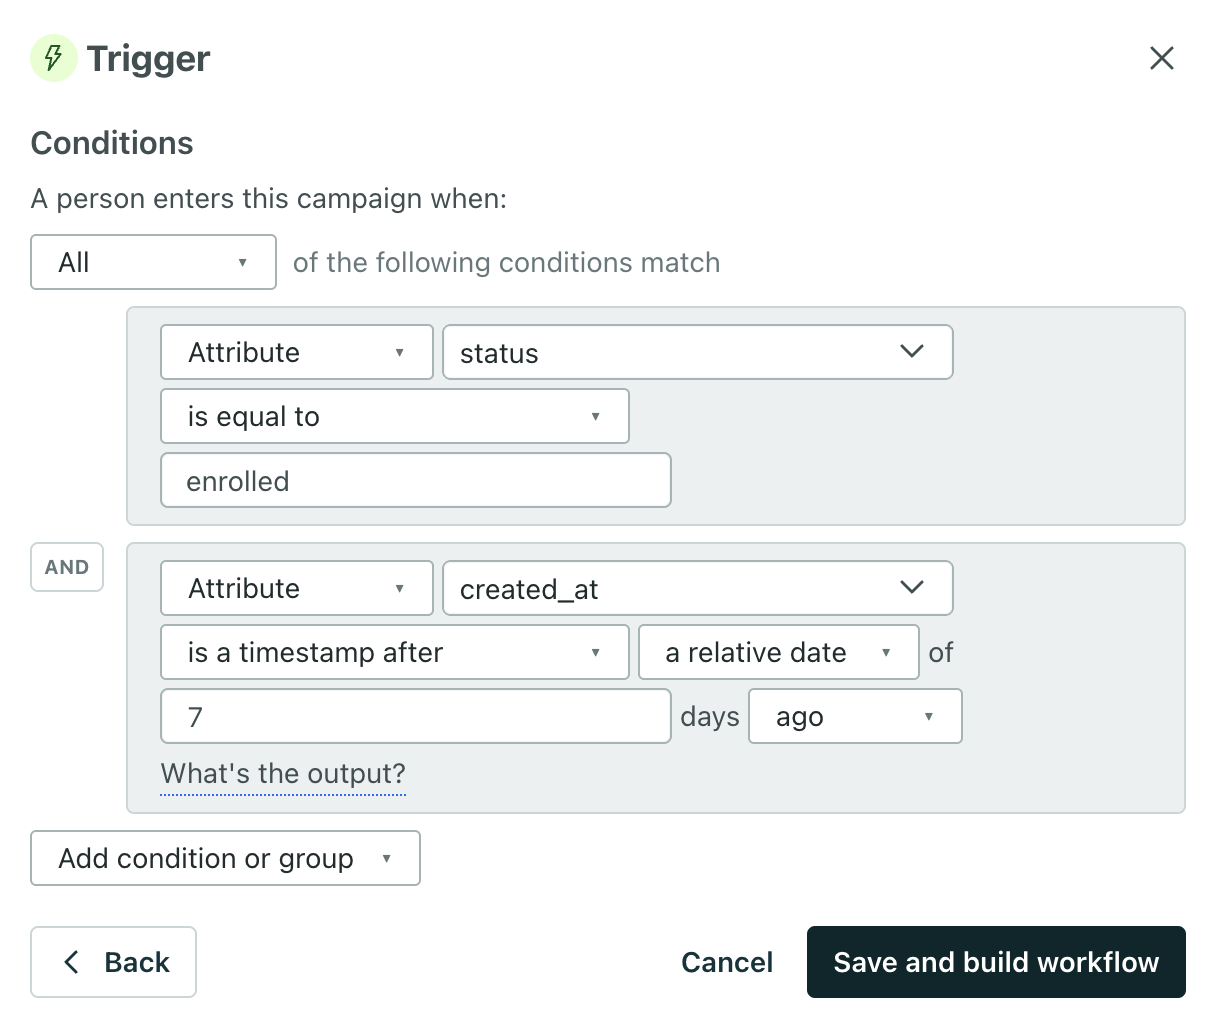
To exclude people with older timestamps, add a time-based trigger condition like Attribute: created_at is a timestamp after a relative date of 1 day ago.
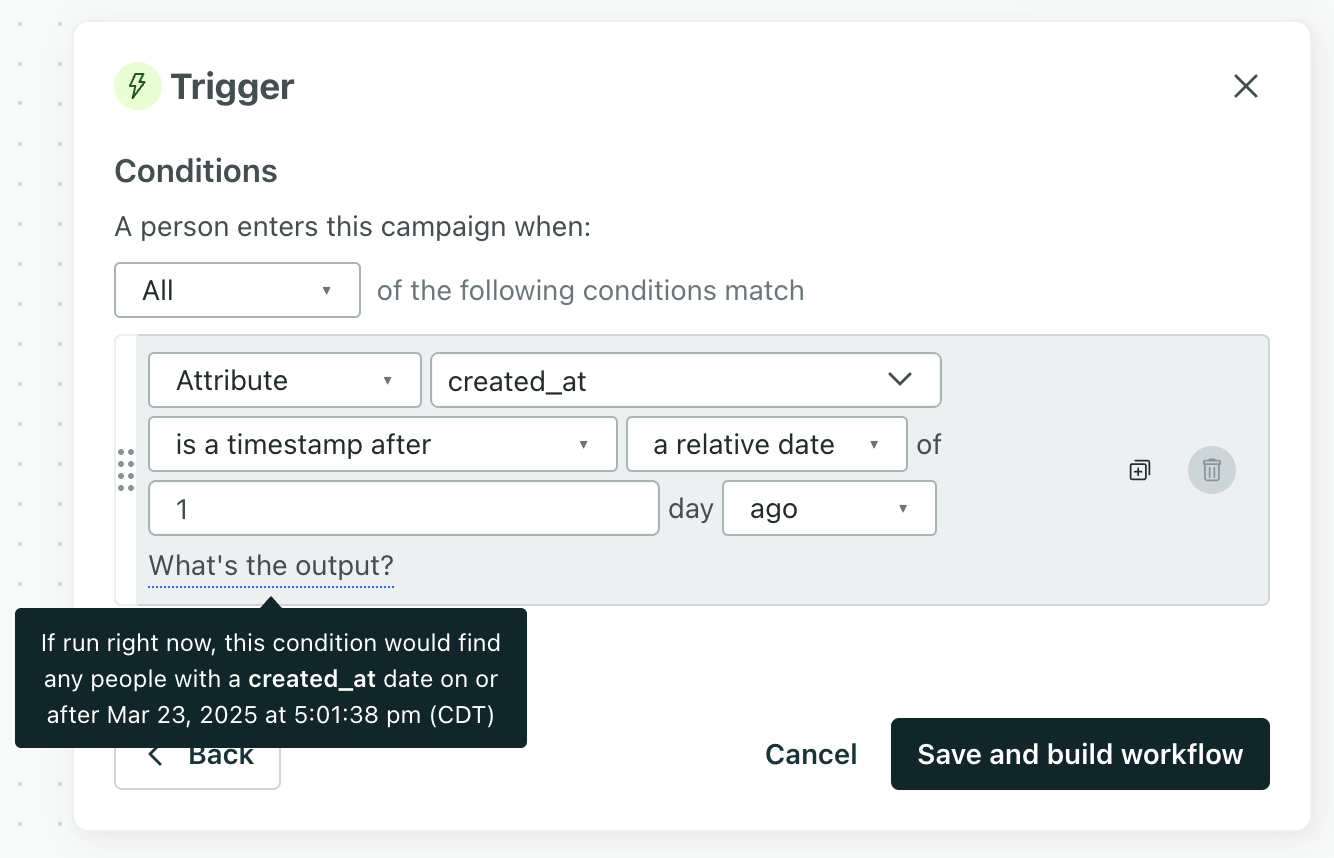
This ensures that only people whose created_at timestamp is within the last day will trigger the automation.
Delay people at the beginning of your automation
Imagine you have an automation that uses a legacy segment trigger. People enter when they join the segment “Trial users” which is based on the condition plan_type is equal to trial. The first step in your automation is a 3-day Wait until block. You start the automation and include current matches in the audience.
If someone’s plan_type updated to trial 1 day ago, matchtime logic would apply. That person would only wait 2 more days because of the time of their attribute update.
With the new attribute or segment trigger, matchtime isn’t used. People enter the automation the moment they meet the trigger condition and would wait the full 3 days.
If you want to time the delay based on when someone actually started their trial, pass a timestamp attribute like trial_start_date, and use it in a condition of a Wait until block at the beginning of your automation: trial_start_date is a timestamp after a relative date of 3 days ago.
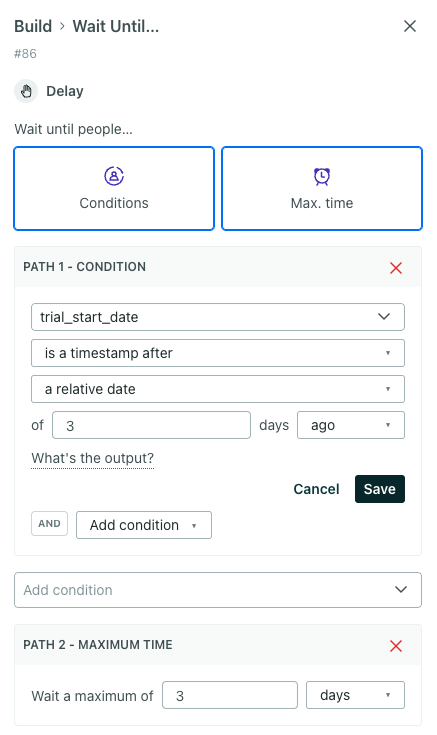
This gives you full control over when people move forward, based on the actual timing of their trial—not just when they entered the automation.
Wait until a future date
Both of the previous examples showcase matchtimes in the past. Let’s take a look at one more example where matchtimes are in the future.
Imagine you have an automation that starts when someone purchases a new subscription. The automation uses a legacy segment trigger where the segment is defined by the condition plan_start is a timestamp. Let’s say someone’s plan_start is in two days.
In this setup, this person would enter the automation before their plan starts—but they would be held at the beginning of your workflow until the timestamp (their actual plan start date) is reached.
With the new attribute or segment trigger, people start the workflow as soon as they meet the trigger conditions. That means they won’t automatically wait until the plan start date unless you explicitly add that logic.
If you want people to wait until a future date, use a date-triggered automation. In some cases, adding a Wait until block at the start of your workflow (based on a timestamp like plan_start) can work too.
More on matchtimes
These examples include simple triggers, but if you want to calculate matchtimes for legacy segment triggers with multiple conditions, consider the following:
- If the conditions are joined by an AND, the matchtime is the most recent of the conditions.
- If the conditions are joined by an OR, the matchtime is the oldest of the conditions.
Attribute or segment
With the Attribute or Segment trigger, you can target a range of data through segments or quickly specify profile attributes to define your audience:
- Add profile
The record that represents a person or object in Customer.io. A person is the human; their profile is everything you know about them in your workspace, like their attributes, activity, and message history. People and objects both have profiles, and we bill based on the total number of profiles in your account.
attributes to quickly target people who should trigger this automation - Add segments
A segment is a group of people in your workspace. Use segments to trigger automations, track membership over time, or fine-tune your audience. There are three types of segments: data-driven, snapshot, and manual. Data-driven segments automatically update when people start or stop matching criteria. Snapshot segments capture everyone who matches at a point in time and only change when you refresh them. Manual segments are static groups of people.
if you want to reuse a specific set of criteria across automations and track membership over time - Or add attributes AND segments to the trigger criteria to hone in on your exact audience
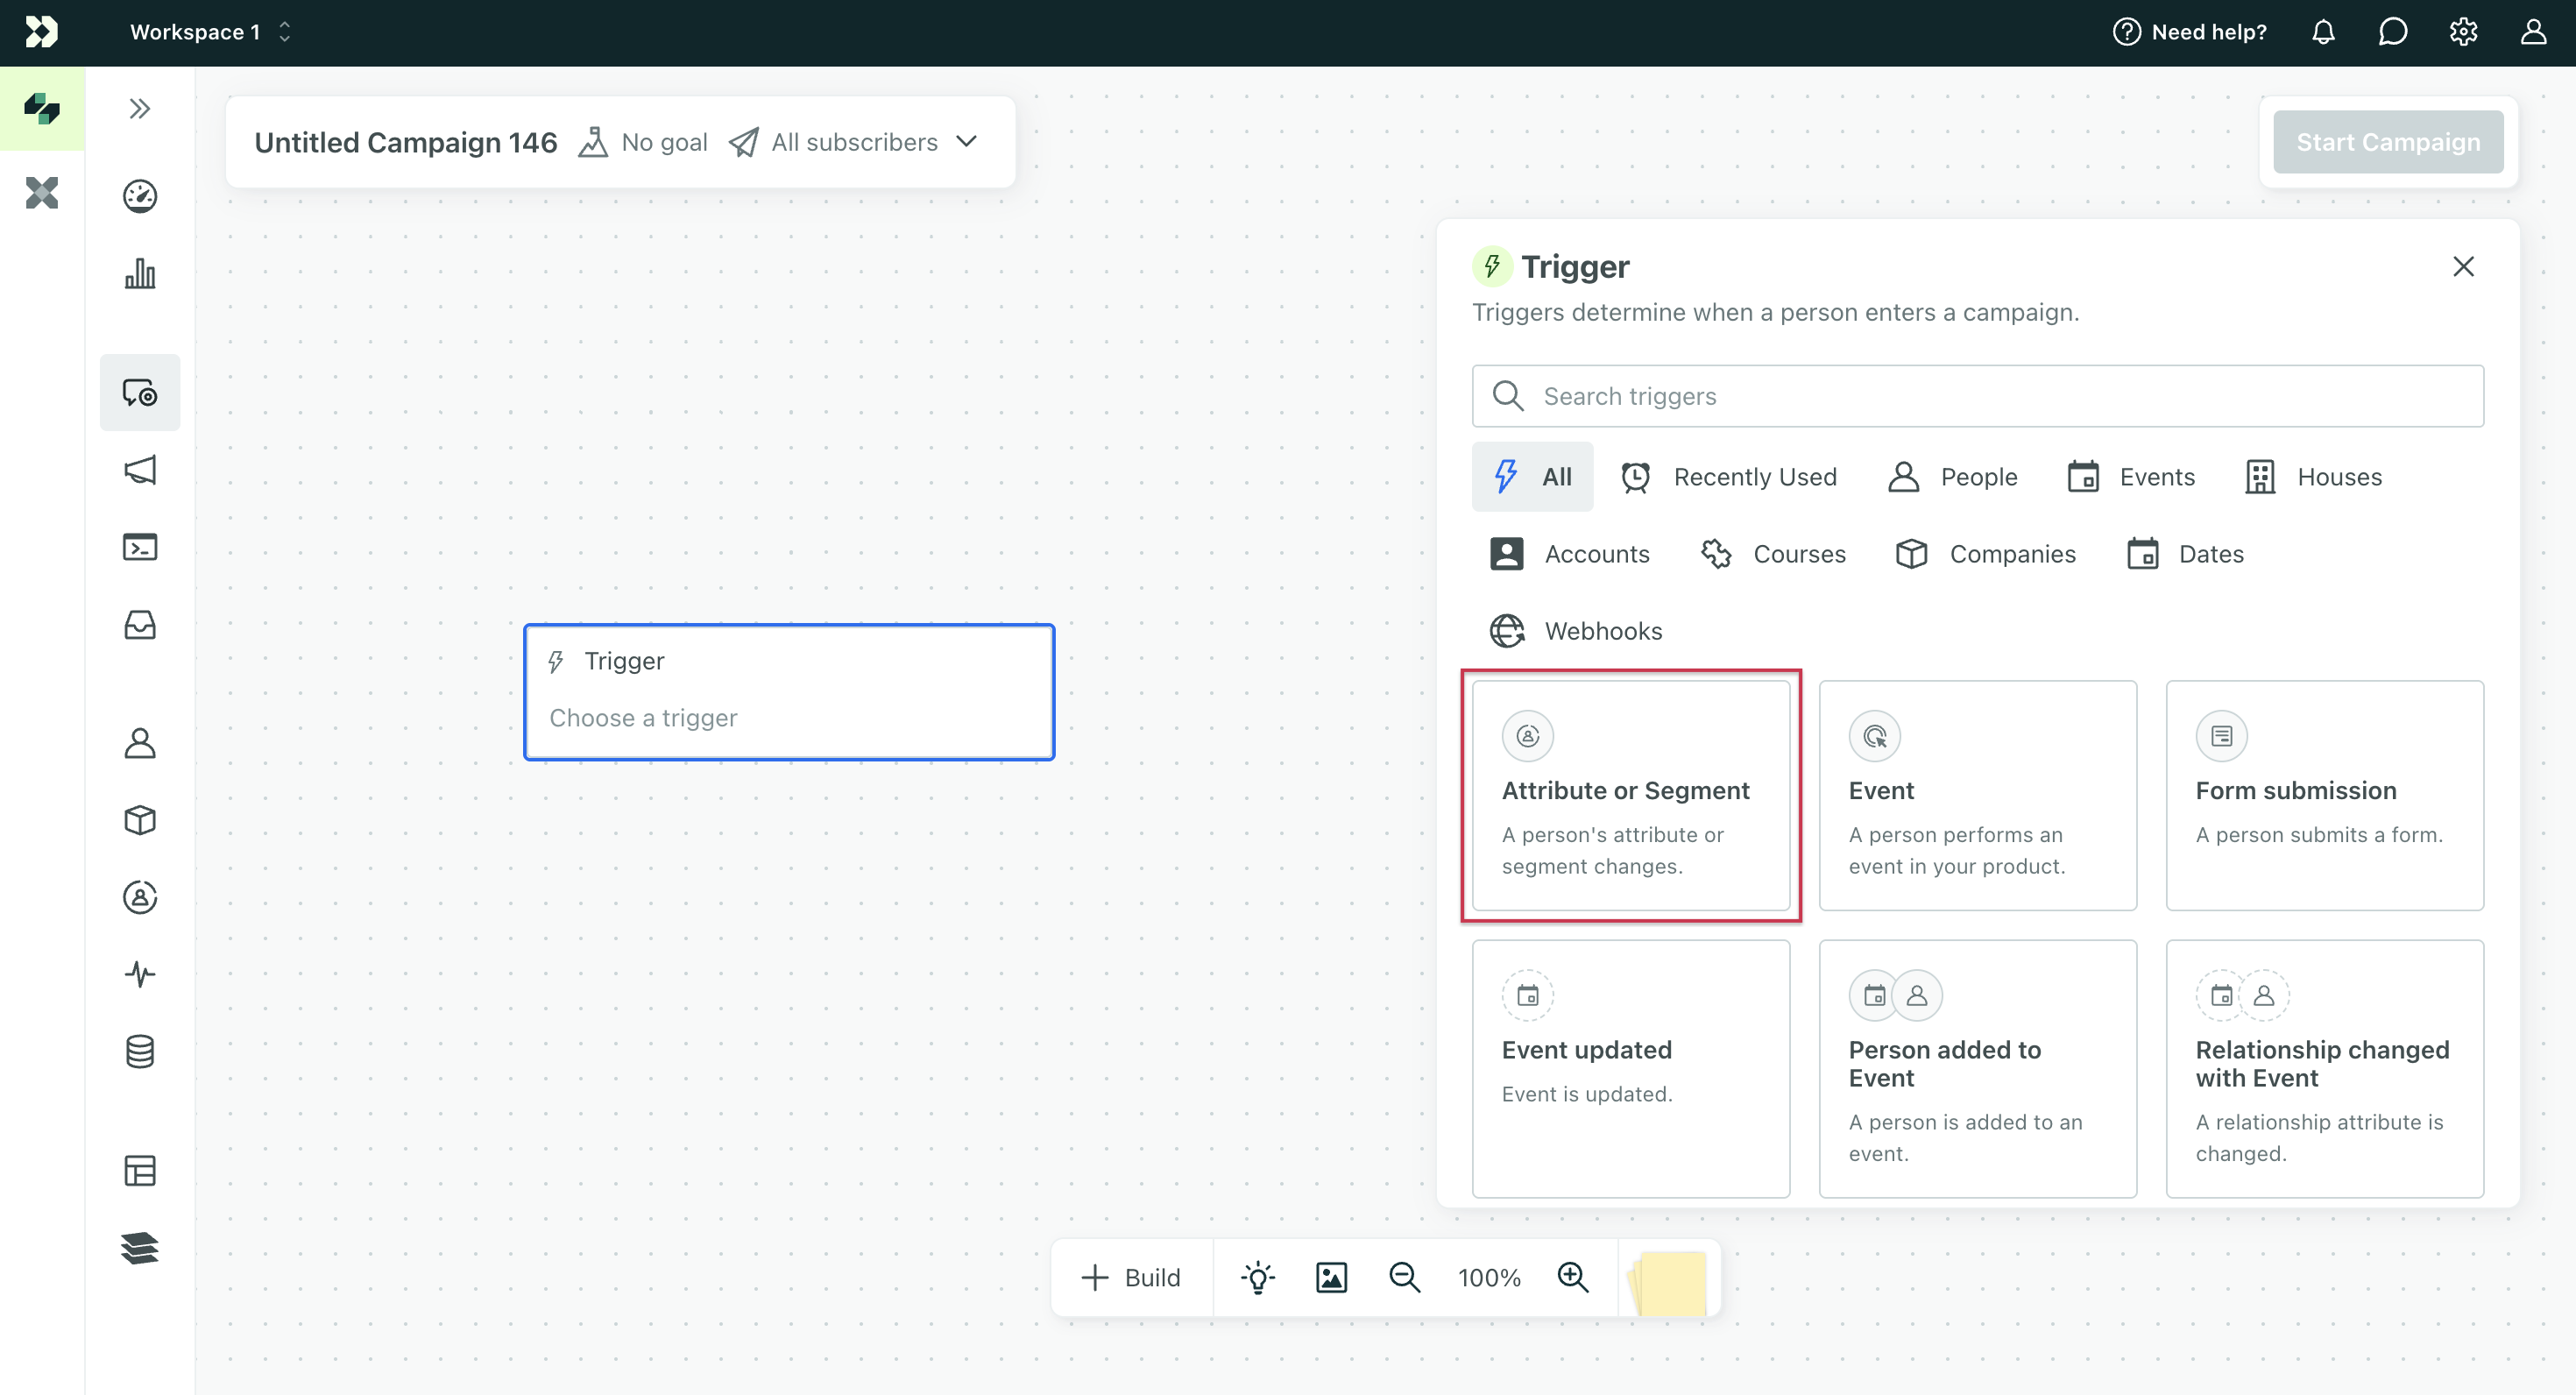
Click Attribute or Segment to get started:
Then choose your trigger criteria. Choose whether people should meet All or At least one condition to start the automation. You can specify profile attribute conditions and/or segments.
Frequency
By default, people will enter your automation once. If your automation does not use a Filter, you can let customers enter your automation multiple times with the Frequency setting. When you enable Frequency settings, you’ll use one of these options to determine how often a person can re-enter your automation:
-
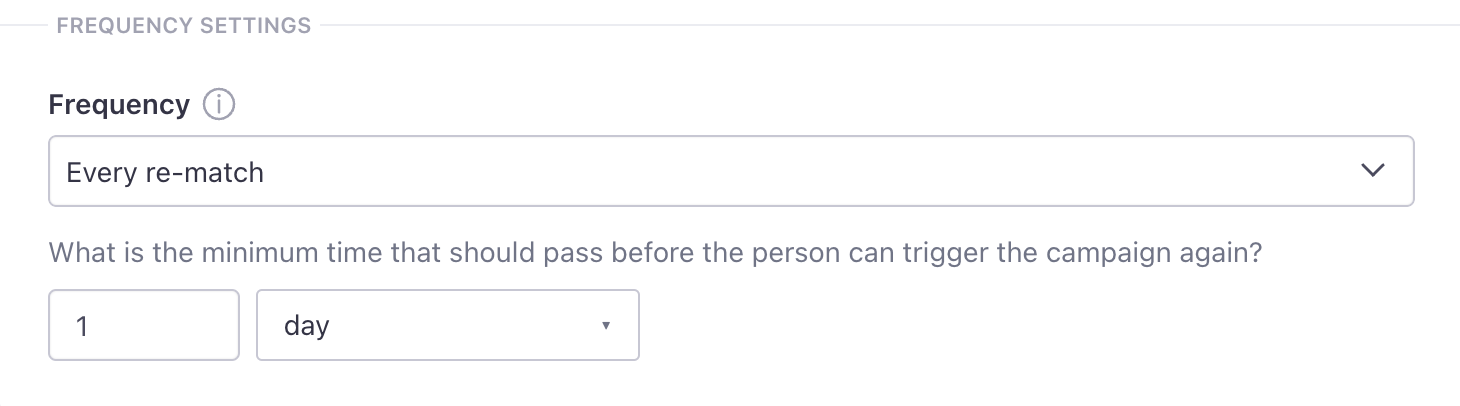
Every re-match: people will enter this campaign when they match and re-match the trigger conditions; they must stop matching the trigger conditions then re-match the conditions to re-trigger the campaign.
- They must re-match after they’ve exited the automation, which means if they re-match during the automation, they will not re-trigger the automation upon exiting. They would have to stop matching and re-match again after they exit the automation.
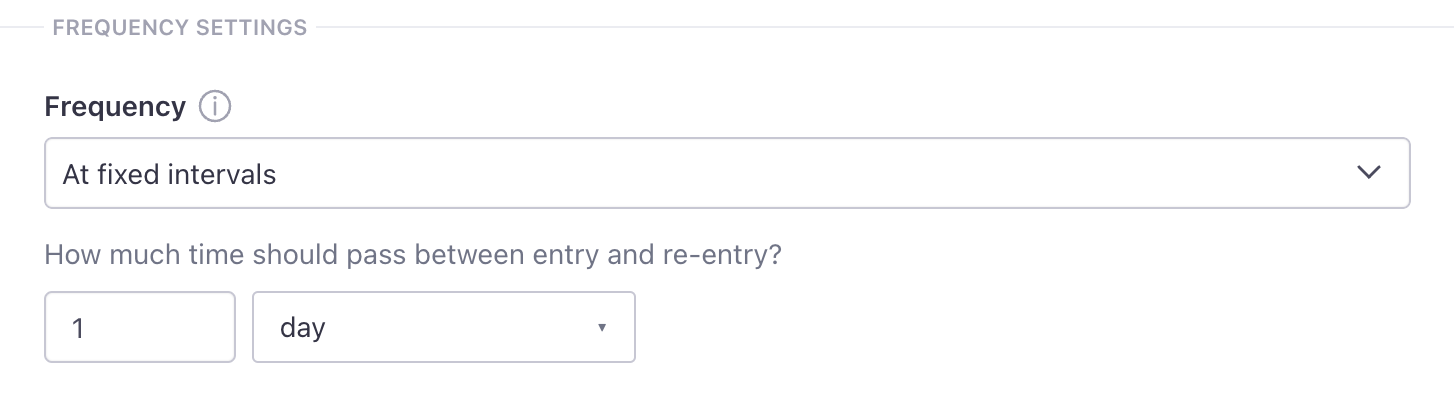
- They must re-match after the minimum wait time has elapsed, as well. In the example below, the minimum wait time is 1 day.
- For example, imagine an automation that triggers when someone joins the segment “Inactive for two weeks” and the frequency is “Every re-match.” When people enter that segment, they trigger an automation and receive a message. Later, they exit the automation. Then the minimum wait time elapses. To re-enter the automation, they must exit then re-enter the “Inactive for two weeks” segment (become active, then become inactive again).
-
At fixed intervals: people will repeat the campaign at a set interval, provided they match the conditions when the interval elapses.
- A person cannot re-trigger an automation while they have an active automation journey.
- The automation will check if a person can re-enter based on their initial journey.
- For example, imagine an automation has a frequency of “At fixed intervals” and two days should elapse between entry and re-entry. If a person’s first journey started March 22 at 11 am, then the automation will check for re-entry on March 24 at 11 am. If the journey is still active, a new journey won’t begin. The next time it will check is March 26 at 11 am. If they exited the automation at 9 am on the 26th, they would start a new journey. However, if they don’t exit until 12 pm, they won’t re-enter again until the 28th at 11 am.
Deprecated: Segment change
Segments are based on audience criteria—attributes A key-value pair that you associate with a person or an object—like a person's name, the date they were created in your workspace, or a company's billing date etc. Use attributes to target people and personalize messages.
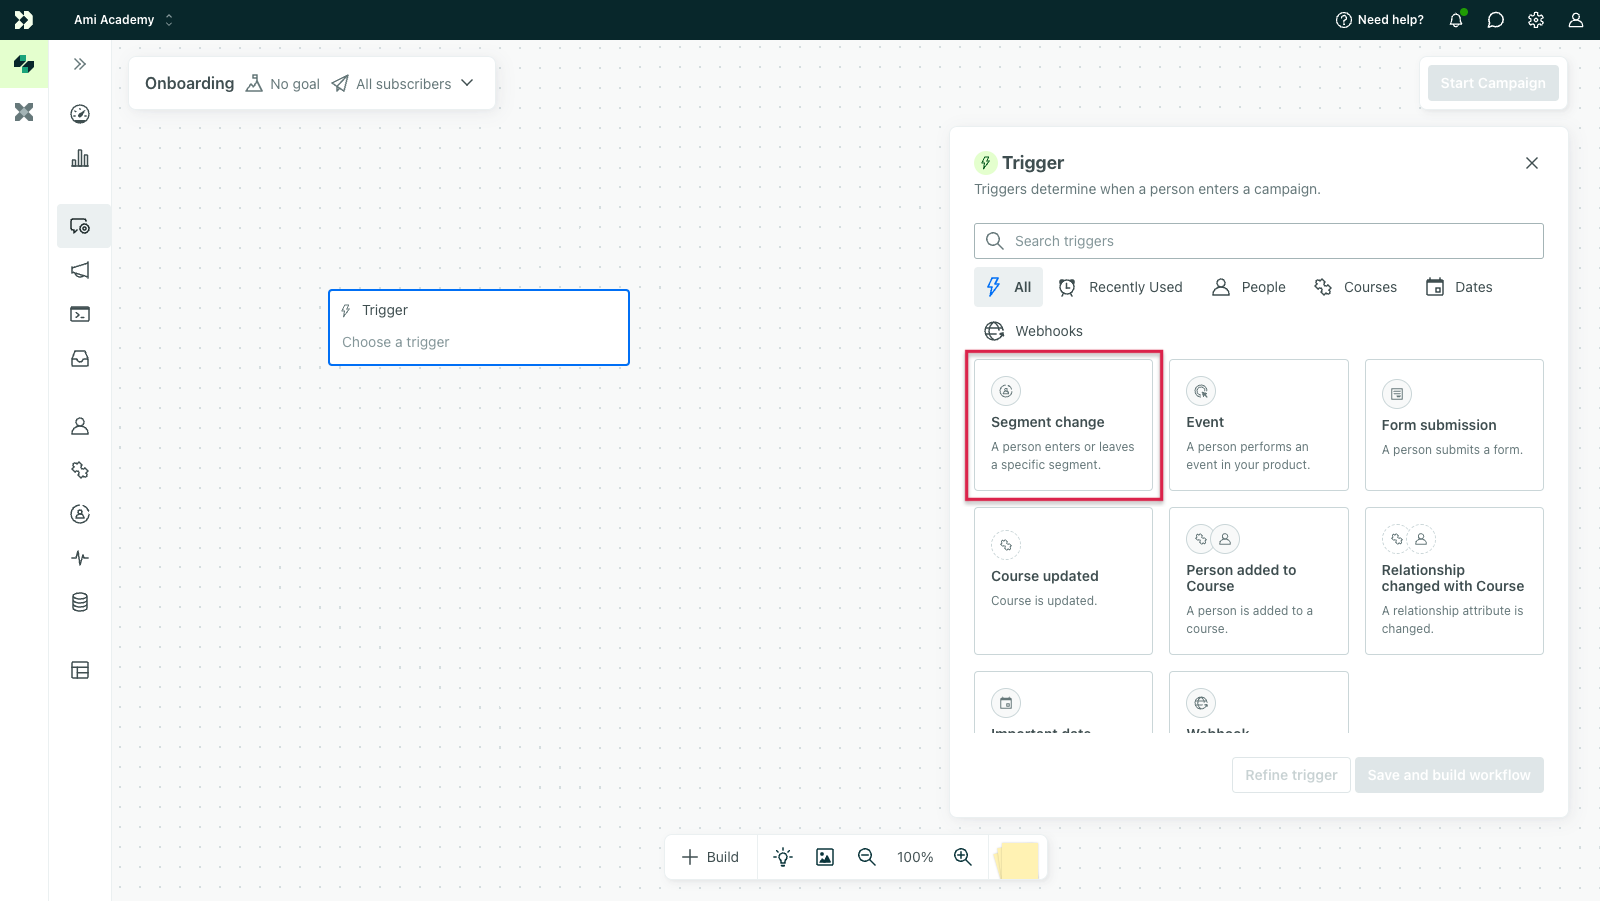
Click Segment change to get started:
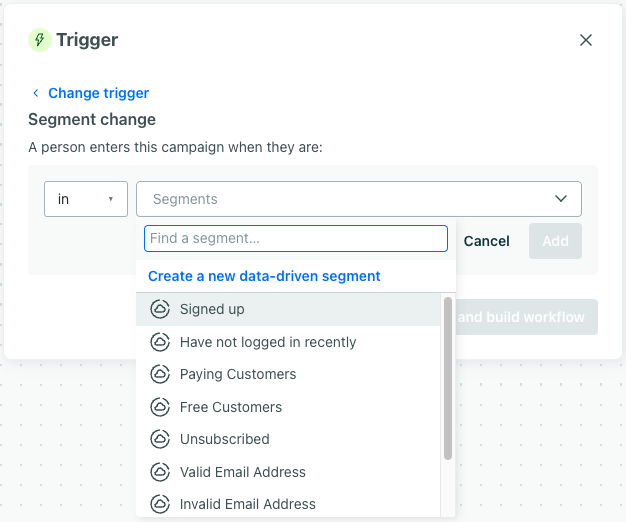
We’ll prompt you to choose one or more segments that your audience is in or not in. If you haven’t created a segment yet, you can click Create a new data-driven segment to set conditions for a new segment.
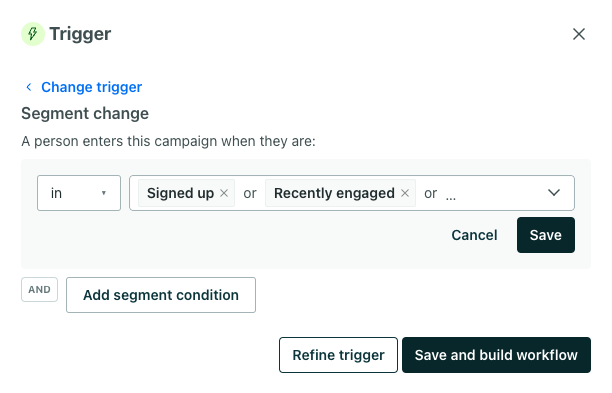
You can set multiple segments using and or or conditions. Use and to trigger automations only when people meet all of your conditions. Click + Add condition to create an and condition.
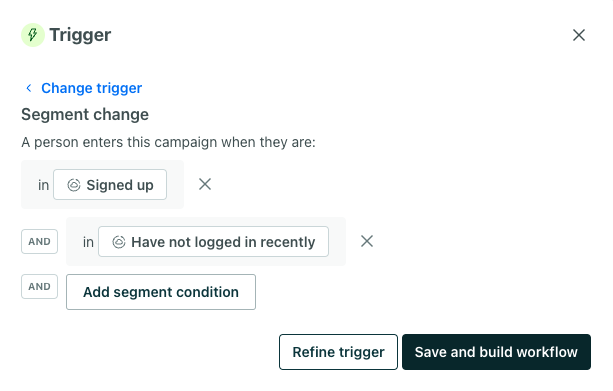
Use an or condition to trigger an automation based on a person belonging to any of the segments. Add segments to the same field to create an or condition:
Filter
With segment-triggered automations, you can also add a segment filter. You should weave your segment filter criteria into your segment trigger conditions as much as possible, but if you find you cannot accomplish what you need without a segment trigger AND segment filter, please let us know! We want to account for this use case as we develop the next generation of automations.
Frequency
By default, people will enter your automation once. If your automation does not use a Filter, you can let customers enter your automation multiple times with the Frequency setting. When you enable Frequency settings, you’ll use one of these options to determine how often a person can re-enter your automation:
-
Every re-match: people will enter this campaign when they match and re-match the trigger conditions; they must stop matching the trigger conditions then re-match the conditions to re-trigger the campaign.
- They must re-match after they’ve exited the automation, which means if they re-match during the automation, they will not re-trigger the automation upon exiting. They would have to stop matching and re-match again after they exit the automation.
- They must re-match after the minimum wait time has elapsed, as well. In the example below, the minimum wait time is 1 day.
- For example, imagine an automation that triggers when someone joins the segment “Inactive for two weeks” and the frequency is “Every re-match.” When people enter that segment, they trigger an automation and receive a message. Later, they exit the automation. Then the minimum wait time elapses. To re-enter the automation, they must exit then re-enter the “Inactive for two weeks” segment (become active, then become inactive again).
-
At fixed intervals: people will repeat the campaign at a set interval, provided they match the conditions when the interval elapses.
- A person cannot re-trigger an automation while they have an active automation journey.
- The automation will check if a person can re-enter based on their initial journey.
- For example, imagine an automation has a frequency of “At fixed intervals” and two days should elapse between entry and re-entry. If a person’s first journey started March 22 at 11 am, then the automation will check for re-entry on March 24 at 11 am. If the journey is still active, a new journey won’t begin. The next time it will check is March 26 at 11 am. If they exited the automation at 9 am on the 26th, they would start a new journey. However, if they don’t exit until 12 pm, they won’t re-enter again until the 28th at 11 am.
Trigger by important dates
This option lets you trigger an automation based on a date-time attribute A key-value pair that you associate with a person or an object—like a person's name, the date they were created in your workspace, or a company's billing date etc. Use attributes to target people and personalize messages.
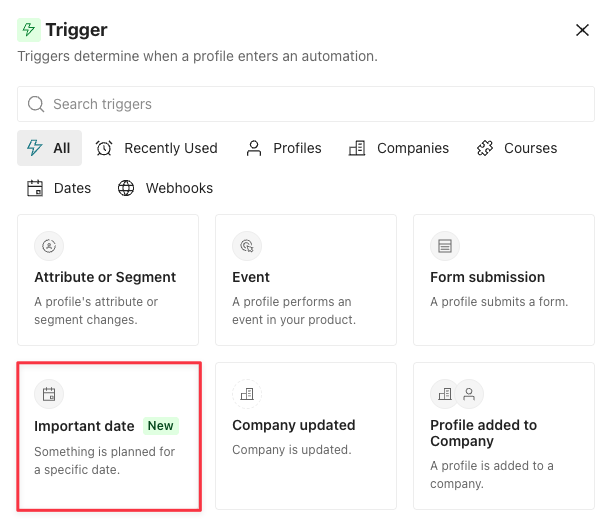
The attribute must contain a date in either Unix or ISO 8601 format. If a person doesn’t have this attribute, or the attribute isn’t in the right format, they’ll never trigger the automation.
Dates unique to people
You might use this trigger to wish your audience a happy birthday or thank them for being a subscriber on their renewal date.
-
When picking a trigger type, choose Important date.
-
Select People to trigger based on a date attribute stored on your audience.
-
Choose the Date attribute. Your workspace schedules your automation based on the date, not the time of this attribute. You set the time in a later step. Learn more about accessing arrays and nested data and how to format your date values.
-
Determine how frequently your audience should enter your automation.
- Once: A person triggers the automation one time.
- Monthly: A person can trigger the campaign once per month. For example, if the date attribute is June 5, 2026 and it triggers on the date (the 5th), then the automation triggers every month on the 5th. If the current month doesn’t include that day, like the 31st, then your workspace triggers the automation on the last day of the month.
- Yearly: A person triggers the automation once per year on the same month and day. For example, if the date attribute is June 5, 2026, the automation triggers again on June 5, 2027.
-
Set your date settings:
On the date: Trigger the automation on the recurrence date.Before the date: Trigger the automation a set number of days before the date attribute.After the date: Trigger the automation a set number of days after the date attribute.
-
Pick the time of day that you want to trigger this automation. We won’t use the time stored in the date attribute. But, if you store your audience’s
timezoneas an attribute, you can selectthe user's time zoneto trigger your automation.Keep in mind, if you activate this campaign and the trigger matches today’s date, people only enter the campaign today if the campaign was activated BEFORE the trigger time. Otherwise, people follow your frequency settings. For instance, if you have a yearly birthday campaign and activate the campaign at 2pm CST, but the campaign is set to trigger at 1pm CST, then people with a birthday today won’t get the campaign until next year. The same applies to attribute update; if someone’s birthday is updated to today but the trigger time has passed, they won’t start the campaign until next year.
Then decide if you want to narrow the audience further by adding Filters. You can filter for people who belong to or don’t belong to segments. Click the trigger, and select Filters to get started.
Dates unique to custom objects
You might use this trigger type to remind your audience to renew their subscription 14 days before their account expires or to send reminders ahead of a reservation.
Each scheduled date can start journeys for up to 50,000 people related to each object. See date triggers on objects for how this limit works.
-
When picking a trigger type, choose Important date.
-
Under Date from, select one of your Object types
An object type is a group of objects. An object type could be Online Classes while an object within the type could be English 101. Customer.io generates a unique, immutable
to trigger based on dates stored on your custom objects.object_type_id.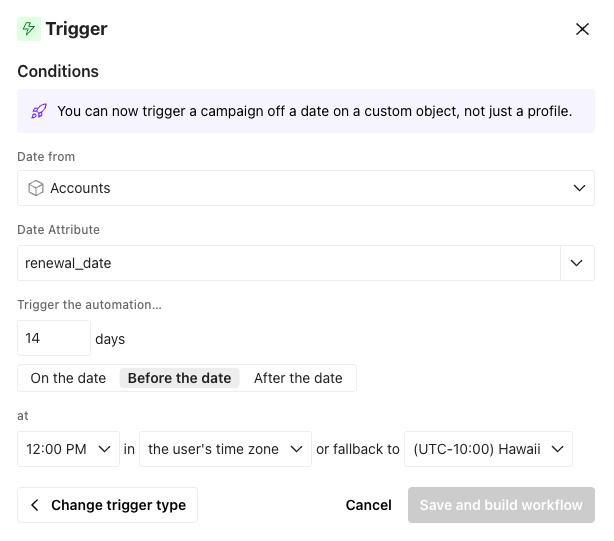
-
Choose the Date attribute. Your workspace schedules your automation based on the date, not the time of this attribute. You set the time in a later step. Learn more about accessing arrays and nested data and how to format your date values.
-
Determine how frequently your audience should enter your automation.
- Once: A person triggers the automation one time.
- Monthly: A person can trigger the campaign once per month. For example, if the date attribute is June 5, 2026 and it triggers on the date (the 5th), then the automation triggers every month on the 5th. If the current month doesn’t include that day, like the 31st, then your workspace triggers the automation on the last day of the month.
- Yearly: A person triggers the automation once per year on the same month and day. For example, if the date attribute is June 5, 2026, the automation triggers again on June 5, 2027.
-
Set your date settings:
On the date: Trigger the automation on the recurrence date.Before the date: Trigger the automation a set number of days before the date attribute.After the date: Trigger the automation a set number of days after the date attribute.
-
Pick the time of day that you want to trigger this automation. We won’t use the time stored in the date attribute. But, if you store your audience’s
timezoneas an attribute, you can selectthe user's time zoneto trigger your automation.Keep in mind, if you activate this campaign and the trigger matches today’s date, people only enter the campaign today if the campaign was activated BEFORE the trigger time. Otherwise, people follow your frequency settings.
To filter for specific objects in your chosen object type, like a specific account or course, click the trigger block and select Filters. You can add one or more object attributes as filter conditions.
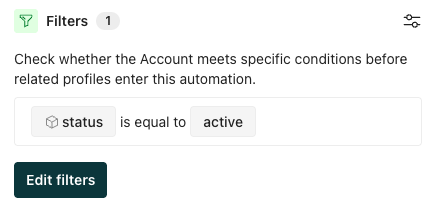
To filter which people enter the automation, click Audience and choose whether every person or certain people related to these objects should enter the automation.
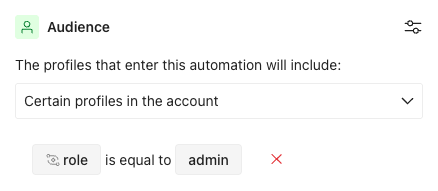
You can also use the triggering object’s attributes and relationships later in the workflow—in Wait until blocks, branches, exit conditions, and data actions. Learn more about workflow actions for objects and relationships.
Supported date attributes
You can pick a date attribute from the dropdown or specify a timestamp attribute in an array or object.
For example, you can use any of these notations, depending on what’s stored on your people or objects:
appointment_time- a single timestamp attributeappointments.next_date- a timestamp within a JSON objectappointment_times[0]- the first timestamp in an arrayappointment_times[0].follow_up_date- the timestamp of the first JSON object in the array
Unfortunately, your workflow can’t show the number of people who will receive a message when you use a nested attribute. Instead, you see how many people have the parent attribute (i.e. appointments).
Supported date values
Automations trigger based on a Unix or ISO 8601 format. These are the ISO 8601 date-time formats we support:
| ISO 8601 Format | Example |
|---|---|
| YYYY-MM | 2024-03 (This will default to the first of the month.) |
| YYYY-MM-DD | 2023-11-15 |
| YYYY-MM-DDThh:mm:ssZ | 2023-11-15T23:14:37Z |
| YYYYMMDDThh:mm:ssZ | 20231115T231437Z |
| YYYY-MM-DDThh:mm:ss.ms | 2007-11-22T12:30:22.321 |
| YYYY-MM-DDThh:mm:ss+/-< UTC offset > | 2024-02-07T12:30:22-08:00 |
Geofence set
Premium This feature is available for Premium plans. Enterprise This feature is available for Enterprise plans.You can trigger an automation based on when a person enters, stays in, or exits a geofence set A named group of geofences that you act on together—for example, trigger a campaign when a person enters any geofence in the set. When a person crosses a geofence, our mobile SDKs send a Geofence Transition event for each geofence set the geofence belongs to.
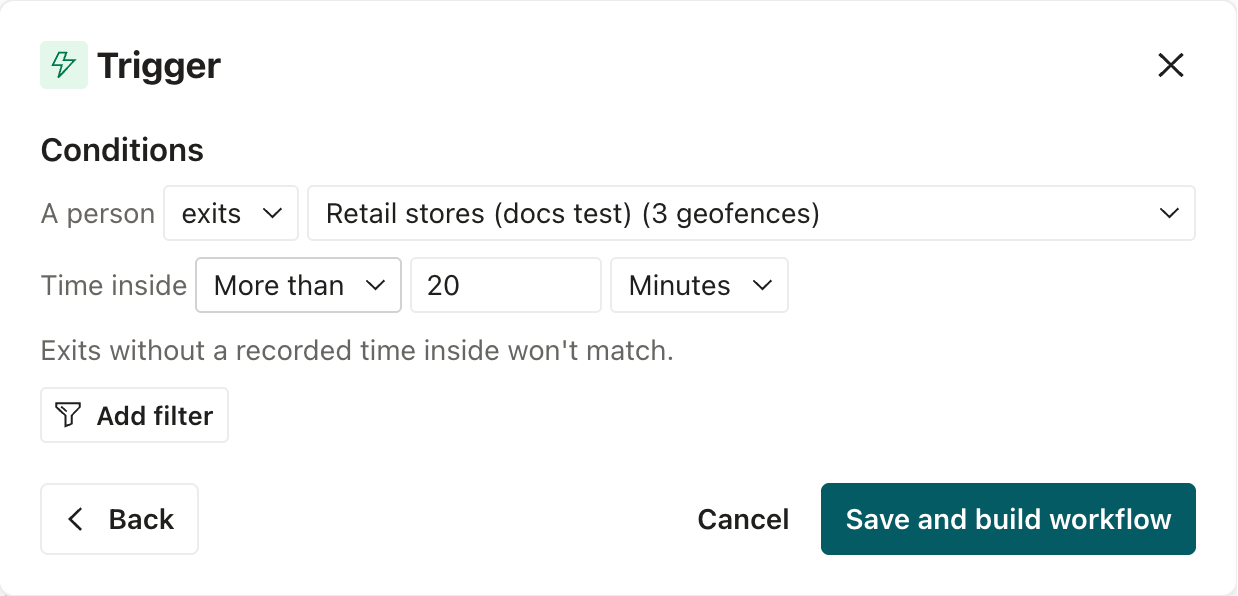
- Enters and exits trigger the automation when a person crosses into or out of any geofence in the set. When you choose exits, you can also set Time inside to More than an amount of time, like 20 minutes, to only start the automation for people whose recorded visit lasted longer than that. This only matches exits for users with an SDK version that supports visit duration. Learn more about visit duration.
- Stays in
When a person stays inside a geofence for at least the geofence's dwell time, like 10 minutes in a store. Our mobile SDKs send a
triggers the automation when a person stays inside a geofence for a minimum amount of time. You set the dwell time on geofences, not in the automation trigger. Customer.io only starts the automation when a dwell event happened within the last hour, so a dwell event that a device delivers late doesn’t inadvertently start a journey.Geofence Transitionevent withtransitionset todwell, which you can use to trigger automations and build segments.
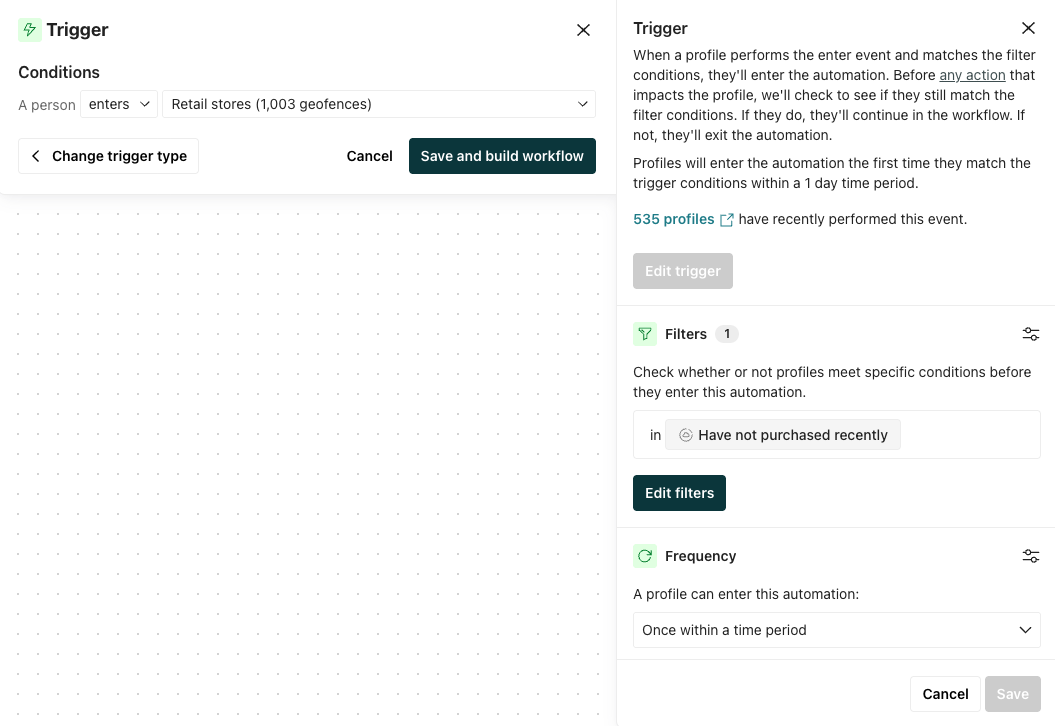
You can also filter the audience further by specifying which segments people should or should belong to. For example, maybe you want people to receive a special offer when they enter a geofence (the trigger condition) but haven’t made a purchase recently (a segment filter).
Like with automations triggered by other events, you can specify a frequency—how often a person can re-enter this automation. By default, people enter on every event, which means everytime they meet the trigger conditions for your geofence set. You can also set this to trigger once or once within a time period.
A geofence transition event fires when a person enters, stays in, or exits any geofence within a geofence set. However, learn more about the 1-hr long cooldown period.
You can reference the geofence data that triggered the campaign in messages using the event liquid object, like you would for other event-triggered campaigns.
Trigger based on custom objects
You can trigger automations based on changes to custom objects or relationships your audience has to custom objects.
To trigger messages based on dates stored on custom objects, like the time of an appointment or the date of membership expiration, use the Important date trigger.
Object change
You can trigger an automation when an object An object is a non-person entity that you can associate with one or more people—like a company, account, or online course.
On the trigger step of setting up an automation, you will see a list of all object types in your workspace. Underneath each object type, you’ll see object triggers listed as “Object_name updated,” like “Account updated.”
If you use the Object updated trigger, you must specify the specific attributes you want to watch for updates. If an object already matches your conditions, an update doesn’t trigger the automation again. For example:
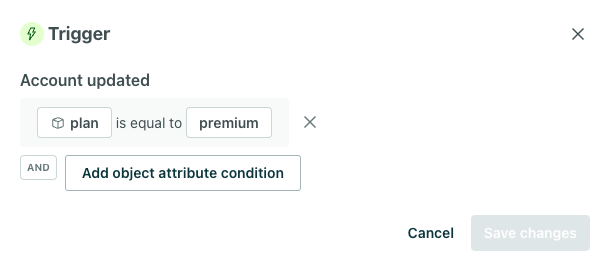
You can use a variety of operators like “equal to” or “exists.” You cannot use operators like greater than, less than, etc. If you need other operators, consider adding a segment filter or passing your information to Customer.io so the existing operators work.
Frequency
For now, automations with custom object triggers only support the “every re-match” frequency. Stay tuned for more frequency options in upcoming releases.
The “every re-match” setting means an object can trigger the automation more than once. An object triggers the automation again when it stops matching your conditions and then re-matches. For example, if you trigger an automation when an account’s plan changes to premium, and an account’s plan changes from premium to basic and later back to premium, people related to that account enter the automation again.
People with an active journey in the automation don’t have to finish their current journey to start a new journey: if the object matches again a user can start a simultaneous journey.
Audience
You have the flexibility to decide who your audience is. The audience could be:
- every people related to the object
- certain people related to the object based on person or relationship attributes
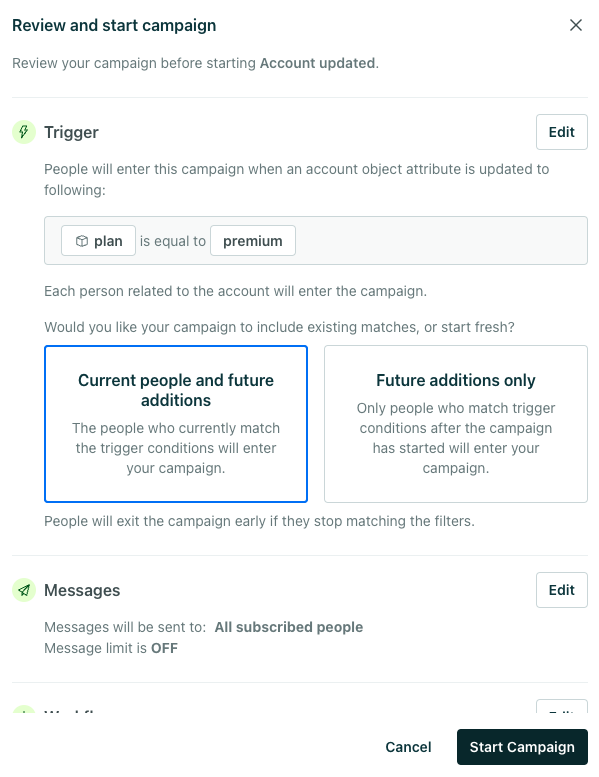
Last, you’ll review your audience before you start your automation. Select whether the automation should trigger for current matches and future additions or only future additions. For instance, if you trigger an automation when the plan of an Account object changes to premium, selecting “Current people and future additions” means people who are already related to accounts with premium plans will enter.
Filters
You can apply filters to further refine who should enter and stay in the automation. We evaluate filters when the person first meets the trigger criteria and before action items in your workflow. For example, if your automation is designed to nurture leads, you might filter out people who have already paid for your services.
Exit Conditions
You can decide when a person exits an object-triggered automation. You can find these under Exit in Automation settings. You can choose that:
- they never exit.
- they only exit when they match the conversion criteria.
- they exit when they stop matching filter criteria.
- they exit when they stop matching filter criteria OR match the conversion criteria.
We evaluate exit conditions before every journey and before action items in your workflow. We do not evaluate whether people meet the trigger criteria after they’ve entered the automation.
Relationship change
You can trigger an automation based on a relationship - the association between an object An object is a non-person entity that you can associate with one or more people—like a company, account, or online course.
On the trigger step of setting up an automation, you will see a list of all object types in your account. Underneath each object type, you’ll see relationship triggers listed as “Person added” or “Relationship changed.”
If you select Person added, you can optionally refine the audience by relationship attributes to funnel the right people into the automation. Otherwise, the automation will trigger when any person is added to any object within the specified object type.
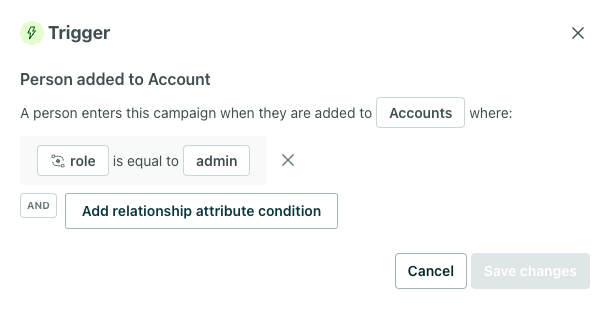
If you select Relationship changed, you must specify which relationship attributes to target. For instance:
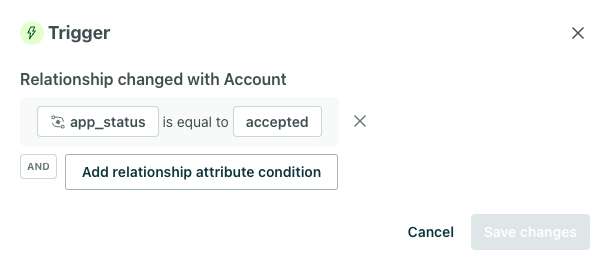
You can use a variety of operators like “equal to” or “exists.” You cannot use operators like greater than, less than, etc. If you need other operators, consider adding a segment filter or passing your information to Customer.io so the existing operators work.
You cannot target any change to a relationship; you must specify what a relationship attribute is specifically changing to or changing from (role is equal to admin or role is not equal to admin, for instance).
Frequency
For now, automations with relationship triggers only support the “every re-match” frequency. Stay tuned for more frequency options in upcoming releases.
Audience
You have the flexibility to decide who your audience is. The audience could be:
- the person who was added to the object (default)
- every person in the object
- certain people related to the object based on person or relationship attributes
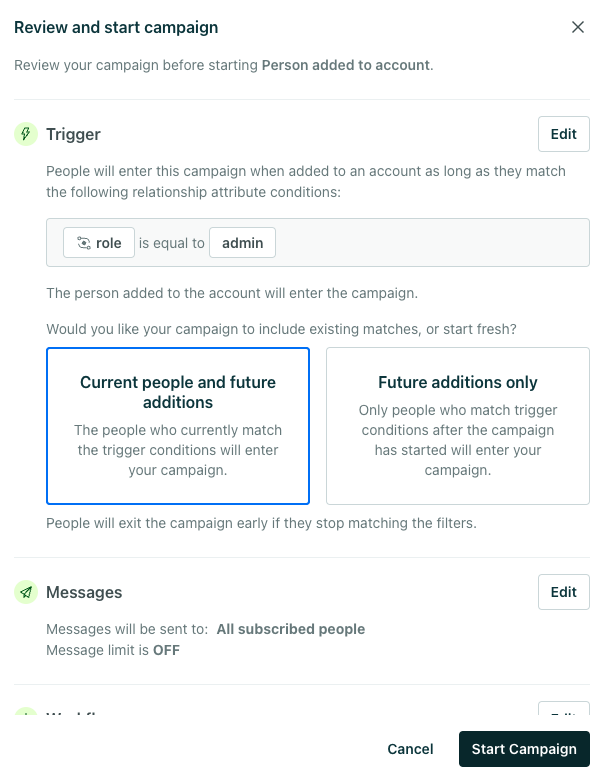
Last, you’ll review your audience before you start your automation. Select whether the automation should trigger for current matches and future additions or only future additions. For instance, if you trigger an automation when a person is added to an Account as an Admin, selecting “Current people and future additions” means people who are already admins of an account will enter.
Filters
You can apply filters to further refine who should enter and stay in the automation. We evaluate filters when the person first meets the trigger criteria and before action items in your workflow. For example, if your automation is designed to nurture leads, you might filter out people who have already paid for your services.
Exit Conditions
You can decide when a person exits a relationship-triggered automation. You can find these under Exit in Automation settings. You can choose that:
- they never exit.
- they only exit when they match the conversion criteria.
- they exit when they stop matching filter criteria.
- they exit when they stop matching filter criteria OR match the conversion criteria.
We evaluate exit conditions before every journey and before action items in your workflow. We do not evaluate whether people meet the trigger criteria after they’ve entered the automation.
Form submission
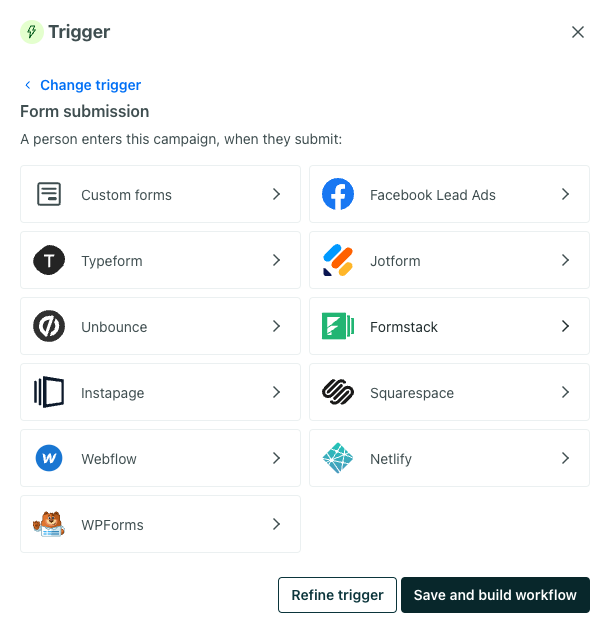
You can connect forms—Facebook Lead Ads, Jotform, Typeform, your own custom web forms, etc—to your workspace. You can trigger an automation when someone fills out your form. This can help you nurture new leads or respond to support requests.
When you select the When someone fills out a form on your website option, you can either connect a new form or select an existing form—if you’ve already added forms to your workspace.
Filters
You can apply segment-based filters to determine whether someone in the automation should receive messages. For example, if your automation is designed to nurture leads, you might filter out people who have already paid for your services.
Frequency
Much like event-triggered automations, a person enters your automation every time they fill out your form by default. You can limit the automation frequency if you don’t want to send your audience an automation every time they fill out your form.
Toggle frequency to limit how often people move through your automation.
- Once ever: people will only enter the automation the first time they fill out your form.
- Once within a time period: people can only enter the automation once within a time period, no matter how many times they fill out your form.
Event
Event-triggered automations help you respond to your audience’s behavior in your app or on your website—like encouraging people to complete their purchase when they abandon your cart, or messaging people who visit a product page on your website to let them know when the product goes on sale. If you want to trigger automations based on geofence events, use the Geofence set trigger instead.
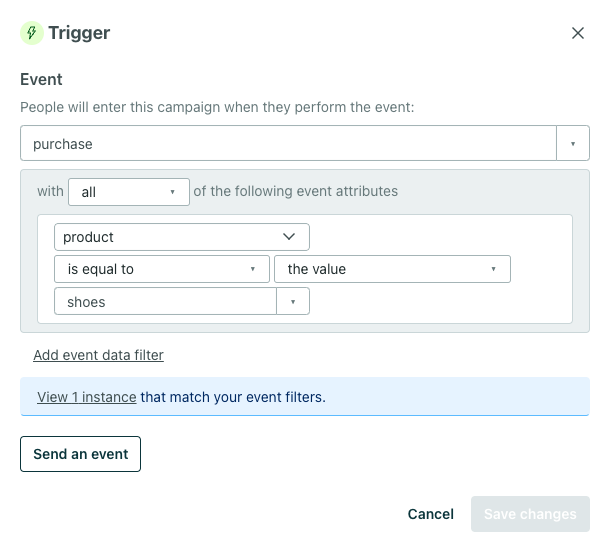
When you use this kind of trigger, you can choose the event that you want to use to trigger your automation. If you don’t see the event, you can type the event name in the box. If the event occurred recently, click View <x> instances to see recent event examples.
You can narrow your trigger criteria based on properties in your event. If you have a particular event attribute you want to use as a filter—like if you only want to target people who bought a specific product—click Add event data filter and set the event properties you want to match for your trigger.
Event triggers preview the latest 50 events
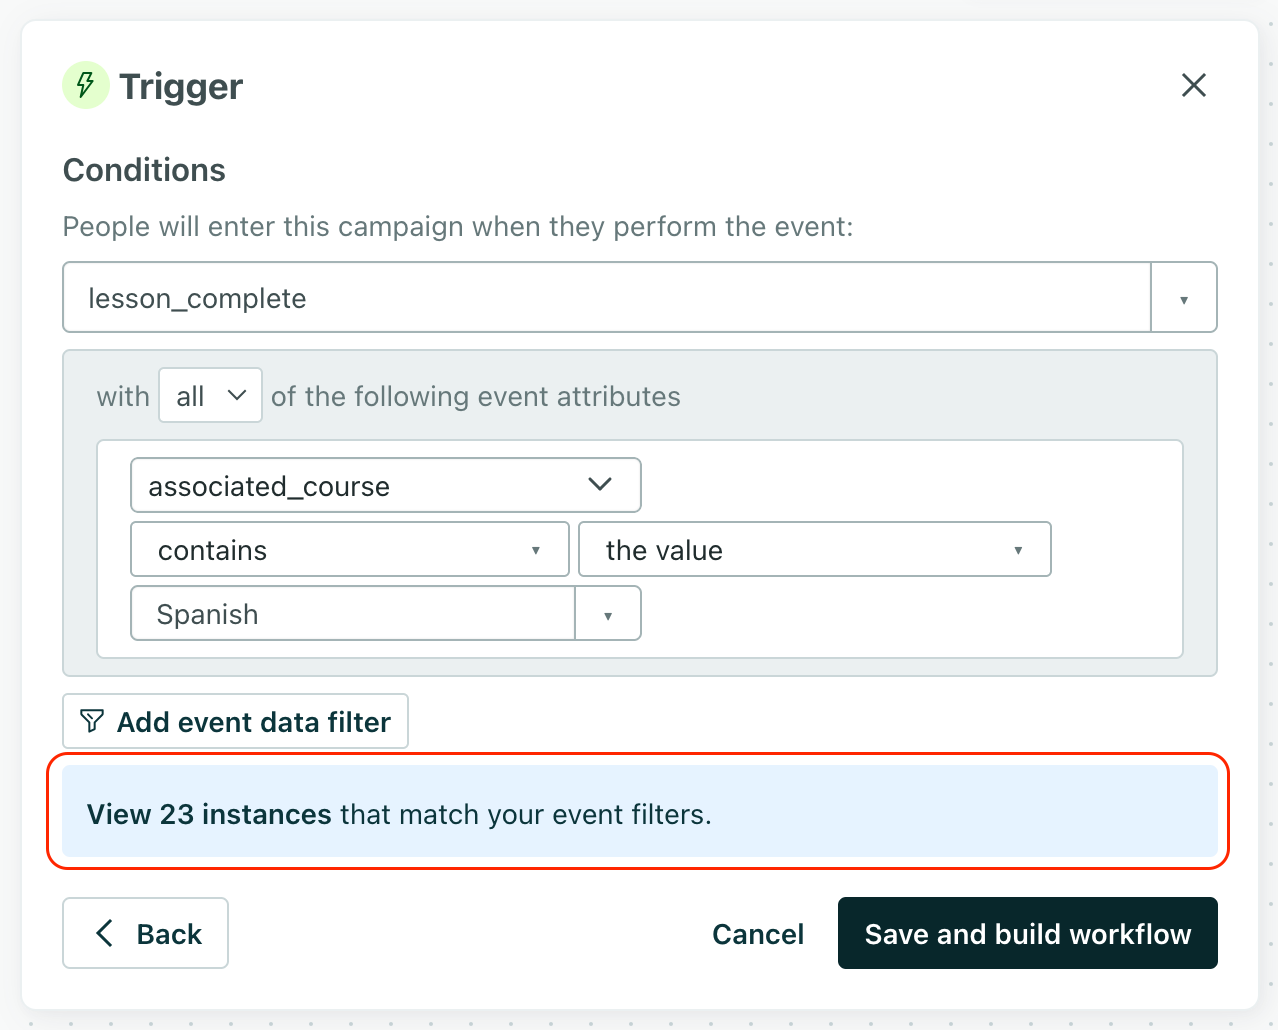
When you use an event filter, we’ll show you the latest 50 occurrences of an event within the last 30 days to help you preview people matching your event criteria. As you add filters, you’ll notice that we’ll show you the total number of events (and people) out of the 50 available preview events that would match your criteria.
This is to help you better understand who would trigger your automation, but it is not an accurate count of people who will trigger your automation!
This 50-event limitation only applies to the preview as you set up your automation. When you start your automation, anybody who matches your criteria will still enter in your automation.
Frequency
By default, a person enters an event-based automation every time they perform the trigger event. You can limit the automation frequency if you don’t want to send your audience an automation every time they perform your event.
Toggle frequency to limit how many times people can move through automations and set your frequency options.
-
One time: people will only enter the automation the first time they perform the event. For example, if you’d like to congratulate someone the first time they complete a lesson in your eLearning app, you can use this setting. This way, you’ll ensure they don’t receive the email again once they’re a seasoned student and flying through lessons regularly.
-
On every event: people will enter the automation every time they perform the event.
-
Once within a time period: people will only enter the automation once within a time period. For example, you want to send an email to someone when they receive notifications in your app. You only want them to receive the email once a day, regardless of how many application notifications they receive. Setting Frequency to “at most once within 24 hours” will ensure that, no matter how many new notifications people get, they will only get an email once.
Webhook
Most automations are triggered by people, and people are the subjects of the automation—you set their attributes, send them messages, etc. Webhook-triggered automations are different: they’re triggered by data, and data (that may or may not be related to people in your audience) is the subject of the automation.
In general, you’ll use these automations to manipulate incoming data and associate it with people in your audience. For example, if people are interested in a product that’s out of stock, you might use a webhook to notify Customer.io when that item is back in stock. In your automation, you can send an event to everybody who was interested in the product, triggering an automation to let these people know that their product is back in stock!
When you set up an automation and select the Webhook option, you’ll get a webhook URL. You’ll provide this URL to the service that you want to collect data from.
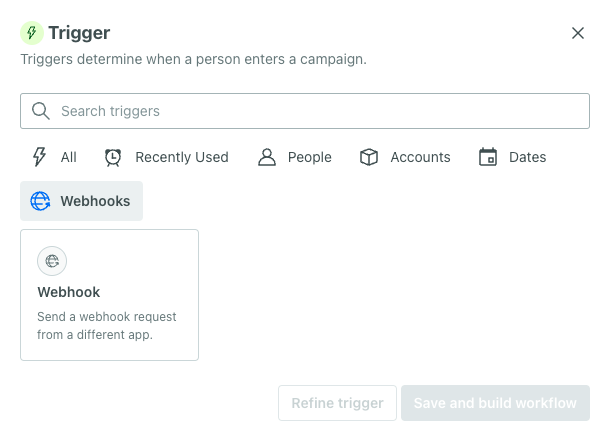
Your automation runs whenever this URL is called. The data from your external service can take any shape. You’ll manipulate the data and associate it people as a part of your automation. This lets you perform Zapier-like transformations on your data without having to build an integration.
Right now, you can’t filter or otherwise limit webhook-triggered automation triggers within Customer.io. You’ll have to make sure that your external service is set up to call your webhook-triggered automation’s webhook URL with a relatively uniform data set and only when you want it to call the URL.
Because webhook-triggered automations aren’t associated with people—at least not directly—they don’t have many of the options that you’ll see in other types of automations. They have a much more streamlined workflow: data comes in, you convert it to the format you want, and the automation ends. You won’t set conversion criteria, a frequency, etc.
Change trigger type
Sometimes you’re building an automation and realize you want people to start a journey based on different criteria. That might mean updating a trigger to include an additional segment or changing the trigger type all together—like moving from an event-triggered automation to a segment-triggered one.
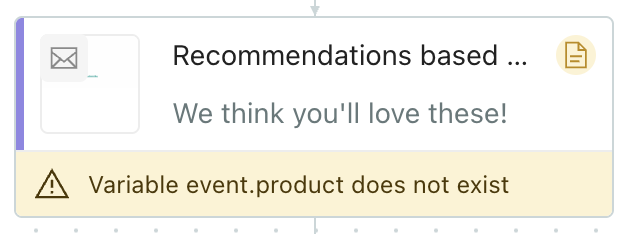
Changing trigger type can impact the rest of your workflow, and you’ll see warnings if the change could cause messages to fail or conditions to not evaluate. For instance, if an email included liquid that pulled in data from your event trigger, like the product a person purchased, then you changed the trigger type, you’ll see a warning calling attention to the email you need to update.
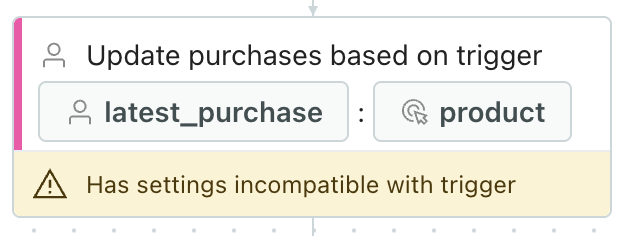
Or if your workflow updates a person’s attributes based on data in the event trigger, you’d see a warning calling attention to that action block.
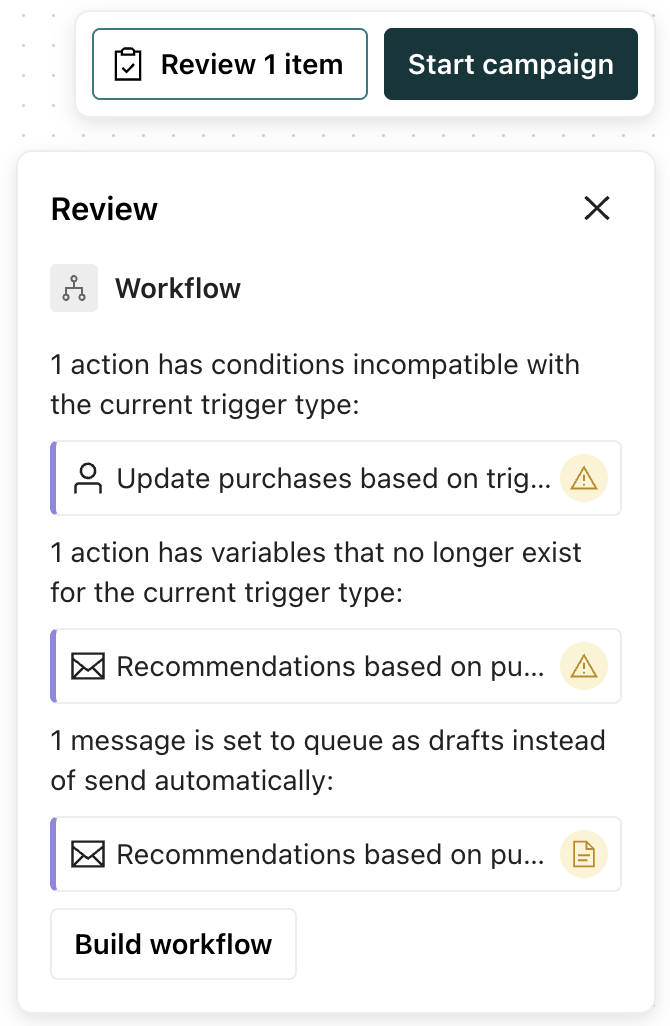
You’ll also see these warnings in the review modal so you know to address them before you activate your automation.
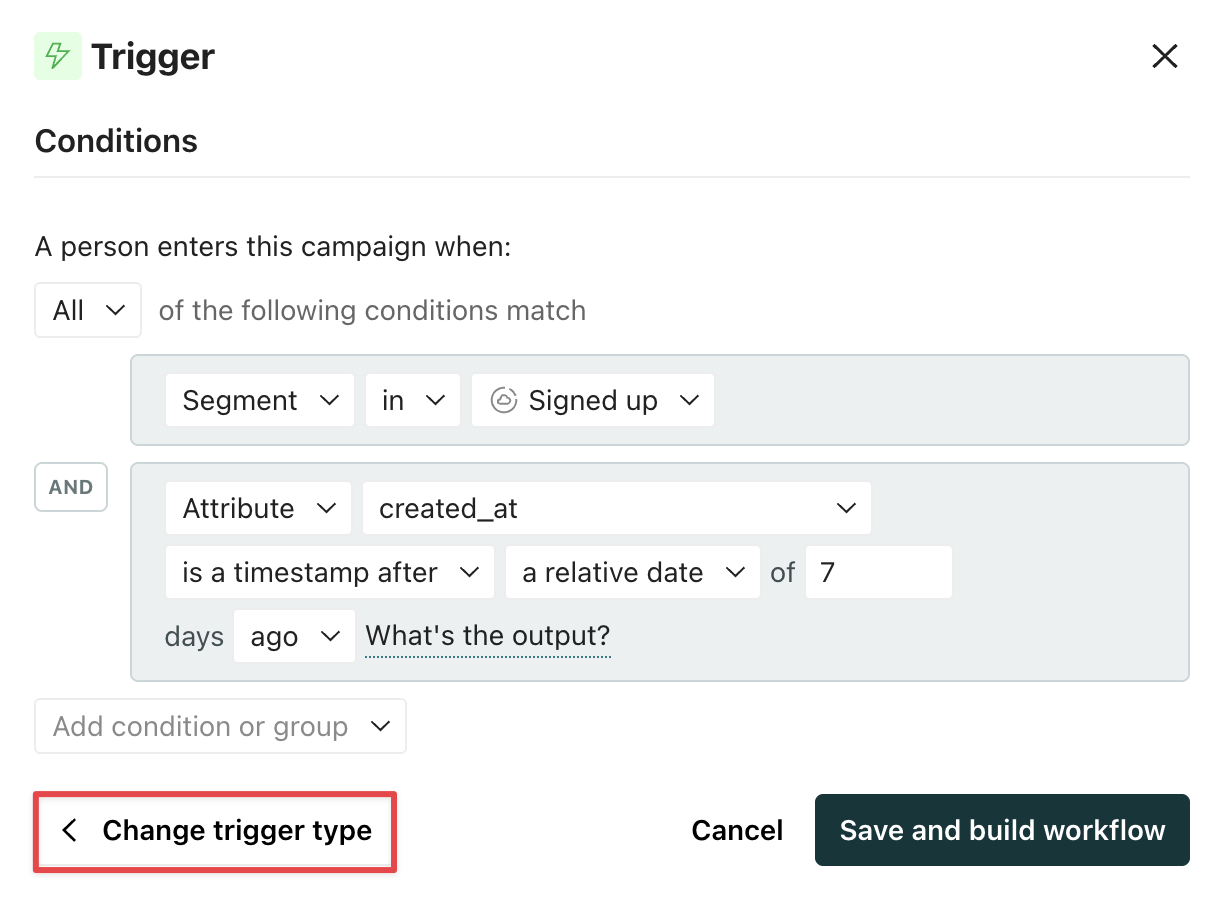
To change the trigger type, go to your automation’s workflow:
- Select the trigger block.
- Click Change trigger type.
- Select the new trigger type.
- Fill in the trigger details.
You can only modify the trigger type when the automation is in a draft or stopped state. This ensures you have time to review and update any workflow items impacted by a change to your trigger.