A Run LLM action lets you prompt a Large Language Model (LLM) to generate and store data for use throughout an automation. It's how you use generative AI to enhance your workflows!
Not seeing this AI feature?
Make sure “Customer.io AI” is enabled in AI settings. Reach out to an Account Admin if you can’t edit the toggle.
How it works
LLM actions let you prompt an AI model as a part of an automation and store the output as attributes so you can use them later in the automation. You can personalize messages, enrich data, and create conditions to help you reach the right audience.
flowchart LR
A[Person enters<br/>automation] --> B[LLM action<br/>runs]
B --> C[Response stored as<br/>attribute]
C --> D[Use attribute in<br/>messages and conditions]
LLM actions automatically follow your account-level security settings for AI: your Gemini safety settings (if the action uses one of Google’s models) and your compliance prompt.
, which expire when people exit your automation. If you want to use the LLM’s response outside of the automation, you can change them to profile attributes
Unlike other workflow blocks, LLM actions have their own currency: AI credits. Each time a person reaches the Run LLM action, it calls a model, which uses your AI credits. The number of credits consumed depends on the model you select, the size of the prompt, and the amount of context sent with the request including liquid syntax and knowledge sources. See AI credits for details on pricing and what happens when credits run out.
You can use LLM actions to generate data for use across your workflows. Here are a few use cases you could consider:
Personalized product recommendations: Pass purchase history and browsing data to suggest relevant products for each person.
Follow-up on purchase based on customer sentiment: Create message content based on a customer’s experience from purchase to delivery. If sentiment is positive, request review. If sentiment is negative, send a follow-up asking what you could do better.
Classify accounts: Classify customers based on their companies’ data.
Update data from the response of an LLM action
You can use LLM actions to analyze a customer’s behavior and generate insights that you store on attributes for use later on in your automation.
To set or update data based on an LLM’s insights, you would follow these steps:
Prompt the LLM to analyze specific profile attributes, trigger data, or data provided in the prompt.
Store the output as a journey or profile attribute, depending on if you want to use the data outside of the automation.
Create subsequent conditions that target the updated attribute or reference the data in messages using liquid.
Send a message using content from an LLM action
Don't communicate sensitive information or updates with LLM actions
If you’re looking to automate personalized messaging at scale, you can use LLM actions to create email content unique to each person moving through your workflow. However, you’ll be sending content that hasn’t been reviewed by your team.
Remember that LLMs can make mistakes, like not quite matching your tone or incorrectly categorizing your data. Don’t communicate sensitive matters with unreviewed, LLM-generated content. Consider using our Agent to generate a template instead.
To send a message using content from an LLM action, you would follow these steps:
Prompt the LLM action to create copy based on your customer’s data and your content guidelines.
Store the output as a journey attribute, like body.
Reference the journey attribute in a subsequent message block.
If the attribute value doesn’t contain liquid syntax, you can reference it as: {{journey.body}}.
If the LLM-generated content contains liquid syntax—like {{customer.first_name}}—use {% render_liquid journey.body %} so the liquid within the value renders dynamically. If you use {{journey.body}} instead, any liquid in the value displays as static text.
Set up an LLM action
You can add an LLM action to any automation workflow.
Your experience for setting up an LLM action depends on what you see in the workflow builder.
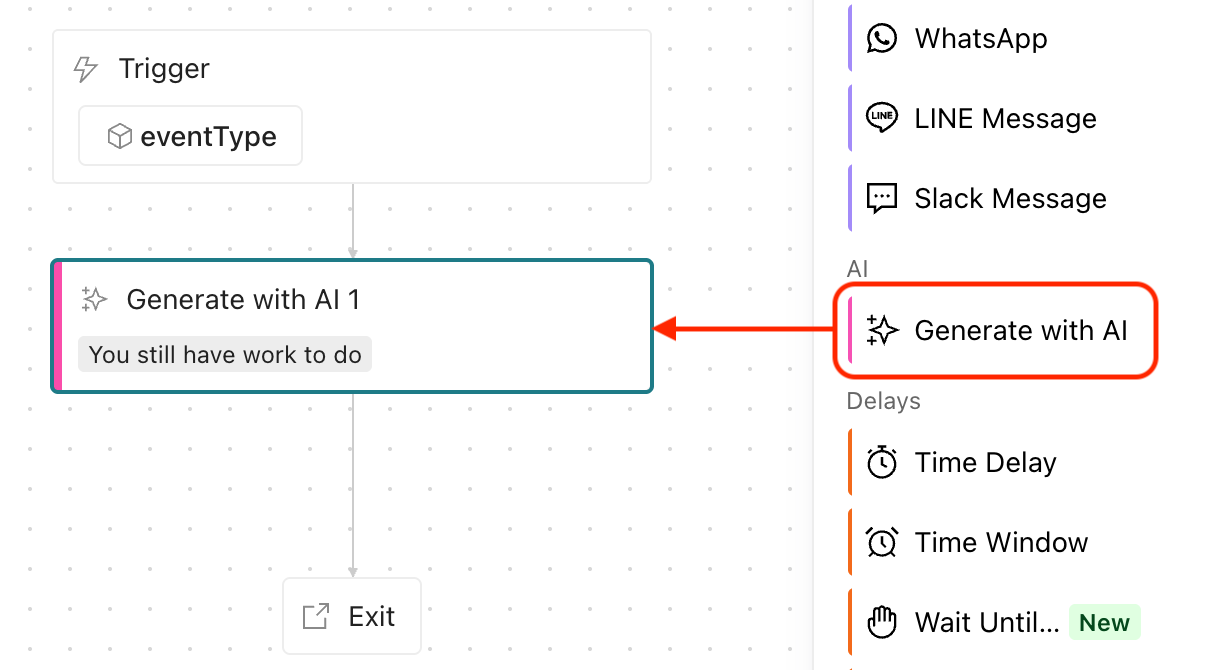
If you see Generate with AI, you can describe what you want the action to do, and Customer.io sets it up for you.
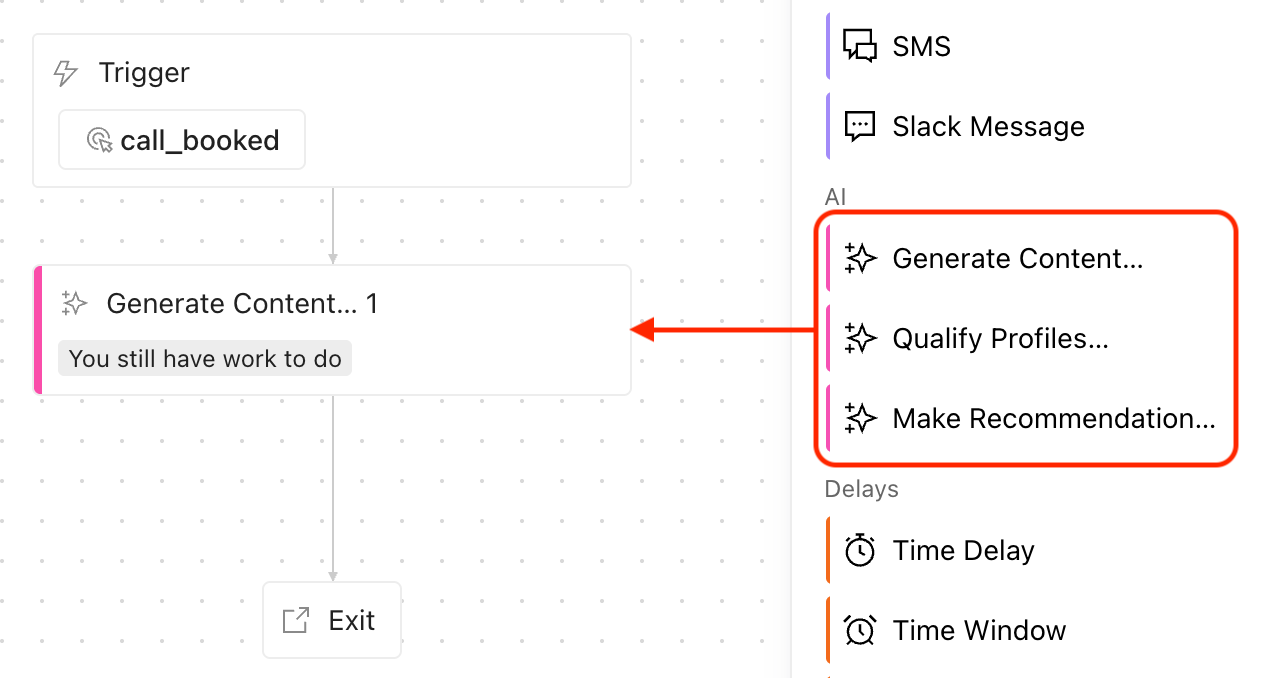
If you see Generate Content…, Qualify Profiles…, and Make Recommendation…, you write the prompt yourself.
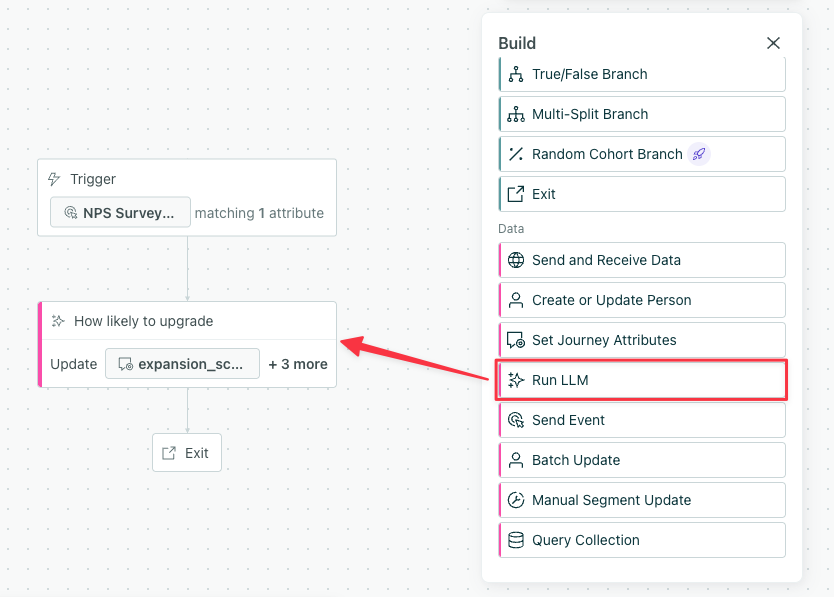
Run LLM
Generate with AI
Run LLM
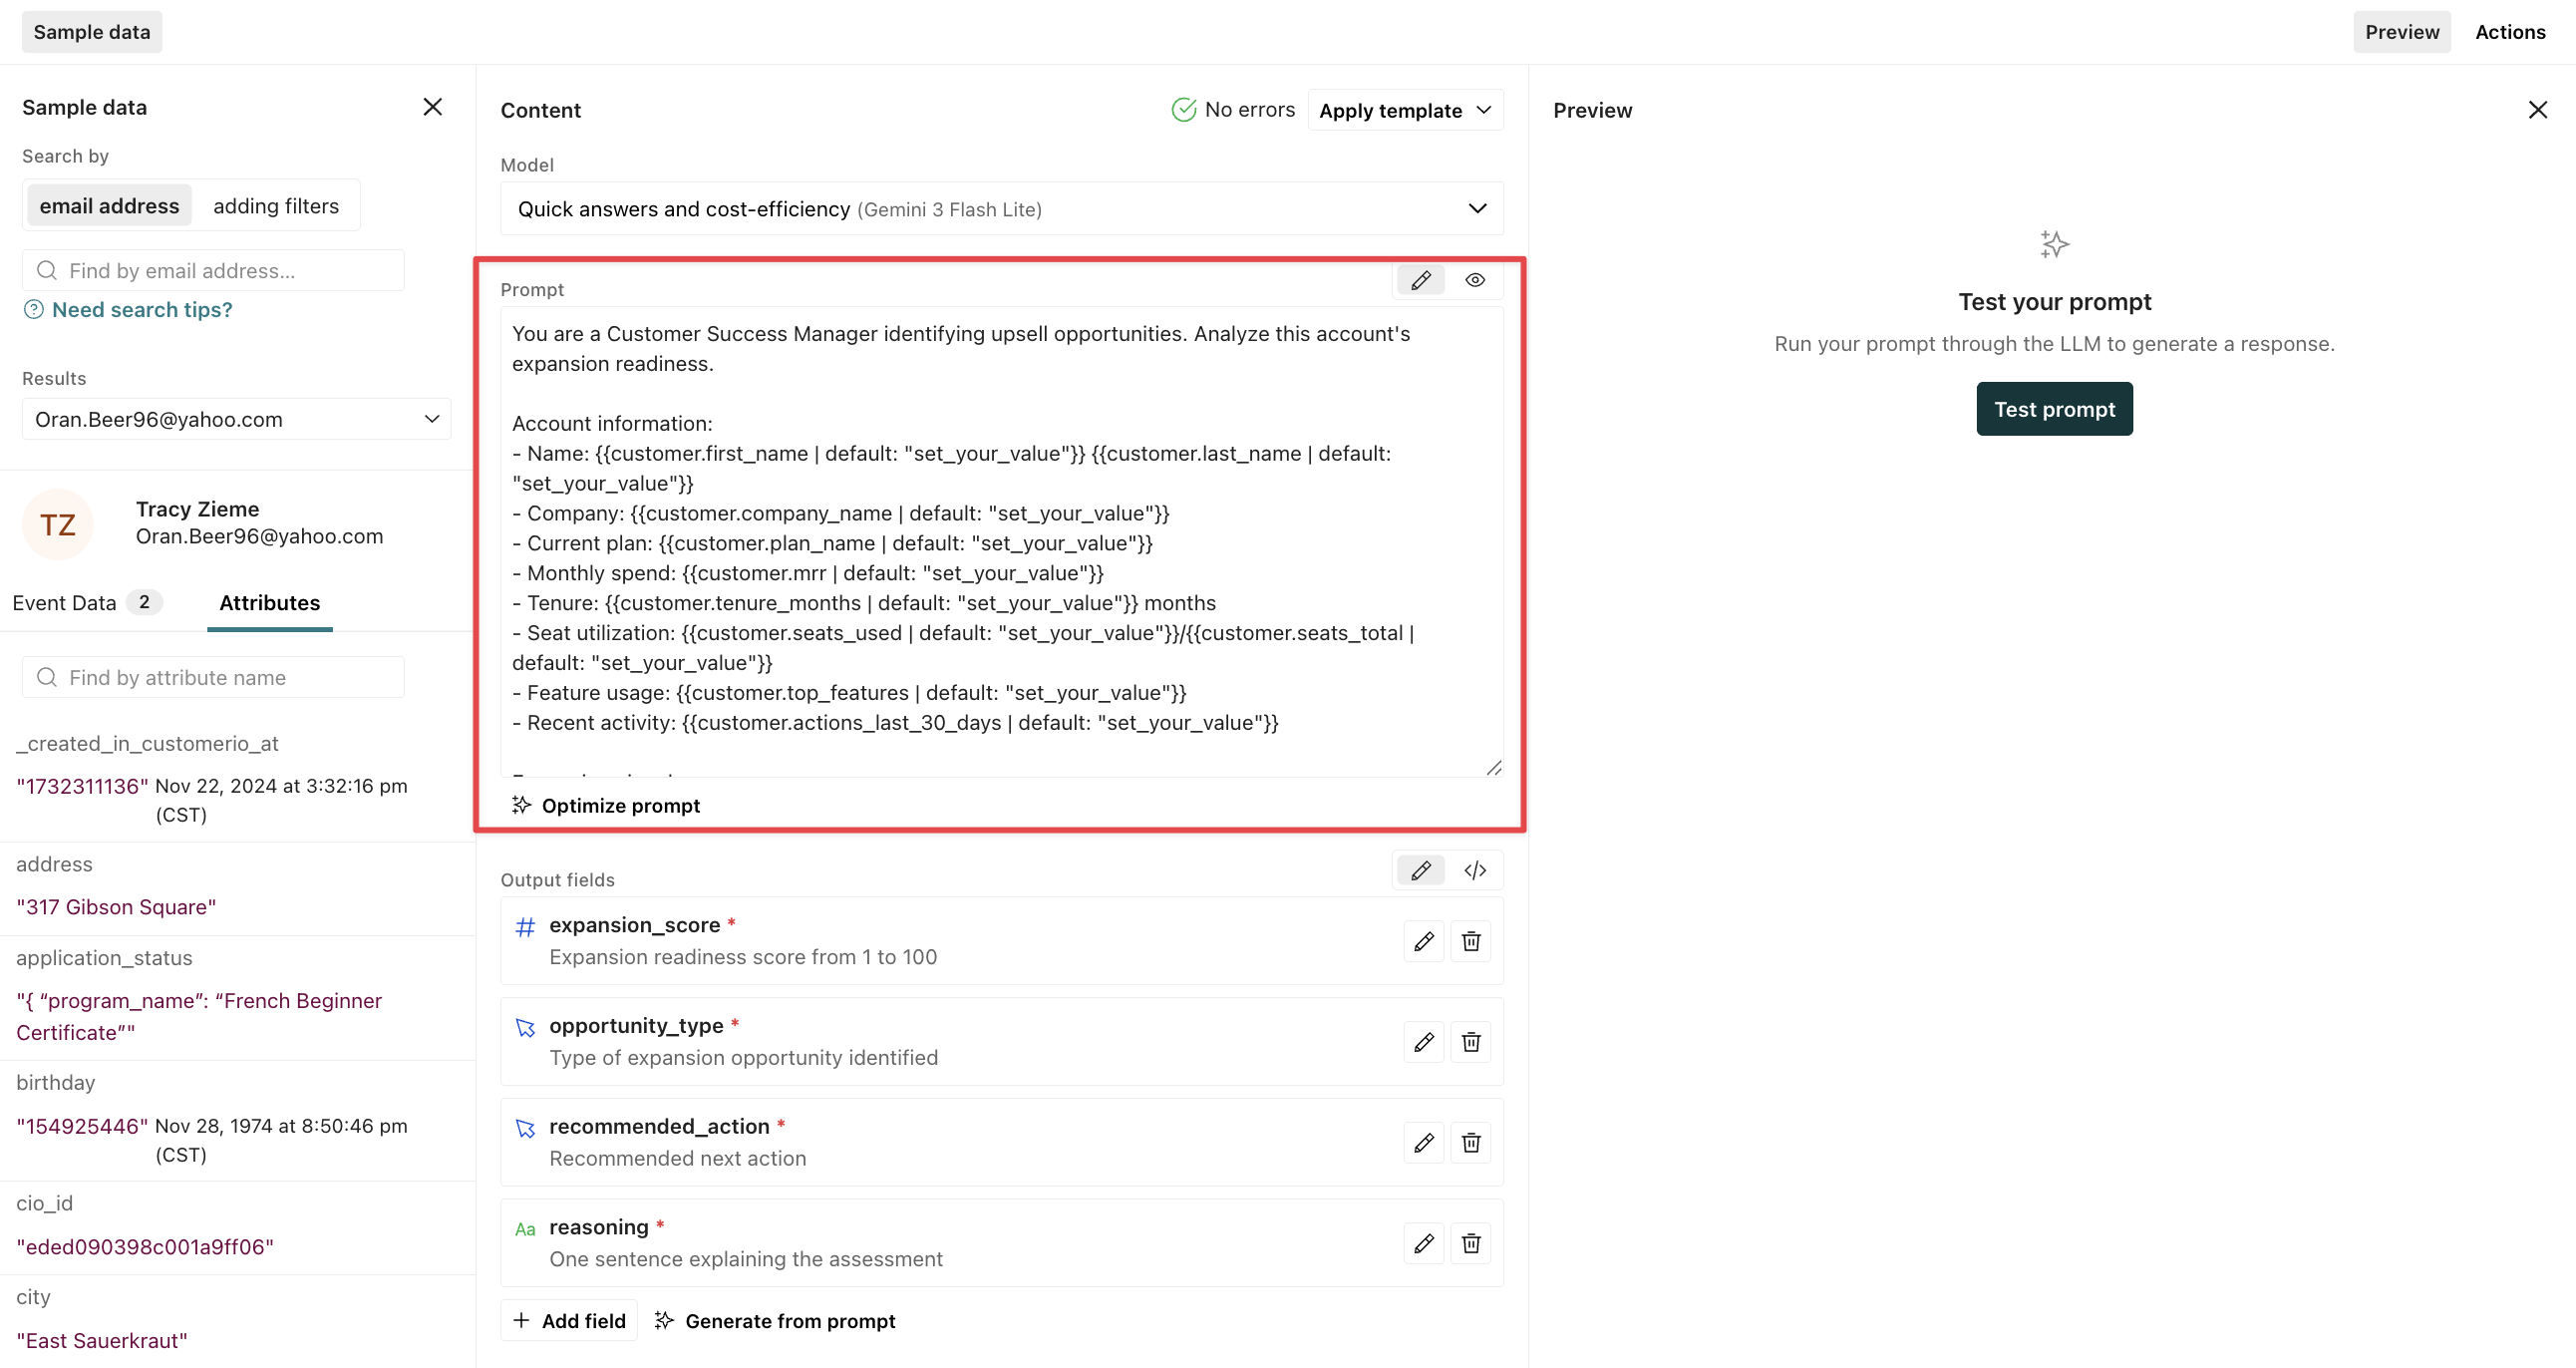
In the workflow builder, scroll down to Data and drag Run LLM onto your canvas. If your AI section shows Generate Content…, Qualify Profiles…, and Make Recommendation…, you can drag one of those instead. The setup steps are the same, except that the items in the AI section are pre-filled with the prompt, knowledge sources, and output fields.
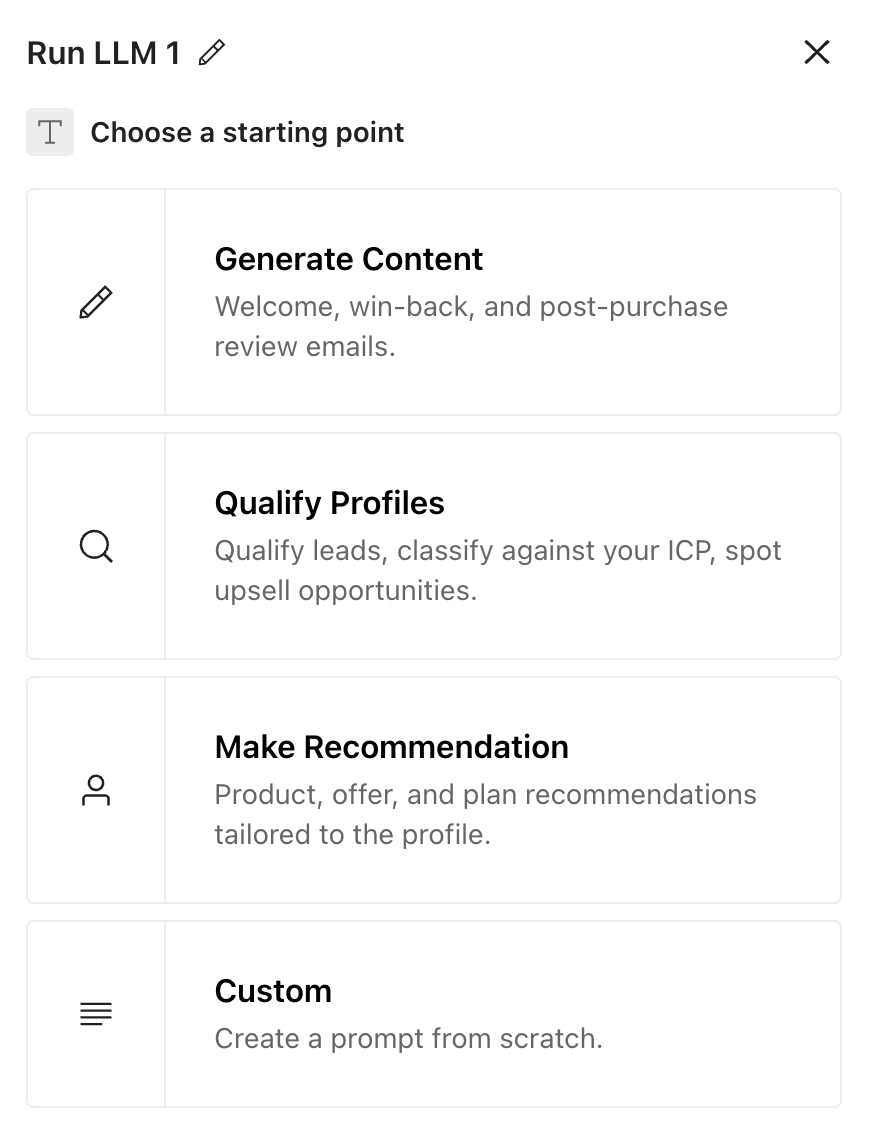
Click the block to open its configuration menu, and follow the prompts. Choose a template or start from scratch.
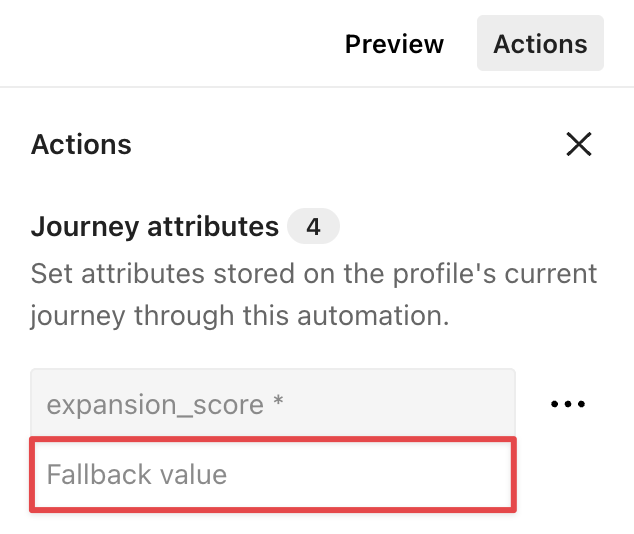
Click the Actions tab to set fallback values for each attribute created by your output fields.
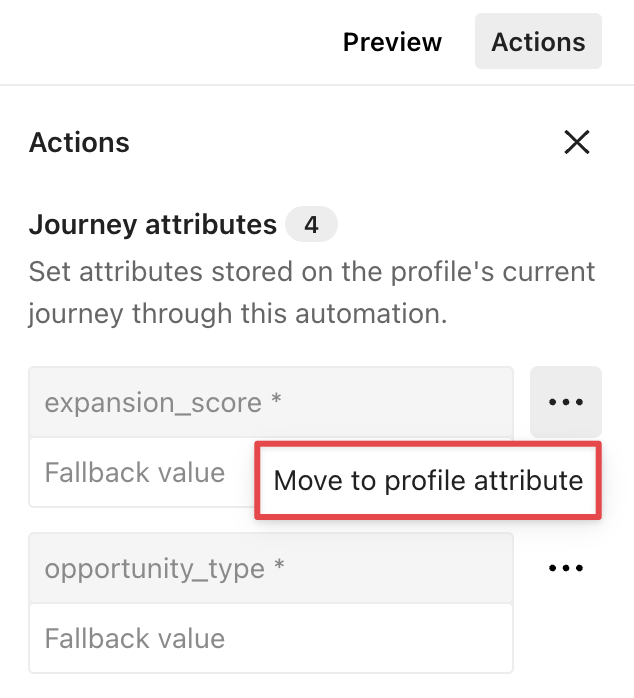
If you want this data available outside the automation, this is also where you can change a journey attribute to a profile attribute.
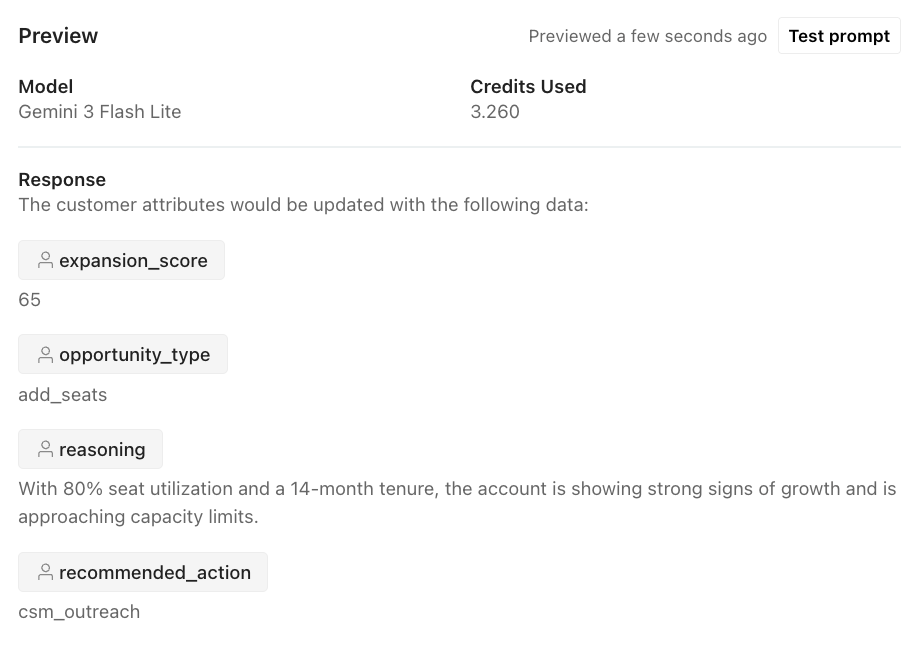
Click Test prompt to see how the LLM would interpret your prompt.
Generate with AI
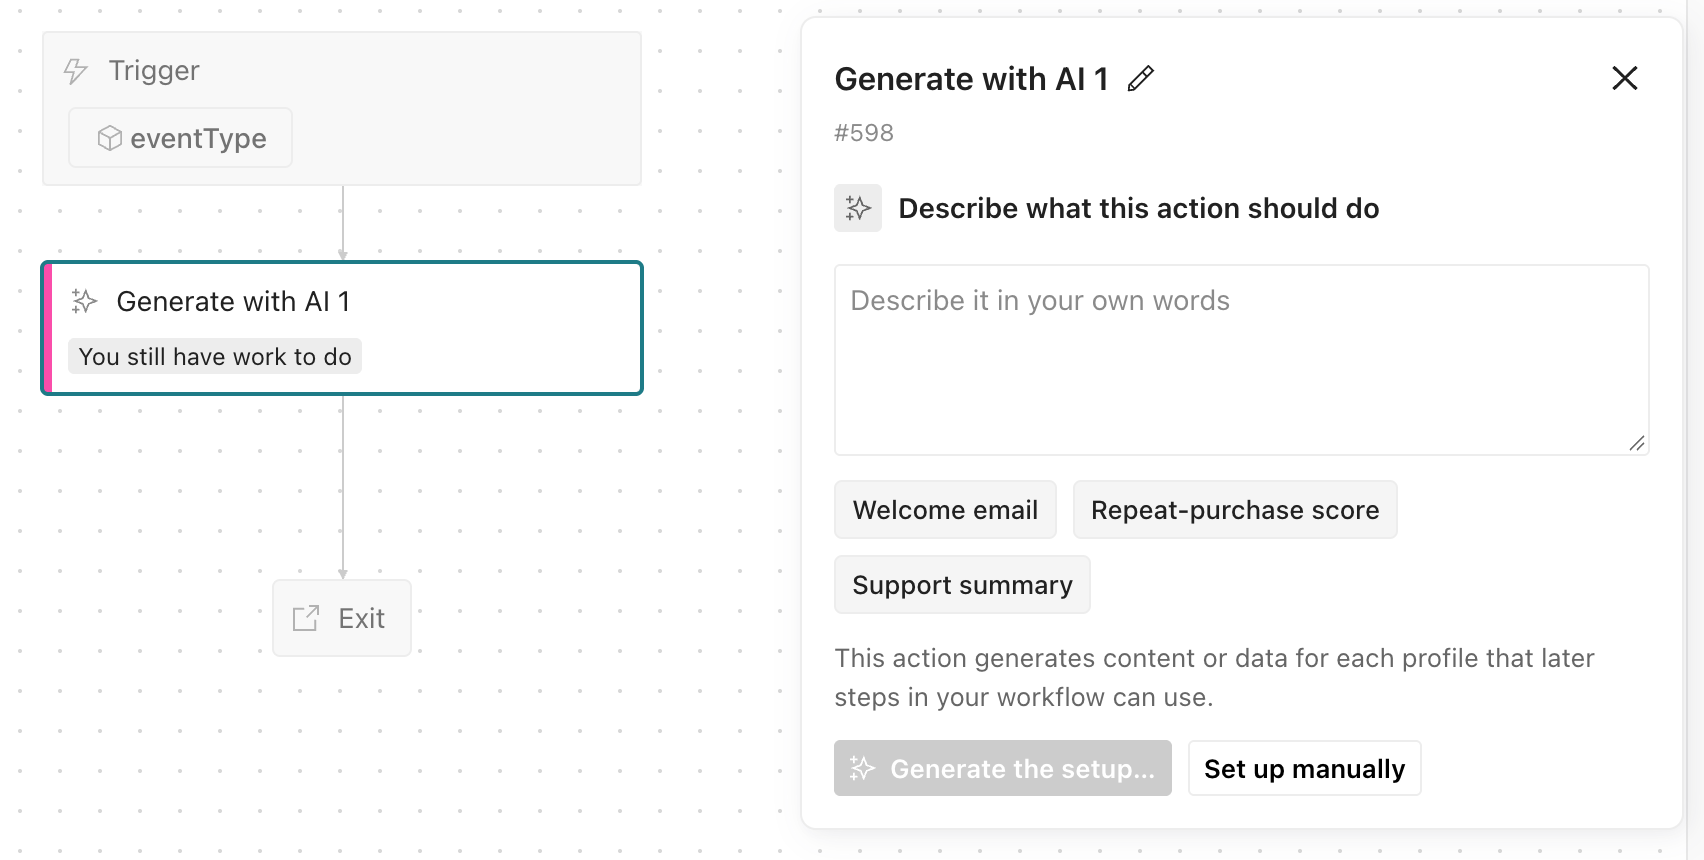
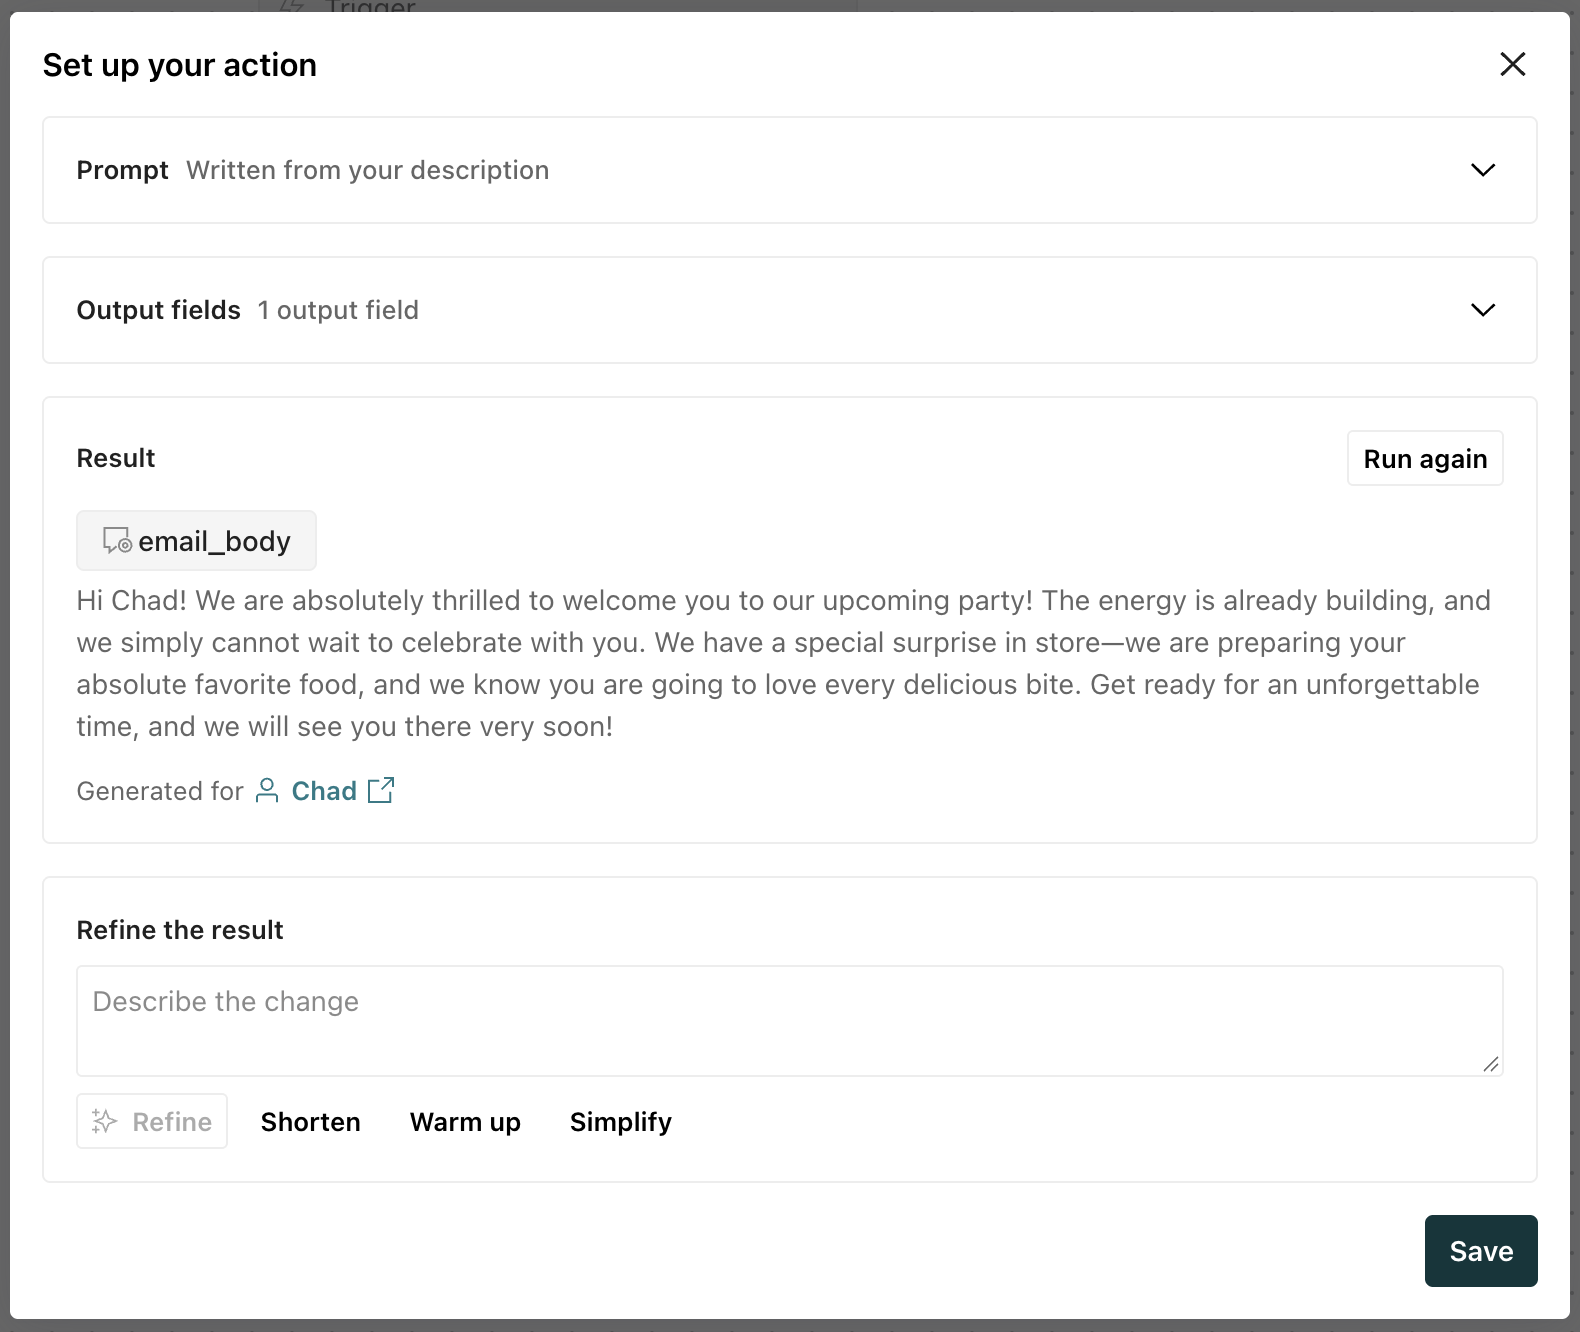
Instead of writing the prompt and output fields yourself, you can describe what you want the action to do. Customer.io writes the prompt, attaches a knowledge source when one fits, and creates the output fields. Then it runs the action on a profile in your workspace, so you can review an example result before you save.
If your AI section doesn’t show Generate with AI, follow the steps in the Run LLM tab.
Drag the Generate with AI action into your workflow.
Click the block.
Under Describe what this action should do, write what you want the action to produce. You can also pick an example, like Welcome email or Support summary, and edit it.
Click Generate the setup…. Customer.io generates your prompt, knowledge sources, and output fields for you. We’ll also run the action on a profile to show you the result so you can make sure that the output is what you want.
Review the the action and make changes if needed. There are a few ways to make changes:
Refine the prompt and output fields directly. When you’re done, click Run again to test your changes.
Enter a prompt in the Refine the result area describing the changes you want to make. Click Refine when you’re done.
Click Save.
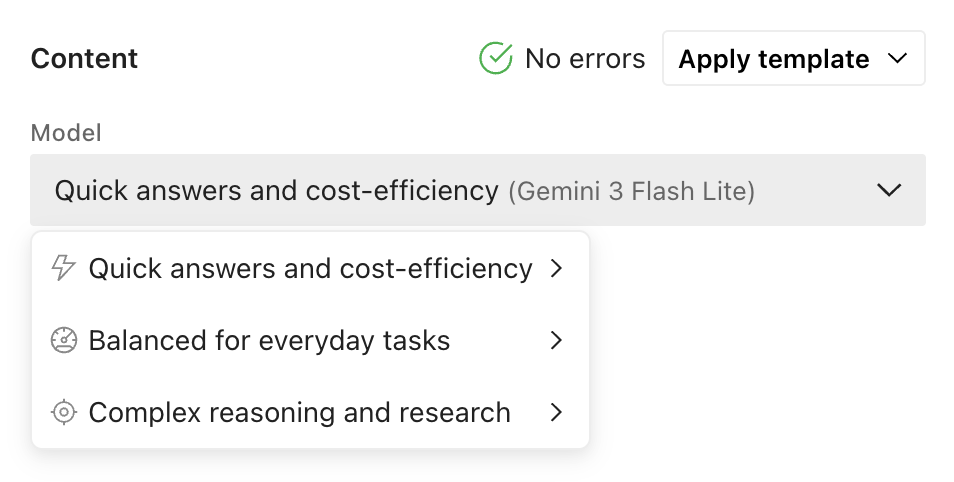
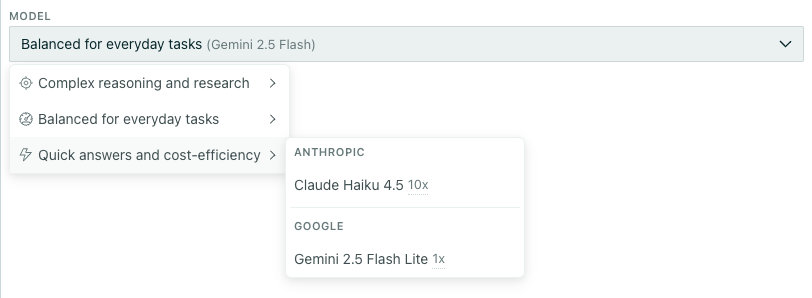
Model: Choose the right model for the task
When you configure an LLM action, you choose which model processes your data. Different models have different strengths—and different costs.
Reasoning models produce higher-quality results for complex tasks but use more credits per run.
Quick models are faster and more cost-efficient, using fewer credits per run.
Consider the complexity of your task when choosing a model. If you’re doing simple categorization or translation, a quick model may work well. For nuanced analysis or creative content, a reasoning model may produce better results.
When you choose a model, you’ll see a multiplier beside the model name. This represents the credit burn rate compared to the base rate of 1x. In this example, Claude Haiku 5.5 uses the base rate and Gemini 3 Flash Lite uses about 2.5x the base rate. Learn more about credit burn rates.
Models you can choose
Provider
Model
Credit burn rate
Good for
Google
Gemini 3 Flash Lite (default)
~2.5x
Quick answers, like categorization and short text
Google
Gemini 3 Flash
~5x
Balanced tasks
Google
Gemini 3 Pro
~20x
Complex reasoning
Anthropic
Claude Haiku 5.5
1x
Quick answers
Anthropic
Claude Sonnet 5.5
~20x
Balanced tasks
Anthropic
Claude Opus 5.5
~40x
Complex reasoning
If your account is in our EU data center, you can’t choose Gemini 3 Pro. An LLM action that uses Gemini 3 Pro runs on Claude Sonnet 5.5 in the EU data center.
Retired models
Model providers retire older models when they release newer models. When a provider retires a model, Customer.io automatically moves your LLM actions to the available model that is closest in function and cost. You don’t need to edit your actions to keep them running.
Google retires the Gemini 2.5 models on October 20, 2026, and Claude 5.5 replaces the Claude 4.x models. LLM actions that use these models now run on these replacement models:
Your action uses
It now runs on
Gemini 2.5 Flash Lite
Claude Haiku 5.5
Gemini 2.5 Flash
Gemini 3 Flash
Gemini 2.5 Pro
Gemini 3 Pro (Claude Sonnet 5.5 in the EU data center)
Claude Haiku 4.5
Claude Haiku 5.5
Claude Sonnet 4.5 or 4.6
Claude Sonnet 5.5
Claude Opus 4.5, 4.6, or 4.7
Claude Opus 5.5
Credits follow the replacement model’s burn rate. An action that used a Claude 4.x model uses fewer credits than before. An action that used Gemini 2.5 Flash Lite uses the same credits as before. An action that used Gemini 2.5 Flash or Gemini 2.5 Pro uses up to about 1.7x more credits than before.
Your Gemini safety settings apply only to Google models. If your action moves from a Gemini model to a Claude model, your Gemini safety settings no longer apply to it. Your compliance prompt still applies. This happens to actions that used Gemini 2.5 Flash Lite, and in our EU data center, to actions that used Gemini 2.5 Pro or Gemini 3 Pro. Review the output of these actions after the move.
Prompt: Tell the LLM what to do and how
When you prompt an LLM action, you should include the following so the LLM has full context on your use case:
Define your goal. If you don’t know exactly what you want, the LLM won’t either.
Be direct, concise, and specific. Provide any context that’s necessary to achieve your goal, like how and why to evaluate data.
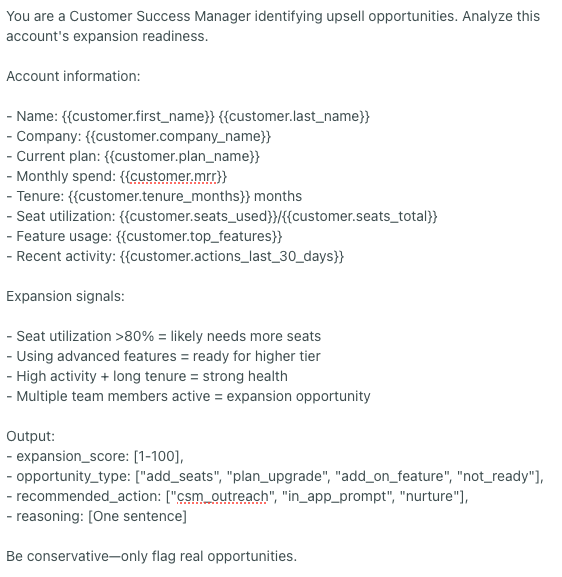
Below is an example of how to improve a prompt. Bottom line, you should test your prompt to gauge whether the output is what you want. But if you’re looking to improve your output quality and make it more consistent, here’s an example that highlights best practices.
Prompt
Quality
Why
Account upsell: Compare customer seat utilization to their current plan.
Low
The goal is not clear; there’s only an idea around upselling. The data to use is barely defined and the desired output is absent.
Analyze this account’s expansion readiness. Compare their seat utilization {{customer.seats_used}} to their current plan {{customer.plan_name}}. An account may expand if seat utilization is greater than 80% and they’re not on the highest plan.
Medium
The goal is stated. Some data is identified along with some criteria for evaluation. But the desired output is still absent.
High
The goal is defined and criteria for being expansion ready is defined. The prompt includes the data to use and desired output format.
Use a template prompt
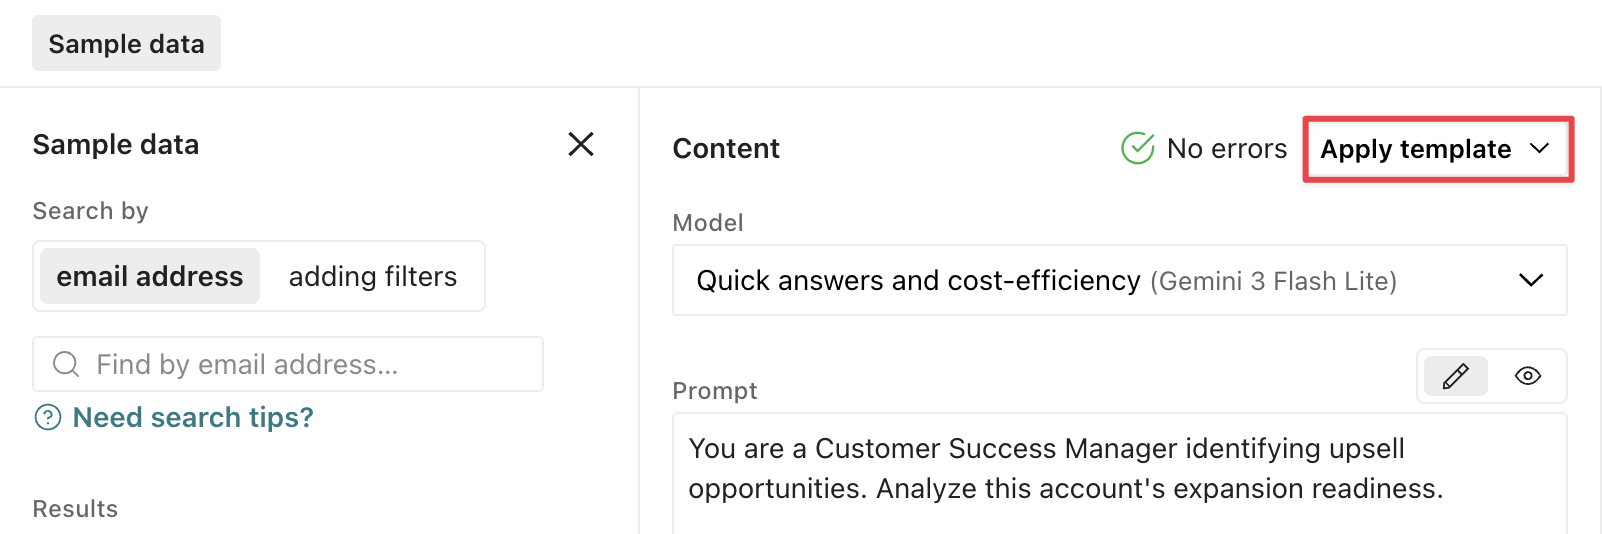
Click Apply template to create a prompt based on one of our templates. Each prompt demonstrates key best practices: defining a persona, setting clear guidelines, and specifying the output format.
You should adapt them to your business, data, and tone for best results with your audience.
Review your AI settings
In your account and workspace settings, you can add context about your company and audience to improve how AI generates responses across your workflows. These settings influence how the agent communicates with you and how AI features like segment generation and email content analysis work.
Go to Account settings > AI to manage compliance and safety settings across all your workspaces. These settings automatically apply to LLM actions.
Gemini Safety Settings—Configure safety thresholds for content created by Customer.io’s tools; these only apply to LLM actions when you use a Gemini model.
Compliance Prompt—Manage regulatory and policy guidelines.
You can include specific data in your prompt so the LLM creates an output personalized to your recipient.
Data type
Liquid keys
Can an LLM action process it?
Your workspace’s business context
{{ai_context.<attribute_name>}}
Yes
Profile attributes
{{customer.<attribute_name>}}
Yes
Journey attributes
{{journey.<attribute_name>}}
Yes
Automation trigger data
{{trigger.<attribute_name>}}, {{trigger.<object_type_name>.<attribute_name>}}, {{trigger.relationship.<attribute_name>}}, and {{event.<attribute_name>}}
Yes
Objects & relationships
Any keys that start with {{objects...
No
Events
None
No
Any trigger data available through liquid is accessible to LLM actions; the LLM action can use events, objects, webhooks, etc that trigger campaigns to generate responses. However, LLM actions cannot access event and object relationships that did not trigger campaigns.
For instance, this means you could ask an LLM action to generate a message based on event data from the trigger, but you shouldn’t prompt the LLM action to analyze all event data for a person and save its findings to the person’s profile. That wouldn’t be inclusive of the breadth of a person’s activity across your platform.
Add your business context with liquid
If you want LLM actions to take into account your business context, you have to explicitly add it to your prompt with liquid. Keep in mind, this takes up extra tokens, so make sure you test it and review the cost implications.
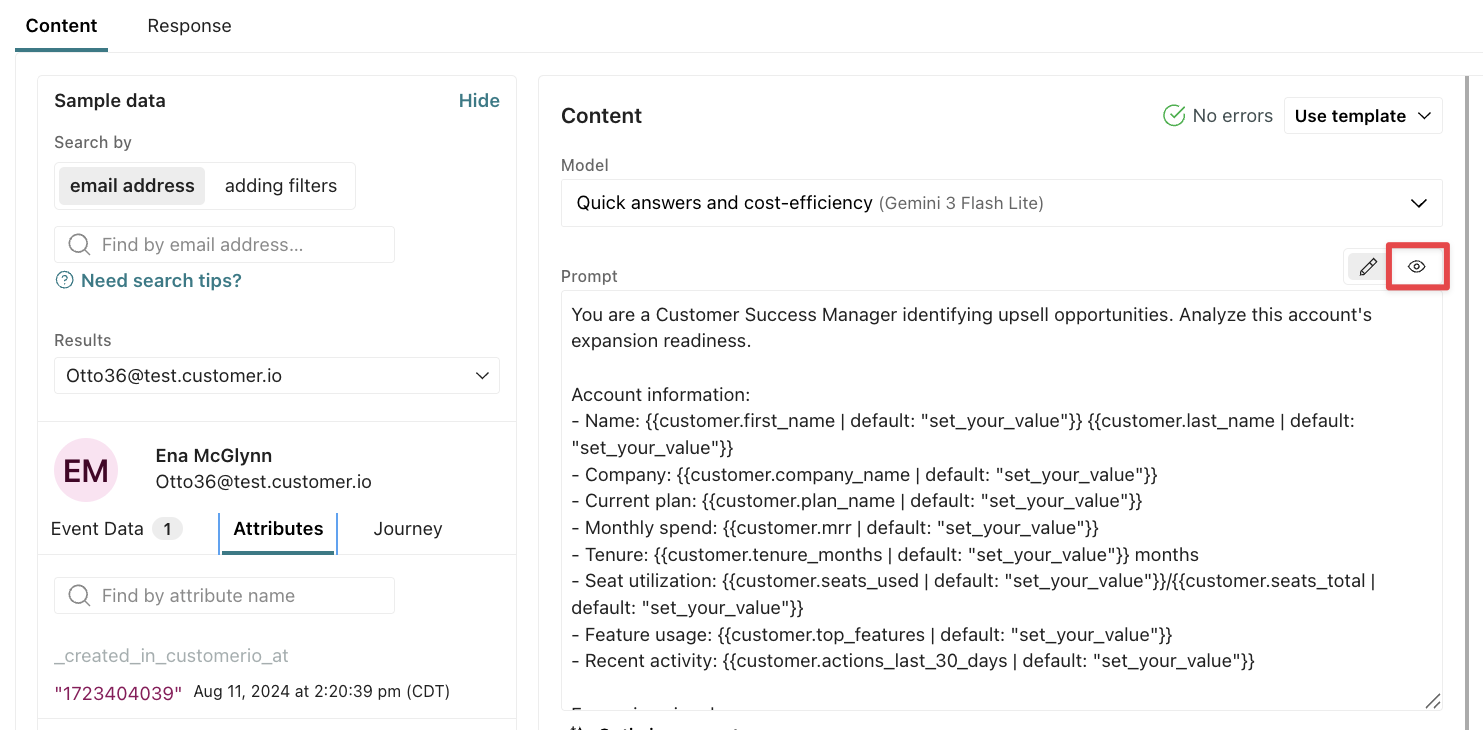
You’ll use the liquid object ai_context with any of the attributes below. For instance, if the output should follow your audience guidelines, you should add {{ai_context.audience}} to the prompt. Click and you’ll see the data that the LLM would process, in this case, the Audience prompt from workspace settings.
Prompt for Run LLM action
Preview
Generate a message following our audience guidelines: {{ai_context.audience}}.
Generate a message following our audience guidelines: marketing, product, engineering, and sales teams looking to improve customer engagement, activate users, drive cross-sells/upsells, enhance onboarding, and improve retention through personalized, data-driven communication across multiple channels.
Some settings, like tone, have nested data that an LLM more easily parses if you explain what each field means. While you can reference {{ai_context.tone}}, you’ll get better results if you create guidelines for the different tones you use with your audience:
If you include the entire object {{ ai_context }} in your prompt, make sure you test it and check the cost implications. Compare that against the cost implications for specifying only the attributes you need. The more clear, concise and directed you can be in your prompt, the more efficiently an LLM will process your prompt. You may find you don’t need all of your business context to get the results you want.
Liquid keys: Basic info & Key links
The table below includes data available through the ai_context object that you’ll find under Basic info and Key links in your Business context.
Liquid key
Value type
Description
ai_context.audience
string
Target audience
ai_context.version
int
Context version
ai_context.workspace_id
int
Workspace ID
ai_context.account_id
int
Account ID
ai_context.domain
string
Sending domain
ai_context.created_at
timestamp
When context was created
ai_context.updated_at
timestamp
When context was last updated
ai_context.name
string
Company name
ai_context.long_description
string
Long description of the business
ai_context.industry
string
Industry
ai_context.website_url
string
Website URL
ai_context.privacy_policy_url
string
Privacy policy URL
ai_context.terms_of_service_url
string
Terms of service URL
ai_context.pricing_url
string
Pricing page URL
ai_context.download_url
string
Download page URL
Liquid keys: Tone & Voice
The table below includes data available through the ai_context object that you’ll find under Tone & Voice in your Business context.
Liquid key
Value type
Description
ai_context.tone.formality.description
string
System-generated description
ai_context.tone.humor.description
string
System-generated description
ai_context.tone.respect.description
string
System-generated description
ai_context.tone.energy.description
string
System-generated description
ai_context.tone_examples
string[]
Example text snippets showing brand tone
You can control the descriptions by changing the sliders under Tone & Voice in Business context.
Liquid keys: Platform availability
The table below includes data available through the ai_context object that you’ll find under Platform availability in your Business context.
Knowledge sources: Add reusable context to your prompt
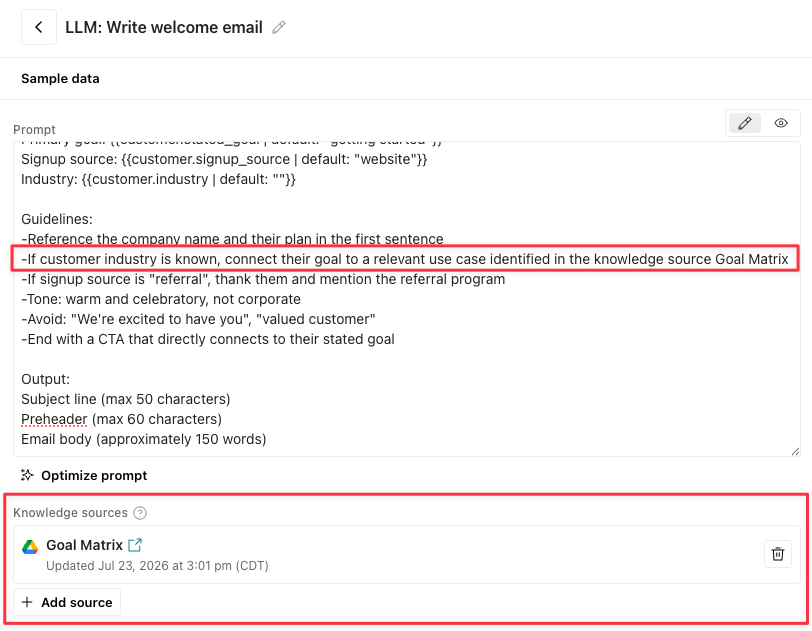
Knowledge sources let an LLM action pull in real, workspace-specific context at run time—without pasting the same background material into every prompt by hand. Instead of copying your brand guidelines, reference docs, or recent activity into each action, you attach a knowledge source once and let the LLM work from it.
Knowledge sources are available to the Agent, so you can use them as context in other requests.
Add a knowledge source
From an LLM action, click Add source under the prompt.
Pick a source type—File upload, Google Drive, or Recent events—and follow the prompts to configure it. The file must be less than 25 MB.
For a File upload, select the document you want to use.
For Google Drive, connect your account and choose a text-based file, like a Google Doc or Sheet. The LLM action can’t read PDFs, images, or .doc/.docx files.
For Recent events, build your event query: choose the event, add property filters, and set the recency window, limit, and ordering.
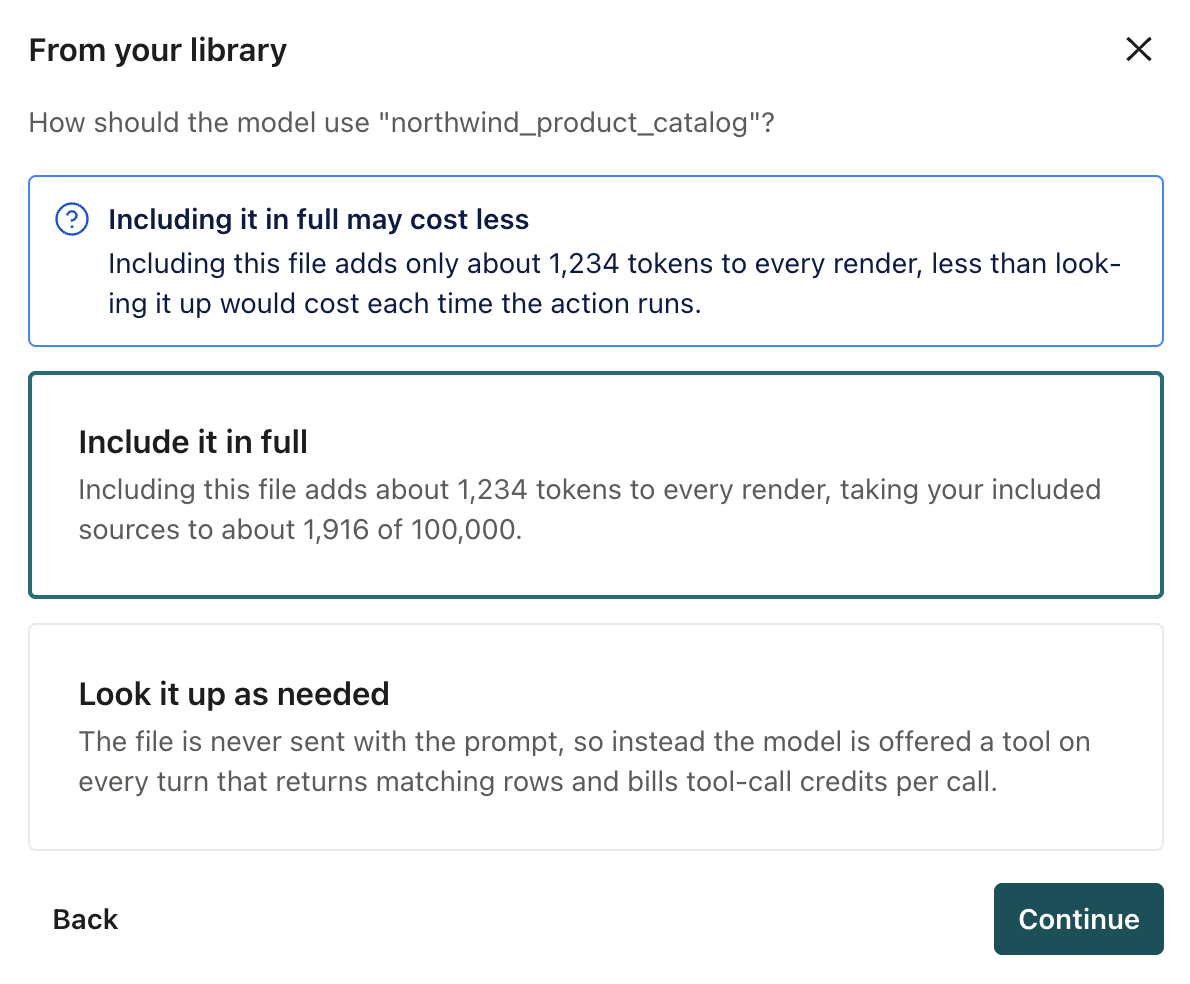
For a file or Google Drive source, choose Include it in full or Look it up as needed. See Choose how the LLM uses a file below.
Save the source.
Add your knowledge source to the prompt. Include how the LLM should interpret or use the knowledge source context by referencing the name of the knowledge source in your prompt.
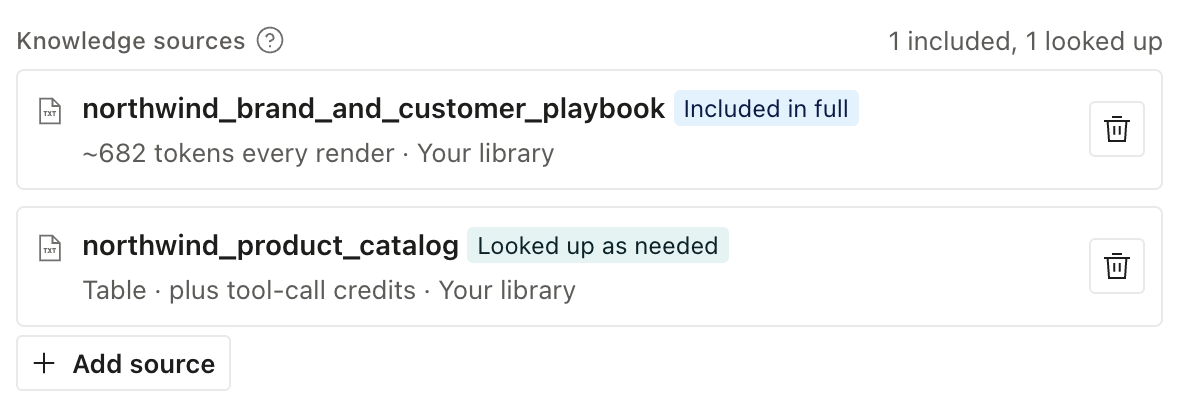
As you add sources, Customer.io shows a token count for each source, so you can see how much context you’re spending before you run the action. Because knowledge sources add to the context sent with each request, they affect AI credit usage. Test your action and review the cost implications.
Choose how the LLM uses a file
When you add a file or Google Drive source, you choose how your action uses it:
Include it in full: The LLM gets the whole file every time the action runs.
Look it up as needed: The LLM searches the file and uses only the parts that matter for each person. In a spreadsheet, like a CSV or Google Sheet, it finds the matching rows. In other text files, it finds the matching passages.
Each option uses AI credits differently:
Include it in full adds the file’s size, in tokens, to every run. The files you include on one action can add up to 100,000 tokens. If a file doesn’t fit, choose Look it up as needed for it instead.
Look it up as needed doesn’t count toward that limit, but each lookup uses credits.
Include a file when it’s small, or when the LLM needs all of it, like when it compares every plan in a pricing sheet. For files of about 2,000 tokens or less, Customer.io suggests that you include them, because that usually costs less than looking them up. Look a file up when it’s large and each person needs only a small part of it, like one product from a large catalog. A spreadsheet that you look up can have up to 50,000 rows.
To compare the cost of each option, use the Test prompt. It shows how many credits a live run uses.
After you save a source, your action’s list of knowledge sources shows which option each source uses.
Reuse sources with the Knowledge Library
When you create a knowledge source, you can save it to the Knowledge Library—a workspace-scoped collection of reusable sources. This lets you set up context once and drop it into any LLM action instead of recreating it each time.
To reuse a saved source, open Knowledge sources on an LLM action and use the Add from library picker. There’s no need to re-upload.
Managing your content in one place means every LLM action can reference the same, up-to-date material—no more copy-paste across actions.
Replace files in your knowledge library
You can find all of your knowledge sources in your workspace’s Knowledge Library. This is where you can edit them, including replacing files. After you replace a file, your LLM actions that use the knowledge source start pulling from the new upload.
Output: Store the response as attributes
After you add your prompt, you’ll generate the output—how the LLM will store its response. By default, the LLM action stores data as journey attributes
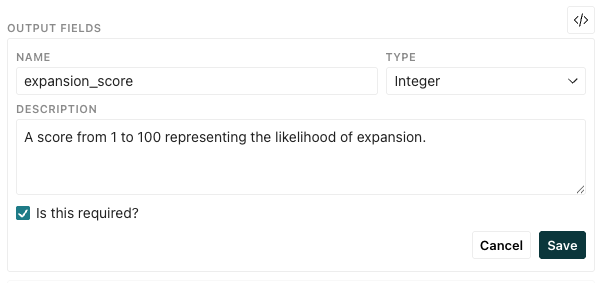
Enter a Description so you know how to use the output. This is especially helpful if you’re setting profile attributes. This description will appear in your Data Index and help you audit your data in the future.
Select whether the LLM action is required to generate the output.
Click Save.
By default, output fields are journey attributes, which expire once a person exits the automation. If you want to use these attributes outside the automation, you can change them to profile attributes in the Actions tab.
Generate outputs from your prompt
Click Generate from prompt under Output Fields.
Click Replace to view the latest output fields.
Review the output: click to view the returned name, value type, and descriptions. Modify them as you see fit.
Name: The key used to reference the output through liquid syntax.
Description: A description of the output. This is especially helpful if you’re setting profile attributes. This description will appear in your Data Index and help you audit your data in the future.
By default, output fields are journey attributes, which expire once a person exits the automation. If you want to use these attributes outside the automation, you can change them to profile attributes in the Response tab.
Types of values
Each output field has a type of value that defines what the LLM action should store in your attributes.
Type
Description
Example
Text
A text string value
”Mark your calendars: the summer solstice is coming!”
Number
A number that can include decimals
3.14
Integer
A whole number (no decimals)
42
Boolean
A true/false value
true
Date
A date string (ISO 8601 format)
“2026-03-31”
Date and Time
A timestamp string (ISO 8601 format)
“2026-03-31T14:30:00Z”
Time
A time string
”14:30:00”
List
An array of generated text values
["Subject line 1", "Subject line 2", "Subject line 3"]
Single Select
One value picked from predefined options
”positive” (from options like ["positive", "negative", "neutral"])
Multi Select
Multiple values picked from predefined options
["positive", "neutral"] (from options like ["positive", "negative", "neutral"])
Delete output fields
To remove output fields stored from an LLM action response, go to the Content tab and click beside the field you want to delete. The Response tab will update to reflect the changes.
Change from journey to profile attributes
By default, output fields are journey attributes, but you can change that in the Actions tab. If you want to take action on the data outside the automation, then you’ll want to change them to profile attributes.
Click beside an attribute to switch types.
You can’t set or modify events, objects, or relationships with LLM actions. However, you can use a Send event action to store events based on customer or journey attributes set by an LLM action.
If an LLM action fails, your automation will retry the action twice. If the action fails after three attempts, the journey will continue without the attribute updates, which could impact subsequent workflow actions that rely on them.
You can set fallback values so any condition or content that references the attributes continues to be evaluated in a way that’s best for your customers. By default, output attributes do not have fallback values, but you can set them in the Actions tab.
Consider what’s best for your use case. How should people move through your automation if the Run LLM action fails?
If the LLM action generates email copy, it might make sense to store fallback content so your customers still get the core of your message in a subsequent action, just with less personalization. Otherwise, the email would fail to send altogether, and they’d move onto the next action.
If the LLM action is meant to determine whether your customer is likely to upgrade their plan, you might leave the fallback blank so you know it didn’t update and send them down a different path in the workflow when the attribute does not exist.
If a customer or journey attribute is already set and the LLM action should update them, the attributes will only update if the LLM action succeeds or has fallback values. If the LLM action fails and has no fallbacks set, the attributes remain unchanged; they won’t be cleared or unset.
You should run tests to enhance your prompt and improve the quality of your responses before going live.
Select a person from the Sample Data panel that would cause the LLM action to run.
Click Test prompt. For smaller screens, click the Preview tab first.
Credits per run reflects the number of credits a live run would use; testing your prompt does not use your AI credits.
Review the model’s output to verify it meets your expectations. If a value is cutoff, hover over it to view the full output.
Adjust your prompt or model selection if needed and preview the response again.
Test LLM actions with multiple people
Try testing with several people to make sure your prompts handle a variety of inputs. Check edge cases like missing attributes or unusual values to make sure the LLM returns something useful and uses any fallbacks specified in your liquid.
Run an LLM action on a subset of people
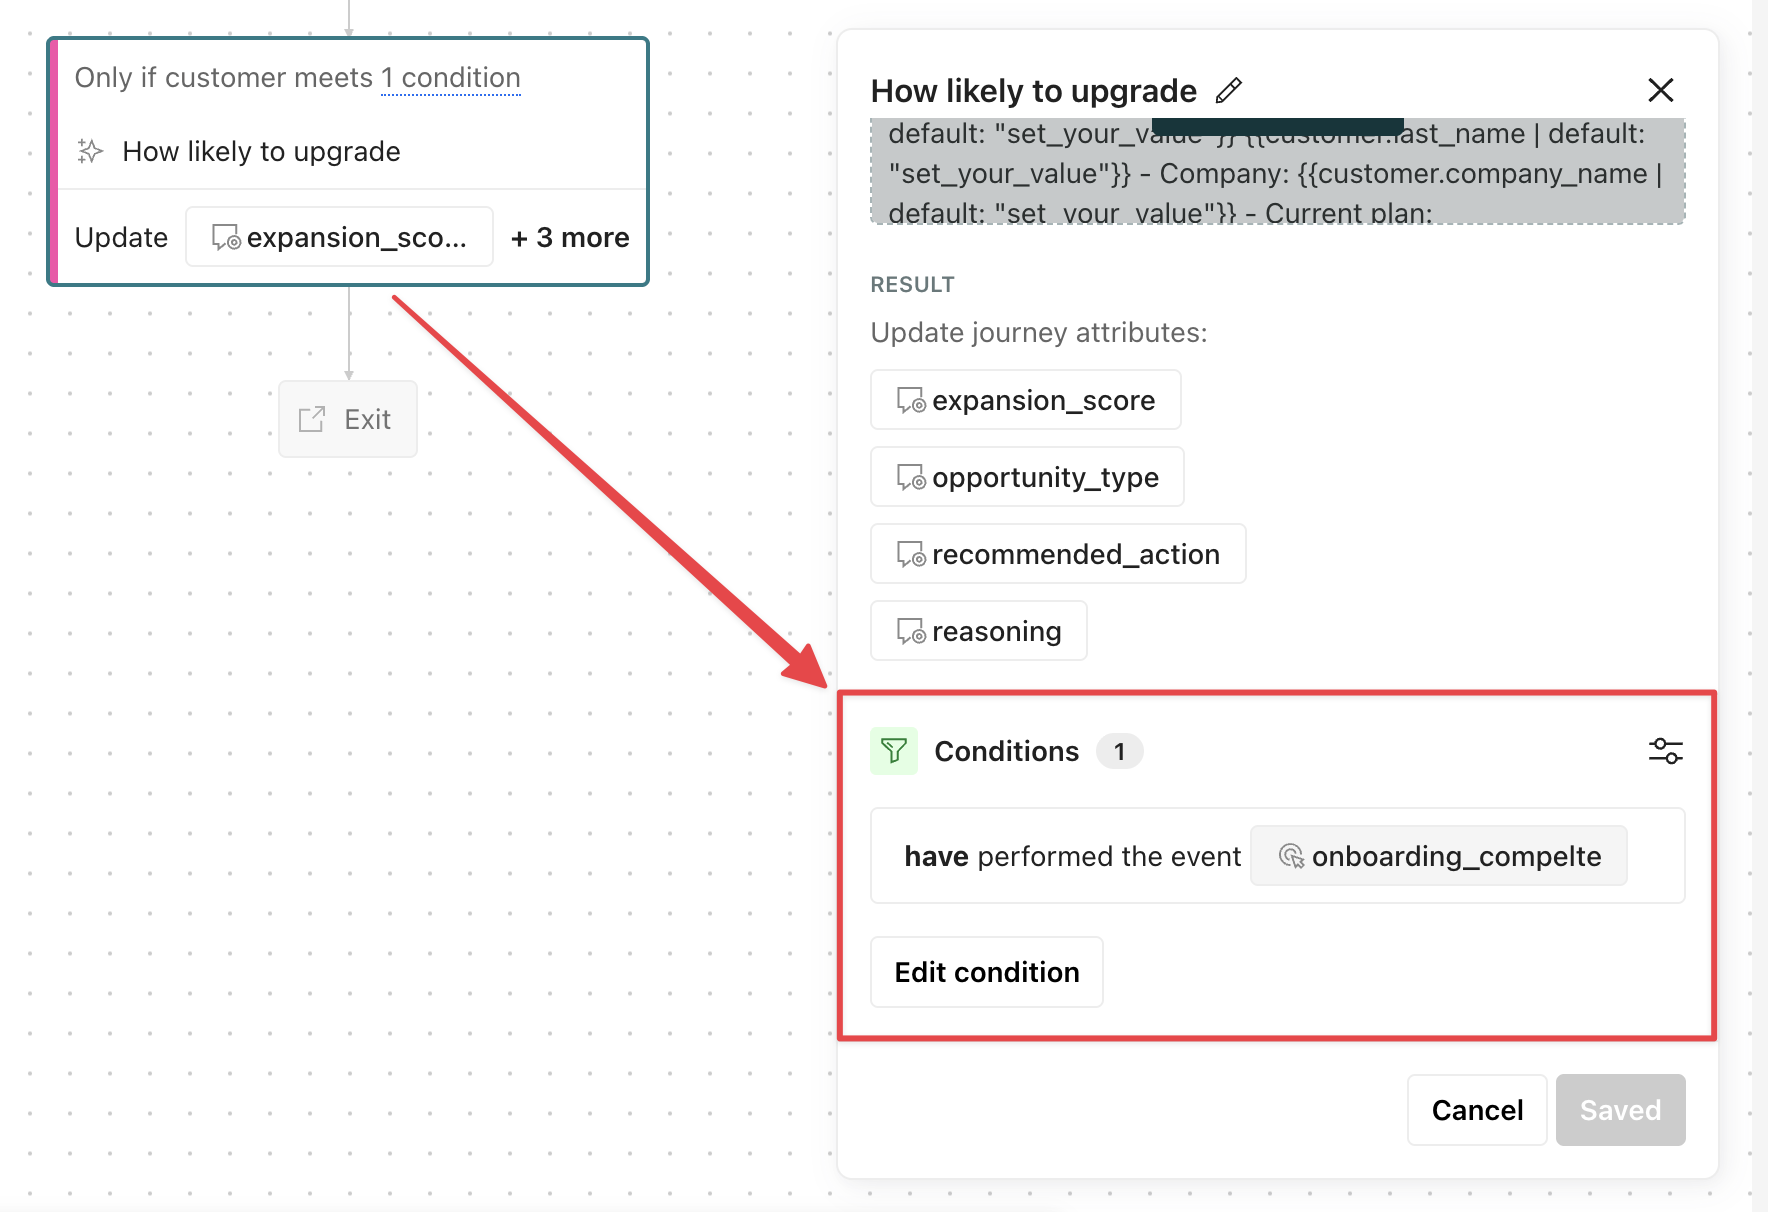
If you only want certain people who trigger your automation to run the LLM action, add Conditions to filter your audience.
After you setup the LLM action, click the block on the canvas to open settings: