

Collections
Collections provide a way to store data independently of people in your workspace that you can use to personalize messages and automation workflows.
What’s a Collection?
A collection is a table of data in your workspace that isn’t tied to a person or an event, sort of like a spreadsheet that your automation workflows and messages can reference. A collection often holds non-person data that you want to use to personalize messages, like upcoming webinars, coupons, or a catalog of online courses.
For example, let’s say you run an online educational platform. You might store your course catalog as a collection, so you could retrieve the specific set of classes that are relevant for each person and list them in an email. This ensures that each person receives a personalized list of courses that match their skill level and interests.
Each row in a collection is a JSON object, and rows can have different attributes. Your collections need to stay within the collection limits.
Collections have optional key fields and delete fields that let you keep the collection up to date programmatically. A key field is the value that represents a unique row in the collection, so you can update individual rows without replacing the whole collection. A delete field is a boolean (true/false) attribute that you can use to automatically remove rows that are out of date.
Collection limits
You can create as many collections as you need in a workspace. However, your collections must stay within the following limits:
- Collection size: A collection that you upload or send in an API request can be up to 10 MB. A collection that you load from files, with write requests or a sync, can be larger: each file can be up to 500 MB and 1,000,000 rows.
- Field length: Each top-level field in a row can hold up to 10,000 characters. For a string, Customer.io counts the characters in the text. For any other value, like a nested object or an array, Customer.io counts the characters in its JSON.
- Account storage: The total size of all collections in your account can’t exceed 5 GB. If creating or updating a collection would take your account over that limit, Customer.io rejects the change. You can prune or delete collections to save space.
Create a Collection
You can upload your collection as JSON, a CSV file, or by sharing a Google Sheet with us. If you upload a CSV file or share a Google Sheet, we expect your file to be a simple table with headers—each column is an attribute of your collection items. To share a Google Sheet with us, you must grant Customer.io access to specific files in your Google Drive.
For example, if your collection contains a list of courses, your CSV might look like this:
name,level,description,duration,instructor
Introduction to Python,beginner,Learn the basics of Python programming,4 weeks,Jane Smith
Data Analysis with R,intermediate,Analyze datasets using R,6 weeks,John Doe
Advanced Machine Learning,advanced,Deep dive into ML algorithms,8 weeks,Alice Johnson
Each row represents an item in your collection, and each column header becomes an attribute that you can reference in your messages.
Your file needs to fit within the collection limits.
To add a collection:
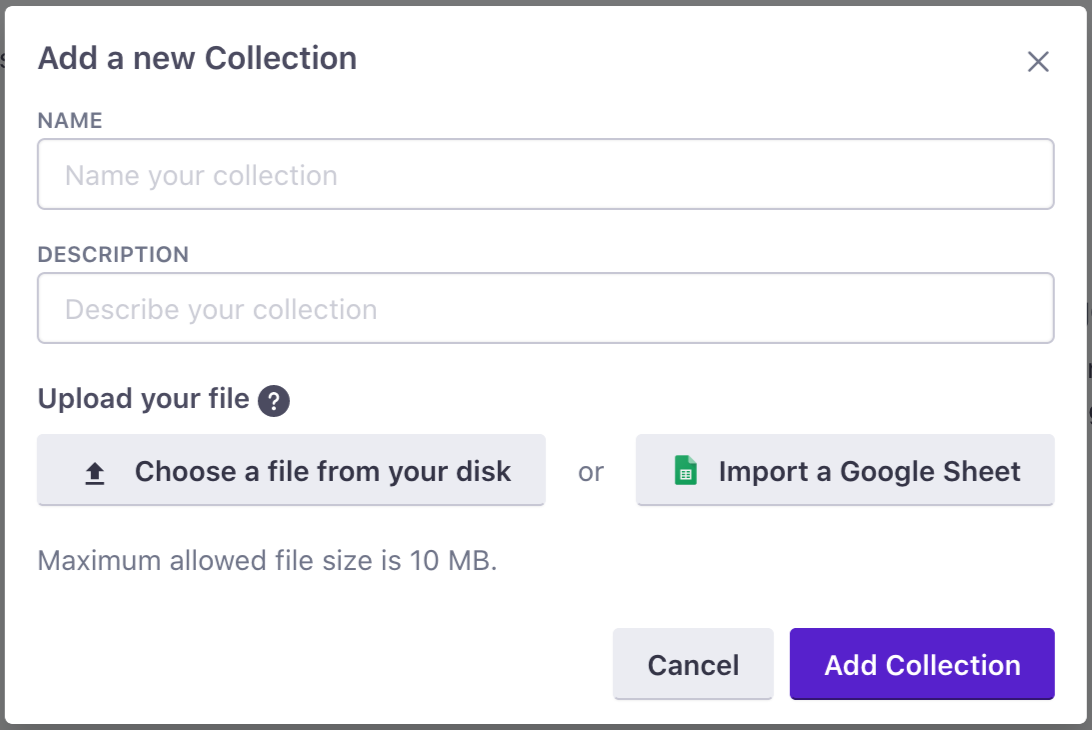
- Under Configure data, click Collections, and then click Add collection.
- Give your collection a name and description.
- Select your collection file: JSON, CSV, or Google Sheet.
- Click Add collection.
Key fields and delete fields
Without a key field, the only way to change a collection is to replace it entirely. To fix one course in an online education catalog, you’d upload the whole collection again. A key field tells Customer.io how to spot unique rows so you can keep a collection up to date programmatically. You must use a key field to sync a collection from cloud storage and to read specific rows by their keys with the API.
A delete key works in conjunction with a key field. When you set a delete field, Customer.io automatically removes rows where your delete key field is true.
- Key field: The attribute whose value is unique to each row, like
skuorid. It works like a primary key in a database table: Customer.io uses each row’s key to find the row to change. You send only the rows that changed, and Customer.io adds or replaces those rows and leaves every other row alone. - Delete field: An attribute, like
deleted, that marks a row for removal. When you update a delete field totrueon a row, Customer.io deletes the row. For example, when you discontinue a product, your systems can mark it in the same file or request that updates your other products, and Customer.io removes it from the collection so your messages stop showing it.
How Customer.io uses key and delete fields
If you use a key field, every row must have a unique value in the key field. The value must be a non-empty string or number (up to 1,024 bytes).
When you write a row whose key already exists, Customer.io replaces the whole row with the one you send. Send the complete row for any write request. Customer.io doesn’t merge your attributes into the old row; it’s a full replacement. If your request leaves an empty value for a field, that value will remain empty; the previous value won’t persist.
A row is marked for deletion when its delete field is true. Customer.io also accepts the text true, 1, or yes in any case, which is how you mark a row in a CSV file. Customer.io never keeps a marked row. When you create or replace a collection that has a delete field, Customer.io leaves the marked rows out. A row that doesn’t set the delete field to true keeps the attribute as you sent it.
Set the key and delete fields
You can set both fields on a collection that already exists.
-
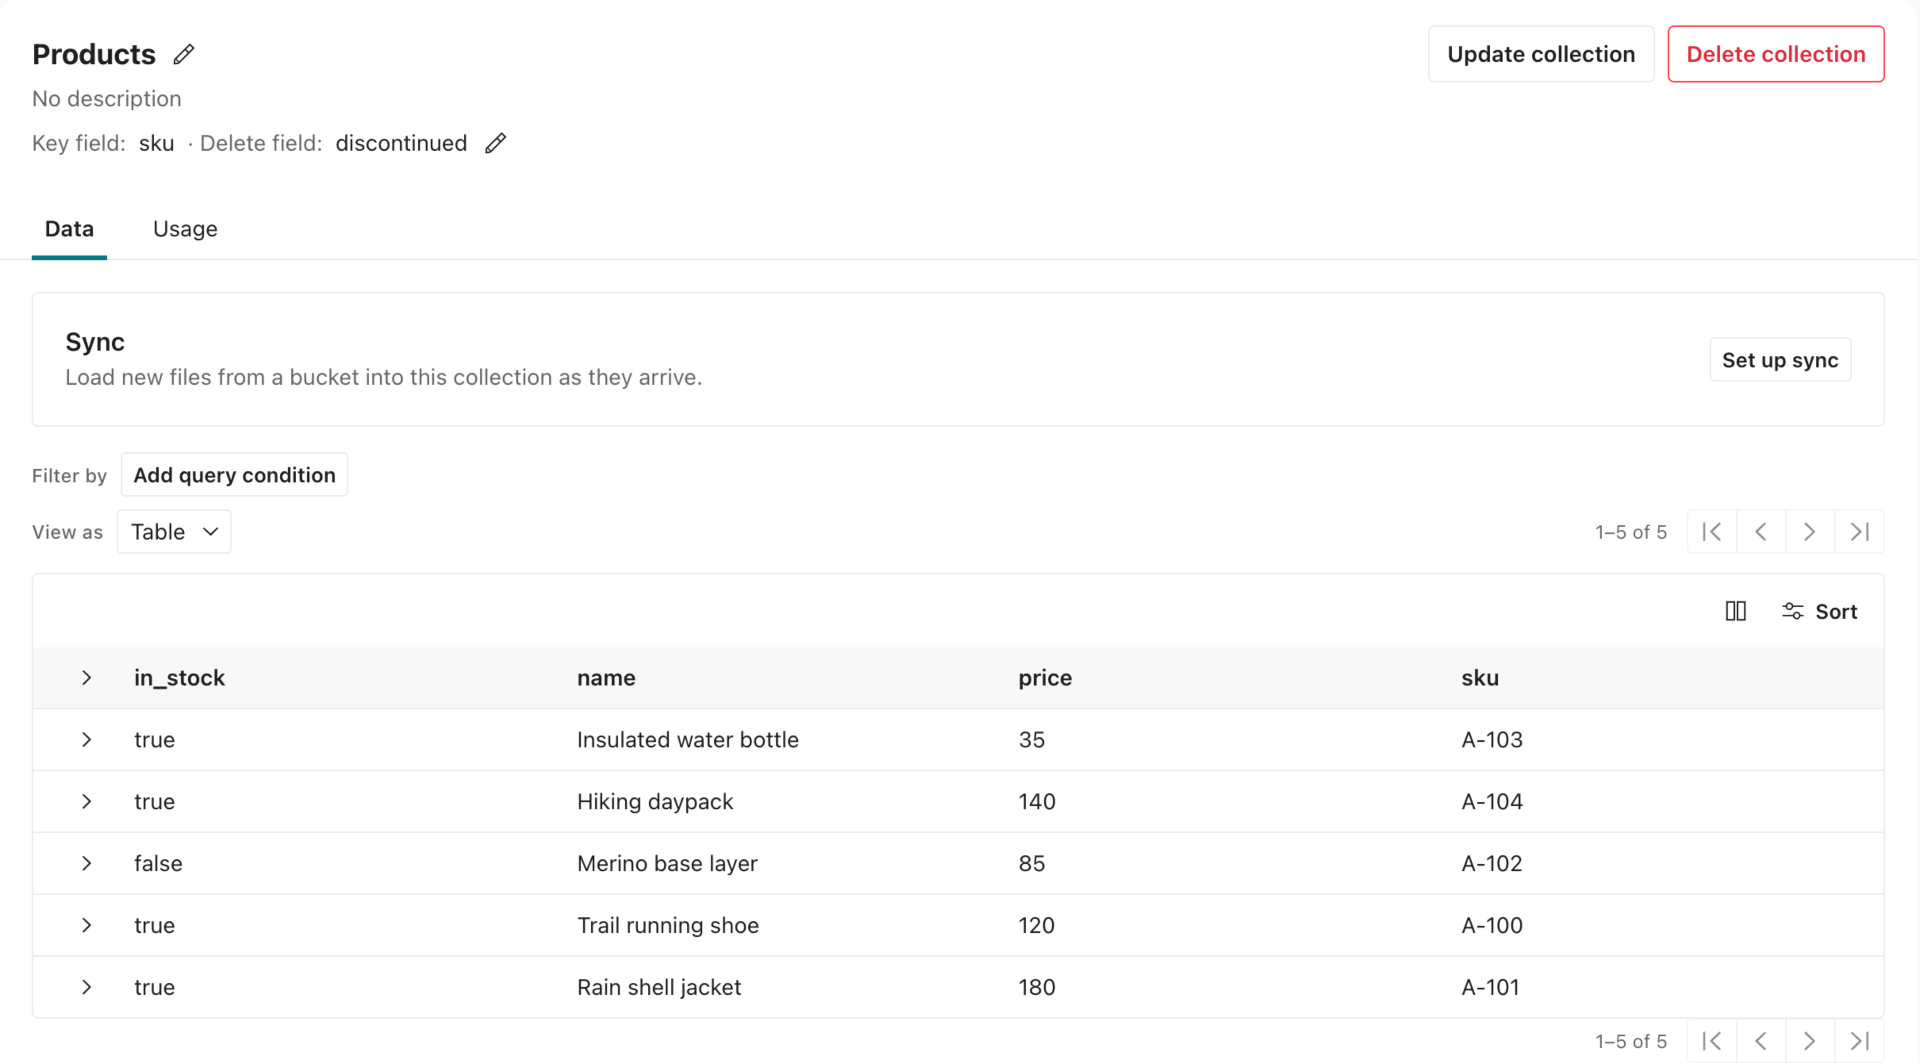
Under Configure data, click Collections, and then go to your collection.
-
At the top of the page, click next to Key field.
-
Choose a Key field from the attributes in your collection’s rows. Remember, this must be a unique value for each row.
-
(Optional) Choose a Delete field. You can pick an attribute from the list or type a new name. The delete field often isn’t in your rows yet, because Customer.io never keeps a row that sets it to
true. -
Click Save.
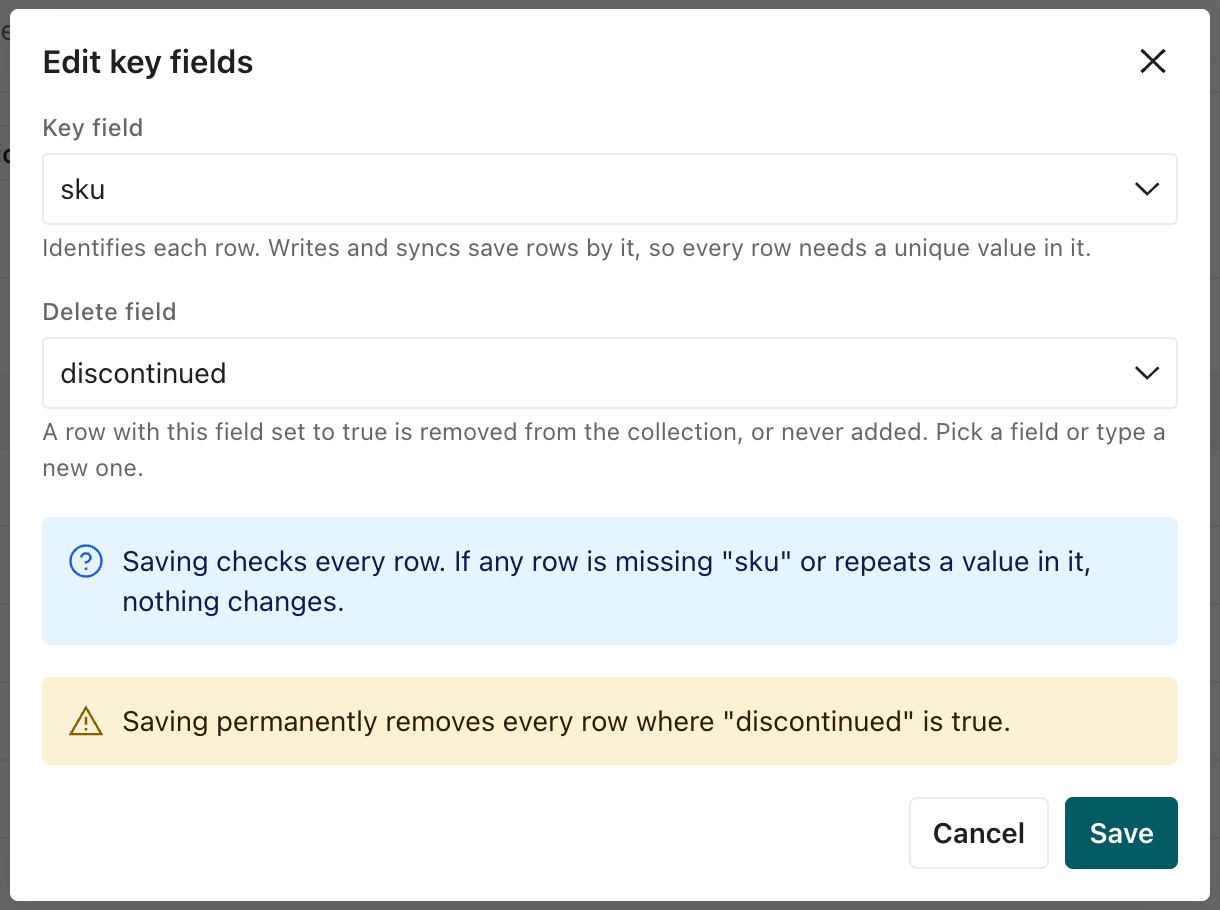
When you set or change the key field, Customer.io checks every row first. If any row is missing a key or repeats another row’s key, Customer.io keeps the old key field and tells you which rows you’ll need to fix.
When you set a delete field, Customer.io permanently deletes every row where that field is already true. Check your rows for the field before you save.
Set key and delete fields with the API
You can also set both fields with the API. Send key_field and delete_field when you create a collection, or later when you update a collection.
If you change either field on an existing collection, Customer.io queues the change as a write request, because it checks and copies every row. The response includes an id for the write request. To check when the change is done, use GET:/v1/collections/:id/writes/:write_id. If any row is missing a key or repeats another row’s key, the write fails with the code invalid-data, and the message in the write request’s status tells you which rows you need to fix.
Sync a collection from cloud storage
If your systems export data to a bucket in Amazon S3, Google Cloud Storage, or Azure Blob Storage, Customer.io can check a folder in the bucket on a schedule and load each new file into your collection. Customer.io saves and deletes each file’s rows by key, so the collection needs a key field. You can also set up a sync with the API.
Set up a sync
-
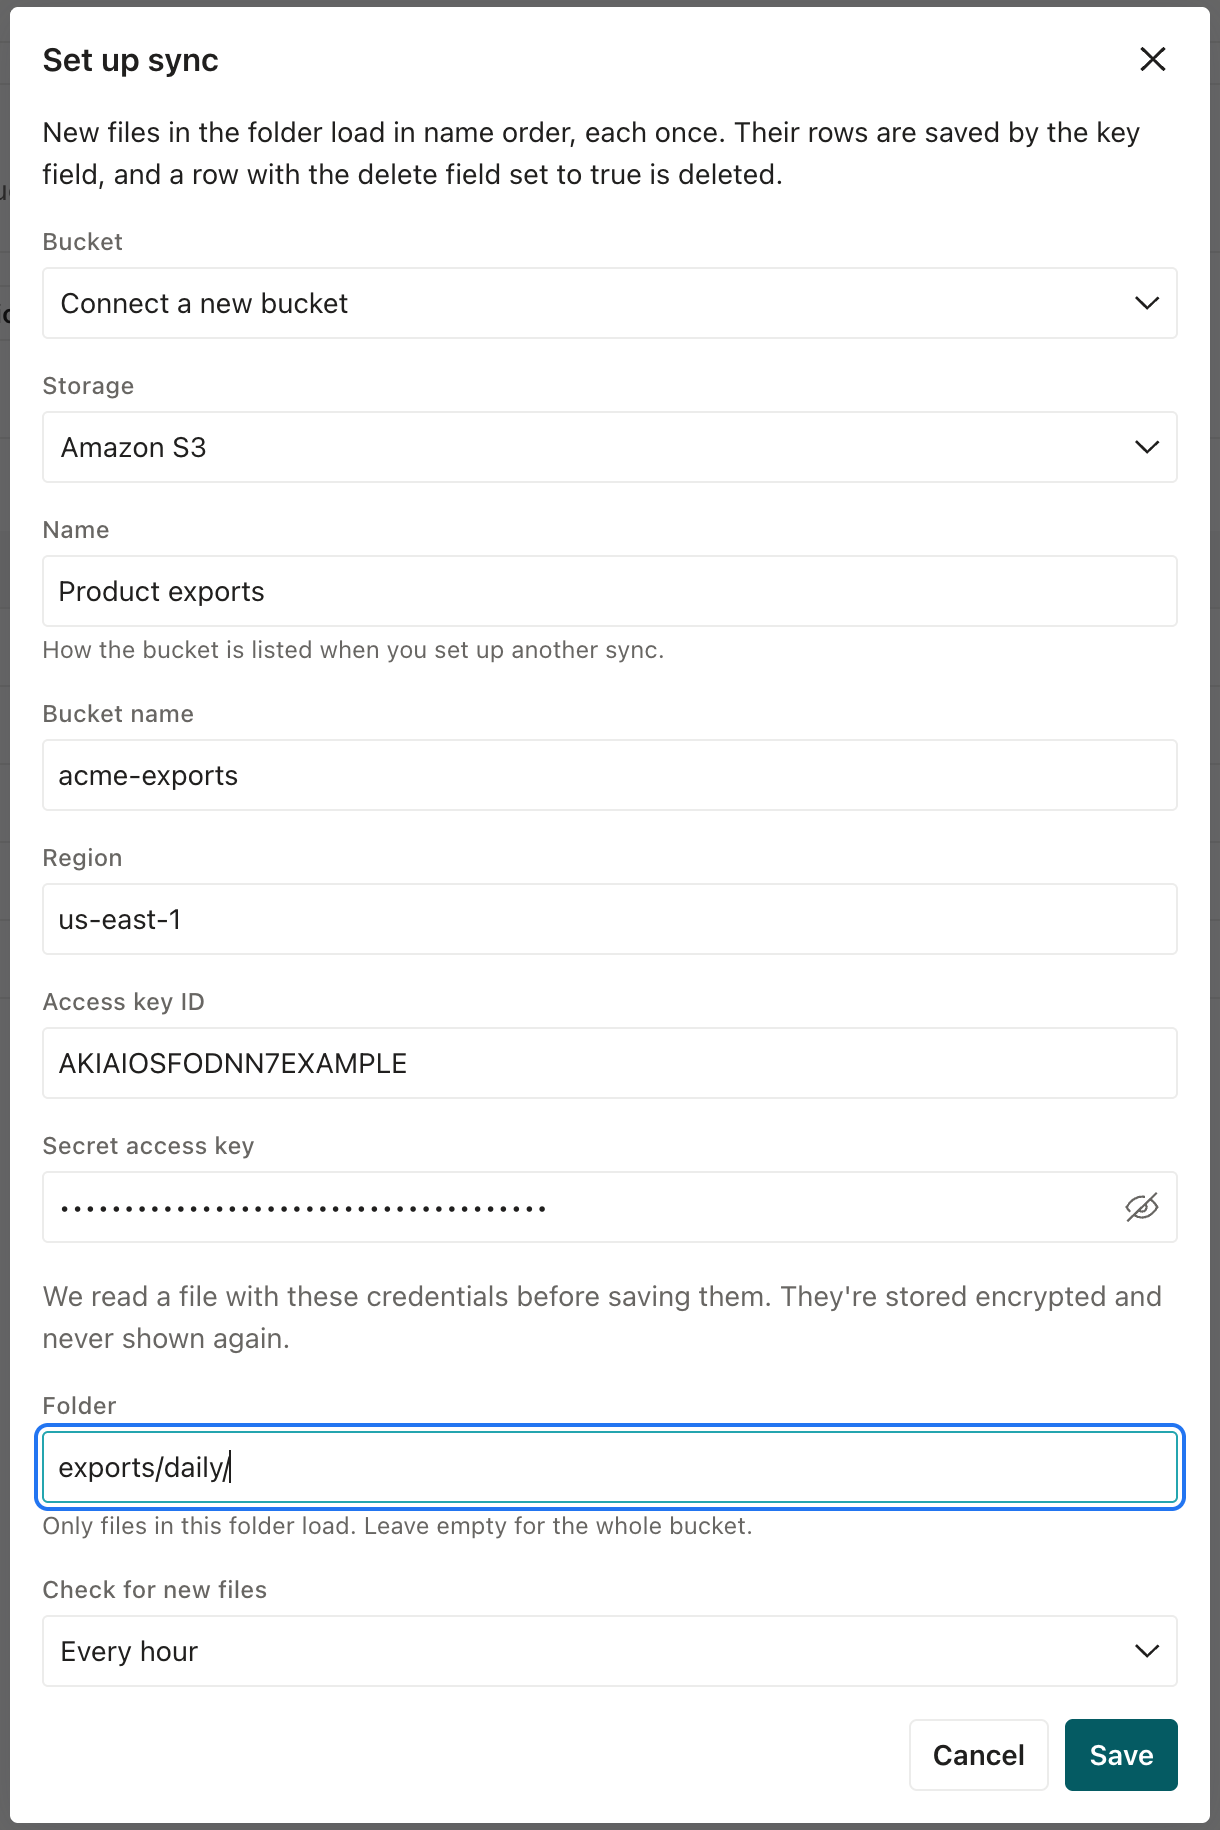
Open your collection. In the Sync panel, click Set up sync.
-
Under Bucket, choose a bucket that you connected before, or choose Connect a new bucket. For a new bucket, choose the Storage provider and give the bucket a Name. Then enter credentials that can list and read the bucket:
Amazon S3
Enter the bucket name, its Region, and the Access key ID and Secret access key of an AWS user.
Google Cloud Storage
Enter the bucket name and the Service account key, which is the JSON key file of a service account.
Azure Blob Storage
Enter a SAS URL for the container that grants read and list permissions.
-
In Folder, enter the folder that your systems export files to, like
exports/daily/. Leave it empty to load files from the whole bucket. -
Under Check for new files, choose how often Customer.io checks the folder, from every hour to every 24 hours.
-
Click Save.
How Customer.io loads your files
Customer.io checks the folder and loads every file in it, including folders. Customer.io loads files one at a time, in alphabetical order by path. After that, at each check, Customer.io loads each new file whose path sorts after the last file it loaded.
Customer.io doesn’t combine your files into one copy of the collection. Instead, Customer.io writes each file’s rows into the collection by key, like a series of updates:
- A row whose key is new adds a row to the collection.
- A row whose key is already in the collection replaces that row, so the most recent file wins.
- A row that sets the delete field to
trueremoves the row with that key. - Rows that a file doesn’t mention stay in the collection as they are.
If two rows in the same file have the same key, Customer.io saves the first row and rejects the second.
If Customer.io can’t load a whole file, the Sync panel shows that the sync stopped at that file. Customer.io doesn’t load any files that come after it, and tries the same file again at each check. To get the sync going again, overwrite the file with one that Customer.io can load, or delete the file. Customer.io then loads the waiting files in order.
Organize your bucket for a sync
Customer.io only reads your bucket. It doesn’t delete, move, or rename your files after it loads them. To keep your sync working the way you expect:
- Start each filename with the date, like
2026-11-05-products.csv, so that newer files sort after older ones. Customer.io skips a new file whose path sorts before the last file it loaded. - Write a new file for each export. Customer.io doesn’t load a file again after you overwrite it, unless the sync stopped at that file.
- Keep only collection files in the folder. Customer.io tries to load every file in the folder and the folders inside it, so files for other systems can stop your sync.
- Clean up loaded files when you want to. After the Sync panel shows a later file as the Last file loaded, you can delete or archive the earlier files, like with a lifecycle rule in your bucket. Deleting loaded files doesn’t change your collection.
Manage a sync
The Sync panel shows the Last file loaded, when Customer.io runs the Next check, and how many Rejected rows Customer.io couldn’t save, like rows without a key. From the panel, you can:
- Click Check now to check the folder without waiting for the next check.
- Click View rejected rows to see each rejected row’s file, row number, key, and reason.
- Click Edit sync to change the bucket, folder, or how often Customer.io checks. If you change the bucket or folder, the sync starts over from the first file.
- Click > Stop sync to stop loading files. The rows that the sync already loaded stay in the collection, and Customer.io clears the list of rejected rows.
Use Collection data in your messages
Now that you’ve added a Collection, the next step is to use them in your automations. The power of Collections is that you can query the Collection as part of an automation workflow, meaning that you can retrieve only the Collection items relevant to that particular person and automation.
Add a Query Collection action
When a person reaches this action, the automation retrieves collection data and stores info based on your parameter. Then you can use this data in subsequent messages.
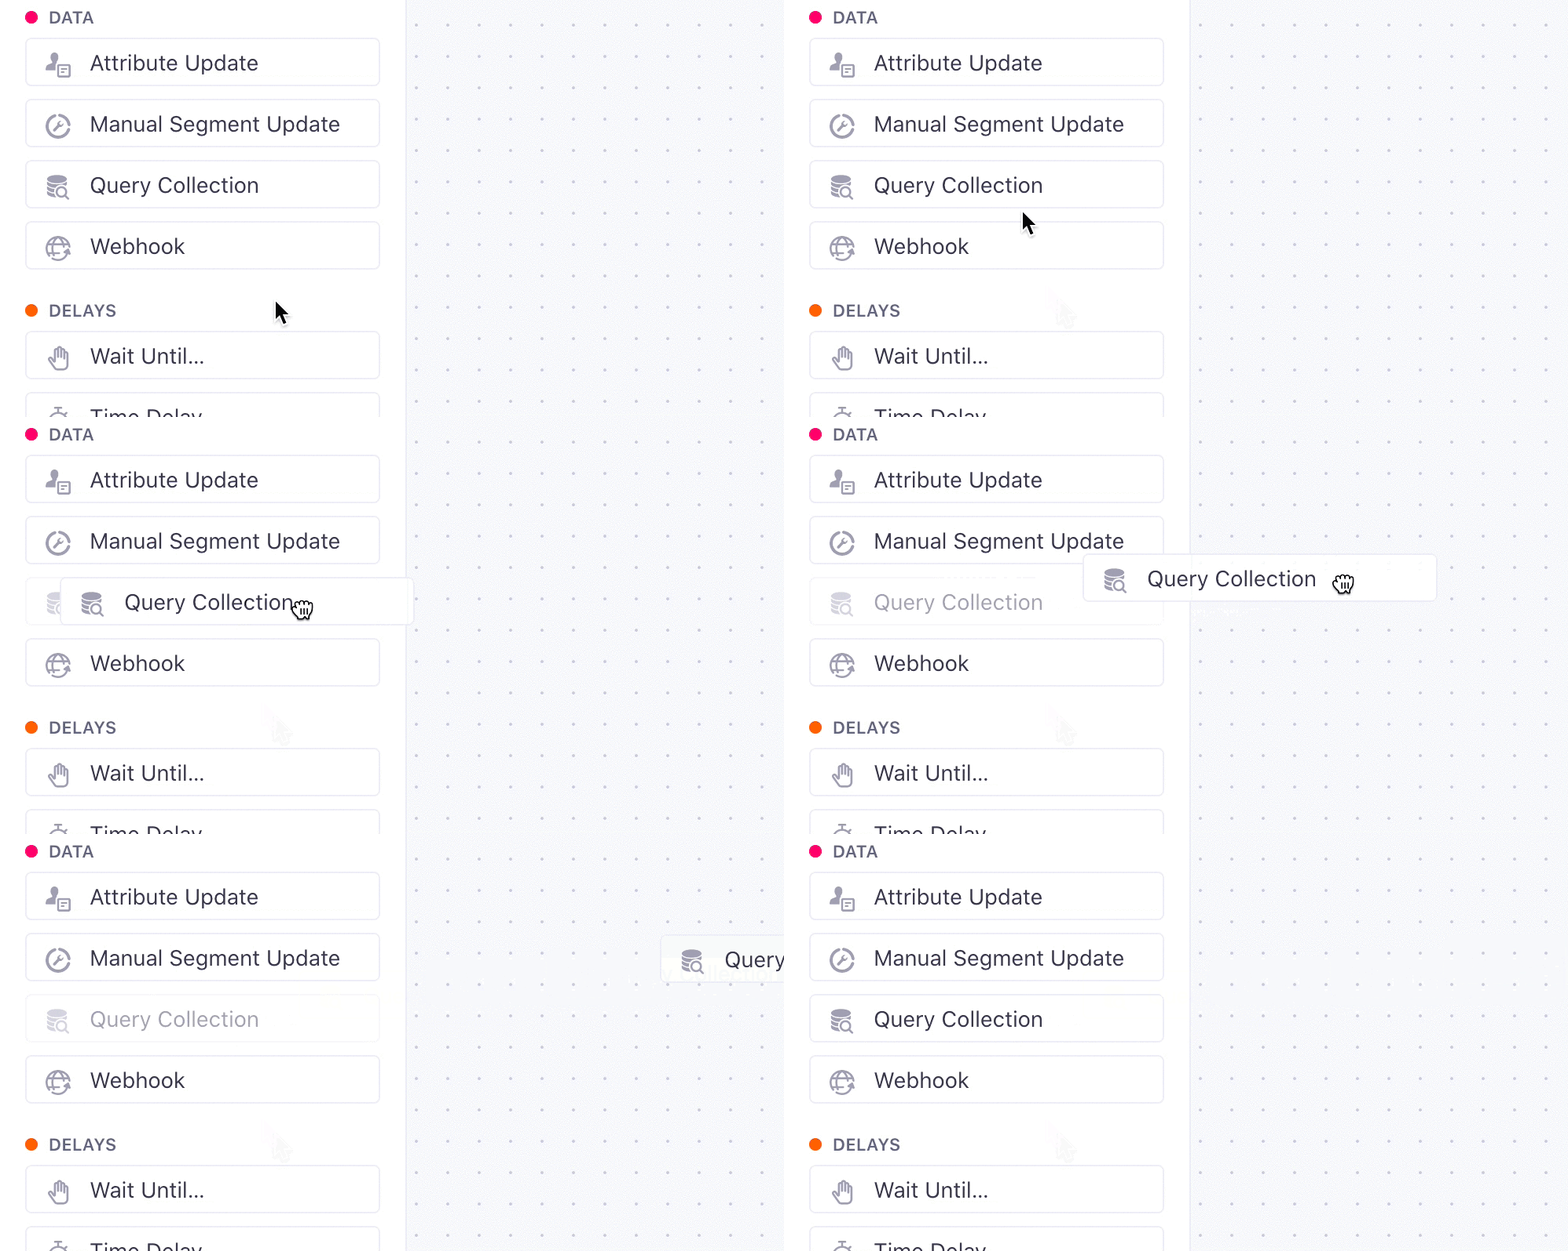
Build a query to retrieve relevant info
Select the query collection action, give it a name, and click Add Query to get started.
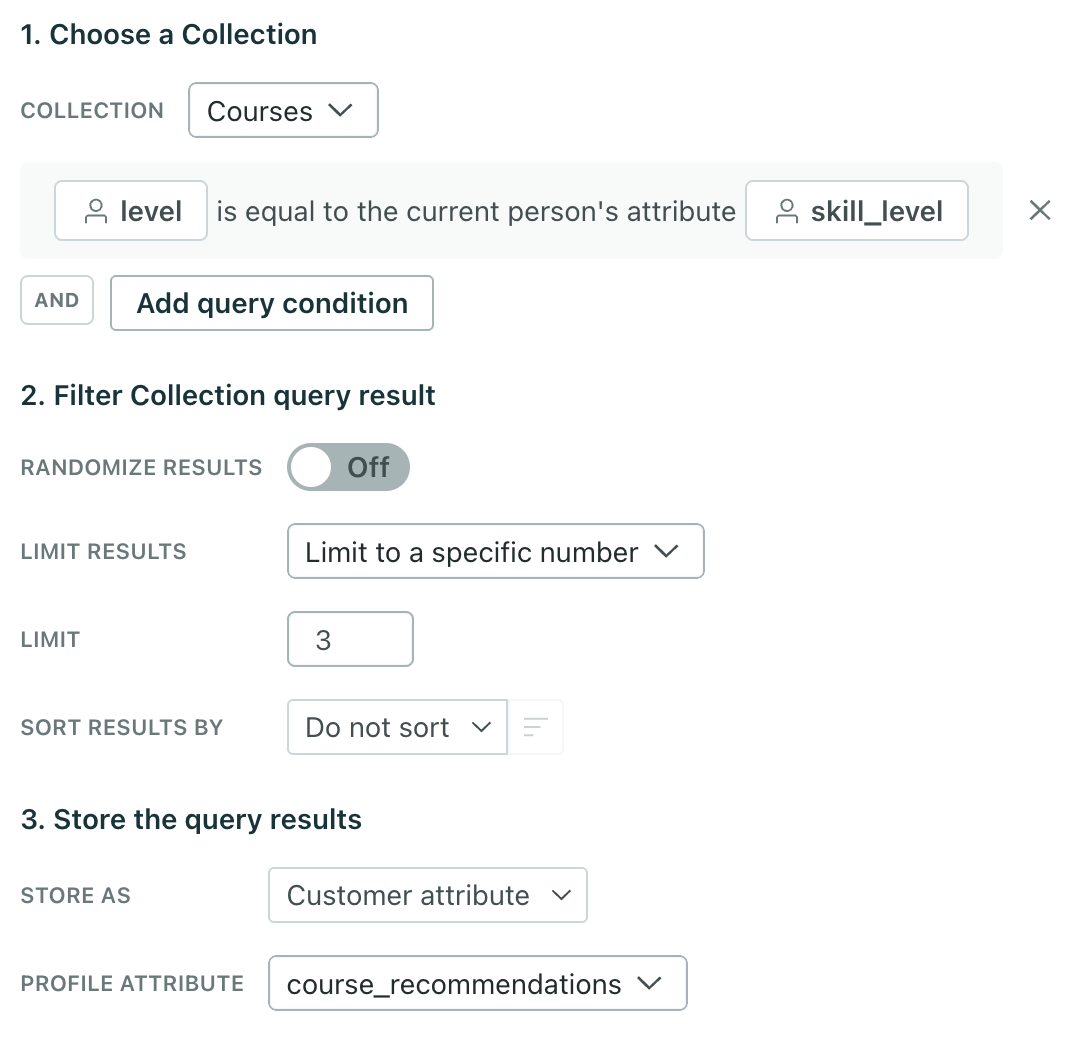
Let’s build a query that retrieves course recommendations based on a person’s skill level.
Choose a collection to query
- Select the Collection you want to query.
- Click Add query condition to filter for the courses you want to send a message about.
For example, you could filter for all courses where the collection attribute level is equal to the person’s attribute skill_level.
Sort the results
Under 2. Filter collection query result, pick an attribute in Sort results by. A new step sorts in descending order. To switch between ascending and descending order, click the sort direction button next to the attribute. Sorting decides which rows a query returns when you set a limit or choose Limit to one result.
If you choose Do not sort, leave Randomize results off, and set a limit or choose Limit to one result, the query can return any rows that match, not necessarily the first ones in your collection. The query preview follows the same rule. If it matters which rows the query returns, sort the results.
In ascending order, Customer.io sorts values by type, and then by value within each type:
- Numbers, by value.
9comes before10, even if your CSV stores them as text. - Version numbers, like
1.2.0, in version order. - Text, alphabetically and ignoring case.
Descending order reverses that, so text comes first and numbers come last. Rows with a missing or empty value for the attribute always come last, in either direction. Rows with equal values keep the order they have in your collection.
If an attribute mixes numbers and words, like 12, n/a, and 7, ascending order puts every number before any word. To get the words first, sort descending or clean up the attribute’s values.
Decide how to store the results
Under Store the query results, decide whether you want to use this information outside of the automation or not:
- Choose Customer attribute to store data on the person, accessible outside of the automation.
- Choose Journey attribute to store data temporarily during the journey; this data expires when the person exits the automation.
Keep the following limits in mind if you’re setting journey attributes:
- Overall limit: 100 journey attributes per journey. You can create or change up to 100 journey attributes during a single journey. Updates beyond this limit fail, and the person moves forward without the update.
- Attribute name limit: 128 bytes
- Attribute value limit: 100 KiB
Then choose or create an attribute, like course_recommendations. We store data on this attribute as JSON.
Preview the results
Choose a person from the Sample data panel to preview the query results. Go to the Preview tab to see what the Collection rows would return for the sample user.
Reference collection data with liquid
Now that you’ve set up your query, you can use the collection data in a message!
Reference profile attributes
For collection data stored as Customer Attributes, reference them using the customer object:
{% for item in customer.course_recommendations %}
  {{ item.name }}
{% endfor %}
If the data is an array, you can use liquid filters, such as first, last, and map, to get specific items or attributes.
{% assign first_course = customer.course_recommendations | first %}If you limited your query to a single result, then the attribute value is an object, not an array. You can instead directly access the name and course description:
{{ customer.promo_course.name }}
{{ customer.promo_course.description }}
Reference journey attributes
For collection data stored as Journey Attributes, reference them using the journey object:
{% for item in journey.course_recommendations %}
  {{ item.name }}
{% endfor %}
If the data is an array, you can use liquid filters, such as first, last, and map, to get specific items or attributes.
{% assign first_course = journey.course_recommendations | first %}If you limited your query to a single result, then the attribute value is an object, not an array. You can instead directly access the name and course description:
{{ journey.promo_course.name }}
{{ journey.promo_course.description }}
Collections API
The endpoints for Collections are available via our App API:
- US region:
https://api.customer.io/v1/ - EU region:
https://api-eu.customer.io/v1/
Creating a new Collection:
POST:/v1/collections
Create a new collection by providing both a name and either an array of JSON objects as data, or a url to download CSV or JSON data from.
{
  "name": "collection name",
  "data": [ { row }, { row } ],
}
If you provide a URL, the data can be JSON (an array of objects, or one object per line) or a CSV file with a header row. Customer.io reads every CSV value as a string. Customer.io detects the format from the Content-Type that your URL returns, or from the file extension if the Content-Type doesn’t say. If Customer.io can’t tell which format the file is, it doesn’t import the file.
You cannot share a Google Sheet with us using this API.
Once created, a Collection has the following JSON definition:
"bytes": bytes_of_data_in_collection,
"created_at": 1589471110,
"updated_at": 1589471132
"id": 1,
"name": collection_name
"rows": number_of_rows_in_collection,
"schema": ["name1", "name2", "name3" ],
"key_field": "sku",
"delete_field": "deleted"
The schema will have a list of all attributes used by any items in the Collection, but remember that we don’t enforce that all items have this set of attributes. The response includes key_field and delete_field only when the collection has them.
Retrieve info about a Collection you’ve already created
GET:/v1/collections/:id
Get the details of a collection with the given id. This does not include the content.
Retrieve the content of a Collection you’ve already created
GET:/v1/collections/:id/content
Returns the rows of the collection with the given id. Without query parameters, Customer.io returns the whole collection as JSON Lines: each line of the response is one row, as a JSON object. If the collection is too large to return in one response, Customer.io responds with a 400, and you need to page through it instead.
- To page through the collection, send
limit, up to 1,000 rows, and pass thenext_cursorfrom each response ascursorin the next request. - To read specific rows from a collection with a key field, send their keys in
keys, like?keys=A-100,A-101.
Both options return a JSON object with a rows array. See the API reference for every parameter.
Retrieve a list of all your Collections
GET:/v1/collections
Returns the details, but not the content, of all of your collections. Each item in collections has the same fields as a single collection:
{
  "collections": [
    { "id": 1, "name": "courses", "rows": 3, "bytes": 412, "schema": ["name", "level"], "created_at": 1589471110, "updated_at": 1589471132 }
  ]
}
Update the content of a Collection
PUT:/v1/collections/:id/content
Provide the content of a Collection as JSON-encoded text or CSV-encoded data. This will replace all the content for the Collection. For example:
[
  {
    "name":"Steak",
    "price":20,
    "quantity":10,
    "can_deliver":false
  }
]
Update the name and content of a Collection
PUT:/v1/collections/:id
Update an existing collection. If name or data or url aren’t provided, the associated data is not updated. This will replace all content for the Collection.
{
"name": "collection name",
"data": [
  {"name":"Hot Dog","price":2,"quantity":1,"can_deliver":true},
  {"name":"Pizza","price":10,"quantity":2,"can_deliver":true},
  {"name":"Steak","price":20,"quantity":10,"can_deliver":false} ]
}
OR
{
  "name": "collection name",
  "url": "https://example.com/sheet.csv"
}
Delete a Collection
DELETE:/v1/collections/:id
Deletes the collection with the given id. You can’t delete a collection that an automation or broadcast queries, including an archived one, because you could unarchive it later. In that case, Customer.io responds with a 422 that lists each one. Remove the collection from those messages first.
Change rows by key
You can add, update, or delete individual rows without uploading the whole collection. The collection needs a key field.
To change rows, send them to POST:/v1/collections/:id/writes. Each row includes its key, which tells Customer.io which row to change. A row whose key already exists replaces the whole old row, and Customer.io adds a row with a new key to the collection.
{
  "data": [
    { "sku": "A-100", "price": 19 },
    { "sku": "A-101", "price": 24 }
  ]
}
To delete rows, also give the collection a delete field, like deleted, with delete_field. A row that sets the delete field to true deletes the row with the same key, so one write request can save some rows and delete others. Customer.io also accepts the text true, 1, or yes in any case, which is how you mark a row for deletion in a CSV file. If no row has that key, Customer.io doesn’t delete anything. When a row doesn’t set the delete field to true, Customer.io saves the row with the attribute as you sent it. If the collection doesn’t have a delete field, Customer.io saves a deleted attribute like any other attribute.
Customer.io never keeps a row that the delete field marks. When you create or replace a collection that has a delete field, Customer.io leaves the marked rows out. When you set a delete field on an existing collection, Customer.io deletes any rows that the field already marks. Setting or removing the delete field is also a write request, and you can check it with GET:/v1/collections/:id/writes/:write_id.
{
  "data": [
    { "sku": "A-100", "price": 21 },
    { "sku": "A-101", "deleted": true }
  ]
}
Customer.io checks every row before it saves anything. If any row is invalid, like a row without a key, Customer.io rejects the whole write and tells you which rows failed. Customer.io saves a write of up to 500 rows all at once. Customer.io saves a larger write 500 rows at a time, so a read can return some of its rows before the write finishes.
Customer.io applies writes to a collection one at a time, in the order it receives them. The writes endpoint responds right away with a write id, so large writes don’t time out. Use GET:/v1/collections/:id/writes/:write_id to check the state of the write:
queued: the write is waiting to run.applied: Customer.io made the change.replaced: you replaced the whole collection before this write ran, so the collection ends up as if this write ran first.failed: Customer.io didn’t make the change. The response includes acodeand, if rows were invalid, the rows that failed.
Customer.io keeps the result of each write for 24 hours. To replace every row in the collection, use PUT:/v1/collections/:id or PUT:/v1/collections/:id/content instead. Those endpoints wait for the result before they respond.
To read rows by key, use GET:/v1/collections/:id/content?keys=A-100,A-101. You can read up to 1,000 keys at a time. To page through a collection, use GET:/v1/collections/:id/content?limit=1000 and pass the next_cursor from each response as cursor in the next request. See the API reference for every field and error code.
Write rows from cloud storage
You can connect a bucket in Amazon S3, Google Cloud Storage, or Azure Blob Storage as a collection source. Then you can write a file from the bucket to a collection without hosting the file at a public URL.
- Connect the bucket with
POST:/v1/collections/sources. Send the bucket’sproviderand credentials that can list and read the bucket. Customer.io reads a file from the bucket before it saves the source, so it can tell you right away if your credentials don’t work. - Send the source’s
idand the file’spathtoPOST:/v1/collections/:id/writes. Customer.io reads the file when it runs the write request.
{
  "source_id": "01JD8X4Q6R2W7N3K5M9P1T0VZC",
  "path": "daily/products.csv"
}
Customer.io saves and deletes the file’s rows by key, the same way as rows you send in a request. If you set a prefix on the source, Customer.io reads only files under that folder, and path is relative to it. The file can be JSON or CSV, the same as a file at a url.
Customer.io encrypts your credentials and never returns them. If you rotate a key or change the bucket’s permissions, use POST:/v1/collections/sources/:id/check to confirm that Customer.io can still read the bucket. See the API reference for the credentials each provider needs.
Sync a collection from a folder
If your systems export a new file to a bucket on a schedule, you can have Customer.io load each new file into a collection automatically. You can set up a sync with the API, or in the app. A sync works like a scheduled write request: Customer.io checks a folder in one of your sources, and saves and deletes rows by key from each new file it finds. The collection needs a key field.
Start a sync with PUT:/v1/collections/:id/sync:
{
  "source_id": "01JD8X4Q6R2W7N3K5M9P1T0VZC",
  "prefix": "daily/",
  "poll_hours": 1
}
Customer.io checks the folder every poll_hours, from 1 to 24 hours. To check right away, use POST:/v1/collections/:id/sync/poll.
Customer.io loads new files in alphabetical order of their paths, and remembers the last file it loaded. At each check, Customer.io loads only the files whose paths sort after that last file. This has two consequences for how you write files:
- Name files so that newer files sort later. Starting each filename with the date works well, like
2026-11-03-products.csv. Customer.io never loads a new file whose path sorts before the last file it loaded. - Write a new file for each change. If you overwrite a file that Customer.io already loaded, Customer.io doesn’t load it again.
If some rows in a file are invalid, like a row without a key, Customer.io loads the rest of the file and records the rows it rejected. Use GET:/v1/collections/:id/sync/rejects to see them. Customer.io keeps rejected rows for 90 days. If Customer.io can’t load a whole file, like when the file is too large or isn’t JSON or CSV, the sync stops at that file. GET:/v1/collections/:id/sync then shows a state of failed and the error, and Customer.io tries the file again at each check until it loads. To get the sync going again, overwrite the file with one that Customer.io can load, or delete the file. Customer.io loads the fixed file, or skips the deleted one, at the next check.
To stop the sync, use DELETE:/v1/collections/:id/sync. The rows that the sync already loaded stay in the collection. See the API reference for every field.