

Send push notifications
You can send basic push notifications—with a title and a body—as a part of an automation or broadcast.
Create a push notification
This process covers a basic push notification. If you set an image or a deep link, your app should either use our SDKs or handle payloads in the format we send. If you want to send more than images and links—like badges, sounds, etc—you can send a message using a Custom Push Payload.
- In your automation, click and drag a Push Notification into your campaign from the sidebar.
- Click the push notification in your workflow to change its settings like send behavior and action conditions. When you’re done, click Add content.
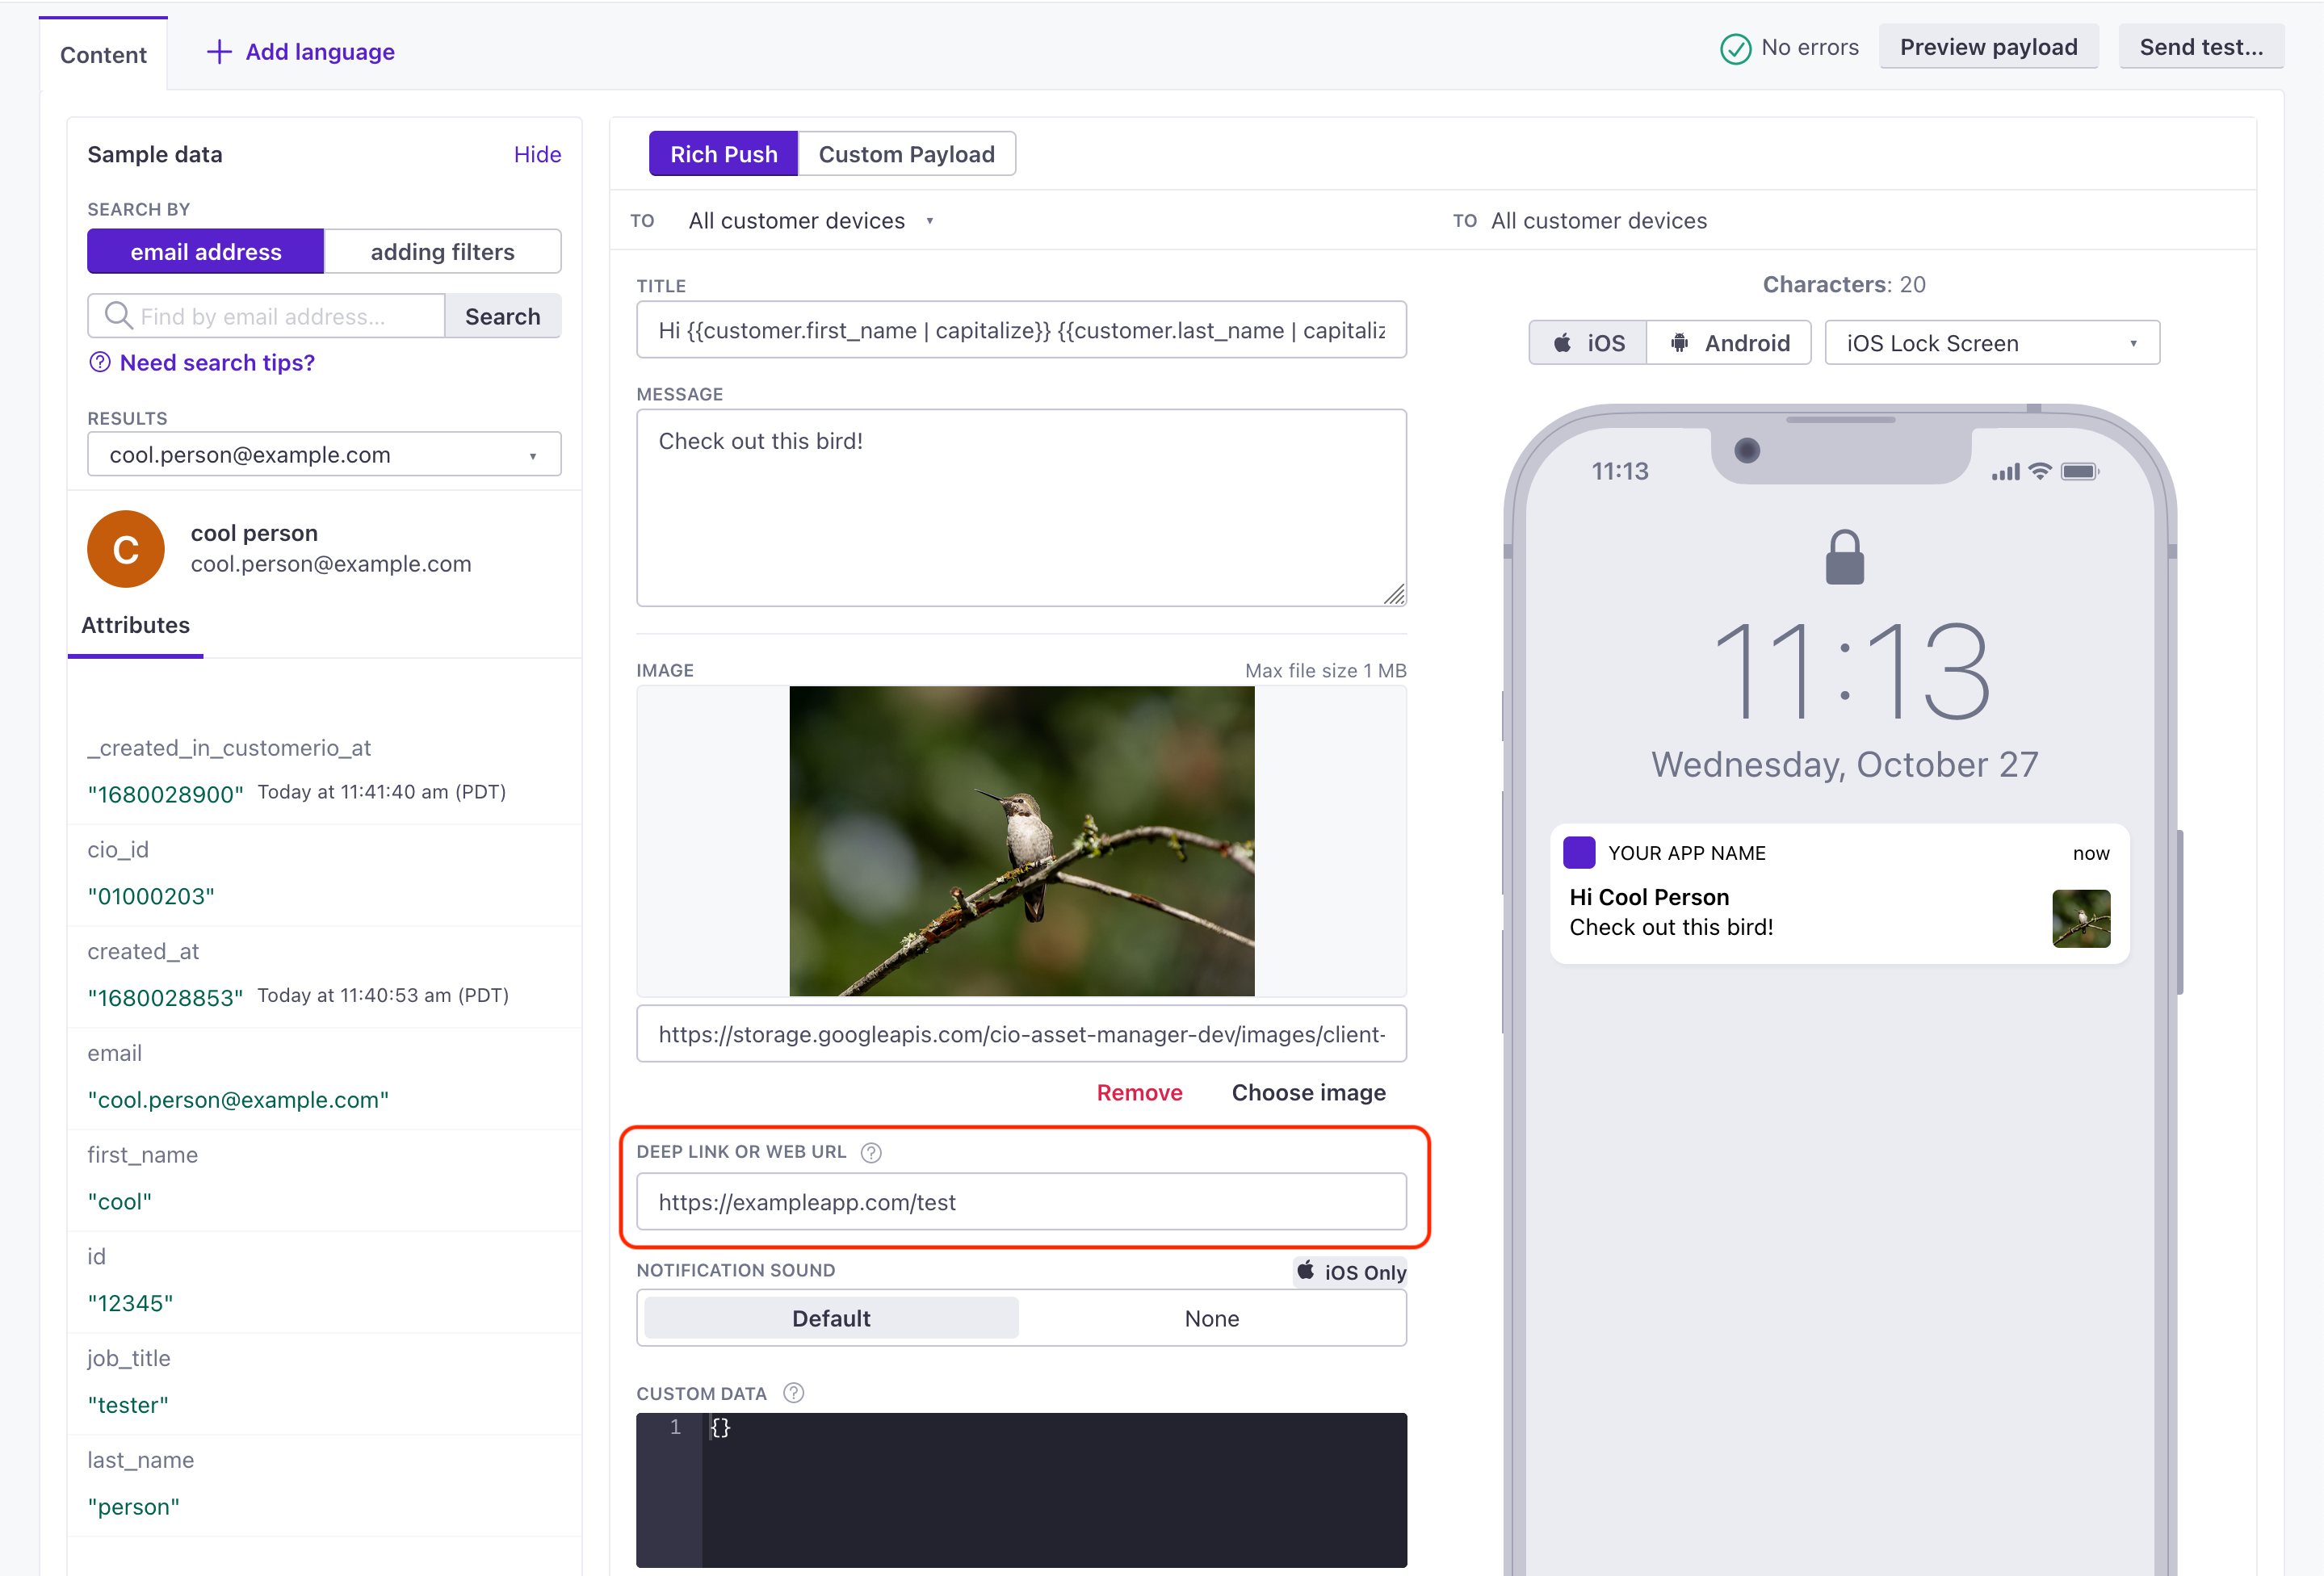
- Choose which device(s) will receive your message in the To field. By default, you send push notifications to a person’s last used device. For more information, see choose which devices receive your message below.
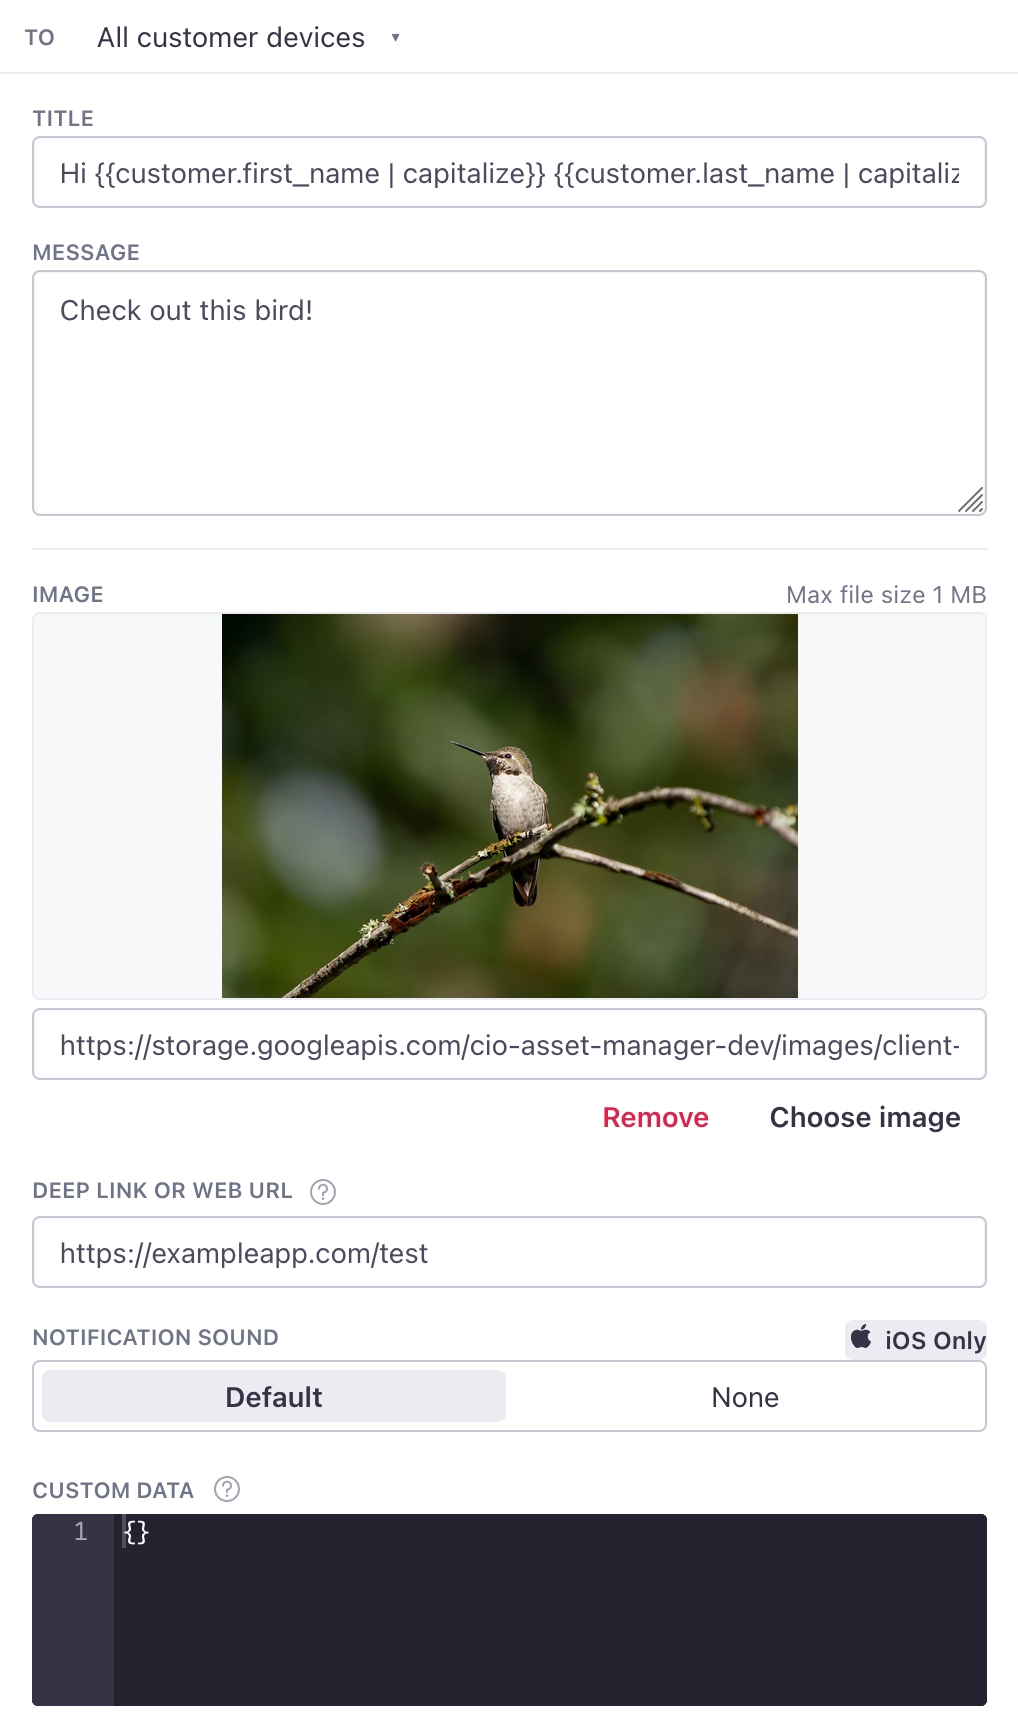
- (Optional) Set a Title—the text that appears above your message. If you don’t specify a title, Android devices display your app name, and iOS devices omit the title all together.
- Enter your Message text. We don’t have a strict size limit, but we suggest you keep messages as short as possible. Use the preview to see how your message wraps and how much real estate it consumes on the screen.
- (Optional) Set an Image URL and/or Deep Link or Web URL. The image shows along with your message, and the link sends your audience somewhere when they tap your notification. Both fields assume that you use our SDKs or handle our payload structure.
- For iOS, determine if you want to play the Default sound or send silently. You cannot provide a custom sound value today. Our SDKs only support the default sound.
- (Optional) Add Custom data to your payload. Custom data is any JSON-formatted data your app is set up to handle independently of our push payload and SDKs. Note: due to a Firebase limitation we only support sending string key value pairs
- Click Save to finish adding a push notification to your automation.
Adjust your action settings
From an automation or API-triggered broadcast, click your push notification to adjust its settings, like send behavior and audience.
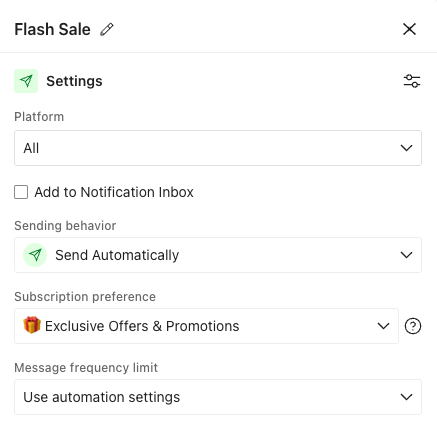
Under Settings, you can take the following actions:
- Choose your Platform. This only appears if you’ve setup both Android and iOS.
- Add to Notification Inbox: If your workspace has a published notification inbox, you can store a copy of your push notification as an inbox message. below.
- Sending behavior: Automatically send the push notification instead of queueing a draft.
- Override the Subscription preference: When people unsubscribe from your emails, it automatically prevents them from receiving push notifications as well. Only override this setting if your sure you’re sending to the right people.
Store push in your notification inbox
If you set up a notification inbox, you can send a copy of your push notification to it. That way, your audience can view your message after they dismissed the push or if they don’t have a device that can receive the notification. If the push delivery fails, your audience can still view the message in their notification inbox.
Requirements
To send push notifications as inbox messages, make sure your settings match these requirements:
- Your inbox is in a published, not draft state.
- Your notification must be a standard rich push, not a custom payload.
Add to notification inbox
You can add a push notification to your inbox only if it’s part of an automation or API-triggered broadcast. You can’t add one-time or transactional push notifications to the inbox.
-
Select a push notification in your workflow.
-
Click Settings and select Add to Notification Inbox.
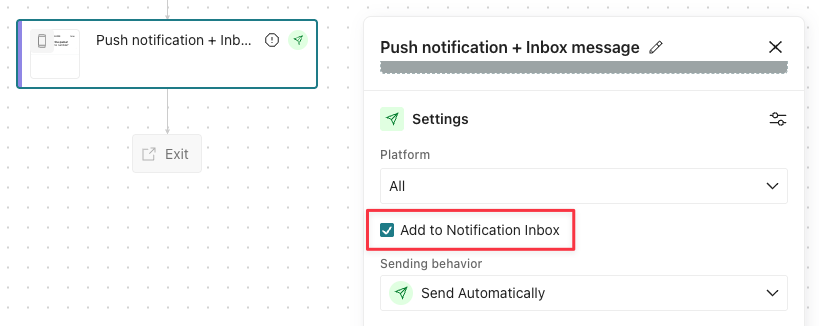
Then when your workflow sends the push notification, it also sends an inbox message. The inbox message uses the push notification’s Title and Message, and it expires 60 days after you send it.
Your workflow sends the inbox message even if it can’t deliver the push notification, like when a person doesn’t have a device that can receive it. In this way, inbox messages also function as a fallback for push notifications.
Metrics
When you send a copy of a push to your notification inbox, the inbox message is its own delivery, separate from the push delivery. It’s name includes (Notification Inbox) followed by your push’s name, and the delivery links back to the push delivery it came from.
Learn more about how we report on inbox message metrics.
Preview push notifications
When you compose your notification, you can select different mobile contexts to see what your push might look like on different devices. Here’s the iOS lock screen:
We’ve chosen an “Alert” style for our display, but kept it fairly generic due to the sheer amount of devices that might be out there. To truly see what it looks like on a specific device, you should send a test to that device.
Choose which device(s) receive your message
When composing a push notification, the To field determines which of your audience’s device(s) receive the notification.
You can limit the push to specific device(s) by selecting:
-
(Default) Last used device: Sends the message to the device that your customer most recently used with your app.
By default, our SDKs set
last_usedwhen you invoke theidentifymethod. If you integrate directly with our API, you can provide alast_usedtimestamp when updating devices via API. If you have multiple apps enabled in your workspace,last_usedis the last-used device with the app you selected in the message composer. - Customize: Sends the message to a specific device token. Generally, when you use this option, you want to use a liquid variable—like if you store a person’s preferred device as an attribute
A key-value pair that you associate with a person or an object—like a person's name, the date they were created in your workspace, or a company's billing date etc. Use attributes to target people and personalize messages.
, you might use this option and send to{{customer.preferred_device}}.
You can also choose to send to all of a person’s devices. Learn more about how your workspace tracks metrics when All person devices is selected.
Play sound on push receipt (iOS only)
When you send a push notification to iOS devices, you can opt to send the Default sound or no sound at all. If your audience’s phone is set to vibrate, or they’ve disabled sound permissions for your app, the Default setting will cause the phone to vibrate.
In most cases, you should use the Default sound setting to make sure your audience hears (or feels) your message. But, before you send sound, you should understand:
- Your app needs permission from your users to play sounds. This is done by your app, not our SDKs. Here’s an example from our iOS sample app showing how to request sound permissions.
- iOS users can go into System Settings and disable sound permissions for your app. Enabling the Default setting doesn’t guarantee that your audience hears a sound when your message is delivered!
Message Priority
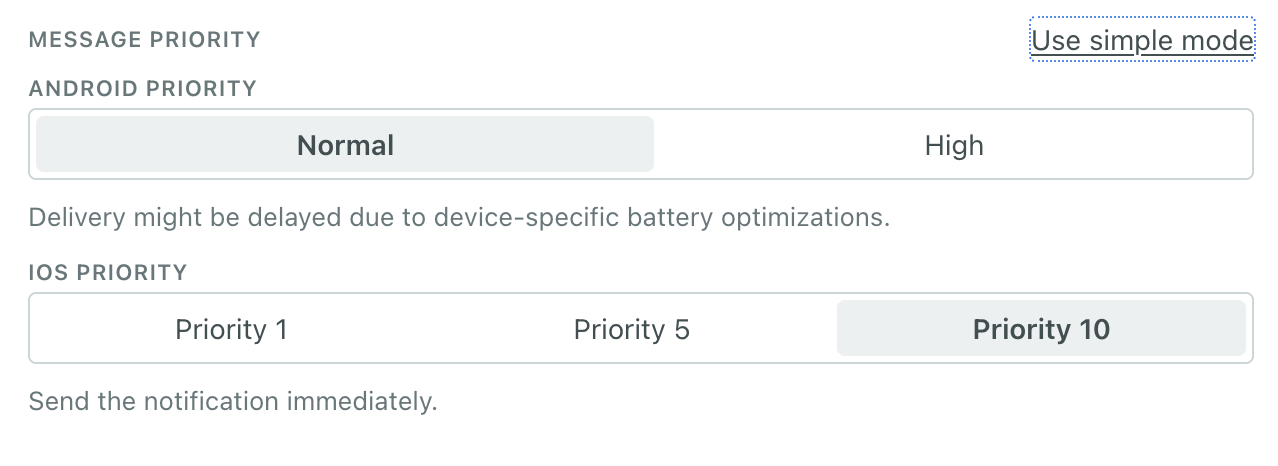
Push notifications have a concept of priority, which typically affects the balance between message delivery speed and battery optimization on recipient devices. In most cases, these settings only affect Android messages because we already send iOS messages at the highest priority (10)—whether you select Normal or High priority. Learn more about iOS message priority
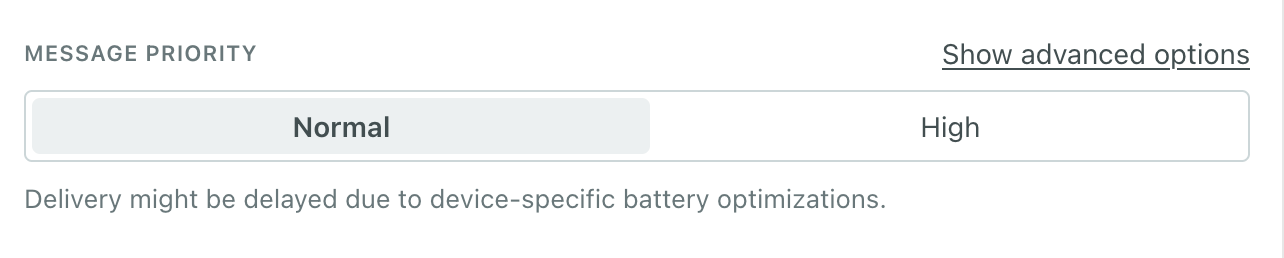
But for Android messages, Normal priority means that messages might be delayed due to device-specific battery optimizations, and devices in standby mode might not wake up long enough to send delivery metrics back to Customer.io, so you might not see messages as delivered until your users open your app.
Setting a High priority ensures that we deliver messages as soon as possible to Android devices, and the message will wake the device to properly report delivery metrics.
You can set separate priority settings for each platform by clicking Show advanced options. You might do this if you wanted to lower the priority of iOS messages, which, again, are already delivered at the highest priority by default.
Personalize messages with liquid
As with all other Customer.io messages, you can personalize messages with relevant customer data using liquid A syntax that supports variables, letting you personalize messages for your audience. For example, if you want to reference a person's first name, you might use the variable {{customer.first_name}}.
If you’ve got an event or API-triggered broadcast automation, you can also use event and broadcast data! For example, if you trigger your message using a purchase event, you might notify your audience how much they spent with a message like this:
Thanks for purchasing! You've spent {{event.total}}!
Standard push notification payload
Push notification Title and Body are standard for most messages. However, if you send a notification with an image or a link, you’ll either need to use our SDK or handle our notification payload(s). Below are our standard notification payloads.
The payload changes slightly depending on whether you use Firebase Cloud Messaging (FCM, for both iOS and Android devices) or Apple’s Push Notification service (APNs, for iOS devices only).
APNs (iOS)
Your Image URL and Deep link or web URL go inside a CIO.push object. Custom Data resides in the payload but outside the CIO and aps objects.
{
    "CIO": {
        "push": {
            "link": "string",
            "image": "string"
        }
    },
    "aps": {
        "mutable-content": 1,
        "alert": {
            "title": "Title of your push goes here!",
            "body": "Body of your push goes here!"
        }
    },
    //custom keys go here
    "customKey": "a custom key"
}
FCM (iOS)
The CIO.push object contains the link and image fields from notification. Custom Data resides in the payload but outside the CIO and aps objects.
{
  "message": {
    "apns": {
      "payload": {
        "CIO": {
          "push": {
            "link": "string",
            "image": "string"
          }
        },
        "aps": {
          "mutable-content": 1,
          "alert": {
            "title": "string",
            "body": "string"
          }
        },
        // custom keys go in the payload but outside the CIO and aps objects
        "customKey1": "custom keys",
        "customKey2": "another custom key"
      }
    }
  }
}
FCM (Android)
When you send a push notification containing an image or a link, we place the entire payload in the data object.
{
    "message": {
        //rich push
        "data": {
            "title": "string", //(optional) The title of the notification
            "body": "string", //The message you want to send
            "image": "string", //https URL to an image you want to include in the notification
            "link": "string", //Deep link in the format remote-habits://deep?message=hello&message2=world

           // other "custom keys" are sent inside this object
        }
    }
}
Test your push notifications
To send a test push, you’ll need the device tokens of your test devices. Go to the People page and select your test “people” to find their devices—either in the Devices tab or the Devices section of the Overview.
Hover over a token and click to copy it.
.png)
Test your push content
To see your push notification’s content on a single device, click the “Send test” button in the top right-hand corner of the composer. You’ll see this modal:
.png)
Paste your device token into the “Send test…” box in the Push composer and send a test to it. You may see a “Device type” option if you have both Android and iOS enabled, and you’ll need to tell us which type your test device is.
If your workspace has more than one mobile app, make sure your test device runs the app you selected in the composer. A test sent with credentials for one app won’t reach a device token registered by a different app.
If you’ve chosen to send to sandbox in your Push settings, that will be enabled here. To disable it, you’ll need to return to your settings and uncheck that box:
.png)
Once you’ve sent a test, you’ll be able to quickly re-use that token, by checking the ‘Last tested token’ box.